SpringBoot快速入门--基础版(包含整合常用框架、跨域)
高级版转到:SpringBoot快速入门–高级版
SpringBoot 概述
SpringBoot 概念
SpringBoot提供了一种快速使用Spring的方式,基于约定优于配置的思想,可以让开发人员不必在配置与逻 辑业务之间进行思维的切换,全身心的投入到逻辑业务的代码编写中,从而大大提高了开发的效率,一定程度 上缩短了项目周期。2014 年 4 月,Spring Boot 1.0.0 发布。Spring的顶级项目之一(https://spring.io)。
Spring 缺点
1) 配置繁琐
虽然Spring的组件代码是轻量级的,但它的配置却是重量级的。一开始,Spring用XML配置,而且是很多 XML配置。Spring 2.5引入了基于注解的组件扫描,这消除了大量针对应用程序自身组件的显式XML配置。 Spring 3.0引入了基于Java的配置,这是一种类型安全的可重构配置方式,可以代替XML。 所有这些配置都代表了开发时的损耗。因为在思考Spring特性配置和解决业务问题之间需要进行思维切换,所 以编写配置挤占了编写应用程序逻辑的时间。和所有框架一样,Spring实用,但它要求的回报也不少。
2)依赖繁琐
项目的依赖管理也是一件耗时耗力的事情。在环境搭建时,需要分析要导入哪些库的坐标,而且还需要分析导 入与之有依赖关系的其他库的坐标,一旦选错了依赖的版本,随之而来的不兼容问题就会严重阻碍项目的开发 进度。
SpringBoot 功能
1) 自动配置
Spring Boot的自动配置是一个运行时(更准确地说,是应用程序启动时)的过程,考虑了众多因素,才决定 Spring配置应该用哪个,不该用哪个。该过程是SpringBoot自动完成的。
2) 起步依赖
起步依赖本质上是一个Maven项目对象模型(Project Object Model,POM),定义了对其他库的传递依赖 ,这些东西加在一起即支持某项功能。 简单的说,起步依赖就是将具备某种功能的坐标打包到一起,并提供一些默认的功能。
3) 辅助功能
提供了一些大型项目中常见的非功能性特性,如嵌入式服务器、安全、指标,健康检测、外部配置等。
Spring Boot 并不是对 Spring 功能上的增强,而是提供了一种快速使用 Spring 的方式。
小结
SpringBoot提供了一种快速开发Spring项目的方式,而不是对Spring功能上的增强。
Spring的缺点:
- 配置繁琐
- 依赖繁琐
SpringBoot功能:
- 自动配置
- 起步依赖:依赖传递
- 辅助功能
SpringBoot 快速构建
案例:需求
搭建SpringBoot工程,定义HelloController.hello()方法,返回"Hello SpringBoot!”。
案例:实现步骤
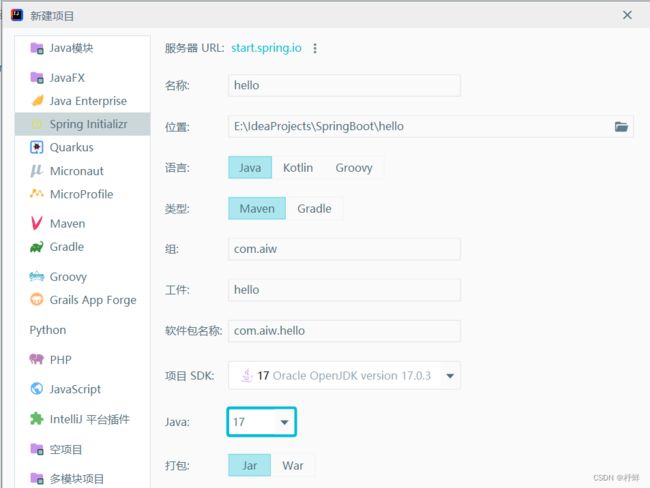
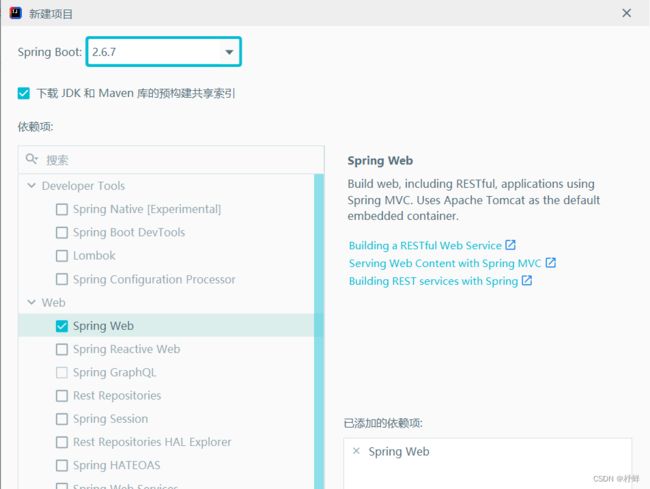
① 创建Spring Initializr项目
② 定义Controller
package com.aiw.hello.controller;

import org.springframework.web.bind.annotation.RequestMapping;
import org.springframework.web.bind.annotation.RestController;

@RestController
public class HelloController {

    @RequestMapping("/hello")
    public String hello() {
        return "Hello SpringBoot!";
    }

}
小结
- SpringBoot在创建项目时,使用jar的打包方式。
- SpringBoot的引导类,是项目入口,运行main方法就可以启动项目。
- 使用SpringBoot和Spring构建的项目,业务代码编写方式完全一样。
SpringBoot 起步依赖原理分析
1) spring-boot-starter-parent
主要定义版本信息,这样在pom.xml中引入依赖不用指定版本
依次点击spring-boot-starter-parent->spring-boot-dependencies,进入spring-boot-dependencies-2.6.7.pom
如搜索starter-web:

如搜索mysql:

如搜索tomcat:

也可以修改默认版本号,在pom.xml添加如下:
<properties>
    <java.version>17java.version>

    <mysql.version>5.1.40mysql.version>
properties>
此处修改mysql版本为5.1.40,不再是默认8.0.28版本
2) spring-boot-starter-web
点击spring-boot-starter-web进入到spring-boot-starter-web-2.6.7.pom
包含如下依赖:
<dependency>
    <groupId>org.springframeworkgroupId>
    <artifactId>spring-webartifactId>
    <version>5.3.19version>
    <scope>compilescope>
dependency>
<dependency>
    <groupId>org.springframeworkgroupId>
    <artifactId>spring-webmvcartifactId>
    <version>5.3.19version>
    <scope>compilescope>
dependency>
小结
- 在spring-boot-starter-parent中定义了各种技术的版本信息,组合了一套最优搭配的技术版本。
- 在各种starter中,定义了完成该功能需要的坐标合集,其中大部分版本信息来自于父工程。
- 我们的工程继承parent,引入starter后,通过依赖传递,就可以简单方便获得需要的jar包,并且不会存在版本冲突等问题。
SpringBoot 配置
配置文件分类
SpringBoot是基于约定的,所以很多配置都有默认值,但如果想使用自己的配置替换默认配置的话,就可以使用 application.properties或者application.yml(application.yaml)进行配置。
-
properties:
server.port=8080 -
yml:
server:
  port: 666
yml/yaml中,键和值之间有个空格
小结
- SpringBoot提供了2种配置文件类型:properteis和yml/yaml
- 默认配置文件名称:application
- 在同一级目录下优先级为:properties > yml > yaml
YAML
YAML全称是 YAML Ain’t Markup Language 。YAML是一种直观的能够被电脑识别的的数据数据序列化格式,并且容易被人类阅 读,容易和脚本语言交互的,可以被支持YAML库的不同的编程语言程序导入,比如: C/C++, Ruby, Python, Java, Perl, C#, PHP 等。YML文件是以数据为核心的,比传统的xml方式更加简洁。
YAML文件的扩展名可以使用.yml或者.yaml。
-
properties:
server.port=8080 server.address=127.0.0.1 -
xml:
<server> <port>8080port> <address>127.0.0.1address> server> -
yml:
server:
    port: 8080
    address: 127.0.0.1
简洁,以数据为核心
基本语法
- 大小写敏感
- 数据值前边必须有空格,作为分隔符
- 使用缩进表示层级关系
- 缩进时不允许使用Tab键,只允许使用空格(各个系统 Tab对应的 空格数目可能不同,导致层次混乱)
- 缩进的空格数目不重要,只要相同层级的元素左侧对齐即可
- # 表示注释,从这个字符一直到行尾,都会被解析器忽略
server:
    port: 8080
    address: 127.0.0.1
name: abc
数据格式
-
对象(map):键值对的集合
person: name: zhangsan # 行内写法 person: {name: zhangsan} -
数组:一组按次序排列的值
address: - beijing - shanghai # 行内写法 address: [beijing,shanghai] -
纯量:单个的、不可再分的值
msg1: 'hello \n world' # 单引忽略转义字符
msg2: "hello \n world" # 双引识别转义字符
参数引用
name: lisi
person:
	name: ${name} # 引用上边定义的name值
小结
1) 配置文件类型
- properties:和以前一样
- yml/yaml:注意空格
2) yaml:简洁,以数据为核心
- 基本语法
- 大小写敏感
- 数据值前边必须有空格,作为分隔符
- 使用空格缩进表示层级关系,相同缩进表示同一级
- 数据格式
- 对象
- 数组: 使用 “- ”表示数组每个元素
- 纯量
- 参数引用
- ${key}
读取配置文件内容
1) @Value
测试:
// 纯量
@Value("${msg1}")
private String msg1;

// 对象
@Value("${person.name}")
private String name;

@Value("${person.age}")
private Integer age;

// 数组
@Value("${address[0]}")
private String address;
输出:
System.out.println(msg1);

System.out.println(name);
System.out.println(age);

System.out.println(address);
2) Environment
包名:org.springframework.core.env
测试:
@Autowired
private Environment env;
输出:
// 纯量
System.out.println(env.getProperty("msg1"));
// 对象
System.out.println(env.getProperty("person.name"));
// 数组
System.out.println(env.getProperty("address[0]"));
3) @ConfigurationProperties
创建Person类
package com.aiw.hello.pojo;

import org.springframework.boot.context.properties.ConfigurationProperties;
import org.springframework.stereotype.Component;

@Component
@ConfigurationProperties(prefix = "person")
public class Person {
    private String name;
    private Integer age;

    public String getName() {
        return name;
    }

    public void setName(String name) {
        this.name = name;
    }

    public Integer getAge() {
        return age;
    }

    public void setAge(Integer age) {
        this.age = age;
    }

    @Override
    public String toString() {
        return "Person{" +
                "name='" + name + '\'' +
                ", age=" + age +
                '}';
    }
}
测试:
@Autowired
private Person person;
输出:
System.out.println(person);
可以添加配置处理器,这样写自定义配置的时候有提示,在pom.xml中添加:
<dependency>
 <groupId>org.springframework.bootgroupId>
 <artifactId>spring-boot-configuration-processorartifactId>
 <optional>trueoptional>
dependency>
引入依赖之后,重新构建项目(Ctrl+F9),再写自定义配置时,就有提示了
profile
我们在开发Spring Boot应用时,通常同一套程序会被安装到不同环境,比如:开发、测试、生产等。其中数据库地址、服务 器端口等等配置都不同,如果每次打包时,都要修改配置文件,那么非常麻烦。profile功能就是来进行动态配置切换的。
1) profile配置方式
-
多profile文件方式
新建三个配置文件:
application-dev.propertiesserver.port=999application-pro.propertiesserver.port=888application-test.propertiesserver.port=777在
application.properties设置如下:spring.profiles.active=dev -
yml多文档方式
新建
application.yml--- server: port: 999 spring: profiles: dev --- server: port: 888 spring: profiles: pro --- server: port: 777 spring: profiles: test修改
application.propertiesspring.profiles.active=pro
2) profile激活方式
-
配置文件
如上,使用
spring.profiles.active=dev来激活 -
虚拟机参数
-
命令行参数
在编辑配置里面,点击
修改选项,勾选程序实参,并填入如下:

启动项目,如下:

将项目打包成jar包,在Maven处点击package:
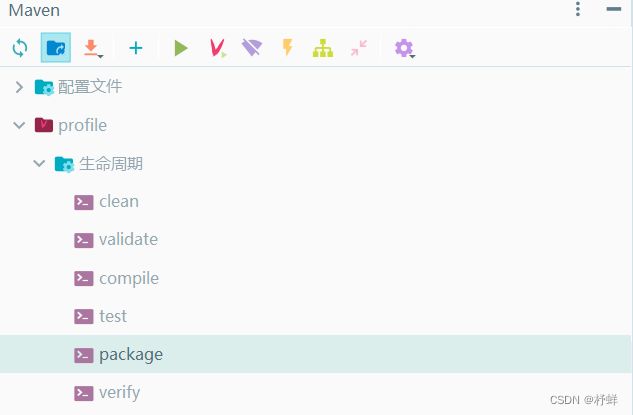
运行如下:

使用cmd打开E:\IdeaProjects\SpringBoot\profile\target,输入如下命令:java -jar profile-0.0.1-SNAPSHOT.jar --spring.profiles.active=pro

小结
1) profile是用来完成不同环境下,配置动态切换功能的。
2) profile配置方式
- 多profile文件方式:提供多个配置文件,每个代表一种环境。
- application-dev.properties/yml 开发环境
- application-test.properties/yml 测试环境
- application-pro.properties/yml 生产环境
- yml多文档方式:
- 在yml中使用 — 分隔不同配置
3) profile激活方式
- 配置文件: 再配置文件中配置:spring.profiles.active=dev
- 虚拟机参数:在VM options 指定:-Dspring.profiles.active=dev
- 命令行参数:java –jar xxx.jar --spring.profiles.active=dev
内部配置加载顺序
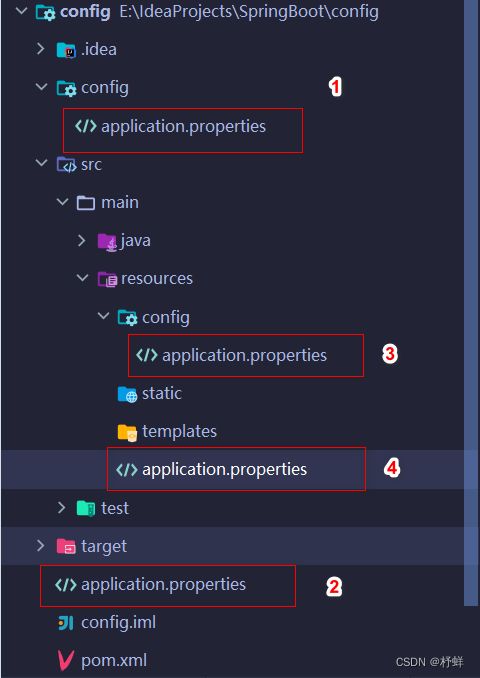
Springboot程序启动时,会从以下位置加载配置文件:
- file:./config/:当前项目下的/config目录下
- file:./ :当前项目的根目录
- classpath:/config/:classpath的/config目录
- classpath:/ :classpath的根目录
外部配置加载顺序
通过官网查看外部属性加载顺序: https://docs.spring.io/spring-boot/docs/current/reference/html/boot-features-external-config.html
1)命令行方式
将项目使用Maven打包成jar包,并在jar包位置打开cmd,复制E:\IdeaProjects\application.properties到任意目录,此处放在E:\IdeaProjects\application.properties
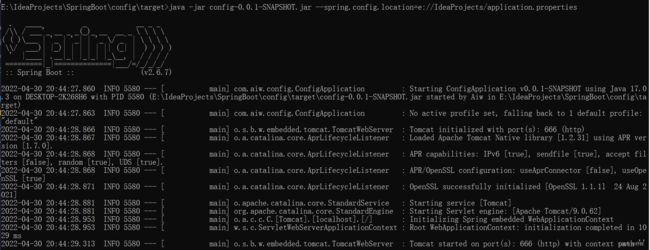
此处使用了项目外部的配置,如端口号使用的是外部配置的端口号
2)置于同级目录
将application.properties放到项目被打包成jar的目录,使其位于同级;即配置文件和jar包同一级目录会被自动读取
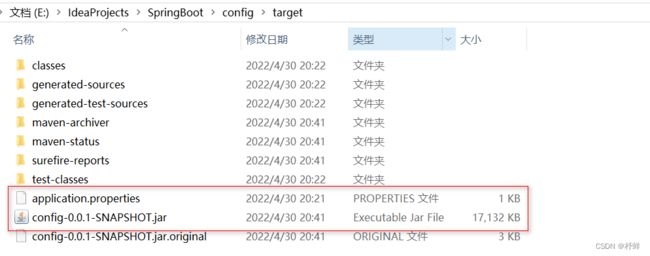
重新在cmd运行,不带参数

在项目jar包的同级目录下,新建一个config目录,将配置文件放于此目录,也会被自动读取
config目录比根目录优先级高
整合JUnit
① 搭建SpringBoot工程
使用Spring Initializr快速构建空项目
② 引入junit依赖
在pom.xml中引入:
<dependency>
    <groupId>junitgroupId>
    <artifactId>junitartifactId>
    <scope>testscope>
dependency>
③ 编写Service类
创建UserService和
package com.example.junit.service;

import org.springframework.stereotype.Service;

@Service
public class UserService {

    public void addUser(){
        System.out.println("add user");
    }

}
④ 添加测试类、测试方法和相关注解
• @RunWith(SpringRunner.class)
• @SpringBootTest
package com.example.junit;

import com.example.junit.service.UserService;
import org.junit.Test;
import org.junit.runner.RunWith;
import org.springframework.beans.factory.annotation.Autowired;
import org.springframework.boot.test.context.SpringBootTest;
import org.springframework.test.context.junit4.SpringRunner;

@RunWith(SpringRunner.class)
@SpringBootTest
public class UserServiceTest {
    @Autowired
    private UserService userService;

    @Test
    public void testAddUser() {
        userService.addUser();
    }

}
包名相同不需要为@SpringBootTest指定属性,若不同包,需要指定
classes = 启动类.class最新版不需要@RunWith注解
⑤ 测试运行
整合Redis
① 搭建SpringBoot工程
使用Spring Initializr快速构建,并勾选如下依赖:

② 引入redis依赖
使用Spring Initializr勾选redis依赖,即可自动引入,也可以手动在pom.xml引入:
<dependency>
    <groupId>org.springframework.bootgroupId>
    <artifactId>spring-boot-starter-data-redisartifactId>
dependency>
③ 修改测试类、添加测试方法
package com.aiw.redis;

import org.junit.jupiter.api.Test;
import org.springframework.beans.factory.annotation.Autowired;
import org.springframework.boot.test.context.SpringBootTest;
import org.springframework.data.redis.core.RedisTemplate;

@SpringBootTest
class RedisApplicationTests {
    @Autowired
    private RedisTemplate redisTemplate;

    @Test
    public void testSet() {
        // 存入数据
        redisTemplate.boundValueOps("name").set("zhangsan");
    }

    @Test
    public void testGet() {
        // 获取数据
        Object name = redisTemplate.boundValueOps("name").get();
        System.out.println(name);
    }

}
④ 启动redis
找到redis目录,双击redis-server.exe即可启动;redis端口默认为6379
⑤ 测试运行
在
application.yml中可以配置如下属性:spring: redis: host: localhost # redis的主机ip,默认 port: 6379 # redis的端口,默认 password: # redis的密码,默认为空redis其它配置信息,参考官网Common Application Properties (spring.io)
整合MyBatis
① 搭建SpringBoot工程
使用Spring Initializr快速构建,并勾选如下依赖:
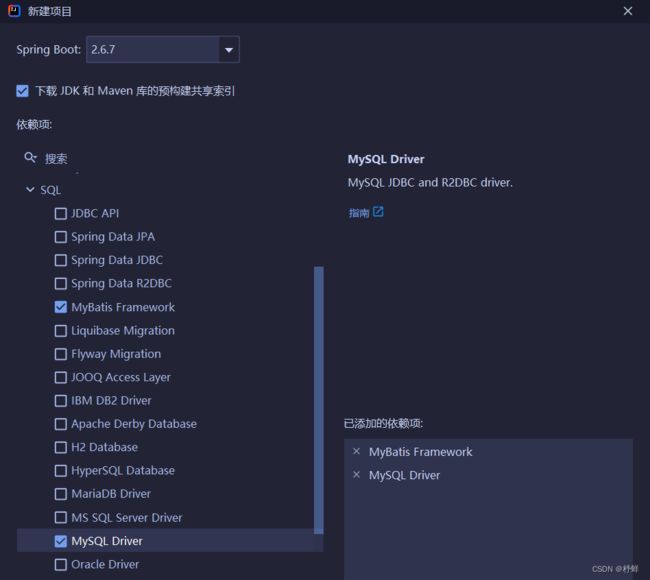
② 引入mybatis、mysql依赖
使用Spring Initializr勾选mybatis、mysql依赖,即可自动引入,也可以手动在pom.xml引入:
<dependency>
    <groupId>org.mybatis.spring.bootgroupId>
    <artifactId>mybatis-spring-boot-starterartifactId>
    <version>2.2.2version>
dependency>

<dependency>
    <groupId>mysqlgroupId>
    <artifactId>mysql-connector-javaartifactId>
    <scope>runtimescope>
dependency>
虽说高版本mysql驱动兼容低版本,但是此处任采用自定义驱动版本,不使用默认的8.0+版本;个人装的是mysql5.0+版本,故在pom.xml中添加如下:
<properties>
    <java.version>17java.version>

    <mysql.version>5.1.40mysql.version>
properties>
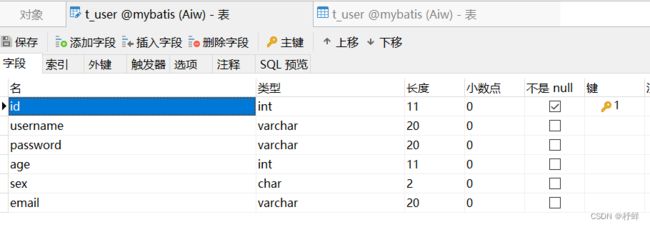
③ 创建表
④ 创建POJO类
为简化实体类代码,此处使用Lombok,在pom.xml引入Lombok依赖和在IDEA中安装Lombok插件(IDEA高版本自带)
<dependency>
    <groupId>org.projectlombokgroupId>
    <artifactId>lombokartifactId>
    <optional>trueoptional>
dependency>
创建User实体类
package com.aiw.mybatis.pojo;

import lombok.AllArgsConstructor;
import lombok.Data;
import lombok.NoArgsConstructor;

@Data
@NoArgsConstructor
@AllArgsConstructor
public class User {
    private Integer id;
    private String username;
    private String password;
    private Integer age;
    private String sex;
    private String email;
}
⑤ 配置信息
在application.yml中添加如下:
spring:
  # 配置数据源信息
  datasource:
    # 配置连接数据库的各个信息
    driver-class-name: com.mysql.jdbc.Driver
    url: jdbc:mysql://localhost:3306/mybatis?characterEncoding=utf-8&useSSL=false
    username: root
    password: 123456
mysql5.0+和mysql8.0+连接数据库的驱动名不同:
mysql5.0+:com.mysql.jdbc.Driver
mysql8.0+:com.mysql.cj.jdbc.Driver
⑥ 使用纯注解
创建Mapper
package com.aiw.mybatis.mapper;

import com.aiw.mybatis.pojo.User;
import org.apache.ibatis.annotations.Mapper;
import org.apache.ibatis.annotations.Select;

import java.util.List;

@Mapper
public interface UserMapper {
    @Select("select * from t_user")
    public List<User> selectAll();
}
在主程序上添加@MapperScan注解是一样效果,此时需去掉Mapper接口上的@Mapper注解:
@MapperScan("com.aiw.mybatis.mapper")
@SpringBootApplication
public class MybatisApplication {

 public static void main(String[] args) {
     SpringApplication.run(MybatisApplication.class, args);
 }

}
修改测试类
package com.aiw.mybatis;

import com.aiw.mybatis.mapper.UserMapper;
import com.aiw.mybatis.pojo.User;
import org.junit.jupiter.api.Test;
import org.springframework.beans.factory.annotation.Autowired;
import org.springframework.boot.test.context.SpringBootTest;

import java.util.List;

@SpringBootTest
class MybatisApplicationTests {
    @Autowired(required = false)
    private UserMapper userMapper;

    @Test
    public void testSelectAll() {
        List<User> users = userMapper.selectAll();
        users.forEach(System.out::println);
    }

}
⑦ 使用xml
创建Mapper
package com.aiw.mybatis.mapper;

import com.aiw.mybatis.pojo.User;
import org.apache.ibatis.annotations.Select;

import java.util.List;

public interface UserXmlMapper {
    public List<User> selectAll();
}
创建映射文件,路径为src/main/resources/mapper/UserMapper.xml
DOCTYPE mapper
        PUBLIC "-//mybatis.org//DTD Mapper 3.0//EN"
        "http://mybatis.org/dtd/mybatis-3-mapper.dtd">

<mapper namespace="com.aiw.mybatis.mapper.UserXmlMapper">
    <select id="selectAll" resultType="User">
        select * from t_user
    select>
mapper>
有关MyBatis使用XML更多操作,参考前期博客:MyBatis
在主程序上添加@MapperScan注解
@MapperScan("com.aiw.mybatis.mapper")
@SpringBootApplication
public class MybatisApplication {

    public static void main(String[] args) {
        SpringApplication.run(MybatisApplication.class, args);
    }

}
在application.yml添加配置属性
mybatis:
#  config-location: classpath:mybatis-config.xml # mybatis核心配置文件路径
  mapper-locations: classpath:mapper/*.xml  # mapper映射文件路径
  type-aliases-package: com.aiw.mybatis.pojo # 实体类所在包,指定别名
修改测试类
package com.aiw.mybatis;

import com.aiw.mybatis.mapper.UserXmlMapper;
import com.aiw.mybatis.pojo.User;
import org.junit.jupiter.api.Test;
import org.springframework.beans.factory.annotation.Autowired;
import org.springframework.boot.test.context.SpringBootTest;

import java.util.List;

@SpringBootTest
class MybatisApplicationTests {

    @Autowired(required = false)
    private UserXmlMapper userXmlMapper;

    @Test
    public void testSelectAll2() {
        List<User> users = userXmlMapper.selectAll();
        users.forEach(System.out::println);
    }

}
整合MyBatis Plus
① 搭建SpringBoot工程
使用Spring Initializr快速构建空项目
② 引入mybatis-plus、mysql依赖
在pom.xml中引入:
<dependency>
    <groupId>com.baomidougroupId>
    <artifactId>mybatis-plus-boot-starterartifactId>
    <version>3.5.1version>
dependency>

<dependency>
    <groupId>org.projectlombokgroupId>
    <artifactId>lombokartifactId>
    <optional>trueoptional>
dependency>

<dependency>
    <groupId>mysqlgroupId>
    <artifactId>mysql-connector-javaartifactId>
    <scope>runtimescope>
dependency>
指定MySQL默认版本,故在pom.xml中添加如下:
<properties>
    <java.version>17java.version>

    <mysql.version>5.1.40mysql.version>
properties>
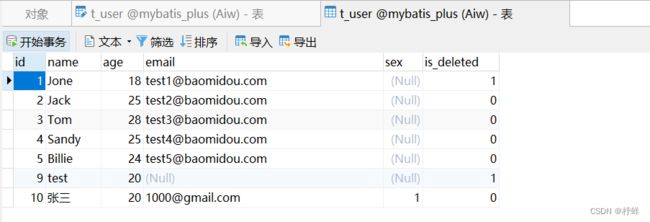
③ 创建表
④ 创建POJO类
package com.aiw.mybatisplus.pojo;

import com.baomidou.mybatisplus.annotation.TableField;
import com.baomidou.mybatisplus.annotation.TableLogic;
import com.baomidou.mybatisplus.annotation.TableName;
import lombok.AllArgsConstructor;
import lombok.Data;
import lombok.NoArgsConstructor;

@TableName("t_user")
@Data
@NoArgsConstructor
@AllArgsConstructor
public class User {
    private Long id;
    private String name;
    private Integer age;
    private String email;
    private Integer sex;
    @TableField("is_deleted")
    @TableLogic
    private Integer isDeleted;
}
⑤ 配置信息
在application.yml中添加如下:
spring:
  # 配置数据源信息
  datasource:
    # 配置数据源类型
    type: com.zaxxer.hikari.HikariDataSource
    # 配置连接数据库的各个信息
    driver-class-name: com.mysql.jdbc.Driver
    url: jdbc:mysql://localhost:3306/mybatis_plus?characterEncoding=utf-8&useSSL=false
    username: root
    password: 123456
MyBatis Plus其它配置信息,参考官网使用配置 | MyBatis-Plus (baomidou.com)
⑥ 添加mapper
package com.aiw.mybatisplus.mapper;

import com.aiw.mybatisplus.pojo.User;
import com.baomidou.mybatisplus.core.mapper.BaseMapper;

public interface UserMapper extends BaseMapper<User> {
}
BaseMapper是MyBatis-Plus提供的模板mapper,其中包含了基本的CRUD方法,泛型为操作的实体类型
MyBatis Plus更多操作,参考前期博客:MyBatis-Plus
⑦ 启动类
在主程序上添加@MapperScan注解
@MapperScan("com.aiw.mybatisplus.mapper")
@SpringBootApplication
public class MybatisPlusApplication {

    public static void main(String[] args) {
        SpringApplication.run(MybatisPlusApplication.class, args);
    }

}
在Spring Boot启动类中添加@MapperScan注解,扫描mapper包
实际上在mapper接口上面加个@Mapper注解也能做到
⑧ 测试
修改测试类,如下:
package com.aiw.mybatisplus;

import com.aiw.mybatisplus.mapper.UserMapper;
import org.junit.jupiter.api.Test;
import org.springframework.beans.factory.annotation.Autowired;
import org.springframework.boot.test.context.SpringBootTest;

@SpringBootTest
class MybatisPlusApplicationTests {
    @Autowired(required = false)
    private UserMapper userMapper;

    @Test
    public void testSelectList() {
        userMapper.selectList(null).forEach(System.out::println);
    }

}
整合Thymeleaf
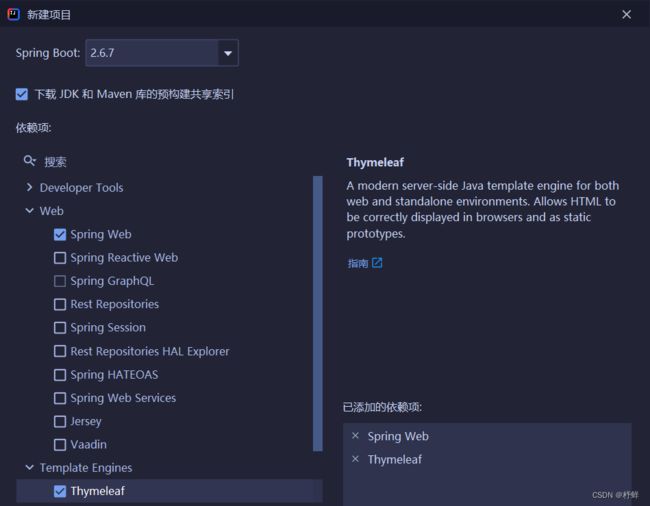
① 搭建SpringBoot工程
使用Spring Initializr快速构建,并勾选如下依赖:
② 引入thymeleaf依赖
使用Spring Initializr勾选spring web、thymeleaf依赖,即可自动引入,也可以手动在pom.xml引入:
<dependency>
    <groupId>org.springframework.bootgroupId>
    <artifactId>spring-boot-starter-thymeleafartifactId>
dependency>
<dependency>
    <groupId>org.springframework.bootgroupId>
    <artifactId>spring-boot-starter-webartifactId>
dependency>
③ 配置信息
在application.yml中添加如下:
spring:
  thymeleaf:
    prefix: classpath:templates/ # 默认路径
    suffix: .html # 后缀
    mode: HTML5 # 模式,支持HTML5 HTML XML TEXT JAVASCRIPT
    cache: false # 缓存,开发时关闭缓存,不然没法看到实时页面
    encoding: UTF-8 # 编码,默认UTF-8
    servlet:
      content-type: text/html # 内容类别,可不用配置
④ 创建控制器
package com.aiw.thymeleaf.controller;

import org.springframework.stereotype.Controller;
import org.springframework.web.bind.annotation.RequestMapping;
import org.springframework.web.servlet.ModelAndView;

@Controller
public class ThymeleafController {

    @RequestMapping("/")
    public ModelAndView thymeleaf() {
        ModelAndView mv = new ModelAndView("index");    // 设置视图名称
        mv.addObject("name", "Hello Thymeleaf");    // 设置视图数据
        return mv;
    }

}
域对象共享数据,更多方式参考前期博客:SpringMVC–域对象共享数据
⑤ 创建视图
在 templates 目录下创建 index.html 文件,代码如下:
DOCTYPE html>
<html xmlns:th="http://www.thymeleaf.org">
<head>
    <meta charset="UTF-8">
    <title>SpringBoot整合Thymeleaf小案例title>
head>
<body>
    <h1 th:text="${name}">h1>
body>
html>
⑥ 测试
启动成功后,访问:http://localhost:8080/ 即可看到效果如下:

整合Logback/Log4j2
Spring Boot默认使用Logback作为日志框架。若使用其它日志框架,首先排除Spring Boot自带的Logback
Logback
① 搭建SpringBoot工程
使用Spring Initializr快速构建空项目
② 引入logback依赖
由于logback为Spring Boot默认日志框架,故无需引入依赖
③ 配置信息
Logback默认配置步骤:
- 尝试在 classpath 下查找文件 logback-test.xml;
- 如果文件不存在,则查找文件 logback.xml;
- 如果两个文件都不存在,logback 用 BasicConfigurator 自动对自己进行配置,这会导致记录输出到控制台
在application.yml中添加如下:
logging:
  config: classpath:logback-test.xml  # logback默认配置文件名
④ logback配置文件
在resources目录下新建logback-test.xml配置文件
<configuration scan="true" scanPeriod="2 seconds" debug="false">

    <property name="LOG_PATH" value="./logs" />
    <property name="LOG_HISTORY_PATH" value="./logs/history" />

    <appender name="STDOUT" class="ch.qos.logback.core.ConsoleAppender">
        <encoder class="ch.qos.logback.classic.encoder.PatternLayoutEncoder">

            <pattern>%d{yyyy-MM-dd HH:mm:ss.SSS} %-5level ${PID:-} --- [%t] %logger{50} - %msg%npattern>
        encoder>
    appender>


    <appender name="INFO_FILE" class="ch.qos.logback.core.rolling.RollingFileAppender">

        <File>${LOG_PATH}/info.logFile>
        <rollingPolicy class="ch.qos.logback.core.rolling.SizeAndTimeBasedRollingPolicy">

            <fileNamePattern>${LOG_PATH}/info-%d{yyyy-MM-dd}.%i.logfileNamePattern>

            <maxHistory>30maxHistory>

            <maxFileSize>100MBmaxFileSize>
        rollingPolicy>
        <encoder class="ch.qos.logback.classic.encoder.PatternLayoutEncoder">
            <pattern>%d{yyyy-MM-dd HH:mm:ss.SSS} %-5level ${PID:-} --- [%t] %logger{50} - %msg%npattern>
        encoder>
    appender>


    <appender name="ERROR_FILE" class="ch.qos.logback.core.rolling.RollingFileAppender">

        <filter class="ch.qos.logback.classic.filter.ThresholdFilter">
            <level>ERRORlevel>
        filter>
        <File>${LOG_PATH}/error.logFile>
        <rollingPolicy class="ch.qos.logback.core.rolling.SizeAndTimeBasedRollingPolicy">
            <fileNamePattern>${LOG_PATH}/error-%d{yyyy-MM-dd}.%i.logfileNamePattern>
            <maxHistory>30maxHistory>
            <maxFileSize>100MBmaxFileSize>
        rollingPolicy>
        <encoder class="ch.qos.logback.classic.encoder.PatternLayoutEncoder">
            <pattern>%d{yyyy-MM-dd HH:mm:ss.SSS} %-5level ${PID:-} --- [%t] %logger{50} - %msg%npattern>
        encoder>
    appender>

    <appender name="fileAppender" class="ch.qos.logback.core.rolling.RollingFileAppender">
        <file>${LOG_HISTORY_PATH}/project-id-execution-detail-info.logfile>
        <encoder>
            <charset>UTF-8charset>
            <pattern>%d{yyyy-MM-dd HH:mm:ss.SSS} %-5level ${PID:-} --- [%t] %logger{50} - %msg%npattern>
        encoder>
        <filter class="ch.qos.logback.classic.filter.ThresholdFilter">
            <level>INFOlevel>
        filter>
    appender>


    <root level="INFO">
        <appender-ref ref="STDOUT" />
        <appender-ref ref="INFO_FILE" />
        <appender-ref ref="ERROR_FILE" />
    root>

configuration>
⑤ 测试
方式一
不使用lombok插件,直接使用。修改测试类,如下:
package com.aiw.logback;


import org.junit.jupiter.api.Test;
import org.slf4j.Logger;
import org.slf4j.LoggerFactory;
import org.springframework.boot.test.context.SpringBootTest;

@SpringBootTest
class LogbackApplicationTests {

    private static final Logger logger= LoggerFactory.getLogger(LogbackApplicationTests.class);

    @Test
    public void LogbackTest() {
        logger.info("Info level log message");
        logger.debug("Debug level log message");
        logger.error("Error level log message");
    }

}
方式二
使用lombok插件,简化代码。在pom.xml引入Lombok依赖和在IDEA中安装Lombok插件(IDEA高版本自带)
<dependency>
    <groupId>org.projectlombokgroupId>
    <artifactId>lombokartifactId>
    <optional>trueoptional>
dependency>
在需要打印日志的类上添加@Slf4j注解,然后通过log.输出日志。修改测试类,如下:
package com.aiw.logback;

import lombok.extern.slf4j.Slf4j;
import org.junit.jupiter.api.Test;
import org.springframework.boot.test.context.SpringBootTest;

@Slf4j
@SpringBootTest
class LogbackApplicationTests {

    @Test
    public void LogbackTest() {
        log.info("Info level log message");
        log.debug("Debug level log message");
        log.error("Error level log message");
    }

}
Log4j2
① 搭建SpringBoot工程
使用Spring Initializr快速构建空项目
② 引入log4j2依赖
引入依赖时,需要首先排除Spring Boot自带的Logback,然后在添加log4j2的依赖;pom.xml中部分修改如下:
<dependencies>
    <dependency>
        <groupId>org.springframework.bootgroupId>
        <artifactId>spring-boot-starterartifactId>

        <exclusions>
            <exclusion>
            <groupId>org.springframework.bootgroupId>
            <artifactId>spring-boot-starter-loggingartifactId>
            exclusion>
        exclusions>
    dependency>


    <dependency>
        <groupId>org.springframework.bootgroupId>
        <artifactId>spring-boot-starter-log4j2artifactId>
    dependency>

    <dependency>
        <groupId>org.springframework.bootgroupId>
        <artifactId>spring-boot-starter-testartifactId>
        <scope>testscope>

        <exclusions>
            <exclusion>
            <groupId>org.springframework.bootgroupId>
            <artifactId>spring-boot-starter-loggingartifactId>
            exclusion>
        exclusions>
    dependency>
dependencies>
③ 配置信息
在application.yml中添加如下:
logging:
  config: classpath:log4j2-spring.xml # log4j2默认配置文件名
④ log4j2配置文件
在resources目录下新建log4j2-spring.xml配置文件
<configuration monitorInterval="5">


    <Properties>


        <property name="LOG_PATTERN" value="%date{HH:mm:ss.SSS} [%thread] %-5level %logger{36} - %msg%n" />


        <property name="FILE_PATH" value="logs/log.log" />

        <property name="FILE_NAME" value="learn" />
    Properties>

    <appenders>

        <console name="Console" target="SYSTEM_OUT">

            <PatternLayout pattern="${LOG_PATTERN}"/>

            <ThresholdFilter level="info" onMatch="ACCEPT" onMismatch="DENY"/>
        console>


        <File name="Filelog" fileName="${FILE_PATH}/test.log" append="false">
            <PatternLayout pattern="${LOG_PATTERN}"/>
        File>


        <RollingFile name="RollingFileInfo" fileName="${FILE_PATH}/info.log" filePattern="${FILE_PATH}/${FILE_NAME}-INFO-%d{yyyy-MM-dd}_%i.log.gz">

            <ThresholdFilter level="info" onMatch="ACCEPT" onMismatch="DENY"/>
            <PatternLayout pattern="${LOG_PATTERN}"/>
            <Policies>

                <TimeBasedTriggeringPolicy interval="1"/>
                <SizeBasedTriggeringPolicy size="10MB"/>
            Policies>

            <DefaultRolloverStrategy max="15"/>
        RollingFile>


        <RollingFile name="RollingFileWarn" fileName="${FILE_PATH}/warn.log" filePattern="${FILE_PATH}/${FILE_NAME}-WARN-%d{yyyy-MM-dd}_%i.log.gz">

            <ThresholdFilter level="warn" onMatch="ACCEPT" onMismatch="DENY"/>
            <PatternLayout pattern="${LOG_PATTERN}"/>
            <Policies>

                <TimeBasedTriggeringPolicy interval="1"/>
                <SizeBasedTriggeringPolicy size="10MB"/>
            Policies>

            <DefaultRolloverStrategy max="15"/>
        RollingFile>


        <RollingFile name="RollingFileError" fileName="${FILE_PATH}/error.log" filePattern="${FILE_PATH}/${FILE_NAME}-ERROR-%d{yyyy-MM-dd}_%i.log.gz">

            <ThresholdFilter level="error" onMatch="ACCEPT" onMismatch="DENY"/>
            <PatternLayout pattern="${LOG_PATTERN}"/>
            <Policies>

                <TimeBasedTriggeringPolicy interval="1"/>
                <SizeBasedTriggeringPolicy size="10MB"/>
            Policies>

            <DefaultRolloverStrategy max="15"/>
        RollingFile>

    appenders>


    <loggers>


        <logger name="org.mybatis" level="info" additivity="false">
            <AppenderRef ref="Console"/>
        logger>


        <Logger name="org.springframework" level="info" additivity="false">
            <AppenderRef ref="Console"/>
        Logger>

        <root level="info">
            <appender-ref ref="Console"/>
            <appender-ref ref="Filelog"/>
            <appender-ref ref="RollingFileInfo"/>
            <appender-ref ref="RollingFileWarn"/>
            <appender-ref ref="RollingFileError"/>
        root>
    loggers>

configuration>
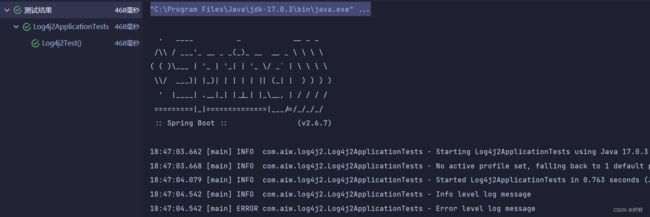
⑤ 测试
方式一
不使用lombok插件,直接使用。修改测试类,如下:
package com.aiw.log4j2;

import org.apache.logging.log4j.LogManager;
import org.apache.logging.log4j.Logger;
import org.junit.jupiter.api.Test;
import org.springframework.boot.test.context.SpringBootTest;

@SpringBootTest
class Log4j2ApplicationTests {
    private static final Logger logger= LogManager.getLogger(Log4j2ApplicationTests.class);

    @Test
    public void Log4j2Test() {
        logger.info("Info level log message");
        logger.debug("Debug level log message");
        logger.error("Error level log message");
    }

}
方式二
使用lombok插件,简化代码。在pom.xml引入Lombok依赖和在IDEA中安装Lombok插件(IDEA高版本自带)
<dependency>
    <groupId>org.projectlombokgroupId>
    <artifactId>lombokartifactId>
    <optional>trueoptional>
dependency>
在需要打印日志的类上添加@Slf4j注解,然后通过log.输出日志。修改测试类,如下:
package com.aiw.log4j2;

import lombok.extern.slf4j.Slf4j;
import org.junit.jupiter.api.Test;
import org.springframework.boot.test.context.SpringBootTest;

@Slf4j
@SpringBootTest
class Log4j2ApplicationTests {

    @Test
    public void Log4j2Test() {
        log.info("Info level log message");
        log.debug("Debug level log message");
        log.error("Error level log message");
    }

}
整合Jackson/FastJson/Gson
Spring Boot默认使用Jackson作为Json解析技术框架;若使用其它两种,首先排除Spring Boot自带的Jackson
Jackson
① 搭建SpringBoot工程
使用Spring Initializr快速构建,并勾选如下依赖:

② 引入jackson依赖
使用Spring Initializr勾选spring web、lombok依赖,即可自动引入,也可以手动在pom.xml引入:
<dependency>
    <groupId>org.springframework.bootgroupId>
    <artifactId>spring-boot-starter-webartifactId>
dependency>

<dependency>
    <groupId>org.projectlombokgroupId>
    <artifactId>lombokartifactId>
    <optional>trueoptional>
dependency>
③ 创建POJO类
为简化实体类代码,此处使用Lombok,在pom.xml引入Lombok依赖和在IDEA中安装Lombok插件(IDEA高版本自带)
<dependency>
    <groupId>org.projectlombokgroupId>
    <artifactId>lombokartifactId>
    <optional>trueoptional>
dependency>
创建Book实体类
package com.aiw.jackson.pojo;

import com.fasterxml.jackson.annotation.JsonFormat;
import com.fasterxml.jackson.annotation.JsonIgnore;
import lombok.AllArgsConstructor;
import lombok.Data;
import lombok.NoArgsConstructor;

import java.util.Date;

@Data
@NoArgsConstructor
@AllArgsConstructor
public class Book {
    private String name;
    private String author;
    @JsonIgnore
    private Double price;
    @JsonFormat(pattern = "yyyy-MM-dd HH:mm:ss", timezone = "GMT+8")
    private Date publishDate;
}
@JsonIgnore:转换json的时候忽略此属性
@JsonFormat(pattern = “yyyy-MM-dd HH:mm:ss”):对该属性的值进行格式化
④ 创建控制器
package com.aiw.jackson.controller;

import com.aiw.jackson.pojo.Book;
import org.springframework.web.bind.annotation.RequestMapping;
import org.springframework.web.bind.annotation.RequestMethod;
import org.springframework.web.bind.annotation.RestController;

import java.util.Date;

@RestController
public class BookController {

    @RequestMapping(value = "/book", method = RequestMethod.POST)
    public Book book() {
        return new Book("Java", "Aiw", 16.0, new Date());
    }

}
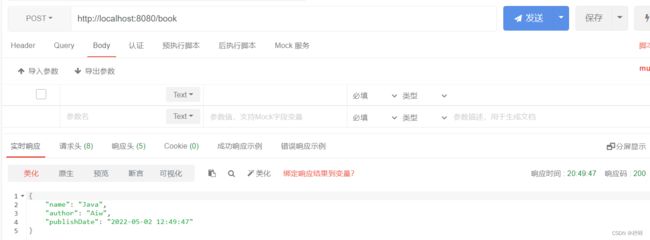
⑤ 测试
FastJson
fastjson是阿里巴巴的一个开源JSON解析框架,是目前JSON解析速度最快的开源框架。
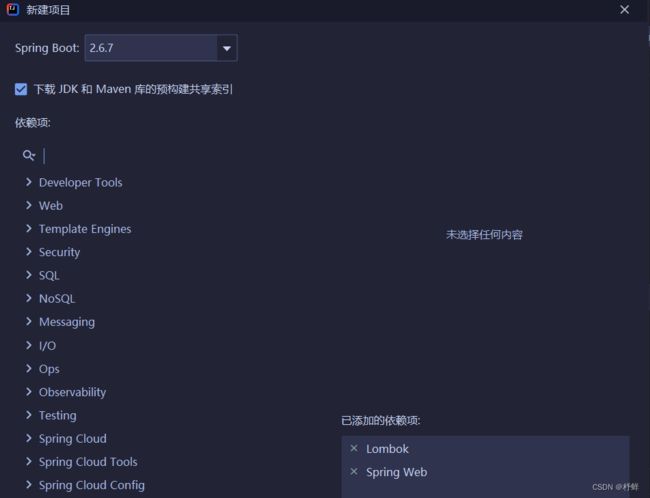
① 搭建SpringBoot工程
使用Spring Initializr快速构建,并勾选如下依赖:
② 引入fastjson依赖
需要首先排除Spring Boot自带的Jackson,再引入fastjson依赖,pom.xml中部分修改如下:
<dependency>
    <groupId>org.springframework.bootgroupId>
    <artifactId>spring-boot-starter-webartifactId>
    <exclusions>
        <exclusion>
            <groupId>org.springframework.bootgroupId>
            <artifactId>spring-boot-starter-jsonartifactId>
        exclusion>
    exclusions>
dependency>

<dependency>
    <groupId>com.alibabagroupId>
    <artifactId>fastjsonartifactId>
    <version>1.2.80version>
dependency>
③ 创建配置类
方式一:返回新的HttpMessageConverter
package com.aiw.fastjson.config;

import com.alibaba.fastjson.support.spring.FastJsonHttpMessageConverter;
import org.springframework.context.annotation.Bean;
import org.springframework.context.annotation.Configuration;
import org.springframework.http.MediaType;

import java.nio.charset.StandardCharsets;
import java.util.ArrayList;
import java.util.List;

@Configuration
public class FastJsonConfig {
    @Bean
    public FastJsonHttpMessageConverter fastJsonHttpMessageConverter() {
        FastJsonHttpMessageConverter converter = new FastJsonHttpMessageConverter();
        List<MediaType> supportedMediaTypes = new ArrayList<>();
        supportedMediaTypes.add(MediaType.APPLICATION_JSON);
        supportedMediaTypes.add(MediaType.APPLICATION_ATOM_XML);
        supportedMediaTypes.add(MediaType.APPLICATION_FORM_URLENCODED);
        supportedMediaTypes.add(MediaType.APPLICATION_OCTET_STREAM);
        supportedMediaTypes.add(MediaType.APPLICATION_PDF);
        supportedMediaTypes.add(MediaType.APPLICATION_RSS_XML);
        supportedMediaTypes.add(MediaType.APPLICATION_XHTML_XML);
        supportedMediaTypes.add(MediaType.APPLICATION_XML);
        supportedMediaTypes.add(MediaType.IMAGE_GIF);
        supportedMediaTypes.add(MediaType.IMAGE_JPEG);
        supportedMediaTypes.add(MediaType.IMAGE_PNG);
        supportedMediaTypes.add(MediaType.TEXT_EVENT_STREAM);
        supportedMediaTypes.add(MediaType.TEXT_HTML);
        supportedMediaTypes.add(MediaType.TEXT_MARKDOWN);
        supportedMediaTypes.add(MediaType.TEXT_PLAIN);
        supportedMediaTypes.add(MediaType.TEXT_XML);
        converter.setSupportedMediaTypes(supportedMediaTypes);
        //自定义配置...
        com.alibaba.fastjson.support.config.FastJsonConfig config = new com.alibaba.fastjson.support.config.FastJsonConfig();
        config.setCharset(StandardCharsets.UTF_8);
        config.setDateFormat("yyyy-MM-dd HH:mm:ss");
        converter.setFastJsonConfig(config);
        converter.setDefaultCharset(StandardCharsets.UTF_8);
        return converter;
    }
}
方式二:实现WebMvcConfigurer接口
package com.aiw.fastjson.config;

import com.alibaba.fastjson.support.config.FastJsonConfig;
import com.alibaba.fastjson.support.spring.FastJsonHttpMessageConverter;
import org.springframework.context.annotation.Configuration;
import org.springframework.http.MediaType;
import org.springframework.http.converter.HttpMessageConverter;
import org.springframework.web.servlet.config.annotation.WebMvcConfigurer;

import java.nio.charset.StandardCharsets;
import java.util.ArrayList;
import java.util.List;

@Configuration
public class WebConfig implements WebMvcConfigurer {

    @Override
    public void configureMessageConverters(List<HttpMessageConverter<?>> converters) {
        FastJsonHttpMessageConverter converter = new FastJsonHttpMessageConverter();
        List<MediaType> supportedMediaTypes = new ArrayList<>();
        supportedMediaTypes.add(MediaType.APPLICATION_JSON);
        supportedMediaTypes.add(MediaType.APPLICATION_ATOM_XML);
        supportedMediaTypes.add(MediaType.APPLICATION_FORM_URLENCODED);
        supportedMediaTypes.add(MediaType.APPLICATION_OCTET_STREAM);
        supportedMediaTypes.add(MediaType.APPLICATION_PDF);
        supportedMediaTypes.add(MediaType.APPLICATION_RSS_XML);
        supportedMediaTypes.add(MediaType.APPLICATION_XHTML_XML);
        supportedMediaTypes.add(MediaType.APPLICATION_XML);
        supportedMediaTypes.add(MediaType.IMAGE_GIF);
        supportedMediaTypes.add(MediaType.IMAGE_JPEG);
        supportedMediaTypes.add(MediaType.IMAGE_PNG);
        supportedMediaTypes.add(MediaType.TEXT_EVENT_STREAM);
        supportedMediaTypes.add(MediaType.TEXT_HTML);
        supportedMediaTypes.add(MediaType.TEXT_MARKDOWN);
        supportedMediaTypes.add(MediaType.TEXT_PLAIN);
        supportedMediaTypes.add(MediaType.TEXT_XML);
        converter.setSupportedMediaTypes(supportedMediaTypes);
        //自定义配置...
        FastJsonConfig config = new FastJsonConfig();
        config.setCharset(StandardCharsets.UTF_8);
        config.setDateFormat("yyyy-MM-dd HH:mm:ss");
        converter.setFastJsonConfig(config);
        converter.setDefaultCharset(StandardCharsets.UTF_8);
        // SpringBoot 2.0.1版本中加载WebMvcConfigurer的顺序发生了变动,
        // 故需使用converters.add(0, converter)指定FastJsonHttpMessageConverter在converters内的顺序
        // 否则在SpringBoot 2.0.1及之后的版本中将优先使用Jackson处理。
        converters.add(0, converter);
    }

}
FastJson2.0以上版本无法使用该配置类,暂未知
④ 创建POJO类
package com.aiw.fastjson.pojo;

import lombok.AllArgsConstructor;
import lombok.Data;
import lombok.NoArgsConstructor;

import java.util.Date;

@Data
@NoArgsConstructor
@AllArgsConstructor
public class Book {
    private String name;
    private String author;
    private Double price;
    private Date publishDate;
}
⑤ 创建控制器
package com.aiw.fastjson.controller;

import com.aiw.fastjson.pojo.Book;
import org.springframework.web.bind.annotation.RequestMapping;
import org.springframework.web.bind.annotation.RequestMethod;
import org.springframework.web.bind.annotation.RestController;

import java.util.Date;

@RestController
public class BookController {

    @RequestMapping(value = "/book", method = RequestMethod.POST)
    public Book book() {
        return new Book("PHP", "Aiw", 11.0, new Date());
    }

}
⑥ 测试
Gson
Gson是Google的一个开源JSON解析框架。
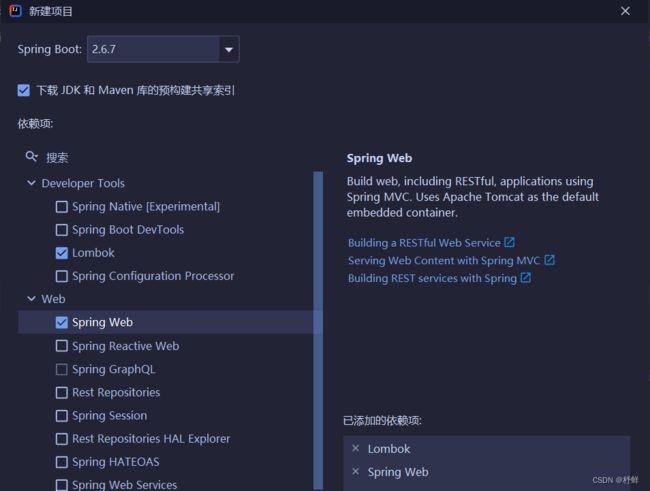
① 搭建SpringBoot工程
使用Spring Initializr快速构建,并勾选如下依赖:
② 引入gson依赖
需要首先排除Spring Boot自带的Jackson,再引入gson依赖,pom.xml中部分修改如下:
<dependency>
    <groupId>org.springframework.bootgroupId>
    <artifactId>spring-boot-starter-webartifactId>
    <exclusions>
        <exclusion>
            <groupId>org.springframework.bootgroupId>
            <artifactId>spring-boot-starter-jsonartifactId>
        exclusion>
    exclusions>
dependency>


<dependency>
    <groupId>com.google.code.gsongroupId>
    <artifactId>gsonartifactId>
dependency>
③ 创建配置类
方式一:返回新的HttpMessageConverter
package com.aiw.gson.config;

import com.google.gson.GsonBuilder;
import org.springframework.context.annotation.Bean;
import org.springframework.context.annotation.Configuration;
import org.springframework.http.converter.json.GsonHttpMessageConverter;

import java.lang.reflect.Modifier;

@Configuration
public class GsonConfig {
    @Bean
    public GsonHttpMessageConverter gsonHttpMessageConverter() {
        //Spring提供了Gson的转换器对象
        GsonHttpMessageConverter converter = new GsonHttpMessageConverter();
        //创建Gson的构建器,通过构建器设置Gson的相关设置
        GsonBuilder gsonBuilder = new GsonBuilder();
        //设置Gson转化时间的格式
        gsonBuilder.setDateFormat("yyyy-MM-dd HH:mm:ss");
        //Gson解析时,它将会过滤被protected修饰的属性
        gsonBuilder.excludeFieldsWithModifiers(Modifier.PROTECTED);
        //创建Gson对象,并传递给转化器
        converter.setGson(gsonBuilder.create());
        return converter;
    }
}
方式二:实现WebMvcConfigurer接口
package com.aiw.gson.config;

import com.google.gson.GsonBuilder;
import org.springframework.http.converter.HttpMessageConverter;
import org.springframework.http.converter.json.GsonHttpMessageConverter;
import org.springframework.web.servlet.config.annotation.WebMvcConfigurer;

import java.lang.reflect.Modifier;
import java.util.List;

public class WebConfig implements WebMvcConfigurer {
    @Override
    public void configureMessageConverters(List<HttpMessageConverter<?>> converters) {
        //Spring提供了Gson的转换器对象
        GsonHttpMessageConverter converter = new GsonHttpMessageConverter();
        //创建Gson的构建器,通过构建器设置Gson的相关设置
        GsonBuilder gsonBuilder = new GsonBuilder();
        //设置Gson转化时间的格式
        gsonBuilder.setDateFormat("yyyy-MM-dd HH:mm:ss");
        //Gson解析时,它将会过滤被protected修饰的属性
        gsonBuilder.excludeFieldsWithModifiers(Modifier.PROTECTED);
        //创建Gson对象,并传递给转化器
        converter.setGson(gsonBuilder.create());
        converters.add(0, converter);
    }
}
方式二设置日期格式在实际测试中并未生效,暂未知原因;推荐使用方式一
④ 创建POJO类
package com.aiw.gson.pojo;

import lombok.AllArgsConstructor;
import lombok.Data;
import lombok.NoArgsConstructor;

import java.util.Date;

@Data
@NoArgsConstructor
@AllArgsConstructor
public class Book {
    private String name;
    private String author;
    private Double price;
    private Date publishDate;
}
⑤ 创建控制器
package com.aiw.gson.controller;

import com.aiw.gson.pojo.Book;
import org.springframework.web.bind.annotation.RequestMapping;
import org.springframework.web.bind.annotation.RequestMethod;
import org.springframework.web.bind.annotation.RestController;

import java.util.Date;

@RestController
public class BookController {

    @RequestMapping(value = "/book", method = RequestMethod.POST)
    public Book book() {
        return new Book("Python", "Aiw", 9.0, new Date());
    }

}
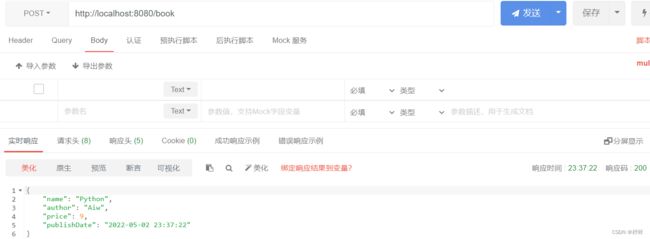
⑥ 测试
解决跨域
方式一:返回新的CorsFilter(全局跨域)
package com.aiw.cors.config;

import org.springframework.context.annotation.Bean;
import org.springframework.context.annotation.Configuration;
import org.springframework.web.cors.CorsConfiguration;
import org.springframework.web.cors.UrlBasedCorsConfigurationSource;
import org.springframework.web.filter.CorsFilter;

import java.util.Arrays;


@Configuration
public class CorsConfig {
    @Bean
    public CorsFilter corsFilter() {
        //1. 添加 CORS配置信息
        CorsConfiguration config = new CorsConfiguration();
        //放行哪些原始域
        config.addAllowedOrigin("*");
        //放行哪些请求方式
        config.addAllowedMethod("*");
        //放行哪些原始请求头部信息
        config.addAllowedHeader("*");
        //暴露哪些头部信息
        config.addExposedHeader("*");
        //2. 添加映射路径
        UrlBasedCorsConfigurationSource corsConfigurationSource = new UrlBasedCorsConfigurationSource();
        corsConfigurationSource.registerCorsConfiguration("/**",config);
        //3. 返回新的CorsFilter
        return new CorsFilter(corsConfigurationSource);
    }
}
方式二:实现WebMvcConfigurer接口(全局跨域)
package com.aiw.cors.config;

import org.springframework.context.annotation.Configuration;
import org.springframework.web.servlet.config.annotation.CorsRegistry;
import org.springframework.web.servlet.config.annotation.WebMvcConfigurer;

@Configuration
public class WebConfig implements WebMvcConfigurer {

    @Override
    public void addCorsMappings(CorsRegistry registry) {
        registry.addMapping("/**")
                .allowedHeaders("*")
                .allowedOrigins("*")
                .exposedHeaders("*")
                .allowedMethods("*")
                .maxAge(3600);  // 默认为 1800 秒
    }
}
方式三:使用注解 @CrossOrigin(局部跨域)
① 在控制器上添加@CrossOrigin注解,那么该控制器下的所有方法都支持跨域。
package com.aiw.cors.controller;

import org.springframework.web.bind.annotation.CrossOrigin;
import org.springframework.web.bind.annotation.RequestMapping;
import org.springframework.web.bind.annotation.RequestMethod;
import org.springframework.web.bind.annotation.RestController;

@CrossOrigin
@RestController
public class CorsController {
    @RequestMapping(value = "/cors", method = RequestMethod.POST)
    public String test() {
        return "test cors";
    }
}
② 直接在相应的请求方法上添加@CrossOrigin注解,那么该方法则支持跨域。
package com.aiw.cors.controller;

import org.springframework.web.bind.annotation.CrossOrigin;
import org.springframework.web.bind.annotation.RequestMapping;
import org.springframework.web.bind.annotation.RequestMethod;
import org.springframework.web.bind.annotation.RestController;

@RestController
public class CorsController {
    @CrossOrigin
    @RequestMapping(value = "/cors", method = RequestMethod.POST)
    public String test() {
        return "test cors";
    }
}
参考博客:SpringBoot解决跨域的5种方式


![[外链图片转存失败,源站可能有防盗链机制,建议将图片保存下来直接上传(img-01YpQlVD-1651554323130)(SpringBoot快速入门(黑马程序员).assets/image-20220430182229663.png)]](http://img.e-com-net.com/image/info8/5a063281d93a4edca12b5e42e3501658.jpg)
