【ONE·Linux || 基础IO(一)】
总言
文件输入与输出相关介绍:语言层面/系统层面文件调用接口举例、文件描述符、重定向说明、缓冲区理解。
文章目录
- 总言
- 1、文件输入与输出
-
- 1.1、预备知识
- 1.2、语言层面:回归C语言中文件相关接口
-
- 1.2.1、打开文件和关闭文件:对当前路径的理解
- 1.2.2、文件读写操作
-
- 1.2.2.1、解释字符串结尾标识符\0,\n
- 1.2.2.2、fopen以 "w" 方式打开文件:引出输出重定向>
- 1.2.2.3、fopen以"a"方式打开文件:引出追加重定向>>
- 1.2.2.4、fopen以"r"方式打开:演示fgets函数,写一个cat命令
- 1.3、系统层面:直接使用系统的文件接口
-
- 1.3.1、打开文件和关闭文件:
-
- 1.3.1.1、open:文件打开
- 1.3.1.2、close:文件关闭
- 1.3.2、文件读写操作
-
- 1.3.2.1、write:如何达到语言层"w"的效果
- 1.3.2.2、write:如何达到语言层"r"的效果
- 1.3.2.3、read:文件读取
- 1.4、分析系统接口的细节:引入fd文件描述符,解释一些周边问题
-
- 1.4.1、fd文件描述符返回值
- 1.4.2、对fd的理解
- 1.4.3、fd分配规则和重定向原理
-
- 1.4.3.1、原理演示
- 1.4.3.2、常规写法
- 1.4.3.3、重新理解Linux下一切皆文件
- 1.4.4、解释缓冲区
-
- 1.4.4.1、问题一:什么是缓冲区?谁提供的?
- 1.4.4.2、问题二:为什么要缓冲区?
- 1.4.4.3、问题三:缓冲区在哪?
1、文件输入与输出
1.1、预备知识
1)、文件操作的范畴
说明:根据之前所学,文件=文件内容+属性(二者都是数据)。因此,用户对文件的操作无外乎①对文件内容的操作、②对文件属性的操作。
2)、文件存放在磁盘(硬件)上,那么谁在访问文件?
说明:访问文件,实际上是编写出的可执行程序加载到内存中,形成进程运行起来,在进程内部执行相关代码,调用到库中相关的函数,从而调用操作系统提供的接口,访问到文件。
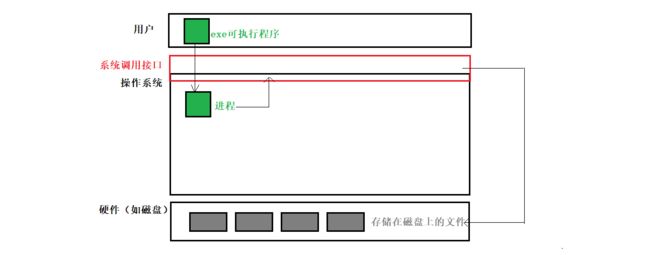
文件类系统调用接口:要向硬件中写入,只有操作系统拥有该权限。作为用户层,若我们需要涉及硬件读写相关,那么操作系统在保护其结构的基础上,需要为我们提供相应的接口。
3)、文件类系统调用接口存在意义
理由一:统一性。为了便捷使用文件类系统调用接口,在上语言层面,对这些接口进行了各自的封装,导致不同的语言间,它们各自的文件访问接口不同(比如各类参数传递、函数名等等)。若单独学习语言级别的文件调用接口,相对繁多且杂,但它们的共性是底层都使用了系统调用接口,在一个平台,OS只有一个,那么这样的接口也就只有一套,便于我们了解学习各类文件输入输出。
理由二:跨平台。实际上,语言级别的系统接口是必要的,若不提供它,所有访问文件的操作,都需要直接使用OS的接口,这样一来所编写的文件代码就无法在在其它OS平台上运行,即不具备跨平台性。
4)、什么是文件
站在系统角度,能够被input读取,或者output写出的设备,就叫做文件。狭义的文件指普通磁盘文件,广义的文件有:显示器、键盘、网卡、声卡、显卡、磁盘等等几乎所有外设。
1.2、语言层面:回归C语言中文件相关接口
1.2.1、打开文件和关闭文件:对当前路径的理解
1)、问题引入
在C语言中,fopen可以打开一个文件,相关函数内容可通过man fopen查阅。在学习C语言时,我们也曾了解过该函数,在一些模式下,若我们打开的文件不存在,则会创建新的文件,因此有了以下问题。

问题:①打开文件时,若文件不存在,则创建文件,是谁执行了创建文件的操作?②创建出的文件默认路径在哪?③为什么是这个默认路径?
2)、说明
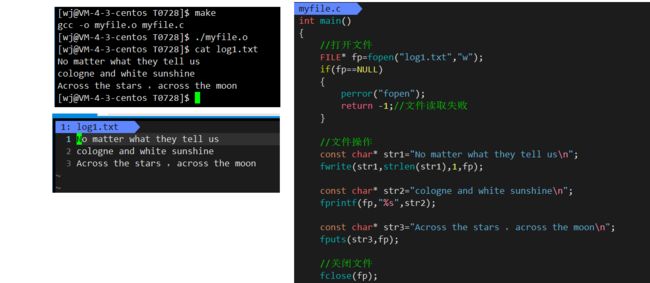
演示所用代码:
#include
1、如下图,当文件不存在时,操作系统会在默认的当前路径下创建文件,那么,①什么叫做当前路径?②当前路径是否等同于源代码路径?
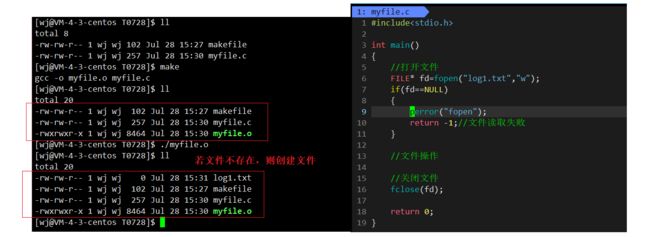
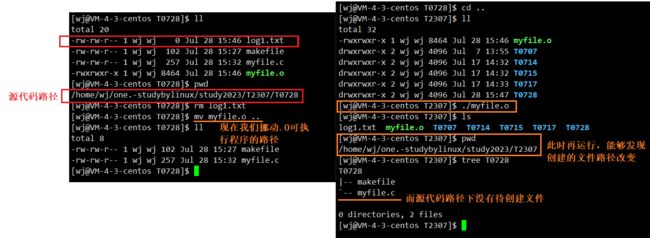
回答②:文件创建的当前路径和源代码路径并不能完全等同,以下为相关验证:所谓的当前路径,通常情况下与可执行程序所在的路径等同,但有些平台也不一致,如window下,VS会将其分文件夹存放。
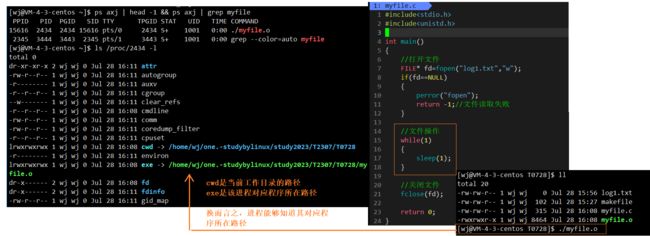
回答①:实际上,进程运行起来,每个进程都会记录自己的exe程序所在路径和cwd当前工作路径,所创建的文件路径正是系统根据cwd路径与fopen中参数path指定的文件名做拼接而成。
若将进程的工作目录cwd改变,则对应创建的文件所在路径也会改变。
1.2.2、文件读写操作
#include
1.2.2.1、解释字符串结尾标识符\0,\n
问题:上述fwrite(str1,strlen(str1),1,fp);中,考虑到字符串结尾为\0,strlen计算时是否需要+1,即fwrite(str1,strlen(str1)+1,1,fp)?

回答:不需要。如上图,计入\0反而读入文件后会在多出一个^@。字符串以\0结尾是C语言的规定(语言层面的规则),文件调用为操作系统执行,系统层面并不需要遵守语言层面的规则,文件中只需要保存有效数据即可。
相关演示代码:
#include
1.2.2.2、fopen以 “w” 方式打开文件:引出输出重定向>
1)、基本解释
       w      Truncate  file  to zero length or create text file for writing.  The stream
              is positioned at the beginning of the file.
以"w"方式读写文件在上述我们已经基本演示过,此处主要来探讨其细节部分:
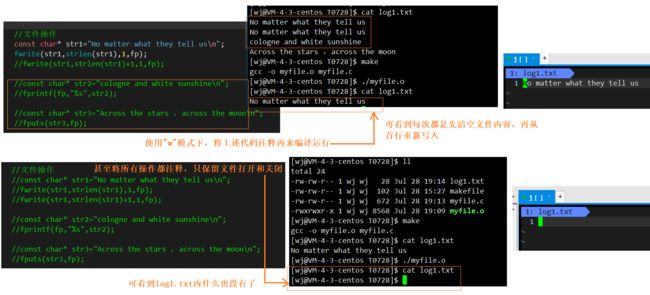
2)、重定向引入
对于输出重定向,其类似于此处的"w",会产生清空文件内容并重头开始写入的效应。
[wj@VM-4-3-centos T0728]$ echo Everything has its time > log1.txt
[wj@VM-4-3-centos T0728]$ cat log1.txt
Everything has its time
[wj@VM-4-3-centos T0728]$ > log1.txt
[wj@VM-4-3-centos T0728]$ cat log1.txt
[wj@VM-4-3-centos T0728]$
1.2.2.3、fopen以"a"方式打开文件:引出追加重定向>>
1)、基本解释
       r      Open  text  file for reading.  The stream is positioned at the beginning of
              the file.

2)、重定向引入
对于追加重定向,其类似于此处的"r"操作,会不断向文件中新增内容。
[wj@VM-4-3-centos T0728]$ echo Return To Innocence >>log1.txt
[wj@VM-4-3-centos T0728]$ cat log1.txt
so keep your head up
so keep your head up
so keep your head up
so keep your head up
Return To Innocence
[wj@VM-4-3-centos T0728]$
上述小结相关代码如下:
#include
1.2.2.4、fopen以"r"方式打开:演示fgets函数,写一个cat命令
1)、基本解释
#include 相关演示如下:fgets(buffer,sizeof(buffer),fp),fp指向log1.txt,故fgets读取到文件,并将其内容逐行打印到显示器上fprintf(stdout,"%s",buffer);。

代码如下:
#include
2)、写一个cat命令
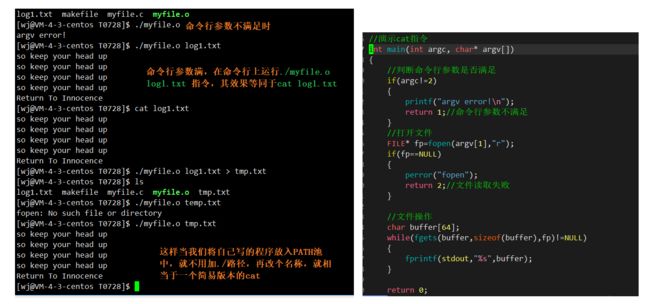
基于上述操作,广义角度显示器等外设也是文件,我们可以照猫画虎写一个简易的cat指令,要求为读取命令行参数,并将其内容显示到显示器上。相关演示如下:
#include[wj@VM-4-3-centos T0728]$ ls
log1.txt makefile myfile.c myfile.o
[wj@VM-4-3-centos T0728]$ ./myfile.o
argv error!
[wj@VM-4-3-centos T0728]$ ./myfile.o log1.txt
so keep your head up
so keep your head up
so keep your head up
so keep your head up
Return To Innocence
[wj@VM-4-3-centos T0728]$ cat log1.txt
so keep your head up
so keep your head up
so keep your head up
so keep your head up
Return To Innocence
[wj@VM-4-3-centos T0728]$ ./myfile.o log1.txt > tmp.txt
[wj@VM-4-3-centos T0728]$ ls
log1.txt makefile myfile.c myfile.o tmp.txt
[wj@VM-4-3-centos T0728]$ ./myfile.o temp.txt
fopen: No such file or directory
[wj@VM-4-3-centos T0728]$ ./myfile.o tmp.txt
so keep your head up
so keep your head up
so keep your head up
so keep your head up
Return To Innocence
[wj@VM-4-3-centos T0728]$
1.3、系统层面:直接使用系统的文件接口
1.3.1、打开文件和关闭文件:
1.3.1.1、open:文件打开
1)、语言库接口和系统调用接口的上下层关系
C语言库函数接口:fopen、fclose、fread、fwrite
系统接口:open、close、read、write
可以认为,f#系列的函数,都是对系统调用的封装。
2)、open文件打开相关参数介绍与演示
man open:可查看关于open的相关介绍
NAME
open, creat - open and possibly create a file or device
SYNOPSIS
#include 说明:
pathname: 要打开或创建的目标文件
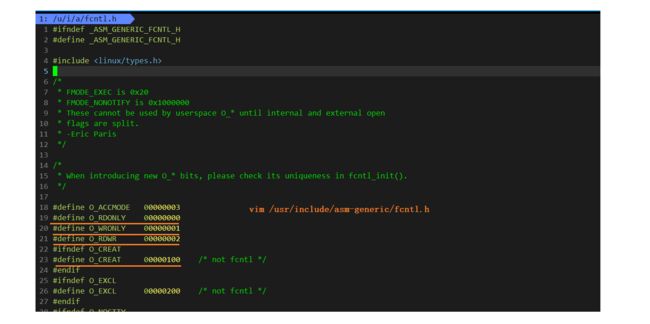
flags: 打开文件时,可以传入多个参数选项,用下面的一个或者多个常量进行“或”运算,构成flags。参数如下:
O_RDONLY: 只读打开
O_WRONLY: 只写打开
O_RDWR : 读,写打开
PS:上述三个常量,必须指定一个且只能指定一个。
O_CREAT : 若文件不存在,则创建它。需要使用mode选项,来指明新文件的访问权限
O_APPEND: 追加写
返回值: 若成功则返回新打开的文件描述符(file descriptor), 若失败则返回-1。
RETURN VALUE
       open() and creat() return the new file descriptor,
       or -1 if an error occurred (in which case, errno is set appropriately).
如何给函数传递标志位?(对flags的认识理解)
如上,flags中传入参数为一个个宏定义,那么,如何使用这些宏该?它们是怎么达成对应效果的?
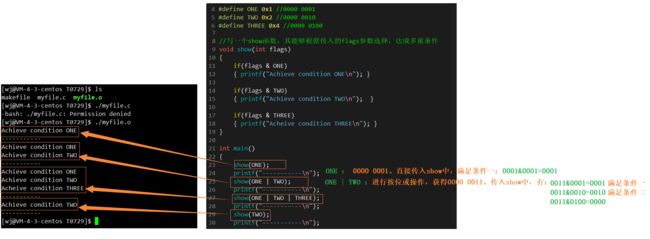
实际上,我们将flags这类选项称之为函数标记位,如上述int flags,该参数需要具有传入多个参数的能力,而要达到此效果,可根据参数类型(int整形,32位下32个比特位),使用不同比特位表示不同种参数选项。以下为一个简单的演示例子:
#include
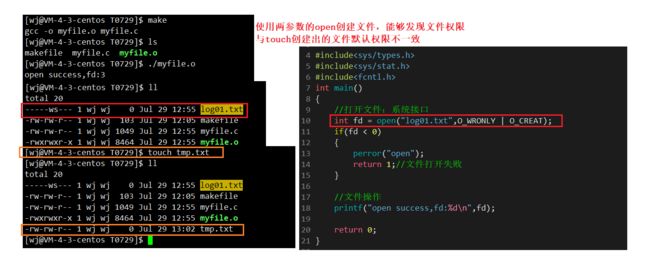
演示一:如何使用这两个open
函数声明如下:
       int open(const char *pathname, int flags);
       int open(const char *pathname, int flags, mode_t mode);
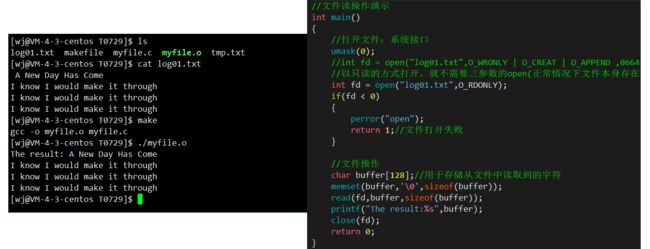
说明一:通常,只含两个参数的open适用于文件存在的情况。代码如下:
#include演示结果如下:
[wj@VM-4-3-centos T0729]$ ls
makefile  myfile.c
[wj@VM-4-3-centos T0729]$ make
gcc -o myfile.o myfile.c

[wj@VM-4-3-centos T0729]$ ls //可看到不存在文件log01.txt
makefile  myfile.c  myfile.o
[wj@VM-4-3-centos T0729]$ ./myfile.o //运行后显示open打开失败
open: No such file or directory
演示二:成功获取返回值
说明二: 实际上,我们在应用层看到的一个简单的操作,在系统层面可能会经过繁杂的操作才能得到。例如上述,在库函数层面,我们使用"w"以写的方式打开文件时,若文件不存在则会创建文件。这里我们以O_WRONLY写的方式打开,但实际上并未创建不存在文件,这就需要我们在flags文件标志位中传入多个参数。以下为相关演示:
相比于上述只是对flags参数传入做了小改动:int fd=open("log01.txt",O_WRONLY | O_CREAT);,
[wj@VM-4-3-centos T0729]$ make
gcc -o myfile.o myfile.c
[wj@VM-4-3-centos T0729]$ ls
makefile  myfile.c  myfile.o
[wj@VM-4-3-centos T0729]$ ./myfile.o
open success,fd:3 //可以看到成功获取返回值,即文件标记符fd=3。
[wj@VM-4-3-centos T0729]$
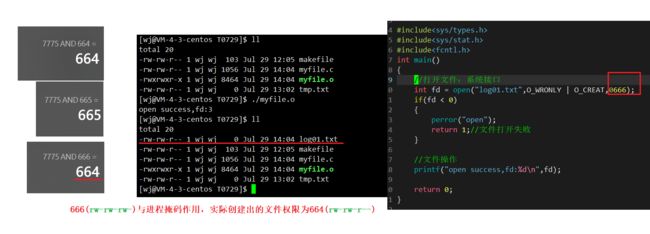
演示三:若文件不存在,需要使用带三个参数的open,第三个参数mode可设置文件默认权限
以下为man open中关于mode的部分节选内容,需要注意,实际创建出来的文件权限是(mode & ~umask)共同作用的结果。
              mode specifies the permissions to use in case a new file is created.  This argument must be supplied
              when  O_CREAT  is  specified in flags; if O_CREAT is not specified, then mode is ignored.
              The effective permissions are modified by the process's umask in the usual way: The  permissions
              of the created file are (mode & ~umask).  Note that this mode applies only to future accesses of
              the newly created file; the open() call  that  creates  a  read-only  file  may  well  return  a
              read/write file descriptor.

              The following symbolic constants are provided for mode:

              S_IRWXU  00700 user (file owner) has read, write and execute permission

              S_IRUSR  00400 user has read permission

              S_IWUSR  00200 user has write permission

              S_IXUSR  00100 user has execute permission
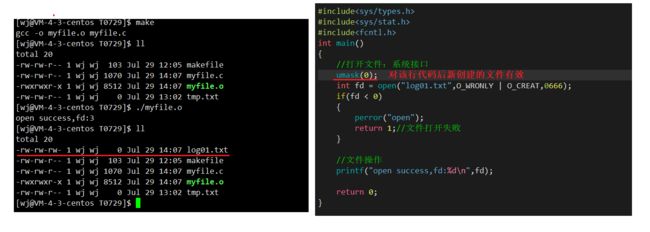
若我们希望传递参数时,Mode输入的权限不受umask影响,即输入0666就是0666,那么可以使用系统函数umask来解决。umask(0),清除配置中0002带来的影响,将当前程序中所创建的文件权限掩码设置为0000。
NAME
umask - set file mode creation mask
SYNOPSIS
#include 1.3.1.2、close:文件关闭
man colse可查看相关函数具体介绍,我们只用根据打开文件所提供的文件描述符,即可关闭对应文件。
NAME
close - close a file descriptor
SYNOPSIS
#include
1.3.2、文件读写操作
1.3.2.1、write:如何达到语言层"w"的效果
1)、write声明介绍和使用
man 2 write:
NAME
write - write to a file descriptor
SYNOPSIS
#include 演示代码如下:
#include 演示结果如下:
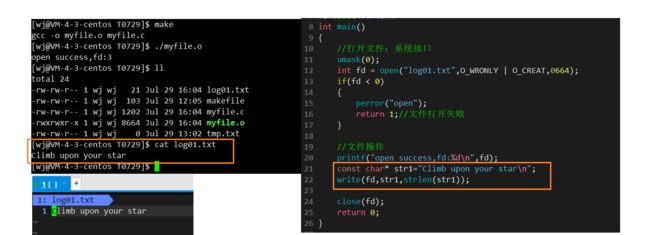
2)、“w”:清空文件内容,每次都从首行写入
问题说明:以下也验证了语言层面看似简单的操作,实则系统层面有时会做多项处理。
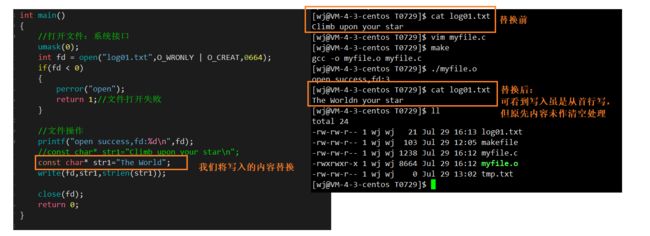
要达到上层语言库里的fopen(“XXX”,“w”)的调用效果,则在open文件时,对flags参数继续添加选项:O_WRONLY|O_CREAT|O_TRUNC
       O_TRUNC
              If the file already exists and is a regular file and the open  mode  allows
              writing (i.e., is O_RDWR or O_WRONLY) it will be truncated to length 0.  If
              the file is a FIFO or terminal device file, the O_TRUNC  flag  is  ignored.
              Otherwise the effect of O_TRUNC is unspecified.
int main()
{
    //打开文件:系统接口
    umask(0);
    int fd = open("log01.txt",O_WRONLY | O_CREAT | O_TRUNC ,0664);
    if(fd < 0)
    {
        perror("open");
        return 1;//文件打开失败
    }

    //文件操作
    printf("open success,fd:%d\n",fd);
    //const char* str1="Climb upon your star\n";
    const char* str1="The World";
    write(fd,str1,strlen(str1));
	//文件关闭
    close(fd);
    return 0;
}
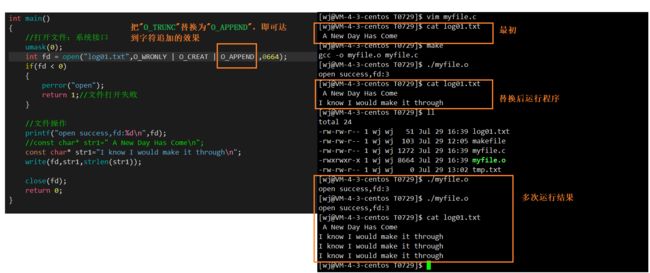
1.3.2.2、write:如何达到语言层"r"的效果
       O_APPEND
              The file is opened in append mode.  Before each write(2), the  file  offset
              is  positioned  at  the end of the file, as if with lseek(2).  O_APPEND may
              lead to corrupted files on NFS  file  systems  if  more  than  one  process
              appends  data  to  a  file  at  once.  This is because NFS does not support
              appending to a file, so the client kernel has to simulate it,  which  can't
              be done without a race condition.
代码如下:
#include
1.3.2.3、read:文件读取
NAME
read - read from a file descriptor
SYNOPSIS
#include 演示代码如下:
#include
1.4、分析系统接口的细节:引入fd文件描述符,解释一些周边问题
1.4.1、fd文件描述符返回值
1)、问题引入与阶段理解一
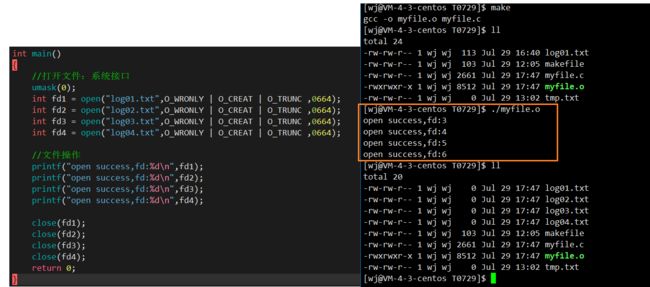
问题引入: 连续创建多个文件,观察其返回值文件描述符(file descriptor),发现fd是从3开始。为什么会存在这样的现象?
相关代码:
int main()
{
    //打开文件:系统接口
    umask(0);
    int fd1 = open("log01.txt",O_WRONLY | O_CREAT | O_TRUNC ,0664);
    int fd2 = open("log02.txt",O_WRONLY | O_CREAT | O_TRUNC ,0664);
    int fd3 = open("log03.txt",O_WRONLY | O_CREAT | O_TRUNC ,0664);
    int fd4 = open("log04.txt",O_WRONLY | O_CREAT | O_TRUNC ,0664);

    //文件操作
    printf("open success,fd:%d\n",fd1);
    printf("open success,fd:%d\n",fd2);
    printf("open success,fd:%d\n",fd3);
    printf("open success,fd:%d\n",fd4);

    close(fd1);
    close(fd2);
    close(fd3);
    close(fd4);
    return 0;
}
2)、验证0、1、2对应stdin、stdout、stderr
说明: Linux进程默认情况下会有3个缺省打开的文件描述符,分别是标准输入0(stdin), 标准输出1(stdout), 标准错误2(stderr),对应的物理设备一般是:键盘,显示器,显示器。
验证代码如下:
int main()
{
    //对stdout
    fprintf(stdout,"hello stdout!\n");
    const char* s1="hello 1!\n";
    write(1,s1,strlen(s1));//系统调用接口,fd=1,用于验证是否对应stdout

    printf("----------------\n");

    //对stdin
    int a=0;
    printf("stdin|输入整数a的值:");
    fscanf(stdin,"%d",&a);
    printf("stdin|实际读取a=%d\n",a);

    printf("fd=0| 输入字符串:");
    fflush(stdout);
    char buffer[20]="";
    ssize_t ret=read(0,buffer,sizeof(buffer));//系统调用接口,fd=0,用于验证是否对应stdin
    if(ret>0)//read会返回读取到的实际值个数
    {
        buffer[ret]='\n';
        printf("fd=0|实际读取::%s\n",buffer);
    }

    return 0;
}
验证结果如下:
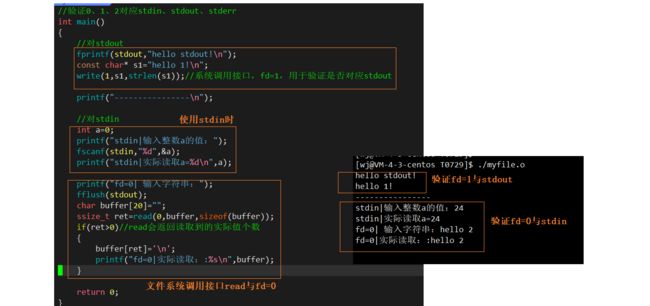
3)、说明0、1、2与默认的三个标准文件之间的关系(FILE和fd)
在C语言中,我们曾学习了解过文件指针:
每个被使用的文件都在内存中开辟了一个相应的文件信息区,用来存放文件的相关信息(如文件的名字,文件状态及文件当前的位置等)。这些信息是保存在一个结构体变量中的。该结构体类型是有系统声明的,取名
FILE.
FILE *fopen(const char *path, const char *mode);
需要知道,FILE这类结构体是由C标准库提供的,若要对文件读写则需通过OS操作系统,那么这类库函数中需要封装系统调用接口,也就意味着,系统层面只认识文件描述符fd,那么上层语言库中FILE内一定封装有fd。
相关验证查看:
//验证FILE内封装有fd
int main()
{
    printf("stdin:%d\n",stdin->_fileno);
    printf("stdout:%d\n",stdout->_fileno);
    printf("stderr:%d\n",stderr->_fileno);
    return 0;
}
1.4.2、对fd的理解
问题一:一个进程可以打开多个文件吗?
回答:进程要访问文件,就需要打开文件,一般而言,一个进程可以打开多个文件。
问题二:内核中是否需要管理打开的文件?如何管理文件?
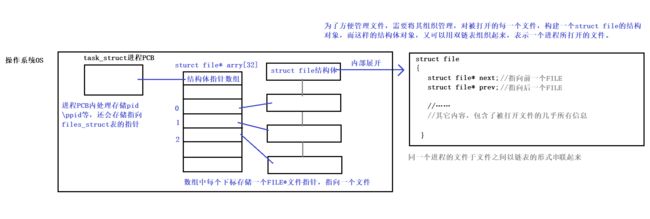
回答:需要。当操作系统中存在多个进程并且进程内部打开了文件,势必导致操作系统中存在大量被打开的文件。为了方便操作系统管理,对于这些文件则需要进行组织管理。
说明:当我们打开文件时,操作系统在内存中要创建相应的数据结构来描述目标文件。于是就有了file结构体,表示一个已经打开的文件对象。

问题三:那么,进程和文件如何建立对应关系?
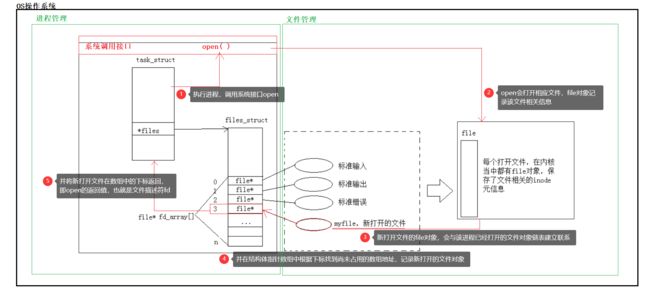
进程执行open系统调用,所以必须让进程和文件关联起来。每个进程都有一个指针*files,指向一张表files_struct,该表最重要的部分就是包含一个指针数组,每个元素都是一个指向打开文件的指针!
问题四:那么,文件描述符fd在内核中究竟是什么呢?
如下述:fd实际为数组的下标(文件描述符表)。所以,只要拿着文件描述符,就可以找到对应的文件。同时也将进程管理与文件管理联系起来。
1.4.3、fd分配规则和重定向原理
1.4.3.1、原理演示
1)、fd文件描述符分配规则说明
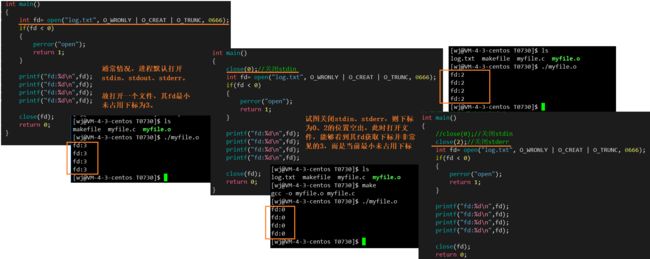
结论:在files_struct数组当中,找到当前没有被使用的最小的一个下标,作为新的文件描述符。
验证结果如下:
相关验证代码:
#include
2)、解释输出重定向
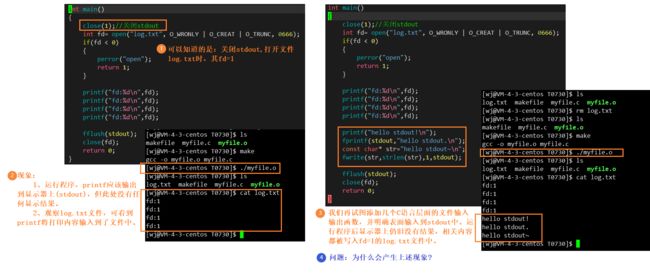
上述代码演示了关闭stdin和stderr,假如我们关闭stdout,会产生什么结果?以下为相关演示:
演示代码:
int main()
{
    close(1);//关闭stdout
    int fd= open("log.txt", O_WRONLY | O_CREAT | O_TRUNC, 0666);
    if(fd < 0)
    {
        perror("open");
        return 1;
    }

    printf("fd:%d\n",fd);
    printf("fd:%d\n",fd);
    printf("fd:%d\n",fd);
    printf("fd:%d\n",fd);

    printf("hello stdout!\n");
    fprintf(stdout,"hello stdout.\n");
    const char* str="hello stdout~\n";
    fwrite(str,strlen(str),1,stdout);

    fflush(stdout);
    close(fd);
    return 0;
}
可以看到原先输出到显示器上的内容,现如今输出到了文件中。为什么会产生这个现象?
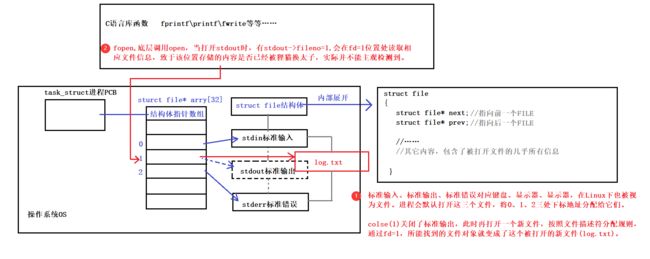
由此,就形成了输出重定向。实际上,重定向就是在OS内部,更改fd对应的内容指向。
2)、解释追加重定向
同理可得追加重定向,只是open中打开模式做了变动。
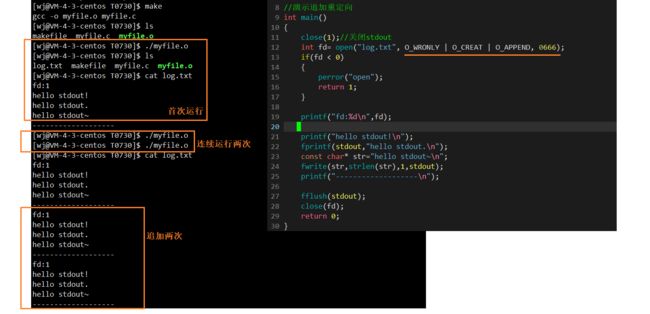
相关代码如下:
[wj@VM-4-3-centos T0730]$ make
gcc -o myfile.o myfile.c
[wj@VM-4-3-centos T0730]$ ls
makefile  myfile.c  myfile.o
[wj@VM-4-3-centos T0730]$ ./myfile.o
[wj@VM-4-3-centos T0730]$ ls
log.txt  makefile  myfile.c  myfile.o
[wj@VM-4-3-centos T0730]$ cat log.txt
fd:1
hello stdout!
hello stdout.
hello stdout~
-------------------
[wj@VM-4-3-centos T0730]$ ./myfile.o
[wj@VM-4-3-centos T0730]$ ./myfile.o
[wj@VM-4-3-centos T0730]$ cat log.txt
fd:1
hello stdout!
hello stdout.
hello stdout~
-------------------
fd:1
hello stdout!
hello stdout.
hello stdout~
-------------------
fd:1
hello stdout!
hello stdout.
hello stdout~
-------------------
[wj@VM-4-3-centos T0730]$
#include
3)、解释输入重定向
原理相同,只是此处open以读的方式打开,且关闭的是fd=0。
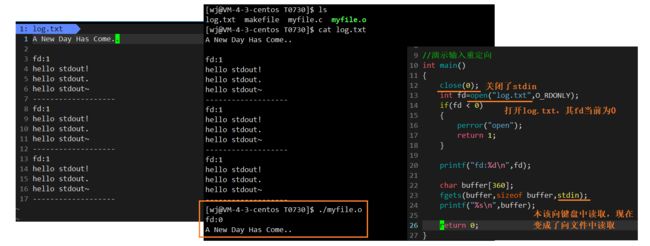
相关代码如下:
//演示输入重定向
int main()
{
    close(0);
    int fd=open("log.txt",O_RDONLY);
    if(fd < 0)
    {
        perror("open");
        return 1;
    }

    printf("fd:%d\n",fd);

    char buffer[360];
    fgets(buffer,sizeof buffer,stdin);
    printf("%s\n",buffer);

    return 0;
}
[wj@VM-4-3-centos T0730]$ ls
log.txt  makefile  myfile.c  myfile.o
[wj@VM-4-3-centos T0730]$ cat log.txt
A New Day Has Come..

fd:1
hello stdout!
hello stdout.
hello stdout~
-------------------
fd:1
hello stdout!
hello stdout.
hello stdout~
-------------------
fd:1
hello stdout!
hello stdout.
hello stdout~
-------------------
[wj@VM-4-3-centos T0730]$ ./myfile.o
fd:0
A New Day Has Come..
1.4.3.2、常规写法
实际上,我们无需向上述一样打开文件、关闭文件,这里有相关的函数可使用man dup
NAME
dup, dup2, dup3 - duplicate a file descriptor
SYNOPSIS
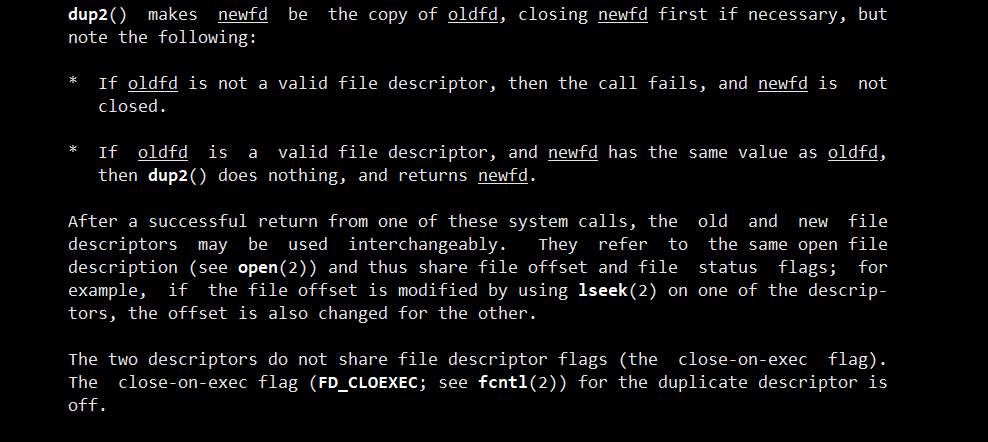
#include 这里主要介绍dup2:关闭原先newfd对应的文件,并将oldfd赋值给newfd。
       dup2()  makes  newfd  be  the copy of oldfd, closing newfd first if necessary, but
       note the following:

       *  If oldfd is not a valid file descriptor, then the call fails, and newfd is  not
          closed.

       *  If  oldfd  is  a  valid file descriptor, and newfd has the same value as oldfd,
          then dup2() does nothing, and returns newfd.

       After a successful return from one of these system calls, the  old  and  new  file
       descriptors  may  be  used  interchangeably.   They  refer  to  the same open file
       description (see open(2)) and thus share file offset and file  status  flags;  for
       example,  if  the file offset is modified by using lseek(2) on one of the descrip‐
       tors, the offset is also changed for the other.

       The two descriptors do not share file descriptor flags (the  close-on-exec  flag).
       The  close-on-exec flag (FD_CLOEXEC; see fcntl(2)) for the duplicate descriptor is
       off.
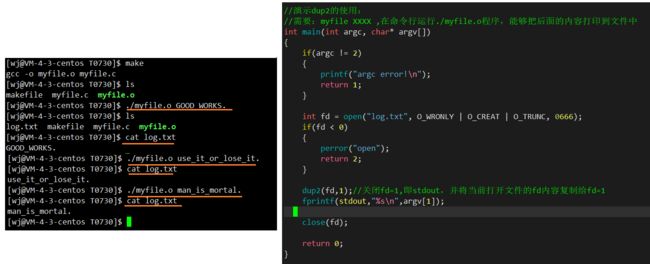
演示代码:
//演示dup2的使用:
//需要:myfile XXXX ,在命令行运行./myfile.o程序,能够把后面的内容打印到文件中
int main(int argc, char* argv[])
{
    if(argc != 2)
    {
        printf("argc error!\n");
        return 1;
    }

    int fd = open("log.txt", O_WRONLY | O_CREAT | O_TRUNC, 0666);
    if(fd < 0)
    {
        perror("open");
        return 2;
    }

    dup2(fd,1);//关闭fd=1,即stdout,并将当前打开文件的fd内容复制给fd=1
    fprintf(stdout,"%s\n",argv[1]);

    close(fd);

    return 0;
}
[wj@VM-4-3-centos T0730]$ make
gcc -o myfile.o myfile.c
[wj@VM-4-3-centos T0730]$ ls
makefile  myfile.c  myfile.o

[wj@VM-4-3-centos T0730]$ ./myfile.o GOOD_WORKS.
[wj@VM-4-3-centos T0730]$ ls
log.txt  makefile  myfile.c  myfile.o
[wj@VM-4-3-centos T0730]$ cat log.txt
GOOD_WORKS.

[wj@VM-4-3-centos T0730]$ ./myfile.o use_it_or_lose_it.
[wj@VM-4-3-centos T0730]$ cat log.txt
use_it_or_lose_it.

[wj@VM-4-3-centos T0730]$ ./myfile.o man_is_mortal.
[wj@VM-4-3-centos T0730]$ cat log.txt
man_is_mortal.
同理可得追加重定向、输入重定向。
1.4.3.3、重新理解Linux下一切皆文件
将底层寻找其共同规律,使用结构体对象struct file统一管理起来。这样虽然底层的硬件不同, 对应的操作方法不同,但在上层角度,每个设备的核心访问函数都是一样的,read、wirte、I/O等等,只是其内部具体实现不同。
上层整体看到的是struct file结构,这是完全一致的,故而可一视同仁,将所有硬件视为文件对待。
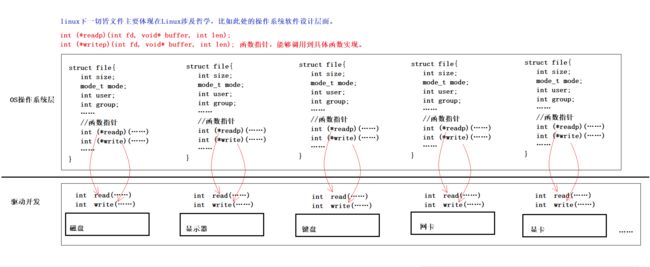
这样的设计方案称之为VFS虚拟文件系统。
1.4.4、解释缓冲区
1.4.4.1、问题一:什么是缓冲区?谁提供的?
说明:缓冲区实际上是一段内存空间,用于临时存储数据。
验证代码如下:
int main()
{
    //使用C语言提供的接口
    printf("hello printf\n");
    fprintf(stdout,"hello fprintf\n");
    const char* s="hello fputs\n";
    fputs(s,stdout);

    //使用系统提供的接口
    const char* s2="hello write\n";
    write(1,s2,strlen(s2));

    //fork();//创建子进程
    return 0;
}
验证结果入下:可以初步判断,缓冲区是有语言层面提供的。那么,为什么fork存在影响?缓冲区在这里做了什么?(相关回答见下述小节三)

1.4.4.2、问题二:为什么要缓冲区?
1)、写透模式和写回模式
在用户角度,缓冲区的一个意义在于方便。在系统层面,缓冲区可以提高整机效率,从而提高用户的影响速度。
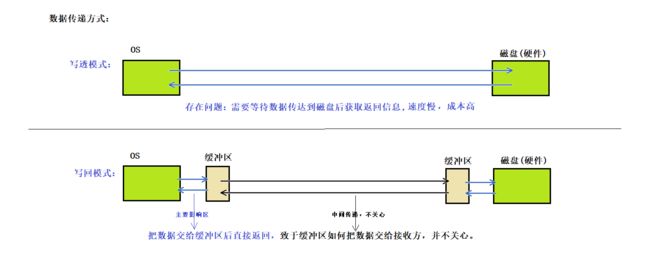
如上图,写透模式(WT)下存在一定问题,因此引入缓冲区,从而能提高整体效率,而后者称之为写回模式(WB)。
2)、缓冲区刷新策略
正常情况下:
1、立即刷新
2、行刷新(行缓冲):\n
3、满缓冲(全缓冲)
特殊情况:
1、用户强中刷新:fflush
2、进程退出
PS:根据小节一,缓冲区由上层语言提供,对应的,它也需要维护缓冲区的刷新策略。
3)、对缓冲区的认识
说明: 一般而言,所有设备倾向于全缓冲,在缓冲区填满后才一次性刷新。这样可以减少IO次数,更少的访问外设,以便提高效率。(PS:OS和外设进行IO操作时,影响效率的主要矛盾不是传输数据量的大小,而是IO过程本身。)虽然如此,但缓冲区具体刷新策略要结合实际情况做妥协。
常见情况说明: 行缓冲设备文件为显示器,全缓冲设备文件为磁盘。
1.4.4.3、问题三:缓冲区在哪?
1)、问题解释
//验证缓冲区提供者
int main()
{
    //使用C语言提供的接口
    printf("hello printf\n");
    fprintf(stdout,"hello fprintf\n");
    const char* s="hello fputs\n";
    fputs(s,stdout);

    //使用系统提供的接口
    const char* s2="hello write\n";
    write(1,s2,strlen(s2));

    //fork();//创建子进程
    return 0;
}
在小节一中曾遗留下一个问题,即为什么fork创建子进程后,向显示器输出和向文件中输出,获取结果会不同?

1、对fork,首先要明确的是,fork创建子进程,虽然代码执行完成,但并不代表该串代码内涉及到的数据已经刷新。那么不进行进程替换时,子进程的代码数据来源于父进程,将文件刷新的过程是一种写入的过程,发生写时拷贝,子进程将获得自己的一份数据。
2、使用库函数的文件函数,进程会将数据交给缓冲区,缓冲区内数据再转交给内核结构。
3、向显示器打印,缓冲区的刷新策略是行刷新,上述打印内容均以\n结尾,满足行刷新策略。执行fork时,一定是函数执行完成,且缓冲区内数据也刷新完成。所以此时即使子进程写时拷贝,缓冲区内也无相关数据。
4、使用重定向向磁盘中打印,即使有\n,但实则执行的是满刷新(全缓冲)。fork执行时,虽然函数已经执行完成,但被打印数据保存在缓冲区中,该数据属于父进程数据,子进程发生写时拷贝时,也会一并复制一份。
5、此处演示案例中,fork之后无后续代码执行,那么面临进程退出,进程退出会使得缓冲区刷新,因此父子进程各自刷新其数据。
2)、说明
1、实际上,语言库为我们提供的是用户级缓冲区,实际操作系统层面还有一个内核级缓冲区。
2、先前内容我们知道了struct FILE结构内部封装了fd,实际上其中还封装有该文件fd所对应的语言层面的缓冲区结构。
