【框架篇】MyBatis 介绍及使用(详细教程)
一,MyBatis 介绍
MyBatis 是一款优秀的持久层框架,它支持自定义 SQL、存储过程以及高级映射。MyBatis 免除了几乎所有的 JDBC 代码以及设置参数和获取结果集的工作。MyBatis 可以通过简单的 XML 或注解来配置和映射原始类型、接口和 Java POJO(Plain Old Java Objects,普通老式 Java 对象)为数据库中的记录。
简单来说,MyBatis是一个开源的持久层框架,它提供了一种简单且强大的方式来与关系型数据库进行交互。MyBatis通过使用XML或注解来定义数据库操作,并通过原生的SQL查询语句与数据库进行交互。
总之,MyBatis是一个轻量级、易于学习且功能强大的持久层框架,适用于各种规模的Java应用程序。它通过简化数据库访问的过程,提高了开发效率和代码的可维护性。MyBatis官网地址
二,MyBatis 用途
对于后端开发来说。程序是由后端程序和数据库这两个重要的部分组成的,而这两个重要的组成部分要通讯,需要依靠数据库连接工具。
而数据库连接工具有哪些呢? 常用来作为数据库连接工具的有JDBC,但是 JDBC 的操作步骤比较繁琐。
JDBC 的操作步骤主要分为以下几步:
- 创建一个数据源对象
- 设置数据源对象的属性
- 通过数据源对象获取数据库连接对象
- 构造SQL执行语句
- 通过连接对象创建预编译的SQL语句执行对象
- 执行SQL语句,并获取结果集
- 释放结果集,预编译的SQL语句执行对象和数据库连接对象
使用 JDBC 进行数据库表查询操作具体实现代码:
//导入java.sql包中的相关类
import java.sql.Connection;
import java.sql.PreparedStatement;
import java.sql.ResultSet;
import java.sql.SQLException;

//导入javax.sql包中的相关类
import javax.sql.DataSource;

//导入com.mysql.cj.jdbc包中的MysqlDataSource类
import com.mysql.cj.jdbc.MysqlDataSource;


public class JDBCSelectDemo {
    public static void main(String[] args) throws SQLException {
        //创建一个数据源对象
        DataSource dataSource = new MysqlDataSource();

        //设置数据源对象的属性
        ((MysqlDataSource)dataSource).setUrl("jdbc:mysql://127.0.0.1:3306/itcast?characterEncoding=utf8&useSSL=false");
        ((MysqlDataSource)dataSource).setUser("root");
        ((MysqlDataSource)dataSource).setPassword("123456");

        //通过数据源对象获取数据库连接对象
        Connection connection = dataSource.getConnection();

        //准备SQL查询语句
        String sql = "select * from student";

        //通过连接对象创建预编译的SQL语句执行对象
        PreparedStatement statement = connection.prepareStatement(sql);

        //执行SQL查询,并获取查询结果集
        ResultSet resultSet = statement.executeQuery();

        //遍历查询结果集,输出每一条记录的id和name字段值
        while(resultSet.next()){
            int id = resultSet.getInt("id");
            String name = resultSet.getString("name");
            System.out.println("id = " + id + ", name = " + name);
        }

        //关闭查询结果集、预编译的SQL语句执行对象和数据库连接对象
        resultSet.close();
        statement.close();
        connection.close();
    }
}
从上述代码和操作流程可以看出,对于 JDBC作为数据库连接工具来说,整个操作流程是非常的繁琐,我们不但要拼接每一个参数,而且还要按照模板代码的方式,一步步的操作数据库,并且在每次操作完数据库后,还要进行手动关闭连接等,最主要的还是所有的这些操作步骤都需要在每个方法中重复书写,导致代码冗余和增加了代码的工作量。
那有没有一种方法,可以更简单、更方便的操作数据库呢?
当然是有的,使用MyBatis就可以很好地解决上述的问题,它可以帮助我们更方便,更快速的操作数据库。
三,MyBatis 使用
MyBatis 的使用分为两部分,分别为:MyBatis开发环境的配置,使用MyBatis模式和语法操作数据库。
1,数据库和数据表的创建
1.1,数据库和数据表创建
-- 创建数据库
drop database if exists itcast;
create database itcast DEFAULT CHARACTER SET utf8mb4;

-- 使用数据数据
use itcast;

-- 创建表[用户表]
drop table if exists  userinfo;
create table userinfo(
    id int primary key auto_increment,
    username varchar(100) not null,
    password varchar(32) not null,
    photo varchar(500) default '',
    createtime timestamp default current_timestamp,
    updatetime timestamp default current_timestamp,
    `state` int default 1
) default charset 'utf8mb4';

-- 添加一个用户信息
INSERT INTO `itcast`.`userinfo` (`id`, `username`, `password`, `photo`, `createtime`, `updatetime`, `state`) VALUES
(1, 'admin', 'admin', '', '2021-12-06 17:10:48', '2021-12-06 17:10:48', 1);
2,MyBatis开发环境的配置
2.1,添加MyBatis框架支持
添加MyBatis框架支持分为两种情况,一种情况是对自己之前的 Spring 项目进行升级,另一种情况是创建一个全新的 MyBatis 和 Spring Boot的项目,下面分别来演示这两种情况的具体实现。
新项目添加MyBatis框架支持流程:
1,创建Spring Boot 项目,注意标记的两个属性选项。
2,选择项目版本为2.7.14,并勾选MyBatis Framework,MySQL Driver 这两个框架支持。
老项目添加MyBatis框架支持流程:
1,在老项目的pom.xml文件中添加MyBatis框架依赖,框架依赖为:
<dependency>
    <groupId>org.mybatis.spring.bootgroupId>
    <artifactId>mybatis-spring-boot-starterartifactId>
    <version>2.1.4version>
dependency>

<dependency>
    <groupId>mysqlgroupId>
    <artifactId>mysql-connector-javaartifactId>
    <version>5.1.38version>
    <scope>runtimescope>
dependency>
2,添加依赖后,重新加载项目
2.2,设置MyBatis配置信息
1)设置数据库连接的相关信息
在配置文件 application.yml 中设置数据库连接的相关信息,配置如下:
spring:
  datasource:
    url: jdbc:mysql://127.0.0.1:3306/mycnblog?characterEncoding=utf8&useSSL=false
    username: root
    password: '123456'
    driver-class-name: com.mysql.cj.jdbc.Driver
注意说明:如果使用的mysql-connector-java是 5.x 版本之前,driver-class-name的参数值应设置为com.mysql.jdbc.Driver,如果版本大于5.x,driver-class-name的参数值应设置为com.mysql.cj.jdbc.Driver。
2)设置MyBatis xml保存路径
设置MyBatis xml保存路径,xml 文件中保存是对数据库的具体操作SQL,配置如下:
mybatis:
  mapper-locations: classpath:mybatis/*Mapper.xml
3)启动MyBatis项目
在设置好MyBatis配置信息后,运行启动MyBatis项目,观察能否成功运行,如果项目成功运行,说明配置成功。
3,MyBatis开发流程
3.1,根据xml保存路径创建包
3.2,添加实体类对象
在 Java 目录下创建一个实体类包用来存放各种实体类,其中就包含UserEntity实体类。
添加UserEntity 实体类代码:
package com.example.mybatis.entity;
import lombok.Data;
import java.time.LocalDateTime;
@Data
public class UserEntity {
    private int id;
    private String username;
    private String password;
    private String photo;
    private LocalDateTime createTime;
    private LocalDateTime updateTime;
}
3.3,添加 mapper 接口
数据库持久层UserMapper接口定义代码:
package com.example.mybatis.mapper;
import com.example.mybatis.entity.UserEntity;
import org.apache.ibatis.annotations.Mapper;
import java.util.List;
@Mapper
public interface UserMapper {
    List<UserEntity> getAll();
}
注意说明:创建好UserMapper类后立即在类上添加@Mapper注解,该注解源自org.apache.ibatis.annotations.Mapper。
3.4,添加 mybatis xml 文件
为了数据库持久层的实现,需要添加对应的MyBatis框架的XML映射文件,MyBatis的XML映射文件固定格式如下:
DOCTYPE mapper PUBLIC "-//mybatis.org//DTD Mapper 3.0//EN" "http://mybatis.org/dtd/mybatis-3-mapper.dtd">
<mapper namespace="">

mapper>
为了更好地理解上述内容,举个例子:UserMapper.xml查询所有用户的具体实现,实现代码如下:
<?xml version="1.0" encoding="UTF-8"?>
<!DOCTYPE mapper PUBLIC "-//mybatis.org//DTD Mapper 3.0//EN" "http://mybatis.org/dtd/mybatis-3-mapper.dtd">
<mapper namespace="com.example.mybatis.mapper.UserMapper">
    <select id="getAll" resultType="com.example.mybatis.entity.UserEntity">
        select * from userinfo
    </select>
</mapper>
实现代码说明:
-
namespace属性用于指定映射器接口的完全限定名,它是与此映射器文件相关联的映射器接口的唯一标识,形式为全包名.类名。 -
id属性指定了语句的唯一标识符,与接口中定义的方法名称⼀样的,表示对接口的具体实现方法。 -
resultType属性指定了查询结果的类型。在这个例子中,查询结果的类型是com.example.mybatis.entity.UserEntity。
综上所述,这个示例的目的是定义了一个名为getAll的查询语句,它将查询数据库中的userinfo表,并将结果映射为com.example.mybatis.entity.UserEntity类型的对象。
通过这个映射文件,可以让MyBatis框架自动生成相应的SQL查询代码,方便在 Java 程序中调用和使用。
3.5,添加 Service 服务层
添加 Service 服务层,示例具体实现代码如下:
package com.example.mybatis.service;
import com.example.mybatis.entity.UserEntity;
import com.example.mybatis.mapper.UserMapper;
import org.springframework.beans.factory.annotation.Autowired;
import org.springframework.stereotype.Service;
import java.util.List;
@Service
public class UserService {
    @Autowired
    private UserMapper userMapper;
    public List<UserEntity> getAll(){
        return userMapper.getAll();
    }
}
实现代码说明:在Service类(服务层)中注入Mapper接口(持久层),并在Service类中调用Mapper接口中的具体方法。
3.6,添加 Controller 控制层
添加 Controller 控制层,示例具体实现代码如下:
package com.example.mybatis.controller;
import com.example.mybatis.entity.UserEntity;
import com.example.mybatis.service.UserService;
import org.springframework.beans.factory.annotation.Autowired;
import org.springframework.web.bind.annotation.RequestMapping;
import org.springframework.web.bind.annotation.RestController;
import java.util.List;

@RestController
@RequestMapping("/user")
public class UserController {
    @Autowired
    private UserService userService;
    @RequestMapping("/getAll")
    public List<UserEntity> getAll(){
        return userService.getAll();
    }
}
实现代码说明:在Controller类(控制层)中注入Service(服务层),并在Controller类中调用Service类中的具体方法。
4,MyBatis查询数据库测试
4.1,项目运行启动
4.2,数据库记录信息
4.3,浏览器地址栏输入
4.4,Postman工具检测
四,MyBatis 流程
1,MyBatis 查询数据库流程
MyBatis 在进行查询数据库操作的执行流程主要为:
- 配置数据源:在MyBatis中,首先需要在配置文件中配置数据源,以便连接到数据库。通常是可以通过使用连接池或者直接配置数据库连接信息连接。
- 创建映射文件:MyBatis使用XML文件来定义数据库操作语句和映射关系。创建一个映射文件,它包含了数据库查询、插入、更新和删除等操作的语句,以及将结果映射到 Java对象的规则。
- 创建映射接口:为每个映射文件创建一个对应的 Java接口,接口中定义了与映射文件中相同的操作方法。
- 配置映射关系:在MyBatis的配置文件中,将映射文件和映射接口进行关联,指定它们的路径和命名空间。
- 注入Mapper接口:在需要使用查询功能的类中,通过依赖注入(比如@Autowired)方式注入Mapper接口的实例。
- Controller 类中注入Service 类对象,Service类中注入 Mapper 接口。
- 调用Mapper接口进行查询:通过注入的Mapper接口实例调用定义的查询方法,将参数传递给方法并执行查询操作。
- Controller 类(控制层)中调用 Service类(服务层),而Service类(服务层)中调用Mapper类接口(持久层)。
- 处理查询结果:根据查询的需求和Mapper接口方法的返回类型,对查询结果进行处理。可以返回单个对象、列表、映射结果等。
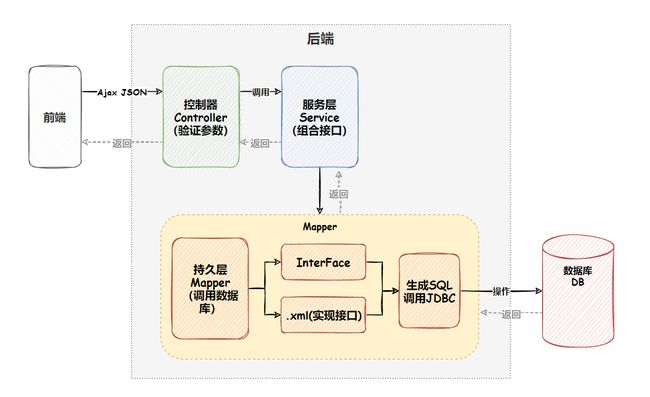
- 查询结果从Mapper持久层中返回至Service,再从Service服务层中返回至Controller,最后再从Controller控制层返回至前端。
2,MyBatis 框架交互流程图
MyBatis 在整个框架中的定位,框架交互流程图:
注意说明:MyBatis 是一个ORM框架,ORM (Object Relational Mapping),即对象关系映射。在面向对象编程语言中,将关系型数据库中的数据与对象建立起映射关系,进而自动的完成数据与对象的互相转换。
对象关系映射主要完成两步操作,分别为将输入数据(传入对象)+ SQL 映射成原生SQL以及将结果集映射为返回对象(输出对象)。
结语
这就是本期博客的全部内容啦!如果有什么其他的问题无法自己解决,可以在评论区留言哦!
最后,如果你觉得这篇文章写的还不错的话或者有所收获的话,麻烦小伙伴们动动你们的小手,给个三连呗(点赞,评论✍,收藏),多多支持一下!各位的支持是我最大的动力,后期不断更新优质的内容来帮助大家,一起进步。那我们下期见!


