接口的顶级理解
目录
1.基本介绍
1.1定义接口
1.2接口使用
2.接口特性
3.实现多个接口
4.接口间的继承
5.接口使用实例
5.1对象比大小
5.1.1方法1:Comparable 接口法
5.1.2构造比较器(Comparator接口法)
5.2对象数组排序
5.2.1 实现 Comparable 接口,
5.2.2构造比较器(实现Comparator接口)
6.Clonable 接口和深拷贝
6.1Clonable 接口
6.2 浅拷贝
6.3深拷贝
1.基本介绍
上述可能过于抽象,我们可以通过语法来理解。
接口就是给出一些没有实现的方法,封装到一起,到某个类要使用的时候,在根据具体情况把这些方法写出来。
1.1定义接口
public interface 接口名称 {// 抽象方法void method ();}
1. 创建接口时, 接口的命名一般以大写字母 I 开头 .2. 接口的命名一般使用 " 形容词" 词性的单词.
1.2接口使用
public class 类名称 implements 接口名称 {// ...}
2.接口特性
public interface IText {

    void A();
    public static void AAwork(){
        System.out.println("AAwork()");
    }
    public default void BBwork(){
        System.out.println("BBwork()");
    }
}
Dometext implements IText
class Dometext implements IText{
    @Override
    public void A() {
        System.out.println("Dometext的A()");
    }
}
Test1
public class Test1 {
    public static void main(String[] args) {
        IText.AAwork();
        Dometext dometext = new Dometext();
        dometext.BBwork();
        dometext.A();

    }
}
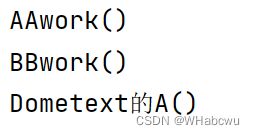
运行结果:
小结:static修饰不可重写,default修饰可重写也可以不重写。
4.接口中可以含有变量,但是接口中的变量会被隐式的指定为 public static final 变量 。
故为常量,不可修改。
5.接口中不能有静态代码块,实例代码块和构造方法
6.接口虽然不是类,但是接口编译完成后字节码文件的后缀格式也是.class
7.如果类没有实现接口中的所有的抽象方法,则类必须设置为抽象类
3.实现多个接口
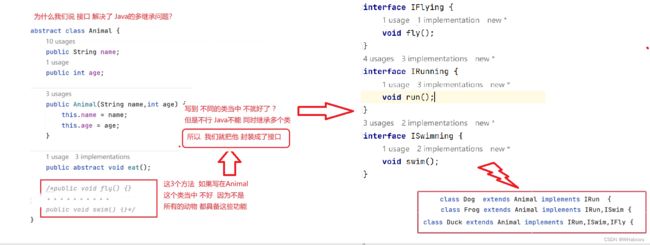
在 Java 中,类和类之间是单继承的,一个类只能有一个父类,即 Java中不支持多继承,但是一个类可以实现多个接 口。
Animal
abstract class Animal {
    public String name;
    public int age;

    public Animal(String name, int age) {
        this.name = name;
        this.age = age;
    }

     public abstract void eat();
}interface IFlying
interface IFlying {
    void fly();
}
interface IRunning
interface IRunning {
    void run();
}
interface ISwimming
interface ISwimming {
    void swim();
}class Cat extends Animal implements IRunning {
public Cat(String name, int age) {
super(name, age);
}
@Override
public void eat() {
System.out.println(name+"吃猫粮");
}
@Override
public void run() {
System.out.println(this.name + "正在用四条腿跑");
}
}class Frog extends Animal implements IRunning, ISwimming {
public Frog(String name, int age) {
super(name, age);
}
@Override
public void run() {
System.out.println(this.name + "正在往前跳");
}
@Override
public void swim() {
System.out.println(this.name + "正在蹬腿游泳");
}
@Override
public void eat() {
System.out.println(name+"吃青蛙粮");
}
}class Duck extends Animal implements IRunning, ISwimming, IFlying {
public Duck(String name, int age) {
super(name, age);
}
@Override
public void fly() {
System.out.println(this.name + "正在用翅膀飞");
}
@Override
public void run() {
System.out.println(this.name + "正在用两条腿跑");
}
@Override
public void swim() {
System.out.println(this.name + "正在漂在水上");
}
@Override
public void eat() {
System.out.println(name+"吃鸭粮");
}
}Text1
public class Text1 {

    public static void func(Animal animal){
        animal.eat();
    }

    public static void main(String[] args) {
        func(new Cat("mimi",1));
        func(new Frog("vava",1));
        func(new Duck("yaya",1));

    }
}
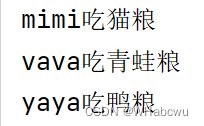
运行结果:
Text2
public class Text2 {


    public static void func(Animal animal){
        animal.eat();
    }
    public static void fFly(IFlying flying){
        flying.fly();
    }
    public static void fRun(IRunning running){
        running.run();
    }
    public static void fSwim(ISwimming swimming){
        swimming.swim();
    }

    public static void main(String[] args) {
        fSwim(new Frog("vava",1));
        fRun(new Frog("vava",1));
    }

}
运行结果:
图解:
图解3-1
再如Text3
public class Text2 {

    public static void main(String[] args) {
        fRun(new Robot("1hao"));
    }


    public static void fRun(IRunning running){
        running.run();
    }
}
运行结果:
4.接口间的继承
子类和父类之间是extends 继承关系,类与接口之间是 implements 实现关系。
图解:
图解4-1
举例:
interface IRunning {void run ();}interface ISwimming {void swim ();}// 两栖的动物 , 既能跑 , 也能游interface IAmphibious extends IRunning , ISwimming {}class Frog implements IAmphibious {...}
5.接口使用实例
5.1对象比大小
class Student {
    String name;
    int age;

    public Student(String name, int age) {
        this.name = name;
        this.age = age;
    }

    @Override
    public String toString() {
        return "Student{" +
                "name='" + name + '\'' +
                ", age=" + age +
                '}';
    }
}
Student wang = new Student("wang", 20);
Student li = new Student("li", 19);
如:我们现在想要比较两个学生的年龄。
5.1.1方法1:Comparable 接口法
让我们的 Student 类实现 Comparable 接口, 并实现其中的 compareTo 方法
代码(5-1-1)
class Student implements Comparable{
    String name;
    int age;

    public Student(String name, int age) {
        this.name = name;
        this.age = age;
    }

    @Override
    public int compareTo(Student o) {
        if(this.age>o.age){
            return 1;
        } else if (this.age < o.age) {
            return -1;
        }else {
            return 0;
        }
    }

    @Override
    public String toString() {
        return "Student{" +
                "name='" + name + '\'' +
                ", age=" + age +
                '}';
    }
}
如果当前对象应排在参数对象之前 , 返回-1 的数字 ;如果当前对象应排在参数对象之后 , 返回1 的数字 ;如果当前对象和参数对象不分先后 , 返回 0;
运行结果:1
5.1.2构造比较器(Comparator接口法)
实现Comparator接口, 并实现其中的 compare 方法
代码(5-1-2)
class AgecompareTo implements Comparator {
    @Override
    public int compare(Student o1, Student o2) {
        return o1.age-o2.age;
    }
}
返回年龄差
运行结果:11
5.2对象数组排序
如:我们现在想要排序学生的年龄。
5.2.1 实现 Comparable 接口,
实现 Comparable 接口, 并重写其中的 compareTo 方法
让我们的 Student 类实现 Comparable 接口, 并实现其中的 compareTo 方法为代码(5-1-1)
Text代码:
public class Text {
    public static void main(String[] args) {
        Student wang = new Student("wang", 200);
        Student li = new Student("li", 19);
        Student hu = new Student("hu", 11);
        Student[] students ={wang,li,hu};
        Arrays.sort(students);
        System.out.println(Arrays.toString(students));

    }
}
运行结果:
5.2.2构造比较器(实现Comparator接口)
实现Comparator接口, 并实现其中的 compare 方法
构造比较器实现Comparator接口, 并实现其中的 compare 方法的代码为代码(5-1-2)
Text代码:
public class Text {

    public static void main(String[] args) {
       Student wang = new Student("wang", 200);
        Student li = new Student("li", 19);
        Student hu = new Student("hu", 11);
        Student[] students ={wang,li,hu};
        AgecompareTo agecompareTo = new AgecompareTo();
        Arrays.sort(students,agecompareTo);
        System.out.println(Arrays.toString(students));


    }
}
运行结果:
![]()
  public static void bsort(Comparable[] comparables){
        for (int i = 0; i < comparables.length - 1; i++) {
            for (int j = 0; j < comparables.length - 1 - i; j++) {
                if(comparables[j].compareTo(comparables[j+1])>0){
                    Comparable tmp=comparables[j];
                    comparables[j]=comparables[j+1];
                    comparables[j+1]=tmp;
                }
            }
        }
}6.Clonable 接口和深拷贝
6.1Clonable 接口
Object 类中存在一个 clone 方法 , 调用这个方法可以创建一个对象的 " 拷贝 ". 但是要想合法调用 clone 方法 , 必须要 先实现 Clonable 接口 , 否则就会抛出 CloneNotSupportedException 异常 .
class Student
class Student implements Cloneable{
    String name;
    int age;

    public Student(String name, int age) {
        this.name = name;
        this.age = age;

    }


    @Override
    public String toString() {
        return "Student{" +
                "name='" + name + '\'' +
                ", age=" + age +
                '}';


    }


    @Override
    protected Object clone() throws CloneNotSupportedException {
        return super.clone();
    }
}
Text1
public class Text1 {
    public static void main(String[] args) throws CloneNotSupportedException {
        Student wang = new Student("wang", 21);
        Student student= (Student) wang.clone();
        System.out.println(student);
    }

}
空接口、标记接口
作用:表示当前类可以被克隆。
6.2 浅拷贝
Money
class Money {
    public double m = 99.99;
}class Student implements Cloneable{
String name;
int age;
Money money=new Money();
public Student(String name, int age) {
this.name = name;
this.age = age;
}
@Override
public String toString() {
return "Student{" +
"name='" + name + '\'' +
", age=" + age +
", money=" + money.m +
'}';
}
@Override
protected Object clone() throws CloneNotSupportedException {
return super.clone();
}
}改造Text1
public class Text1 {
    public static void main(String[] args) throws CloneNotSupportedException {
        Student wang = new Student("wang", 21);
        Student student= (Student) wang.clone();
        System.out.println(wang);
        System.out.println(student);
        System.out.println("=======================");
        wang.money.m=100;
        System.out.println(wang);
        System.out.println(student);


    }

}
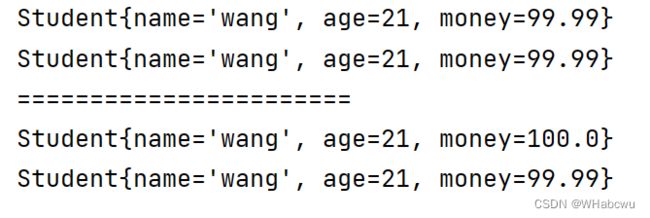
运行结果:
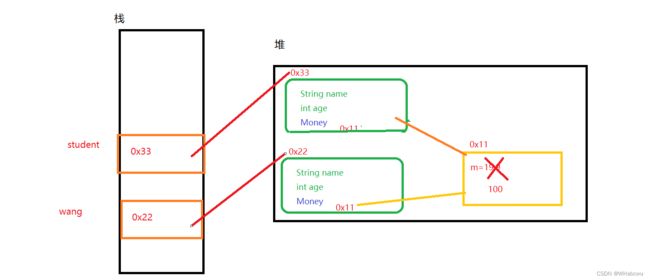
这是为啥?
6.3深拷贝
改造2class Student
class Student implements Cloneable{
    String name;
    int age;
    Money money=new Money();
    public Student(String name, int age) {
        this.name = name;
        this.age = age;

    }


    @Override
    public String toString() {
        return "Student{" +
                "name='" + name + '\'' +
                ", age=" + age +
                ", money=" + money.m +
                '}';
    }

    @Override
    protected Object clone() throws CloneNotSupportedException {
        Student tmp=(Student)super.clone();
            tmp.money=(Money) tmp.money.clone();
            return tmp;
    }
}
改造 Money
class Money implements Cloneable{
    public double m = 99.99;

    @Override
    protected Object clone() throws CloneNotSupportedException {
        return super.clone();
    }
}改造2Text1
public class Text1 {
    public static void main(String[] args) throws CloneNotSupportedException {
        Student wang = new Student("wang", 21);
        Student student= (Student) wang.clone();
        System.out.println(wang);
        System.out.println(student);
        System.out.println("=======================");
        wang.money.m=100;
        System.out.println(wang);
        System.out.println(student);


    }

}
运行结果:
以上为我个人的小分享,如有问题,欢迎讨论!!!
都看到这了,不如关注一下,给个免费的赞 ![]()


