365天深度学习训练营-第P1周:实现mnist手写数字识别
本文为365天深度学习训练营 中的学习记录博客
参考原作者:K同学啊|接辅导、项目定制
● 难度:新手入门⭐
● 语言:Python、tensorflow
要求:
1、清楚tensorflow的训练基本流程
2、实现mnist手写数字识别
一、前期工作及数据导入
1.GPU设置
如果电脑有GPU则设置GPU,如果是使用CPU,则这一步可以省略。
import tensorflow as tf
gpus = tf.config.list_physical_devices("GPU")

if gpus:
	gpu0 = gpus[0] # 默认使用第一个gpu
	tf.config.experimental.set_memory_growth(gpu0, True) # 设置GPU显存用量按需使用
	tf.config.set_visible_devices([gpu0], 'GPU')
2.数据导入
数据依次分为训练集(图片+标签)、测试集(图片+标签)
from tensorflow.keras import datasets, layers, models
import matplotlib.pyplot as plt

# 导入mnist数据,依次分别为训练集图片、训练集标签,测试集图片、测试集标签
(train_images, train_labels), (test_images, test_labels) = datasets.mnist.load_data()
Downloading data from https://storage.googleapis.com/tensorflow/tf-keras-datasets/mnist.npz
11493376/11490434 [==============================] - 1s 0us/step
3.归一化处理
数据归一化目的主要在于使不同量纲的特征处于同一数量级,避免因为数据差对模型产生影响
加快算法的收敛速度
# 将像素点值标准化至0到1区间内
train_images, test_images = train_images / 255.0, test_images / 255.0
# 查看数据维度
train_images.shape, test_images.shape, train_labels.shape, test_labels.shape
((60000, 28, 28), (10000, 28, 28), (60000,), (10000,))
4.可视化数据集图片
可视化数据集,方便进行预览,这里对前20张图片进行了可视化展示
# 将数据集前20个图片可视化显示
# 进行图像大小为20宽、5长的绘图(单位为英寸inch)

plt.figure(figsize=(20, 5))
# 遍历MNIST数据集下标数值0~49
for i in range(20):
    # 将整个figure分成5行10列,绘制第i+1个子图
    plt.subplot(2, 10, i+1)
    # 设置x轴不显示刻度
    plt.xticks([])
    # 设置y轴不显示刻度
    plt.yticks([])
    # 设置不显示子图网格
    plt.grid(False)
    # 图像展示,cmp为颜色图谱,“plt.cm.binary”为matplotlib.cm中的色表
    plt.imshow(train_images[i], cmap=plt.cm.binary)
    # 设置x轴标签显示为图片对应的数字
    plt.xlabel(train_labels[i])

# 显示图片
plt.show()
5.调整图片格式
将图片的大小调整为我们需要的格式
# 调整数据到我们需要的格式
train_images = train_images.reshape((60000, 28, 28, 1))
test_images = test_images.reshape((10000, 28, 28, 1))

# print
train_images.shape, test_images.shape, train_labels.shape, test_labels.shape
((60000, 28, 28, 1), (10000, 28, 28, 1), (60000,), (10000,))
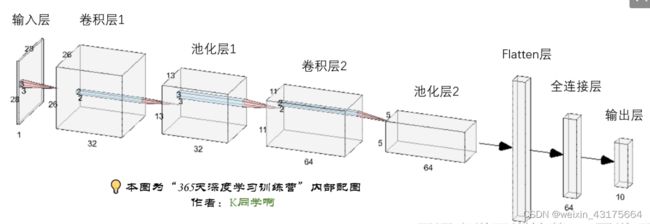
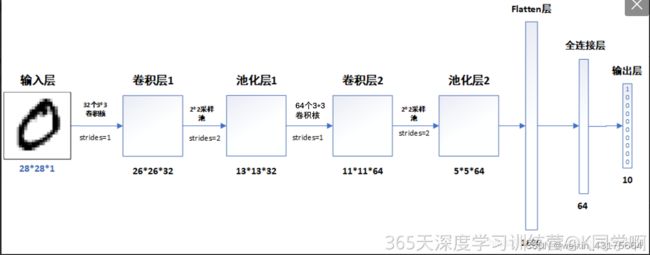
二、构建CNN网络模型
利用tensorflow构建CNN网络模型
model = models.Sequential([
    layers.Conv2D(32, (3, 3), activation='relu', input_shape=(28, 28, 1)),
    layers.MaxPooling2D((2, 2)),
    layers.Conv2D(64, (3, 3), activation='relu'),
    layers.MaxPooling2D((2, 2)),

    layers.Flatten(),
    layers.Dense(64, activation='relu'),
    layers.Dense(10)
])

model.summary()
_________________________________________________________________ Layer (type) Output Shape Param # ================================================================= conv2d (Conv2D) (None, 26, 26, 32) 320 _________________________________________________________________ max_pooling2d (MaxPooling2D) (None, 13, 13, 32) 0 _________________________________________________________________ conv2d_1 (Conv2D) (None, 11, 11, 64) 18496 _________________________________________________________________ max_pooling2d_1 (MaxPooling2 (None, 5, 5, 64) 0 _________________________________________________________________ flatten (Flatten) (None, 1600) 0 _________________________________________________________________ dense (Dense) (None, 64) 102464 _________________________________________________________________ dense_1 (Dense) (None, 10) 650 ================================================================= Total params: 121,930 Trainable params: 121,930 Non-trainable params: 0
三、编译模型
# model.compile()方法用于在配置训练方法时,告知训练时用的优化器,损失函数和准确率评测标准
model.compile(
    # Adam 优化器
    optimizer='adam',
    # 设置交叉熵损失函数
    # from——logits为True时,会将y_pred转化为概率(softmax)  原来的losses里面没有那个函数,换成了CategoricalCrossentropy
    loss=tf.keras.losses.CategoricalCrossentropy(from_logits=True),
    # 设置性能指标列表,将在模型训练时监控列表中的指标
    metrics=['accuracy'])
WARNING:tensorflow:From /opt/conda/lib/python3.6/site-packages/tensorflow/python/keras/utils/losses_utils.py:170: to_float (from tensorflow.python.ops.math_ops) is deprecated and will be removed in a future version.
Instructions for updating:
Use tf.cast instead.
四、训练模型
训练10个轮次
history = model.fit(train_images, train_labels, epochs=10,
                    validation_data=(test_images, test_labels))
五、测试
六、预测
# plt版本原因报错,则reshape
plt.imshow(test_images[1].reshape(28,28))
输出测试集中第一张图片的预测结果
pre = model.predict(test_images)
pre[1]
array([-0.01948653, 0.11450015, -0.01386861, 0.02360445, -0.0363372 , -0.09499966, -0.00625074, 0.0467912 , -0.03560271, -0.02331346], dtype=float32)
七、学习总结
1. MNIST手写数字数据集介绍
MNIST手写数字数据集来源于是美国国家标准与技术研究所,是著名的公开数据集之一。数据集中的数字图片是由250个不同职业的人纯手写绘制,数据集获取的网址为:MNIST handwritten digit database, Yann LeCun, Corinna Cortes and Chris Burges (下载后需解压)。我们一般会采用(train_images, train_labels), (test_images, test_labels) = datasets.mnist.load_data()这行代码直接调用,这样就比较简单
MNIST手写数字数据集中包含了70000张图片,其中60000张为训练数据,10000为测试数据,70000张图片均是28*28,数据集样本如下:
2. 神经网络程序说明
神经网络程序可以简单概括如下:
3.总结
在不同的版本中可能有一些属性没有,学会灵活使用


