127.【SpringBoot 源码刨析D】
SpringBoot 源码刨析D
- (三)、SpringBoot 核心功能
-
- 4.单元测试功能
-
- (1).JUnit5 的变化
- (2).JUnit5常用注解
- (3).断言( `assertions` )
-
- (3.1).简单断言
- (3.2).数组断言
- (3.3).组合断言
- (3.4).异常断言
- (3.5).超时断言
- (3.6).快速失败
- (4).前置条件( `assumptions` )
- (5).嵌套测试
- (6).参数化测试
- 5.指标监控功能
-
- (1).SpringBoot Actuator
-
- (1.1).简介
- (1.2).1.x与2.x的不同
- (1.3).如何使用
- (1.4).可视化
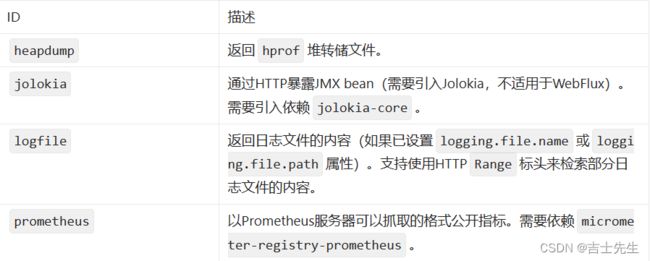
- (2). Actuator Endpoint
-
- (2.1).最常用的Endpoint
- (2.2).Health Endpoint
- (2.3).Metrics Endpoint
- (3).定制Endpoint
-
- (3.1).定制 Health 信息
- (3.2).定制 info 信息
- (3.3).定制Metrics信息
- (3.4).定制Endpoint
- (4).可视化监控 SpringBootAdmin
-
- (4.1)SpringBootAdmin 管理端
- (4.2).客户端 (被监控的一方)
- 6.高级特性
-
- (1).Profile功能
-
- (1.1).application-profile功能
- (1.2).@Profile条件装配功能
- (1.3).profile分组
- (2).外部化配置 - 配置加载优先级
-
- (2.3).外部配置源
- (2.4).配置文件查找位置 (优先级依次递增,也就是后面的同名配置文件会覆盖前面的)
- (2.3).配置文件加载顺序:
- (3).自定义Statr
-
- (3.1).创建一个空项目
- (3.2).使用我们自定义的Statr
- (3.3).starter启动原理
- 7.SpringBoot 原理
-
- (1).SpringBoot启动过程
(三)、SpringBoot 核心功能
4.单元测试功能
(1).JUnit5 的变化
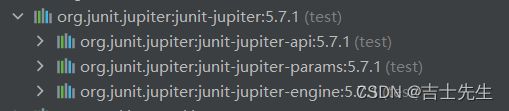
Spring Boot 2.2.0 版本开始引入 JUnit 5 作为单元测试默认库
作为最新版本的JUnit框架,JUnit5与之前版本的Junit框架有很大的不同。由三个不同子项目的几个不同模块组成。
JUnit 5 = JUnit Platform + JUnit Jupiter + JUnit Vintage
- JUnit Platform: Junit Platform是在JVM上启动测试框架的基础,不仅支持Junit自制的测试引擎,其他测试引擎也都可以接入。
- JUnit Jupiter: JUnit Jupiter提供了JUnit5的新的编程模型,是JUnit5新特性的核心。内部 包含了一个测试引擎,用于在Junit Platform上运行。
- JUnit Vintage: 由于JUint已经发展多年,为了照顾老的项目,JUnit Vintage提供了兼容JUnit4.x,Junit3.x的测试引擎。

注意:
SpringBoot 2.4 以后版本移除了默认对 Vintage 的依赖。如果需要兼容junit4需要自行引入(不能使用junit4的功能 @Test)
JUnit 5’s Vintage Engine Removed from spring-boot-starter-test,如果需要继续兼容junit4需要自行引入vintage.
<dependency>
    <groupId>org.junit.vintagegroupId>
    <artifactId>junit-vintage-engineartifactId>
    <scope>testscope>
    <exclusions>
        <exclusion>
            <groupId>org.hamcrestgroupId>
            <artifactId>hamcrest-coreartifactId>
        exclusion>
    exclusions>
dependency>
<dependency>
  <groupId>org.springframework.bootgroupId>
  <artifactId>spring-boot-starter-testartifactId>
  <scope>testscope>
dependency>
@SpringBootTest
class Boot05WebAdminApplicationTests {


    @Test
    void contextLoads() {

    }
}
以前:
@SpringBootTest + @RunWith(SpringTest.class)
SpringBoot整合Junit以后
- 编写测试方法:
@Test标注(注意需要使用junit5版本的注解) - Junit类具有Spring的功能,@Autowired、比如 @Transactional 标注测试方法,测试完成后自动回滚
(2).JUnit5常用注解
JUnit5的注解与JUnit4的注解有所变化
https://junit.org/junit5/docs/current/user-guide/#writing-tests-annotations
- @Test :表示方法是测试方法。但是与JUnit4的@Test不同,他的职责非常单一不能声明任何属性,拓展的测试将会由Jupiter提供额外测试
- @ParameterizedTest :表示方法是参数化测试,下方会有详细介绍
- @RepeatedTest :表示方法可
重复执行(重复执行几次),下方会有详细介绍 - @DisplayName :为测试类或者测试方法
设置展示名称 - @BeforeEach :表示在
每个单元测试之前执行 - @AfterEach :表示在
每个单元测试之后执行 - @BeforeAll :表示在
所有单元测试之前执行 - @AfterAll :表示在
所有单元测试之后执行 - @Tag :表示单元测试类别,类似于JUnit4中的@Categories
- @Disabled :表示
测试类或测试方法不执行,类似于JUnit4中的@Ignore - @Timeout :表示
测试方法运行如果超过了指定时间将会返回错误 - @ExtendWith :为测试类或测试方法提供
扩展类引用.(@springBootTest注解已经包含)
- @DisplayName
package com.jsxs;
import com.jsxs.bean.account;
import org.junit.jupiter.api.DisplayName;
import org.junit.jupiter.api.Test;
import org.springframework.boot.test.context.SpringBootTest;
import org.springframework.jdbc.core.JdbcTemplate;
import javax.annotation.Resource;
import java.util.List;
import java.util.Map;
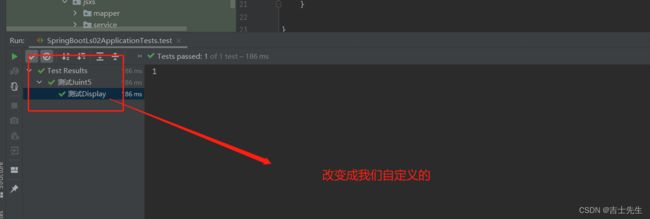
@DisplayName("测试Juint5")
@SpringBootTest
class SpringBootLs02ApplicationTests {
@DisplayName("测试Display")
@Test
void test(){
System.out.println(1);
}
}
- BeforeEach 和 AfterEach
package com.jsxs;
import com.jsxs.bean.account;
import org.junit.jupiter.api.*;
import org.springframework.boot.test.context.SpringBootTest;
import org.springframework.jdbc.core.JdbcTemplate;
import javax.annotation.Resource;
import java.util.List;
import java.util.Map;
@DisplayName("测试Juint5")
@SpringBootTest
class SpringBootLs02ApplicationTests {
@DisplayName("测试Display")
@Test
void test(){
System.out.println(1);
}
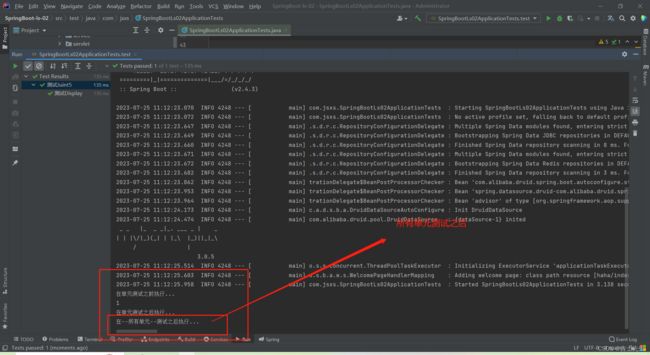
@BeforeEach
void testBefore(){
System.out.println("在单元测试之前执行...");
}
@AfterEach
void testAfter(){
System.out.println("在单元测试之后执行...");
}

- BeforeAll 和 AfterAll (这里的方法都是静态方法)
package com.jsxs;

import com.jsxs.bean.account;
import org.junit.jupiter.api.*;
import org.springframework.boot.test.context.SpringBootTest;
import org.springframework.jdbc.core.JdbcTemplate;

import javax.annotation.Resource;
import java.util.List;
import java.util.Map;

@DisplayName("测试Juint5")
@SpringBootTest
class SpringBootLs02ApplicationTests {

    @DisplayName("测试Display")
    @Test
    void test(){
        System.out.println(1);
    }

    @BeforeEach
    void testBefore(){
        System.out.println("在单元测试之前执行...");
    }

    @AfterEach
    void testAfter(){
        System.out.println("在单元测试之后执行...");
    }

    @BeforeAll   // 需要标注静态方法
    static void testALLBefore(){
        System.out.println("在--所有单元--测试之前执行...");
    }

    @AfterAll  // 需要标注静态方法
    static void testALLAfter(){
        System.out.println("在--所有单元--测试之后执行...");
    }
}
(3).断言( assertions )
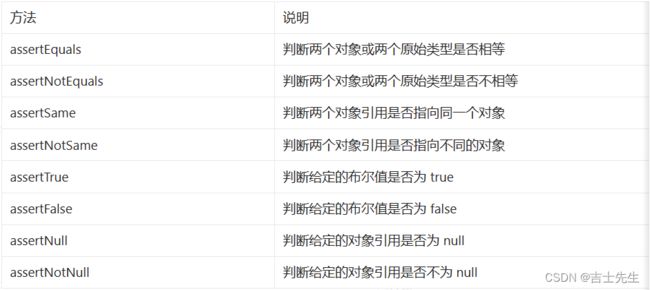
断言(assertions)是测试方法中的核心部分,用来对测试需要满足的条件进行验证。这些断言方法都是 org.junit.jupiter.api.Assertions 的静态方法。JUnit 5 内置的断言可以分成如下几个类别:检查业务逻辑返回的数据是否合理。
所有的测试运行结束以后,会有一个详细的测试报告;
(3.1).简单断言
只要前面的断言有一个失败的,后面的都不会执行。
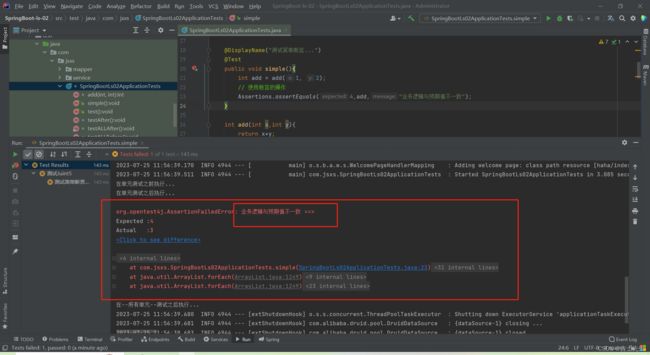
用来对单个值进行简单的验证。如:
    @DisplayName("测试简单断言...")
    @Test
    public void simple(){
        int add = add(1, 2);
        // 使用断言的操作
        Assertions.assertEquals(4,add,"业务逻辑与预期值不一致");

        assertNotSame(new Object(), new Object());
        Object obj = new Object();
        assertSame(obj, obj);

        assertFalse(1 > 2);
        assertTrue(1 < 2);

        assertNull(null);
        assertNotNull(new Object());
    }

    int add(int x,int y){
        return x+y;
    }
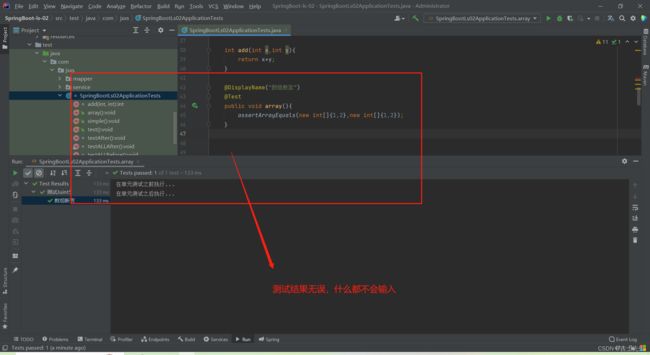
(3.2).数组断言
通过 assertArrayEquals 方法来判断两个对象或原始类型的数组是否相等
@Test
@DisplayName("array assertion")
public void array() {
 assertArrayEquals(new int[]{1, 2}, new int[] {1, 2});
}
(3.3).组合断言
assertAll 方法接受多个 org.junit.jupiter.api.Executable 函数式接口 的实例作为要验证的断言,可以通过 lambda 表达式很容易的提供这些断言.
    @Test
    @DisplayName("assert all")
    public void all() {
        assertAll("Math",
                () -> assertEquals(2, 1 + 1),
                () -> assertTrue(1 > 0)
        );
    }
(3.4).异常断言
在JUnit4时期,想要测试方法的异常情况时,需要用@Rule注解的ExpectedException变量还是比较麻烦的。而JUnit5提供了一种新的断言方式Assertions.assertThrows() ,配合函数式编程就可以进行使用。
@Test
@DisplayName("异常测试")
public void exceptionTest() {
    ArithmeticException exception = Assertions.assertThrows(
           //扔出断言异常
            ArithmeticException.class, () -> System.out.println(1 % 0));
}
(3.5).超时断言
Junit5还提供了Assertions.assertTimeout() 为测试方法设置了超时时间.
@Test
@DisplayName("超时测试")
public void timeoutTest() {
    //如果测试方法时间超过1s将会异常
    Assertions.assertTimeout(Duration.ofMillis(1000), () -> Thread.sleep(500));
}
(3.6).快速失败
通过 fail 方法直接使得测试失败
@Test
@DisplayName("fail")
public void shouldFail() {
 fail("This should fail");
}
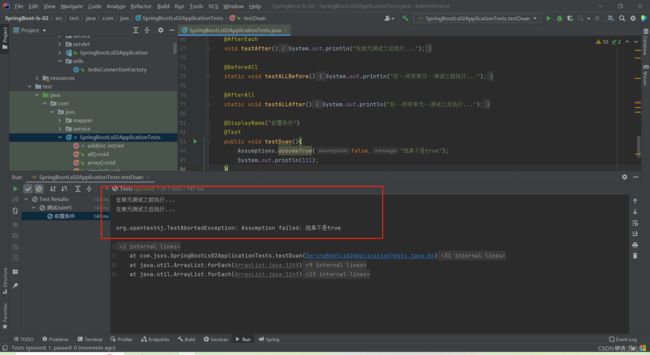
(4).前置条件( assumptions )
JUnit 5 中的前置条件(assumptions【假设】)类似于断言,不同之处在于不满足的断言会使得测试方法失败,而不满足的前置条件只会使得测试方法的执行终止。前置条件可以看成是测试方法执行的前提,当该前提不满足时,就没有继续执行的必要。
    @DisplayName("前置条件")
    @Test
    public void testDuan(){
        Assumptions.assumeTrue(false,"结果不是true");
        System.out.println(111);
    }
所有的测试标志汇总:

(5).嵌套测试
JUnit 5 可以通过 Java 中的内部类和@Nested 注解实现嵌套测试,从而可以更好的把相关的测试方法组织在一起。在内部类中可以使用@BeforeEach 和@AfterEach 注解,而且嵌套的层次没有限制。
- 嵌套测试的情况下,外层的Test不能驱动内层的(Before/After)Each/All之类的方法之前/后允许。
- 内层可以使用外层,外层不可以使用内层
package com.jsxs;

import org.junit.jupiter.api.BeforeEach;
import org.junit.jupiter.api.DisplayName;
import org.junit.jupiter.api.Nested;
import org.junit.jupiter.api.Test;
import org.springframework.boot.test.context.SpringBootTest;

import java.util.EmptyStackException;
import java.util.Stack;

import static org.junit.jupiter.api.Assertions.*;

/**
 * @Author Jsxs
 * @Date 2023/7/25 15:15
 * @PackageName:com
 * @ClassName: TestingAStackDemo
 * @Description: TODO
 * @Version 1.0
 */
@SpringBootTest
@DisplayName("A stack")
class TestingAStackDemo {

    Stack<Object> stack;

    @Test
    @DisplayName("is instantiated with new Stack()")
    void isInstantiatedWithNew() {
        new Stack<>();
        // 1.嵌套测试的情况下,外层的Test不能驱动内层的(Before/After)Each/All之类的方法之前/后允许
        assertNull(stack);
    }

    // 内部嵌套一个类,我们需要使用注解 @Nested
    @Nested
    @DisplayName("when new")
    class WhenNew {

        @BeforeEach
        void createNewStack() {
            stack = new Stack<>();
        }

        // 会成功,因为我们没有向栈中推入数据
        @Test
        @DisplayName("is empty")
        void isEmpty() {
            assertTrue(stack.isEmpty());
        }
        // 会成功,因为我们栈中无数据又移除肯定报异常 -> pop移除
        @Test
        @DisplayName("throws EmptyStackException when popped")
        void throwsExceptionWhenPopped() {
            assertThrows(EmptyStackException.class, stack::pop);
        }
        // 会成功,因为我们栈中无数据又获得第一个元素 -> pep移除
        @Test
        @DisplayName("throws EmptyStackException when peeked")
        void throwsExceptionWhenPeeked() {
            assertThrows(EmptyStackException.class, stack::peek);
        }

        // 内部嵌套一个类,我们需要使用注解 @Nested
        @Nested
        @DisplayName("after pushing an element")
        class AfterPushing {

            String anElement = "an element";

            @BeforeEach
            void pushAnElement() {
                stack.push(anElement);
            }
            // 会成功,因为我们在执行前已经推入了一个数据。
            @Test
            @DisplayName("it is no longer empty")
            void isNotEmpty() {
                assertFalse(stack.isEmpty());
            }

            //会成功,因为我们只添加了一个数据。 所以值匹配相等
            @Test
            @DisplayName("returns the element when popped and is empty")
            void returnElementWhenPopped() {
                assertEquals(anElement, stack.pop());
                assertTrue(stack.isEmpty());
            }
            // 会成功,因为我们查看的第一个值就是这个
            @Test
            @DisplayName("returns the element when peeked but remains not empty")
            void returnElementWhenPeeked() {
                assertEquals(anElement, stack.peek());
                assertFalse(stack.isEmpty());
            }
        }
    }
}
(6).参数化测试
参数化测试是JUnit5很重要的一个新特性,它使得用不同的参数多次运行测试成为了可能,也为我们的单元测试带来许多便利。
利用@ValueSource等注解,指定入参,我们将可以使用不同的参数进行多次单元测试,而不需要每新增一个参数就新增一个单元测试,省去了很多冗余代码。
- @ValueSource:
为参数化测试指定入参来源,支持八大基础类以及String类型,Class类型 - @NullSource: 表示为参数化测试提供一个null的入参
- @EnumSource: 表示为参数化测试提供一个枚举入参
- @CsvFileSource:表示读取指定CSV文件内容作为参数化测试入参
- @MethodSource:表示
读取指定方法的返回值作为参数化测试入参(注意方法返回需要是一个流)
当然如果参数化测试仅仅只能做到指定普通的入参还达不到让我觉得惊艳的地步。让我真正感到他的强大之处的地方在于他可以支持外部的各类入参。如:CSV,YML,JSON 文件甚至方法的返回值也可以作为入参。只需要去实现ArgumentsProvider接口,任何外部文件都可以作为它的入参。
    @ParameterizedTest
    @ValueSource(strings = {"one", "two", "three"})
    @DisplayName("参数化测试1")
    public void parameterizedTest1(String string) {
        System.out.println(string);
        Assertions.assertTrue(StringUtils.isNotBlank(string));
    }


    @ParameterizedTest
    @MethodSource("method")    //指定方法名
    @DisplayName("方法来源参数")
    public void testWithExplicitLocalMethodSource(String name) {
        System.out.println(name);
        Assertions.assertNotNull(name);
    }

    static Stream<String> method() {
        return Stream.of("apple", "banana");
    }

5.指标监控功能
(1).SpringBoot Actuator
(1.1).简介
未来每一个微服务在云上部署以后,我们都需要对其进行监控、追踪、审计、控制等。SpringBoot就抽取了Actuator场景,使得我们每个微服务快速引用即可获得生产级别的应用监控、审计等功能。
        <dependency>
            <groupId>org.springframework.bootgroupId>
            <artifactId>spring-boot-starter-actuatorartifactId>
        dependency>

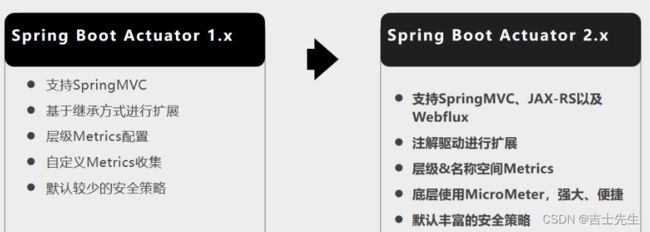
(1.2).1.x与2.x的不同
(1.3).如何使用
- 引入场景
- 访问 http://localhost:8080/actuator/**
- 暴露所有监控信息为HTTP
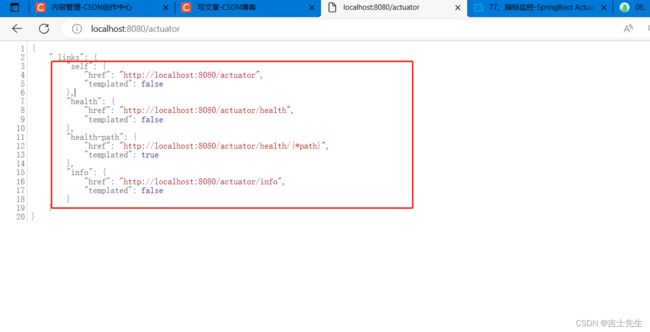
默认暴漏的方式是在jconsole位置,http是没有默认暴漏的有heath、和info
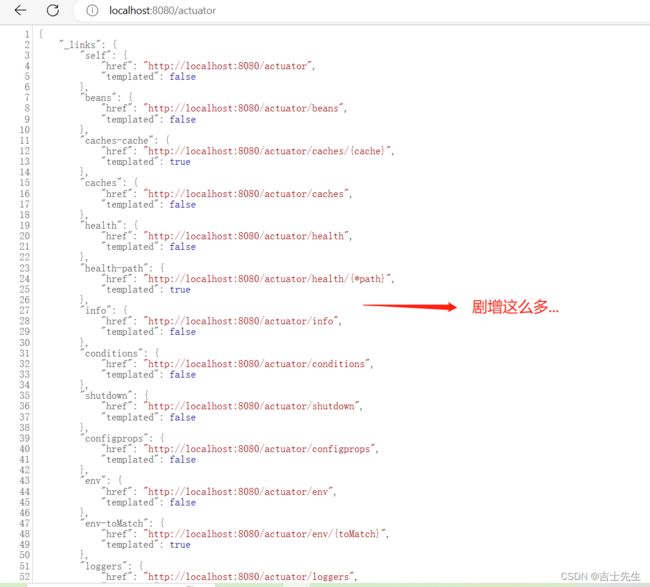
management:
  endpoints:
    enabled-by-default: true #暴露所有端点信息
    web:
      exposure:
        include: '*'  #以web方式暴露所有的Endpoint
启动运行后...
- 测试
- http://localhost:8080/actuator/beans
- http://localhost:8080/actuator/configprops
- http://localhost:8080/actuator/metrics ⭐
- http://localhost:8080/actuator/metrics/jvm.gc.pause ⭐
- http://localhost:8080/actuator/endpointName/detailPath
(1.4).可视化
https://github.com/codecentric/spring-boot-admin
(2). Actuator Endpoint
如果您的应用程序是Web应用程序(Spring MVC,Spring WebFlux或Jersey),则可以使用以下附加端点:
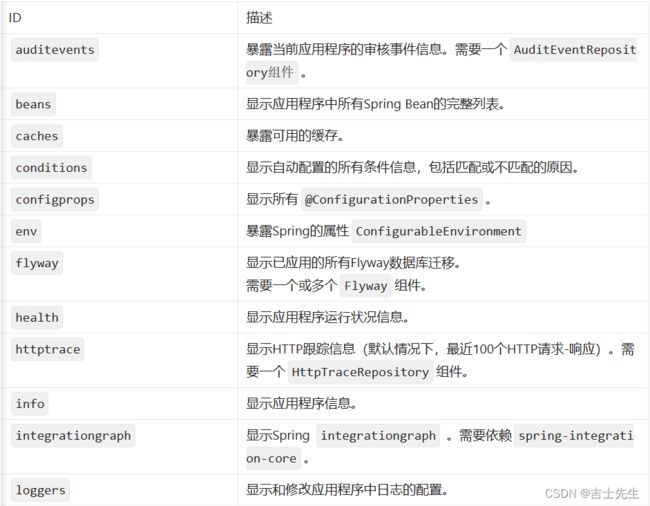
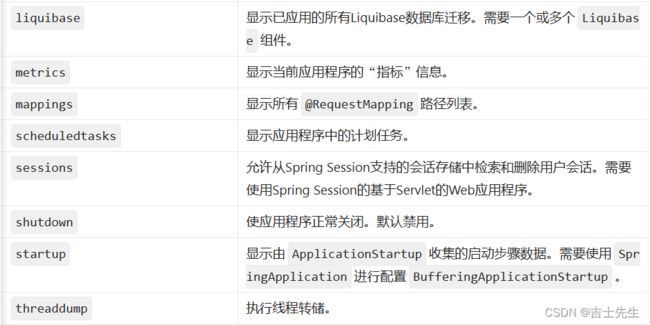
(2.1).最常用的Endpoint
- Health:监控状况
- Metrics:运行时指标
- Loggers:日志记录
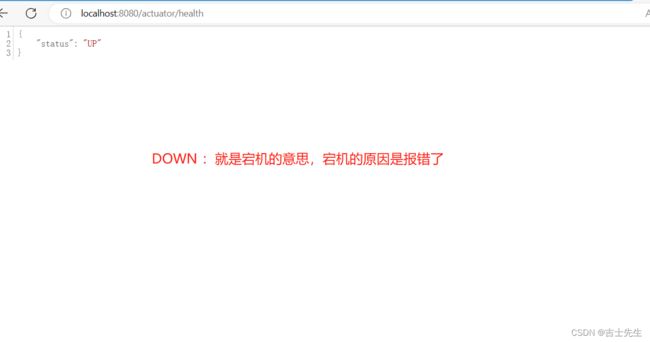
(2.2).Health Endpoint
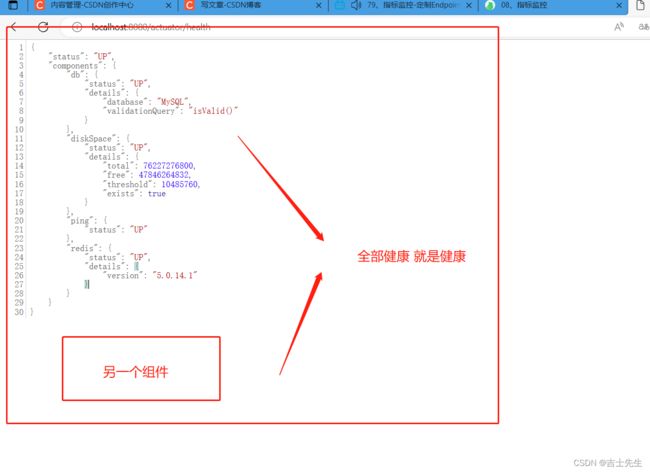
健康检查端点,我们一般用于在云平台,平台会定时的检查应用的健康状况,我们就需要Health Endpoint可以为平台返回当前应用的一系列组件健康状况的集合。
重要的几点:
health endpoint返回的结果,应该是一系列健康检查后的一个汇总报告- 很多的健康检查默认已经自动配置好了,比如:
数据库、redis等 - 可以很容易的添加
自定义的健康检查机制
management:
  endpoints:
    enabled-by-default: true #暴露所有端点信息的开关
    web:
      exposure:
        include: '*'  #以web方式暴露所有端点信息
  endpoint:  # 对具体的断点具体配置
    health:  # 我们配置健康信息的详细一致展示
      show-details: always

(2.3).Metrics Endpoint
提供详细的、层级的、空间指标信息,这些信息可以被pull(主动推送)或者push(被动获取)方式得到;
- 通过Metrics对接多种监控系统
- 简化核心Metrics开发
- 添加自定义Metrics或者扩展已有Metrics
(3).定制Endpoint
(3.1).定制 Health 信息
在我们检测信息的时候,我们需要认为自定义的组件健康和默认的组件都健康的话,我们才认为是健康的。
- 第一种方式: 直接继承抽象类
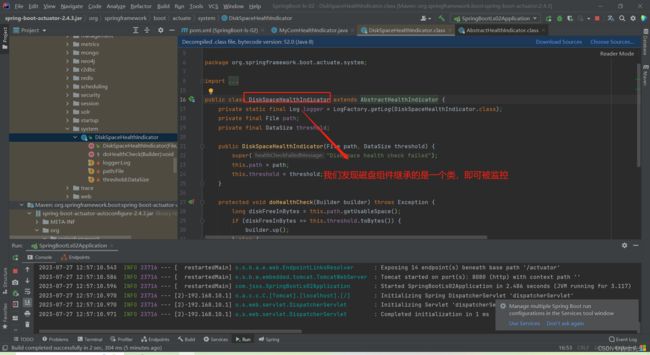
我们只需要继承 AbstractHealthIndicator 类即可
package com.jsxs.health;

import org.springframework.boot.actuate.health.AbstractHealthIndicator;
import org.springframework.boot.actuate.health.Health;
import org.springframework.boot.actuate.health.Status;
import org.springframework.stereotype.Component;

import java.util.HashMap;

/**
 * @Author Jsxs
 * @Date 2023/7/27 12:32
 * @PackageName:com.jsxs.health
 * @ClassName: MyComHealthIndicator
 * @Description: TODO
 * @Version 1.0
 */
@Component
public class MyComHealthIndicator extends AbstractHealthIndicator {
    /**
     * @param builder
     * @throws Exception 真实的检查方法
     */
    @Override
    protected void doHealthCheck(Health.Builder builder) throws Exception {

        HashMap<String, Object> map = new HashMap<>();
        // 返回什么样的状态码,进行设置。
        if (1 == 1) {
//            builder.up();   和下面一样 都是表示健康的状态
            builder.status(Status.UP);
            map.put("count", 1);
            map.put("ms", 100);
        } else {
//            builder.down();
            builder.status(Status.OUT_OF_SERVICE);
            map.put("err", "链接超时");
            map.put("ms", 3000);
        }
//    返回详细信息
        builder.withDetail("code", 100)
                .withDetails(map);

    }
}

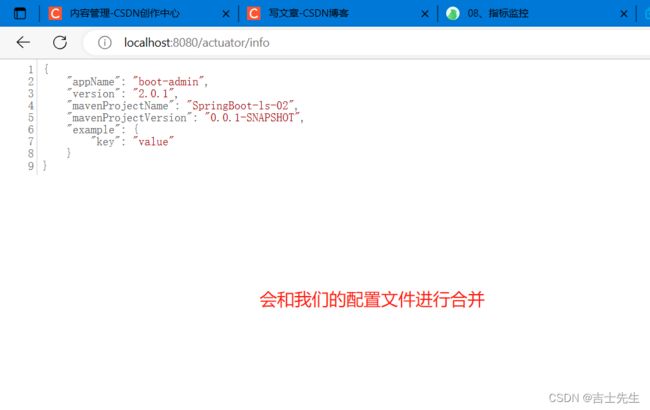
(3.2).定制 info 信息
第一种方式: 配置文件
双@符合之间获取的是 Pom.xml里面的信息
info:
  appName: boot-admin
  version: 2.0.1
  mavenProjectName: @project.artifactId@  #使用@@可以获取maven的pom文件值
  mavenProjectVersion: @project.version@

第二种方式: 编写代码
package com.jsxs.acautor.info;

import org.springframework.boot.actuate.info.Info;
import org.springframework.boot.actuate.info.InfoContributor;
import org.springframework.stereotype.Component;

import java.util.Collections;

/**
 * @Author Jsxs
 * @Date 2023/7/27 13:35
 * @PackageName:com.jsxs.acautor.info
 * @ClassName: InfoContributor
 * @Description: TODO
 * @Version 1.0
 */
@Component
public class ExampleInfoContributor implements InfoContributor {
    @Override
    public void contribute(Info.Builder builder) {
        builder.withDetail("example",
                Collections.singletonMap("key", "value"));
    }
}
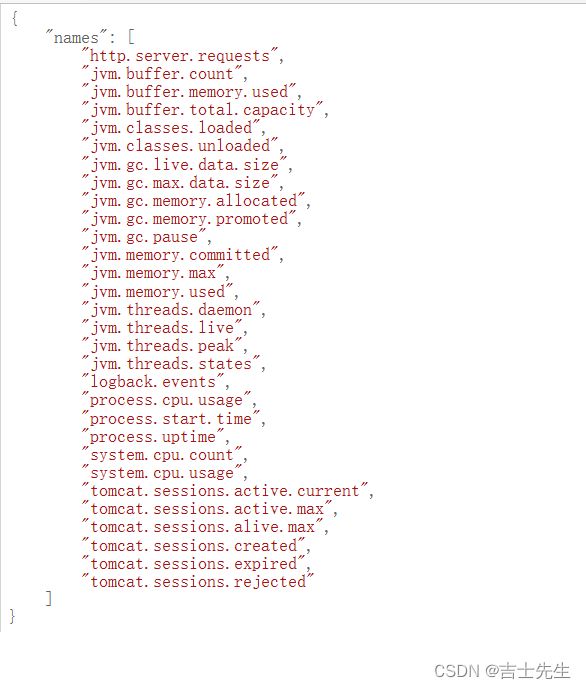
(3.3).定制Metrics信息
- SpringBoot支持自动适配的Metrics
- JVM metrics, report utilization of:
- Various memory and buffer pools
- Statistics related to garbage collection
- Threads utilization
- Number of classes loaded/unloaded
- CPU metrics
- File descriptor metrics
- Kafka consumer and producer metrics
- Log4j2 metrics: record the number of events logged to Log4j2 at each level
- Logback metrics: record the number of events logged to Logback at each level
- Uptime metrics: report a gauge for uptime and a fixed gauge representing the application’s absolute start time
- Tomcat metrics (server.tomcat.mbeanregistry.enabled must be set to true for all Tomcat metrics to be registered)
- Spring Integration metrics
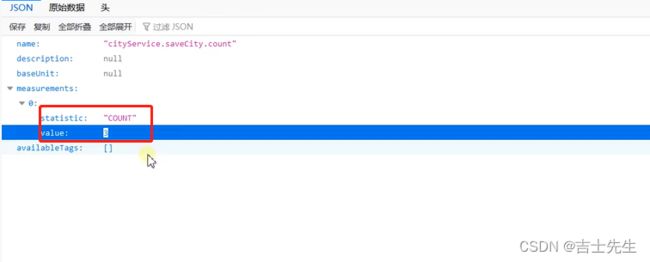
- 增加定制Metrics
class MyService{
	// 1. 设置计数的词为
    Counter counter;
    // 2.利用有参构造的方法注入
    public MyService(MeterRegistry meterRegistry){
         counter = meterRegistry.counter("myservice.method.running.counter");
    }
	// 在要统计的方法中添加如下函数
    public void hello() {
        counter.increment();
    }
}


//也可以使用下面的方式
@Bean
MeterBinder queueSize(Queue queue) {
    return (registry) -> Gauge.builder("queueSize", queue::size).register(registry);
}
(3.4).定制Endpoint
package com.jsxs.acautor.endoption;

import org.springframework.boot.actuate.endpoint.annotation.Endpoint;
import org.springframework.boot.actuate.endpoint.annotation.ReadOperation;
import org.springframework.boot.actuate.endpoint.annotation.WriteOperation;
import org.springframework.stereotype.Component;

import java.util.Collections;
import java.util.Map;

/**
 * @Author Jsxs
 * @Date 2023/7/29 10:22
 * @PackageName:com.jsxs.acautor.endoption
 * @ClassName: DockerEndpoint
 * @Description: TODO
 * @Version 1.0
 */
@Component
@Endpoint(id = "container")  //端点名叫什么
public class DockerEndpoint {

    // 端点的读操作 http://localhost:8080/actuator/container
    @ReadOperation
    public Map getDockerInfo(){
        return Collections.singletonMap("info","docker started...");
    }

    @WriteOperation
    private void restartDocker(){
        System.out.println("docker restarted....");
    }

}

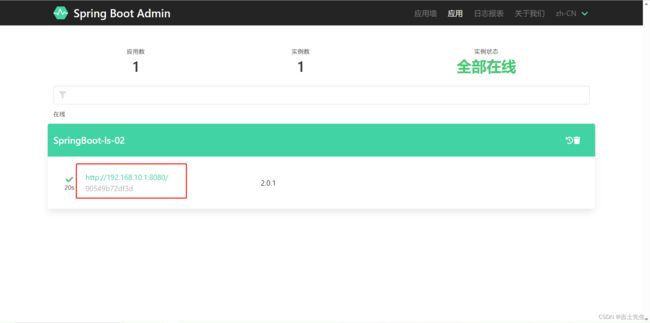
(4).可视化监控 SpringBootAdmin
http://docs.spring-boot-admin.com/current/getting-started.html
(4.1)SpringBootAdmin 管理端
新建SpringBootAdmin项目
1.先引入我们的依赖
<dependency>
    <groupId>de.codecentricgroupId>
    <artifactId>spring-boot-admin-starter-serverartifactId>
    <version>2.3.1version>
dependency>
<dependency>
    <groupId>org.springframework.bootgroupId>
    <artifactId>spring-boot-starter-webartifactId>
dependency>
2. 在SpringBootAdmin的主类中开启监听
package com.example.springbootadmin;

import de.codecentric.boot.admin.server.config.EnableAdminServer;
import org.springframework.boot.SpringApplication;
import org.springframework.boot.autoconfigure.SpringBootApplication;


@EnableAdminServer
@SpringBootApplication
public class SpringBootAdminApplication {

    public static void main(String[] args) {
        SpringApplication.run(SpringBootAdminApplication.class, args);
    }

}
3.设置管理端的端口为 8888

(4.2).客户端 (被监控的一方)
1.客户端引入
<dependency>
    <groupId>de.codecentricgroupId>
    <artifactId>spring-boot-admin-starter-clientartifactId>
    <version>2.3.1version>
dependency>
2.客户端添加配置
spring:
  boot:
    admin:
      client:
        url: http://localhost:8888  #指向管理端的端口

# 暴漏所有的web断点
management:
  endpoints:
    enabled-by-default: true #暴露所有端点信息
    web:
      exposure:
        include: '*'  #以web方式暴露
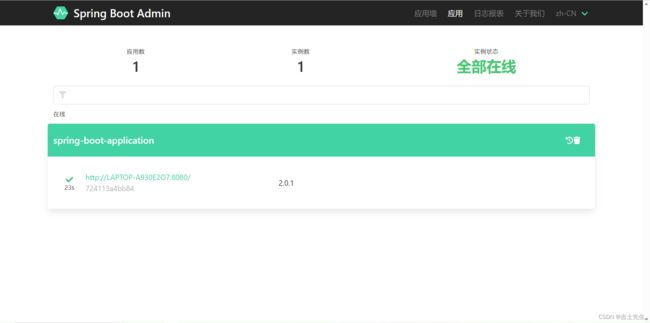
3.映射域名和配置项目名
spring:
  boot:
    admin:
      client:
        url: http://localhost:8888  #指向管理端
        instance:
          prefer-ip: true  #使用ip注册进来
  application:
    name: SpringBoot-ls-02
6.高级特性
(1).Profile功能
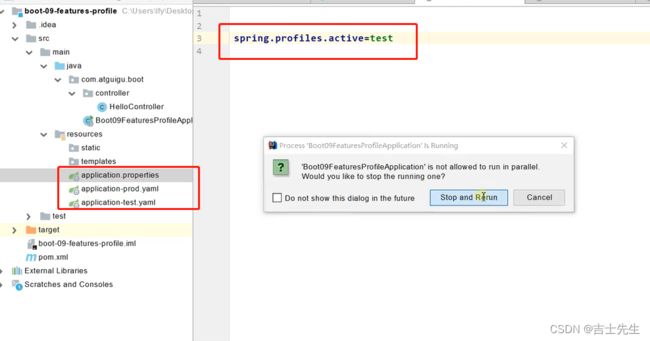
为了方便多环境适配,springboot简化了profile功能。
(1.1).application-profile功能
- 默认配置文件 application.yaml;任何时候都会加载
- 指定环境配置文件
application-{env}.yaml - 激活指定环境
- 配置文件激活
- 命令行激活:
java -jar xxx.jar --spring.profiles.active=prod --person.name=haha- 修改配置文件的任意值,命令行优先
- 默认配置与环境配置同时生效
- 同名配置项,profile配置优先
spring.profiles.active=test
(1.2).@Profile条件装配功能
只要在我们指定的环境中,我们某个类才会有效。
1.接口
package com.jsxs.bean;

/**
 * @Author Jsxs
 * @Date 2023/7/29 11:38
 * @PackageName:com.jsxs.bean
 * @ClassName: Human
 * @Description: TODO
 * @Version 1.0
 */
public interface Human {
    void getName();
}
2.老板在开发环境下有效
package com.jsxs.bean;

import lombok.AllArgsConstructor;
import lombok.Data;
import lombok.NoArgsConstructor;
import org.springframework.boot.context.properties.ConfigurationProperties;
import org.springframework.context.annotation.Profile;
import org.springframework.stereotype.Component;

/**
 * @Author Jsxs
 * @Date 2023/7/29 11:38
 * @PackageName:com.jsxs.bean
 * @ClassName: Boos
 * @Description: TODO
 * @Version 1.0
 */
@Data
@AllArgsConstructor
@NoArgsConstructor
@Component
@ConfigurationProperties("human")
@Profile("prod")
public class Boos implements Human{
    private String name;
    @Override
    public void getName() {
        System.out.println(name);
    }
}
3.员工在生产环境下有效
package com.jsxs.bean;

import lombok.AllArgsConstructor;
import lombok.Data;
import lombok.NoArgsConstructor;
import org.springframework.boot.context.properties.ConfigurationProperties;
import org.springframework.context.annotation.Profile;
import org.springframework.stereotype.Component;

/**
 * @Author Jsxs
 * @Date 2023/7/29 11:39
 * @PackageName:com.jsxs.bean
 * @ClassName: worker
 * @Description: TODO
 * @Version 1.0
 */

@Data
@NoArgsConstructor
@AllArgsConstructor
@Component
@ConfigurationProperties("human")
@Profile("dev")
public class worker implements Human{
    private String name;
    @Override
    public void getName() {
        System.out.println(name);
    }
}
application-prod.yaml
human:
  name: 老板
application-dev.yaml
human:
  name: 员工
(1.3).profile分组
激活一个组,那么这个组的所有配置文件都有效
spring.profiles.group.production[0]=dev
spring.profiles.group.production[1]=test

使用:--spring.profiles.active=production  同时激活了dev环境和test环境
(2).外部化配置 - 配置加载优先级
https://docs.spring.io/spring-boot/docs/current/reference/html/spring-boot-features.html#boot-features-external-config
(2.3).外部配置源
常用:Java属性(Properties)文件、YAML文件、环境变量、命令行参数;
- 测试环境变量 (EL表达式获取一切)
我们通过 EL 表达式 可以获取电脑的环境变量和系统变量。
- 查看怎么写Key的关键字
package com.jsxs;

import org.springframework.boot.SpringApplication;
import org.springframework.boot.autoconfigure.SpringBootApplication;
import org.springframework.boot.web.servlet.ServletComponentScan;
import org.springframework.context.ConfigurableApplicationContext;
import org.springframework.core.env.ConfigurableEnvironment;

import java.util.Map;

@SpringBootApplication
@ServletComponentScan
public class SpringBootLs02Application {

    public static void main(String[] args) {
        ConfigurableApplicationContext run = SpringApplication.run(SpringBootLs02Application.class, args);

        // 获取环境变量
        ConfigurableEnvironment environment = run.getEnvironment();
        Map<String, Object> systemEnvironment = environment.getSystemEnvironment();
        System.out.println(systemEnvironment);
    }

}
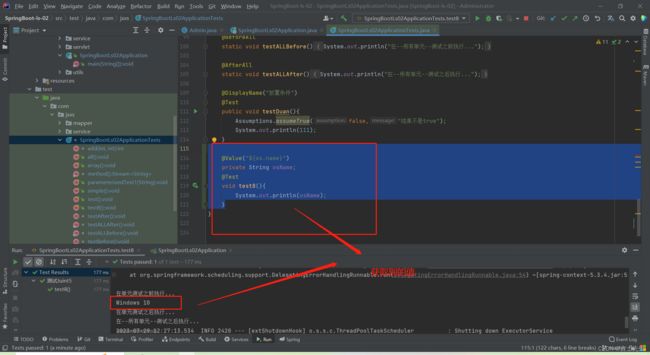
2.真实获取
    @Value("${os.name}")
    private String osName;
    @Test
    void test8(){
        System.out.println(osName);
    }
(2.4).配置文件查找位置 (优先级依次递增,也就是后面的同名配置文件会覆盖前面的)
如果同名就覆盖,不同名就增强
- classpath 根路径
- classpath 根路径下config目录
- jar包当前目录
- jar包当前目录的config目录
- /config子目录的直接子目录
(2.3).配置文件加载顺序:
- 当前jar包内部的
application.properties和application.yml - 当前jar包内部的
application-{profile}.properties和application-{profile}.yml - 引用的外部jar包的
application.properties和application.yml - 引用的外部jar包的
application-{profile}.properties和application-{profile}.yml
总结 : 指定环境优先,外部优先,后面的可以覆盖前面的同名配置项
(3).自定义Statr
(3.1).创建一个空项目
1. 并创建两个Model. 一个是配置项目;另一个是自动引入项目
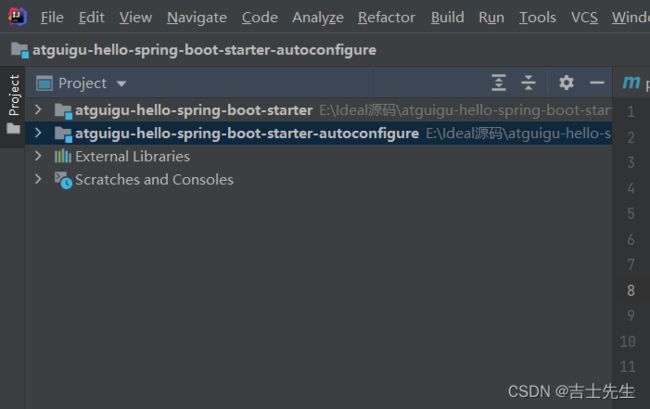
2.将自动包的依赖包信息引入非自动包中
        <dependency>
            <groupId>com.jsxsgroupId>
            <artifactId>atguigu-hello-spring-boot-starter-autoconfigureartifactId>
            <version>0.0.1-SNAPSHOTversion>
        dependency>

3.在自动包的项目中进行业务自动配置

service包下:
HelloProperties.java
并无引入组件
package com.jsxs.bean;

import org.springframework.boot.context.properties.ConfigurationProperties;
import org.springframework.boot.context.properties.EnableConfigurationProperties;
import org.springframework.stereotype.Component;

/**
 * @Author Jsxs
 * @Date 2023/7/29 13:29
 * @PackageName:com.jsxs
 * @ClassName: HelloProperties
 * @Description: TODO
 * @Version 1.0
 */

@ConfigurationProperties("atguigu.hello")
public class HelloProperties {
    private String prefix;
    private String suffix;

    public String getPrefix() {
        return prefix;
    }

    public void setPrefix(String prefix) {
        this.prefix = prefix;
    }

    public String getSuffix() {
        return suffix;
    }

    public void setSuffix(String suffix) {
        this.suffix = suffix;
    }
}
bean包下:
HelloService.jsva
并无引入组件
package com.jsxs.service;
import com.jsxs.bean.HelloProperties;
import javax.annotation.Resource;
/**
* @Author Jsxs
* @Date 2023/7/29 13:27
* @PackageName:com.jsxs.service
* @ClassName: HelloService
* @Description: TODO
* @Version 1.0
*/
public class HelloService {
@Resource
HelloProperties helloProperties;
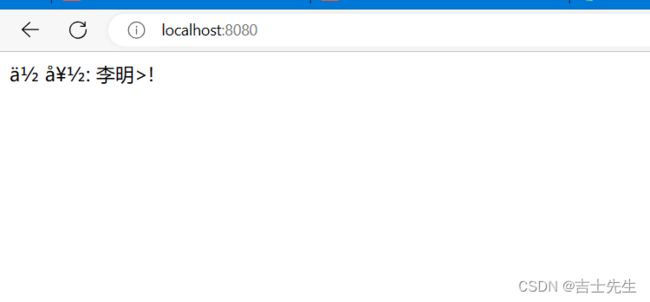
public String sayHello(String username) {
return helloProperties.getPrefix() + ": " + username + ">" + helloProperties.getSuffix();
}
}
auto:
HelloServiceAutoConfig.java
package com.jsxs.auto;

import com.jsxs.bean.HelloProperties;
import com.jsxs.service.HelloService;
import org.springframework.boot.autoconfigure.condition.ConditionalOnMissingBean;
import org.springframework.boot.autoconfigure.condition.ConditionalOnMissingClass;
import org.springframework.boot.context.properties.EnableConfigurationProperties;
import org.springframework.context.annotation.Bean;
import org.springframework.context.annotation.Configuration;

/**
 * @Author Jsxs
 * @Date 2023/7/29 13:37
 * @PackageName:com.jsxs.auto
 * @ClassName: HelloServiceAutoConfig
 * @Description: TODO
 * @Version 1.0
 */

@Configuration
@ConditionalOnMissingBean(HelloService.class)  // 1.假如没存在这个组件,就自动引入
@EnableConfigurationProperties(HelloProperties.class)  // 1.将属性放入容器 2.且绑定属性
public class HelloServiceAutoConfig {

    @Bean
    public HelloService helloService(){
        return new HelloService();
    }
}
5.配置自动引入
autoconfigure包中配置使用 META-INF/spring.factories 中 EnableAutoConfiguration 的值,使得项目启动加载指定的自动配置类
# Auto Configure
org.springframework.boot.autoconfigure.EnableAutoConfiguration=\
com.jsxs.auto.HelloServiceAutoConfig
4. 先放到本地Maven仓库
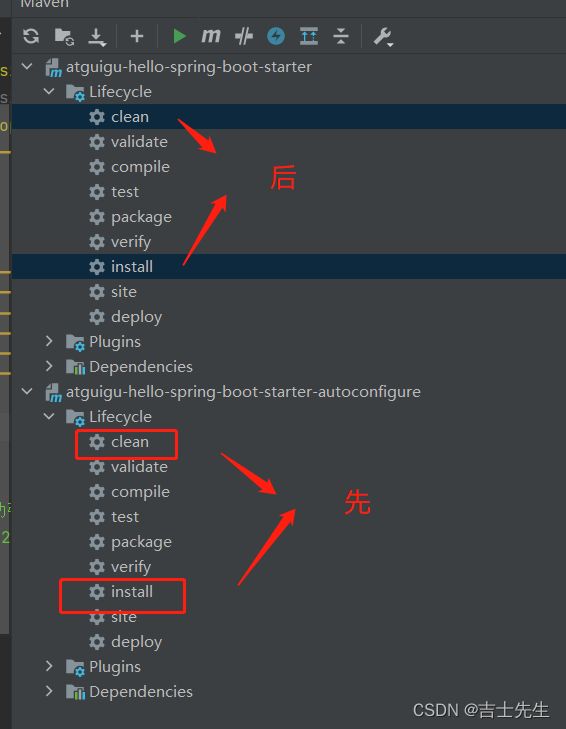
(3.2).使用我们自定义的Statr
1.引入我们的xml文件
        <dependency>
            <groupId>com.jsxsgroupId>
            <artifactId>atguigu-hello-spring-boot-starterartifactId>
            <version>0.0.1-SNAPSHOTversion>
        dependency>
2.测试
package com.jsxs.Controller;

import com.jsxs.service.HelloService;
import org.springframework.web.bind.annotation.GetMapping;
import org.springframework.web.bind.annotation.RestController;

import javax.annotation.Resource;

/**
 * @Author Jsxs
 * @Date 2023/7/29 14:15
 * @PackageName:com.jsxs.Controller
 * @ClassName: HelloController
 * @Description: TODO
 * @Version 1.0
 */
@RestController
public class HelloController {

    @Resource
    HelloService helloService;

    @GetMapping("/")
    public String sayHello(){
        return helloService.sayHello("李明");
    }
}
atguigu.hello.prefix:你好
atguigu.hello.suffix:!
(3.3).starter启动原理
- starter-pom引入 autoconfigurer 包

- autoconfigure包中配置使用
META-INF/spring.factories中 EnableAutoConfiguration 的值,使得项目启动加载指定的自动配置类 - 编写自动配置类 xxxAutoConfiguration -> xxxxProperties
- @Configuration
- @Conditional
- @EnableConfigurationProperties
- @Bean
- …
引入starter — xxxAutoConfiguration — 容器中放入组件 ---- 绑定xxxProperties ---- 配置项
7.SpringBoot 原理
Spring原理【Spring注解】、SpringMVC原理、自动配置原理、SpringBoot原理
(1).SpringBoot启动过程
- 创建 SpringApplication
	public static ConfigurableApplicationContext run(Class<?>[] primarySources, String[] args) {
		return new SpringApplication(primarySources).run(args);
	}
-
保存一些信息 (应用引导器,初始化器,监听器)。
-
判定当前应用的类型。ClassUtils。Servlet -
bootstrappers:
初始启动引导器(List):去spring.factories文件中找 org.springframework.boot.Bootstrapper -
找
ApplicationContextInitializer;启动初始化器去spring.factories找 ApplicationContextInitializer
List- 找 ApplicationListener ;
应用监听器。去spring.factories找 ApplicationListener - List
- 找 ApplicationListener ;
-
运行 SpringApplication
-
StopWatch (
监听项目的起停的) -
记录
应用的启动时间 -
创建引导上下文(Context环境)createBootstrapContext()- 获取到所有之前的
bootstrappers挨个执行 intitialize() 来完成对引导启动器上下文环境设置
- 获取到所有之前的
-
让当前应用进入
headless模式。java.awt.headless -
获取所有
RunListener(运行监听器)【为了方便所有Listener进行事件感知】getSpringFactoriesInstances去spring.factories找 SpringApplicationRunListener.
-
遍历
SpringApplicationRunListener调用 starting 方法;- 相当于通知所有感兴趣系统正在启动过程的人,项目正在 starting。
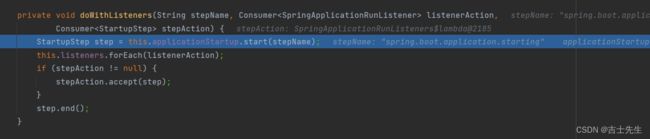
- 相当于通知所有感兴趣系统正在启动过程的人,项目正在 starting。
-
保存
命令行参数;ApplicationArguments -
准备环境
prepareEnvironment();返回或者创建基础环境信息对象。StandardServletEnvironment配置环境信息对象。- 读取所有的配置源的配置属性值。
绑定环境信息- 监听器调用
listener.environmentPrepared();通知所有的监听器当前环境准备完成
-
创建IOC容器(createApplicationContext())
根据项目类型(Servlet)创建容器,
-
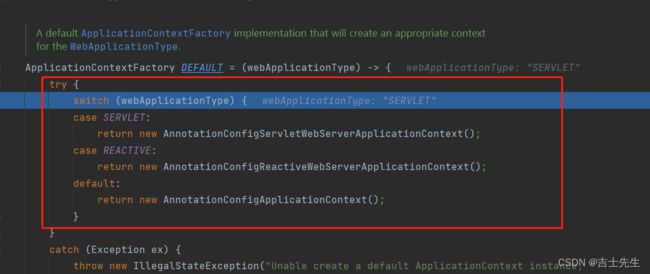
- 当前会创建 AnnotationConfigServletWebServerApplicationContext
- 准备
ApplicationContext IOC容器的基本信息 prepareContext()- 保存环境信息
- IOC容器的后置处理流程。
- 应用初始化器;applyInitializers;
- 遍历所有的
ApplicationContextInitializer。调用initialize.。来对ioc容器进行初始化扩展功能 - 遍历所有的
listener调用 contextPrepared。EventPublishRunListenr;通知所有的监听器contextPrepared
- 遍历所有的
- 所有的监听器 调用 contextLoaded。通知所有的监听器 contextLoaded;
- 刷新IOC容器。refreshContext
- 创建容器中的所有组件(Spring注解)
- 容器刷新完成后工作?afterRefresh
- 所有监听 器 调用
listeners.started(context);通知所有的监听器 started 调用所有runners;callRunners()- 获取容器中的
ApplicationRunner - 获取容器中的
CommandLineRunner - 合并所有runner并且按照@Order进行排序
- 遍历所有的runner。调用 run 方法
- 获取容器中的
- 如果以上有异常,
- 调用Listener 的 failed
- 调用所有监听器的 running 方法
listeners.running(context);通知所有的监听器 running
-running如果有问题。继续通知 failed 。调用所有 Listener 的 failed;通知所有的监听器 failed

/*
 * Copyright 2012-2020 the original author or authors.
 *
 * Licensed under the Apache License, Version 2.0 (the "License");
 * you may not use this file except in compliance with the License.
 * You may obtain a copy of the License at
 *
 *      https://www.apache.org/licenses/LICENSE-2.0
 *
 * Unless required by applicable law or agreed to in writing, software
 * distributed under the License is distributed on an "AS IS" BASIS,
 * WITHOUT WARRANTIES OR CONDITIONS OF ANY KIND, either express or implied.
 * See the License for the specific language governing permissions and
 * limitations under the License.
 */

package org.springframework.boot;

/**
 * Callback interface that can be used to initialize a {@link BootstrapRegistry} before it
 * is used.
 *
 * @author Phillip Webb
 * @since 2.4.0
 * @see SpringApplication#addBootstrapper(Bootstrapper)
 * @see BootstrapRegistry
 */
public interface Bootstrapper {

	/**
	 * Initialize the given {@link BootstrapRegistry} with any required registrations.
	 * @param registry the registry to initialize
	 */
	void intitialize(BootstrapRegistry registry);

}