vue实现根据ip地址获取地区天气

根据ip获取当前地址以及天气怎么弄呢??
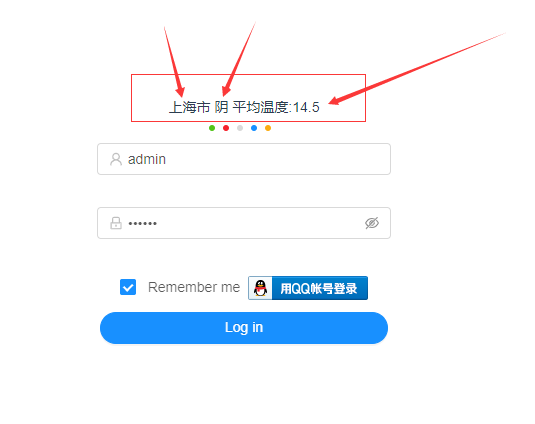
先看效果图

一) 要知道你地区在哪里??获取使用腾讯位置API资格
1) 首先在 https://lbs.qq.com/console/setting.html 这个网页中 先使用微信 注册一个
1-1) 然后创建应用
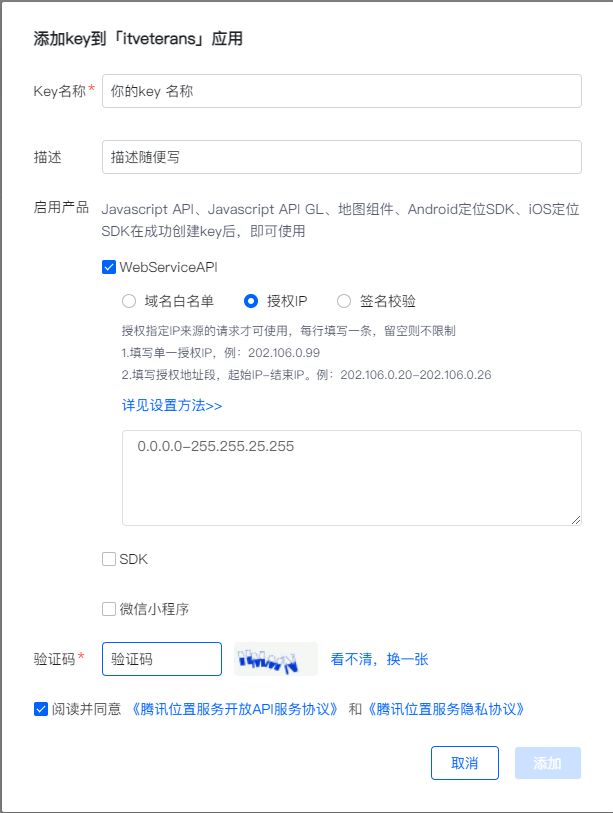
1-2) 创建你的key 效果如下 这里面必须填写 : 0.0.0.0-255.255.25.255

二)我们准备工作弄好了我们开始来编写
2)首先来安装一个 vue-jsonp
npm i -S vue-jsonp
2-1) 在main.js中导入vue-jsonp
import {VueJsonp} from 'vue-jsonp'
Vue.use(VueJsonp)
2-2) 在你的data中定义一些数据 数据如下
data() {
    return {
      // 当地信息(城市、时间、地点、天气)
      local: {
        // ip地址所在城市
        city: '',
        // 所在城市温度
        temperature: '',
        // 天气类型
        type: '',
        // 时
        hour: '',
        // 分
        minute: '',
        // 月
        month: '',
        // 日
        date: '',
        // 星期几
        day: '',
        // 出勤率echart数据
      },
     timeId: '',
    }
 }
2-3)定义好了 在methods中定义获取城市的方法 getLocalCity,在created()中调用 即可
 created() {
    // 获取当地信息
    this.getLocalCity();
  },
methods:{
    getLocalCity() {
          var data = {
            key: '这里就是你刚刚 https://lbs.qq.com/console/setting.html 里面生成的key ',

          }
          var url = 'https://apis.map.qq.com/ws/location/v1/ip' //这个就是地理位置信息的接口
          data.output = 'jsonp'
          this.$jsonp(url, data)
            .then((res) => {
              this.local.city = res.result.ad_info.city
              // 根据城市,获取当前天气和时间(在此先预留获取天气方法,完成后取消注释)
              // this.getLocalWeather(this.local.city)  // 这里就是调用下面的那个
              return res
            })
            .catch((error) => {
              console.log(error)
            })
         },
 }
弄好了我们来进行下一步
安装 axios 来进行调用api
npm install axios
在main.js中引入axios
import axios from "axios";
Vue.prototype.$axios = axios
导入之后 接着 2-3 里面进行添加 methods: 中进行添加
// 获取当地时间和天气
getLocalWeather(city) {
   if (city && city !== '') {
     this.$axios
       .get('http://wthrcdn.etouch.cn/weather_mini?city=' + city)
       .then((res) => {
         // 获取当天数据
         let todayWeather = res.data.forecast[0]
         if (todayWeather !== '') {
           // 获取温度,取平均值
           let high = todayWeather.high.split(' ')[1].slice(0, -1)
           let low = todayWeather.low.split(' ')[1].slice(0, -1)
           this.local.temperature = (parseInt(low) + parseInt(high)) / 2
           // 获取天气类型
           this.local.type = todayWeather.type
           // 获取星期几
           this.local.day = todayWeather.date.slice(-3)
           // 获取当前时间
           let newDate = new Date()
           this.local.hour = newDate.getHours()
           this.local.minute = newDate.getMinutes()
           this.local.month = newDate.getMonth() + 1
           this.local.date = newDate.getDate()
           // 使用定时器,实时刷新城市、天气和时间
           this.timeId = setTimeout(() => {
             this.getLocalCity(city)
           }, 1000)
         }
       })
       .catch(function(error) {
         console.log(error)
       })
   }
 },
销毁定时器 只需在beforeDestroy 钩子函数中添加
beforeDestroy() {
    if (this.timeId && this.timeId !== '') {
      clearTimeout(this.timeId)
      this.timeId = null
    }
  },
刚刚我们时间没有弄 1~9前面有一个0 我们来编写一下 这个也是连着 2-3 同一个 script标签中最后添加
/**
 * 处理月、日、时、分、秒等时间为个位数的情况
 * @param {String} string
 */
export function handleTime(time) {
  time = '' + time
  if (time && time.length === 1) {
    time = '0' + time
  }
  return time
}
然后在 上面进行渲染即可
城市 : {{ local.city }} 天气: {{local.type}} 平均温度:{{local.temperature}}