Java分布式微服务4——异步服务通讯(RabbitMQ)中间件
文章目录
- 微服务的远程异步调用
- MQ介绍
- RabbitMQ
-
- RabbitMQ结构
- RabbitMQ的单机部署
-
- 1.下载镜像
- 2.安装MQ
- RabbitMQ入门
- 常见消息模型
- SpringAMQP
-
- SpringAMQP实现基础消息队列
- SpringAMQP实现工作队列
- SpringAMQP实现发布订阅
-
- 1. Fanout Exchange 广播模式
- 2. Direct Exchange 路由模式
- 3. Topic Exchange 话题
- 消息转换器
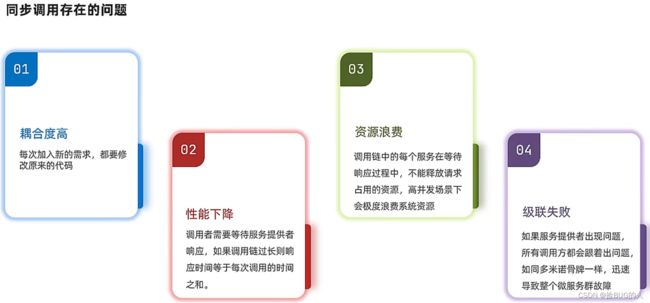
微服务的远程异步调用
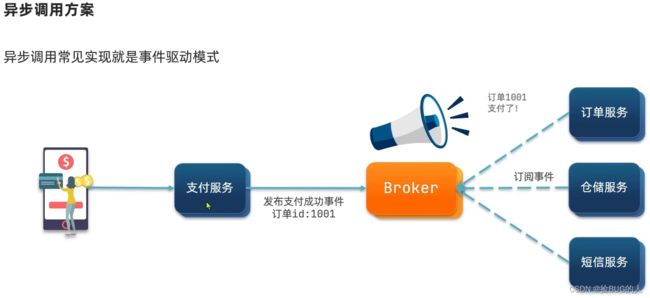
- 故障隔离:支付服务不负责调用其他三个服务,只负责通知Broker支付成功这个事件,然后就返回结果,后面的服务故障了和前面发布事件的服务无关,前面的服务发布完事件就结束了
- 吞吐量提升:Broker将支付成功的事件广播给订阅了这个事件的那些服务,服务们各自并发进行接下来的工作,吞吐量变高,性能提升
- 耦合度低:有新服务加入只要让它订阅就行,耦合度低
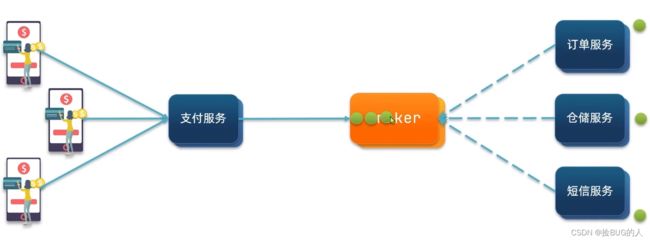
- 流量削峰:broker可以起到缓冲作用,把大量事件存着给后面慢慢处理
- 依赖于Broker的可靠性、安全性、吞吐能力
- 架构复杂,业务流程不清晰,难以追踪
MQ介绍
MQ(MessageQueue)消息队列,就是上文事件驱动架构中的Broker
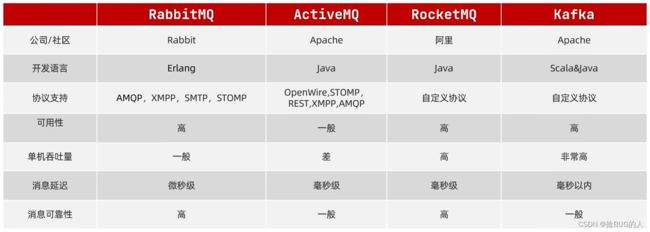
RabbitMQ
RabbitMQ结构
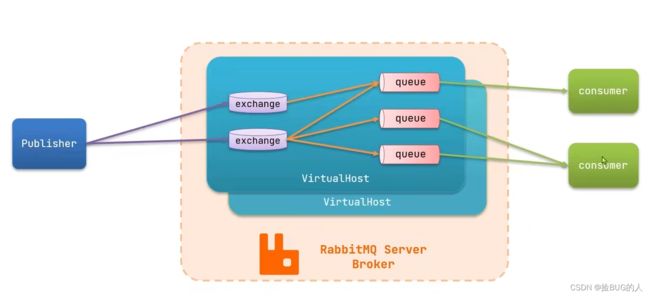
- VirtualHost: 一般属于不同用户,互相隔离,是对exchange、queue等资源的逻辑分组
- channel: 操作MQ的工具
- queue: 缓存消息队列
- exchange: 路由消息到队列中
RabbitMQ的单机部署
基于Erlang语言设计
RabbitMQ文档
在Centos7虚拟机中使用Docker来安装。
1.下载镜像
方式一:在线拉取
docker pull rabbitmq:3-management
方式二:从本地加载
将.tar镜像包上传到虚拟机中后,使用命令加载镜像即可:
docker load -i mq.tar
2.安装MQ
执行下面的命令来运行MQ容器:
docker run \
 -e RABBITMQ_DEFAULT_USER=itcast \
 -e RABBITMQ_DEFAULT_PASS=123321 \
 --name mq \
 --hostname mq1 \
 -p 15672:15672 \ # 15672是管理平台的端口
 -p 5672:5672 \ # 5672消息通信的端口
 -d \
 rabbitmq:3-management
在浏览器使用虚拟机地址:15672就能看到管理平台
ps.一般情况下每个用户要独享一个虚拟主机
管理后台介绍
RabbitMQ入门
官方入门示例
常见消息模型
- 基本消息队列basic queue
- 工作消息队列work queue
- 发布订阅:广播fanout
- 发布订阅:路由direct
- 发布订阅:主题topic
SpringAMQP
- 监听器容器,异步处理入栈消息
- 发送和接收消息的RabbitTemplate
- RabbitAdmin用于自动声明队列,交换和绑定
exchange、queue这种东西,如果没有提前创建好,在使用的时候也会自动创建
SpringAMQP实现基础消息队列
- 父工程引入spring-amqp依赖
        <!--AMQP依赖,包含RabbitMQ-->
        <dependency>
            <groupId>org.springframework.boot</groupId>
            <artifactId>spring-boot-starter-amqp</artifactId>
        </dependency>
- 在publisher服务中利用RabbitTemplate发送消息到simple.queue队列
在publisher的application.yml中添加mq的连接信息
spring:
  rabbitmq:
    host: 192.168.36.128 # 主机名
    port: 5672
    virtual-host: / # 虚拟主机
    username: itcast
    password: 123456
在测试类中编写一个测试方法,注入RabbitTemplate对象
别忘了加注解让spring boot启动,要不然没东西注入报空指针
//@RunWith(SpringRunner.class)
@SpringBootTest
public class PublisherTest {

    @Resource
    private RabbitTemplate rabbitTemplate;

    @Test
    public void testSimpleQueue(){
        String queueName = "simple.queue";
        String message = "hello, spring amqp!";
        rabbitTemplate.convertAndSend(queueName, message);
    }
}
运行测试方法,在管理平台中就能看到队列中有一个消息了
- 在consumer服务中编写消费逻辑,绑定simple.queue队列
同样,添加依赖,然后在配置文件中添加AMQP信息
消费者只需要新建一个类(为了被Springboot找到并内部注入需要添加@Component),定义一个监听方法(用@RabbitListener修饰)即可:
@Component
public class SpringRabbitListener {

    @RabbitListener(queues = "simple.queue")
    public void listenSimpleQueueMessage(String message){
        System.out.println("spring消费者接收到消息:"+message);
    }
}
启动consumer微服务以后,它会自动监听simple.listener队列中有没有消息,如果有就直接拿过来

SpringAMQP实现工作队列
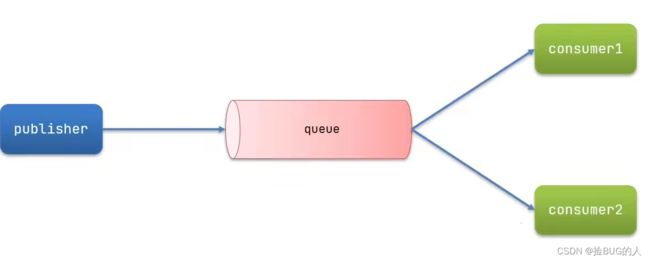
绑定两个consumer可以提高消息处理的速度,避免消息堆积
假设publisher共发送了50条消息,那设置两个consumer的监听者:
@Component
public class SpringRabbitListener {
    @RabbitListener(queues = "simple.queue")
    public void listenWorkQueueMessage1(String msg) throws InterruptedException {
        System.out.println("消费者1接收到消息:"+msg);
        Thread.sleep(50);
    }

    @RabbitListener(queues = "simple.queue")
    public void listenWorkQueueMessage2(String msg) throws InterruptedException {
        System.err.println("消费者2接收到消息:"+msg);
        Thread.sleep(10);
    }
}
事实上,50条消息被平均分配给了两个consumer监听器,消费者1接收完25条以后还要慢慢等消费者2接收完它的25条,并不会抢消息
这是消息预取机制造成的问题,两个消费者是在消费前就把消息分配好了
在配置文件中,可以设置消息预取的上限simple.prefetch(默认为无限),设置为1的时候就是一条一条取,以达到能者多劳,总体速度变快的效果。
spring:
  rabbitmq:
    host: 192.168.36.128
    port: 5672
    virtual-host: /
    username: itcast
    password: 123456
    listener:
      simple:
        prefetch: 1 # 每次只能获取一条消息,处理完成才拿下一条
SpringAMQP实现发布订阅
发布订阅模式与先前案例的区别是,允许同一消息被群发给多个消费者,而不是一个消费者消费完就删除。实现方法靠exchange(交换机)
常见的场景也是一个事件的完成会调动很多后续的服务
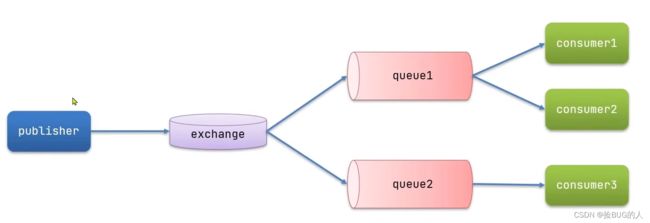
消息发布者现在只需要把消息交给交换机,不需要知道给哪些队列,交换机会帮助转发
交换机三种类型:
- Fanout广播
- Direct路由
- Topic话题
1. Fanout Exchange 广播模式
- 在consumer中声明队列、交换机,并且把队列绑定到交换机(下面还有使用@RabbitListener注解声明和绑定的方法)
@Configuration
public class FanoutConfig {
    @Bean // 声明交换机
    public FanoutExchange fanoutExchange(){
        return new FanoutExchange("itcast.fanout");
    }
    @Bean // 声明队列
    public Queue fanoutQueue1(){
        return new Queue("fanout.queue1");
    }
    @Bean // 绑定
    public Binding bindingQueue1(Queue fanoutQueue1, FanoutExchange fanoutExchange){
        return BindingBuilder.bind(fanoutQueue1).to(fanoutExchange);
    }//以相同方式声明第2个队列并绑定
    @Bean
    public Queue fanoutQueue2(){
        return new Queue("fanout.queue2");
    }
    @Bean
    public Binding bindingQueue2(Queue fanoutQueue2, FanoutExchange fanoutExchange){
        return BindingBuilder.bind(fanoutQueue2).to(fanoutExchange);
    }
}
这些Bean会被springboot自动装配,被AMQP使用
2. 在consumer中编写两个消费者方法,分别监听fanout.queue1和fanout.queue2
@Component
public class SpringRabbitListener {

    @RabbitListener(queues = "fanout.queue1")
    public void listenFanoutQueueMessage1(String msg) throws InterruptedException {
        System.out.println("消费者1接收到消息:"+msg);
        Thread.sleep(50);
    }

    @RabbitListener(queues = "fanout.queue2")
    public void listenFanoutQueueMessage2(String msg) throws InterruptedException {
        System.err.println("消费者2接收到消息:"+msg);
        Thread.sleep(10);
    }
}
- 在publisher中编写测试方法,向itcast.fanout发送消息
@Test
public void testSendFanoutExchange(){
    // 交换机名称
    String exchangeName = "itcast.fanout";
    // 消息
    String msg = "it's a broadcast";
    // 发送
    rabbitTemplate.convertAndSend(exchangeName, "", msg);
}
2. Direct Exchange 路由模式
DIrect Exchange会根据规则把消息路由(routes)到指定队列
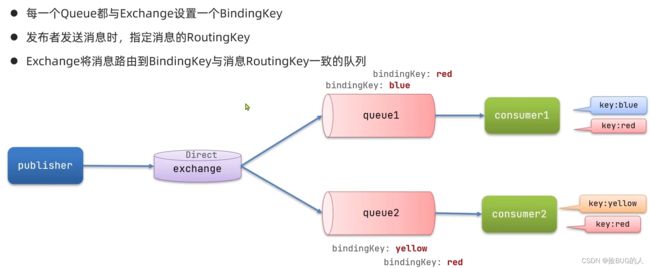
实现思路如下:
- 利用@RabbitListener注解声明Exchange、Queue、RoutingKey,之前那种自定义Bean的方式比较繁琐
@Component
public class SpringRabbitListener {
	@RabbitListener(bindings = @QueueBinding(
	    	value = @Queue(name = "direct.queue1"),
	        exchange = @Exchange(name = "itcast.direct", type = "direct"),
	        key = {"red", "blue"}
	))
	public void listenDirectQueue1(String msg){
	    System.out.println("消费者接收到来自direct.queue1的消息:"+msg);
	}

	@RabbitListener(bindings = @QueueBinding(
	     	value = @Queue(name = "direct.queue2"),
	        exchange = @Exchange(name = "itcast.direct", type = "direct"),
	        key = {"red", "yellow"}
	))
	public void listenDirectQueue2(String msg){
	    System.out.println("消费者接收到来自direct.queue2的消息:"+msg);
	}
}
- 发送消息,携带routingKey
@SpringBootTest
public class PublisherTest {

    @Resource
    private RabbitTemplate rabbitTemplate;

    @Test
    public void testSendDirectExchange(){
        // 交换机名称
        String exchangeName = "itcast.direct";
        // 消息
        String msg = "Hello Blue";
        // 发送
        rabbitTemplate.convertAndSend(exchangeName, "blue", msg);
    }
}
3. Topic Exchange 话题
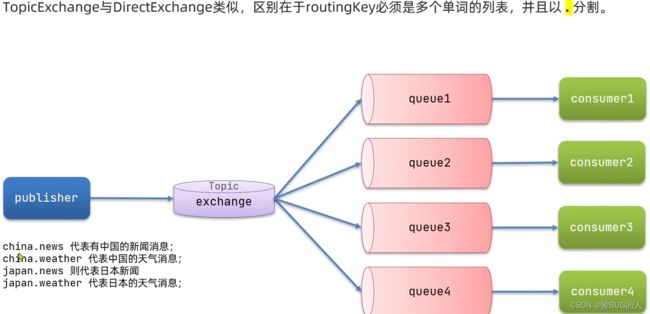
Topic中的BindingKey支持通配符(注意是BindingKey):
#: 0或多个单词
*: 1个单词

实现思路:
在@RabbitListener中
- 声明bindingKey的时候使用通配符
- Exchange的type指定为
"topic"
@RabbitListener(bindings = @QueueBinding(
    	value = @Queue(name = "topic.queue1"),
        exchange = @Exchange(name = "itcast.topic", type = "topic"),
        key = {"china.#"}
))
这样routingKey只要符合bingdingKey的模式,就会把消息分发给它
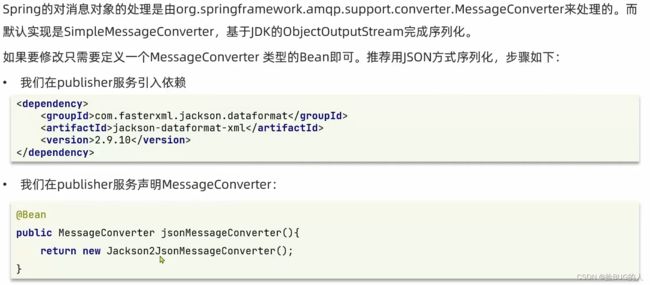
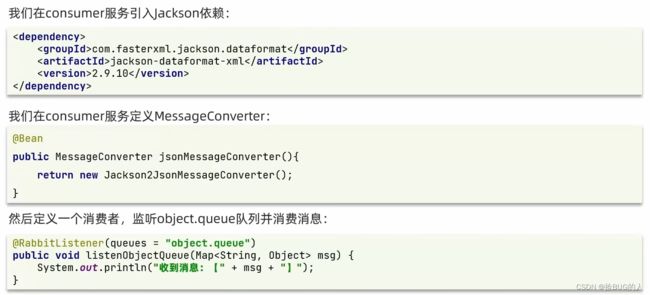
消息转换器
rabbitTemplate.convertAndSend发送的信息是Object类型的,所以可以传任意对象,会自动序列化
默认使用的序列化方式是java提供的序列化,类会被序列化成字节串,有许多缺点
我们可以采用别的序列化方式,比如JSON序列化方式,把MessageConverter类型的容器中的对象顶掉就行
