由浅入深MFC学习摘记--第四部分下
目录
- 第十三章 多文件与多显示
-
- MDI 和 SDI
- 动态拆分窗口
- 静态拆分窗口
- 拆分 拆分窗口
- 示例
- 同源子窗口
-
- CMDIFrameWnd::OnWindowNew
- 范例程序
- 多文件
- 第十四章 MFC 多线程
-
- 从操作系统层面看执行线程
- 线程优先级
- 从程序设计层面看执行线程
- MFC 多线程程序设计
-
- 工作线程
- UI线程
- 执行线程的结束
- 线程同步
- 第十五章 定制向导
- 第十六章 组件与ActiveX Control
-
- components
- ActiveX Controls
-
- ActiveX Control 基础观念:Properties 、Methods、Event
- ActiveX Controls的使用
第十三章 多文件与多显示
MDI 和 SDI
简单理解为,MDI可以同时打开多个文档并显示;SDI同一时间只能打开一个文档。
动态拆分窗口
静态拆分窗口
静态拆分窗口的窗口个数限制是16 列x 16 行,
动态拆分窗口的窗口个数限制是2 列x 2 行。
不论动态拆分或静态拆分,拆分窗口都由CSplitterWnd 提供服务。动态拆分窗口的诞生是靠CSplitterWnd::Create,静态拆分窗口的诞生则是靠CSplitterWnd::CreateStatic。
将上述动态拆分窗口工程修改:
BOOL CChildFrame::OnCreateClient(LPCREATESTRUCT /*lpcs*/, CCreateContext* pContext)
{
	//产生静态分裂窗口,横列为1,纵行为2。
	m_wndSplitter.CreateStatic(this, 1, 2);
	//产生第一个窗口(标号0,0)的view 窗口。
	m_wndSplitter.CreateView(0, 0, RUNTIME_CLASS(CMyView1),
		CSize(100, 0), pContext);
	//产生第二个窗口(标号0,1)的view 窗口。
	m_wndSplitter.CreateView(0, 1, RUNTIME_CLASS(CMyView2),
		CSize(0, 0), pContext);
	return true;
	return m_wndSplitter.Create(this,
		2, 2,			// TODO: 调整行数和列数
		CSize(10, 10),	// TODO: 调整最小窗格大小
		pContext);
}
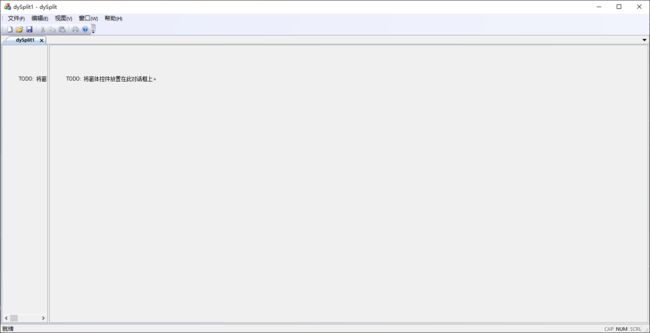
其中CMyView1和CMyView2是两个基于CFormView创建的视图类。
CreateStatic
BOOL CreateStatic(
	CWnd* pParentWnd,
	int nRows,
	in nCols,
 	DWORD dwStyle = WS_CHILD | WS_VISIBLE,
 	UINT nID = AFX_IDW_PANE_FIRST );
第一个参数代表此拆分窗口的父窗口。
第二和第三参数代表行数和列数的个数。
第四个参数是窗口风格,默认为WS_CHILD | WS_VISIBLE,
第五个参数代表窗口(也是一个窗口)的ID 起始值。
CreateView
virtual BOOL CreateView(
	int row, //窗口的标号(从0 起算)。
	int col, //窗口的标号(从0 起算)。
	CRuntimeClass* pViewClass,//View 类的CRuntimeClass指针
 	SIZE sizeInit, //是窗口的初始大小
 	CCreateContext* pContext //是CCreateContext 指针。只要把OnCreateClient 获得的第二个参数填入即可
 );
第三个参数pViewClass,可以利用RUNTIME_CLASS 宏取此指针,也可以利用OnCreateClient 的第二个参数CCreateContext* pContext 所储存的一个成员变量m_pNewViewClass
CSize(100, 0) 表示窗口宽度为100 个图素。高度倒是不为0,对于行为1 的拆分窗口而言,拆分窗口高度永远为父窗口高度。对于列为2 的拆分窗口,右边窗口的宽度永远是窗口总宽度减去左边窗口的宽度。
如果需要使用窗口大小,可以在OnDraw中调用RECT rc; this->GetClientRect(&rc);
拆分 拆分窗口
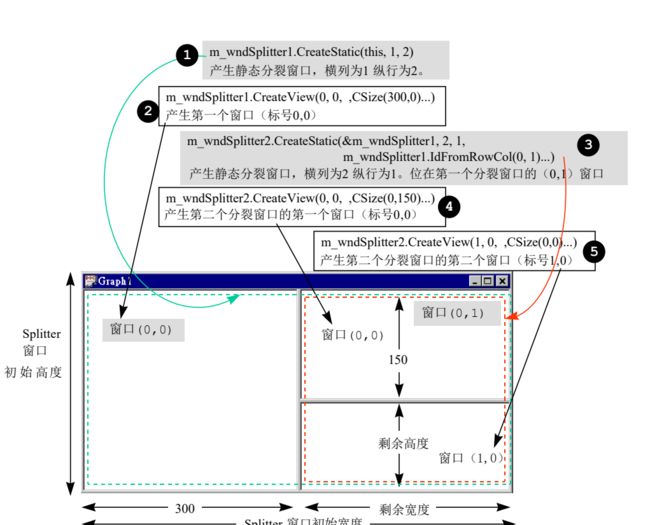
在拆分窗口上继续拆分。
// in header file
class CChildFrame : public CMDIChildWnd
{
...
protected:
 CSplitterWnd m_wndSplitter1;
 CSplitterWnd m_wndSplitter2;/新增成员
public:
// Overrides
 // ClassWizard generated virtual function overrides
 //{{AFX_VIRTUAL(CChildFrame)
 public:
 virtual BOOL OnCreateClient(LPCREATESTRUCT lpcs, CCreateContext* pContext);
 virtual BOOL PreCreateWindow(CREATESTRUCT& cs);
 //}}AFX_VIRTUAL
...
};
BOOL CChildFrame::OnCreateClient(LPCREATESTRUCT /*lpcs*/, CCreateContext* pContext)
{
		//产生静态分裂窗口,行为 1,列为2。
		m_wndSplitter.CreateStatic(this, 1, 2);
		//产生分裂窗口的第一个窗口(标号 0,0)的view 窗口。
		m_wndSplitter.CreateView(0, 0, RUNTIME_CLASS(CMyView1),
			CSize(300, 0), pContext);
		//产生第二个分裂窗口,行为2,列为1。位在第一个分裂窗口的(0, 1)窗口
		m_wndSplitter2.CreateStatic(&m_wndSplitter, 2, 1,
			WS_CHILD | WS_VISIBLE, m_wndSplitter.IdFromRowCol(0, 1));
		//产生第二个分裂窗口的第一个窗口(标号0, 0)的view 窗口。
		m_wndSplitter2.CreateView(0, 0, RUNTIME_CLASS(CMyView2),
			CSize(0, 150), pContext);
		//产生第二个分裂窗口的第二个窗口(标号1, 0)的view 窗口。
		m_wndSplitter2.CreateView(1, 0, RUNTIME_CLASS(CMyView3),
				CSize(0, 0), pContext);
		return TRUE;
}
示例
练习文件https://download.csdn.net/download/watson_pillow/87712908,忘记删除编译文件了

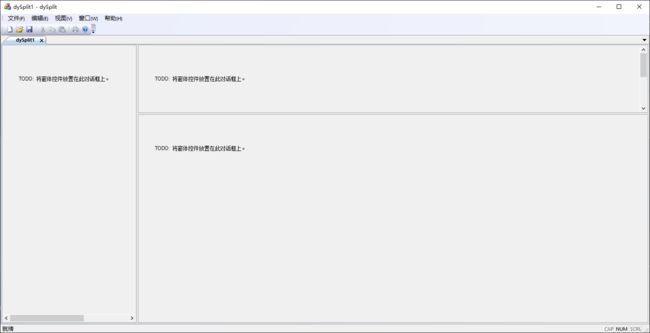
新建多文档MFC项目,需要勾选 拆分窗口。
2、工具栏按钮创建,使用相同的ID,绘制时选择对应工具栏的工具(画刷、画笔、颜色)

// in GRAPHDOC.H
class CGraphDoc : public CDocument
{
...
// Generated message map functions
protected:
 //{{AFX_MSG(CGraphDoc)
 afx_msg void OnGraphData1();
 afx_msg void OnGraphData2();
 afx_msg void OnGraphData3();
 afx_msg void OnUpdateGraphData1(CCmdUI* pCmdUI);
 afx_msg void OnUpdateGraphData2(CCmdUI* pCmdUI);
 afx_msg void OnUpdateGraphData3(CCmdUI* pCmdUI);
 //}}AFX_MSG
 DECLARE_MESSAGE_MAP()
};
// in GRAPHDOC.CPP
BEGIN_MESSAGE_MAP(CGraphDoc, CDocument)
 //{{AFX_MSG_MAP(CGraphDoc)
 ON_COMMAND(ID_GRAPH_DATA1, OnGraphData1)
 ON_COMMAND(ID_GRAPH_DATA2, OnGraphData2)
 ON_COMMAND(ID_GRAPH_DATA3, OnGraphData3)
 ON_UPDATE_COMMAND_UI(ID_GRAPH_DATA1, OnUpdateGraphData1)
 ON_UPDATE_COMMAND_UI(ID_GRAPH_DATA2, OnUpdateGraphData2)
 ON_UPDATE_COMMAND_UI(ID_GRAPH_DATA3, OnUpdateGraphData3)
 //}}AFX_MSG_MAP
END_MESSAGE_MAP()
4、创建类
| 类别名称 | 基础类别 |
|---|---|
| CTextView | CView |
| CBarView | CView |

5、重写CChildFrame::OnCreateClient:
#include "stdafx.h"
#include "Graph.h"
#include "ChildFrm.h"
#include "TextView.h"
#include "BarView.h"
...
BOOL CChildFrame::OnCreateClient( LPCREATESTRUCT /*lpcs*/,
 CCreateContext* pContext)
{
 //产生静态拆分窗口,横列为1,纵行为2。
 m_wndSplitter1.CreateStatic(this, 1, 2);
 //产生拆分窗口的第一个窗口(标号0,0)的view 窗口,采用CTextView。
 m_wndSplitter1.CreateView(0, 0, RUNTIME_CLASS(CTextView),
 CSize(300, 0), pContext);
 //产生第二个拆分窗口,横列为2 纵行为1。位在第一个分裂窗口的(0,1)窗口
 m_wndSplitter2.CreateStatic(&m_wndSplitter1, 2, 1,
 WS_CHILD | WS_VISIBLE, m_wndSplitter1.IdFromRowCol(0, 1));
 //产生第二个拆分窗口的第一个窗口(标号0,0)的view 窗口,采用CBarView。
 m_wndSplitter2.CreateView(0, 0, RUNTIME_CLASS(CBarView),
 CSize(0, 150), pContext);
 //产生第二个拆分窗口的第二个窗口(标号1,0)的view 窗口,采用CGraphView。
 m_wndSplitter2.CreateView(1, 0, pContext->m_pNewViewClass,
 CSize(0, 0), pContext);//pContext->m_pNewViewClass 取代RUNTIME_CLASS(CGraphView),避免编译报错
 //设定active pane
  SetActiveView((CView*)m_wndSplitter1.GetPane(0,0));
 return TRUE;
}
6、修改CGraphDoc,增加一个整数数组m_intArray,增加了一个SetValue 成员函数,并且在【Graph Data】菜单命令被执行时,为m_intArray 设定不同的初值
// in GRAPHDOC.H
class CGraphDoc : public CDocument
{
...
public:
 CArray<int,int> m_intArray;
public:
 void SetValue(int i0, int i1, int i2, int i3, int i4,
 int i5, int i6, int i7, int i8, int i9);
...
};
// in GRAPHDOC.CPP
CGraphDoc::CGraphDoc()
{
 SetValue(5, 10, 15, 20, 25, 78, 64, 38, 29, 9);
}
void CGraphDoc::SetValue(int i0, int i1, int i2, int i3, int i4,
 int i5, int i6, int i7, int i8, int i9);
{
 m_intArray.SetSize(DATANUM, 0);
 m_intArray[0] = i0;
 m_intArray[1] = i1;
 m_intArray[2] = i2;
 m_intArray[3] = i3;
 m_intArray[4] = i4;
 m_intArray[5] = i5;
 m_intArray[6] = i6;
 m_intArray[7] = i7;
 m_intArray[8] = i8;
 m_intArray[9] = i9;
}
void CGraphDoc::OnGraphData1()
{
 SetValue(5, 10, 15, 20, 25, 78, 64, 38, 29, 9);
 UpdateAllViews(NULL);
}
void CGraphDoc::OnGraphData2()
{
 SetValue(50, 60, 70, 80, 90, 23, 68, 39, 73, 58);
  UpdateAllViews(NULL);
}
void CGraphDoc::OnGraphData3()
{
 SetValue(12, 20, 8, 17, 28, 37, 93, 45, 78, 29);
 UpdateAllViews(NULL);
}
void CGraphDoc::OnUpdateGraphData1(CCmdUI* pCmdUI)
{
 pCmdUI->SetCheck(m_intArray[0] == 5);
}
void CGraphDoc::OnUpdateGraphData2(CCmdUI* pCmdUI)
{
 pCmdUI->SetCheck(m_intArray[0] == 50);
}
void CGraphDoc::OnUpdateGraphData3(CCmdUI* pCmdUI)
{
 pCmdUI->SetCheck(m_intArray[0] == 12);
}
//增加宏
#define DATANUM 10
#define DATAMAX 100
7、修改CGraphView的OnDraw
// CGraphView 绘图

void CGraphView::OnDraw(CDC* pDC)
{
		CGraphDoc *pDoc = GetDocument();
		ASSERT_VALID(pDoc);
		int cxDot, cxDotSpacing, cyDot, cxGraph, cyGraph, x, y, i;
		RECT rc;
		CPen pen(PS_SOLID, 1, RGB(255, 0, 0)); // red pen
		CBrush brush(RGB(255, 0, 0));          // red brush
		CBrush *pOldBrush = pDC->SelectObject(&brush);
		CPen *pOldPen = pDC->SelectObject(&pen);
		cxGraph = 100;
		cyGraph = DATAMAX; // defined in resource.h
		this->GetClientRect(&rc);
		pDC->SetMapMode(MM_ANISOTROPIC);
		pDC->SetWindowOrg(0, 0);
		pDC->SetViewportOrg(10, rc.bottom - 10);
		pDC->SetWindowExt(cxGraph, cyGraph);
		pDC->SetViewportExt(rc.right - 20, -(rc.bottom - 20));
		//我们希望图形占满窗口的整个可用空间(以水平方向为准)
		//并希望曲线点的宽度是点间距宽度的1.2,
			//所以(dot_spacing + dot_width)*num_datapoints = graph_width
			//亦即dot_spacing * 3 / 2 * num_datapoints = graph_width
			//亦即dot_spacing = graph_width / num_datapoints * 2 / 3
		cxDotSpacing = (2 * cxGraph) / (3 * DATANUM);
		cxDot = cxDotSpacing / 2;
		if (cxDot < 3)
			cxDot = 3;
		cyDot = cxDot;
		//坐标轴
		pDC->MoveTo(0, 0);
		pDC->LineTo(0, cyGraph);
		pDC->MoveTo(0, 0);
		pDC->LineTo(cxGraph, 0);
		//画出资料点
		pDC->SelectObject(::GetStockObject(NULL_PEN));
		for (x = 0 + cxDotSpacing, y = 0, i = 0; i < DATANUM; i++, x += cxDot + cxDotSpacing)
			pDC->Rectangle(x, y + pDoc->m_intArray[i],
				x + cxDot, y + pDoc->m_intArray[i] - cyDot);
		pDC->SelectObject(pOldBrush);
		pDC->SelectObject(pOldPen);
		return;
}
修改CTextView OnDraw
// CTextView 绘图

void CTextView::OnDraw(CDC* pDC)
{
	//CDocument* pDoc = GetDocument();
	// TODO:  在此添加绘制代码
	CGraphDoc *pDoc = (CGraphDoc *)GetDocument();
	TEXTMETRIC tm;
	int x, y, cy, i;
	TCHAR sz[20];
	pDC->GetTextMetrics(&tm);
	cy = tm.tmHeight;
	pDC->SetTextColor(RGB(255, 0, 0)); // red text
	for (x = 5, y = 5, i = 0; i < DATANUM; i++, y += cy)
	{
		wsprintf(sz,_T("%d"), pDoc->m_intArray[i]);
		pDC->TextOut(x, y, sz, lstrlen(sz));
	}
}
修 改 CBarView OnDraw
// CBarView 绘图

void CBarView::OnDraw(CDC* pDC)
{
	//CDocument* pDoc = GetDocument();
	// TODO:  在此添加绘制代码
	CGraphDoc *pDoc = (CGraphDoc *)GetDocument();
	int cxBar, cxBarSpacing, cxGraph, cyGraph, x, y, i;
	RECT rc;
	CBrush brush(RGB(255, 0, 0)); // red brush
	CBrush *pOldBrush = pDC->SelectObject(&brush);
	CPen pen(PS_SOLID, 1, RGB(255, 0, 0)); // red pen
	CPen *pOldPen = pDC->SelectObject(&pen);
	cxGraph = 100;
	cyGraph = DATAMAX; // defined in resource.h
	this->GetClientRect(&rc);
	pDC->SetMapMode(MM_ANISOTROPIC);
	pDC->SetWindowOrg(0, 0);
	pDC->SetViewportOrg(10, rc.bottom - 10);
	pDC->SetWindowExt(cxGraph, cyGraph);
	pDC->SetViewportExt(rc.right - 20, -(rc.bottom - 20));
	/*长条图的条状物之间距离是条状物宽度的1/3。
	我们希望条状物能够填充窗口的整个可用空间。
		所以(bar_spacing + bar_width) * num_bars = graph_width
		亦即bar_width * 4 / 3 * num_bars = graph_width
		亦即bar_width = graph_width / num_bars * 3 / 4
		*/
	cxBar = (3 * cxGraph) / (4 * DATANUM);
	cxBarSpacing = cxBar / 3;
	if (cxBar < 3)
		cxBar = 3;
	//坐标轴
	pDC->MoveTo(0, 0);
	pDC->LineTo(0, cyGraph);
	pDC->MoveTo(0, 0);
	pDC->LineTo(cxGraph, 0);
	//长条图
	for (x = 0 + cxBarSpacing, y = 0, i = 0; i < DATANUM; i++, x += cxBar + cxBarSpacing)
		pDC->Rectangle(x, y, x + cxBar, y + pDoc->m_intArray[i]);
	pDC->SelectObject(pOldPen);
	pDC->SelectObject(pOldBrush);
}
同源子窗口
目标:【Window/New Window】菜单项目令Framework 拷贝另一份目前作用中的view 窗口。是不是可以引导它使用另一个view 类,以不同的方式表现同一份资料。
CMDIFrameWnd::OnWindowNew
也就是【Window/New Window】调用后的响应函数。
void CMDIFrameWnd::OnWindowNew()
{
    CMDIChildWnd *pActiveChild = MDIGetActive();
    CDocument *pDocument;
    if (pActiveChild == NULL ||
        (pDocument = pActiveChild->GetActiveDocument()) == NULL)
    {
        TRACE0("Warning: No active document for WindowNew command.\n");
        AfxMessageBox(AFX_IDP_COMMAND_FAILURE);
        return; // command failed
    }
    // otherwise we have a new frame !
    CDocTemplate *pTemplate = pDocument->GetDocTemplate();
    ASSERT_VALID(pTemplate);
    CFrameWnd *pFrame = pTemplate->CreateNewFrame(pDocument, pActiveChild);
    if (pFrame == NULL)
    {
        TRACE0("Warning: failed to create new frame.\n");
        return; // command failed
    }
    pTemplate->InitialUpdateFrame(pFrame, pDocument);
}
我们另准备一个View 类,有着不同的OnDraw 显示方式,并再准备好另一份Document Template,记录该新的View 类,然后参考 CDocTemplate *pTemplate = pDocument->GetDocTemplate();让它使用这新的Document Template
范例程序
使用向导创建MFC多文档框架工程Text;
资源中增加菜单
| 命令项目名称 | 识别码(ID) | 提示字符串 |
|---|---|---|
| New Text Window | ID_WINDOW_TEXT | New a Text Window with Active Document |
| New Hex Window | ID_WINDOW_HEX | New a Hex Window with Active Document |
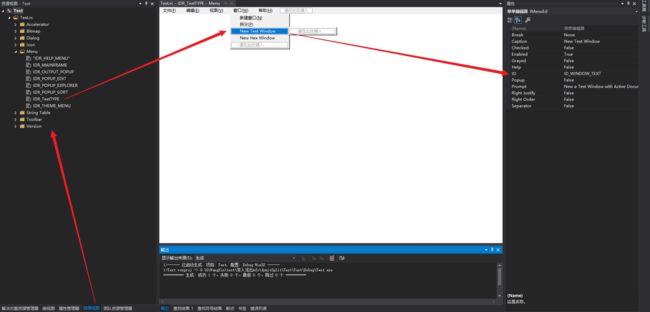
再在工具栏中增加两个按钮,分别对应于新添加的两个菜单命令项。
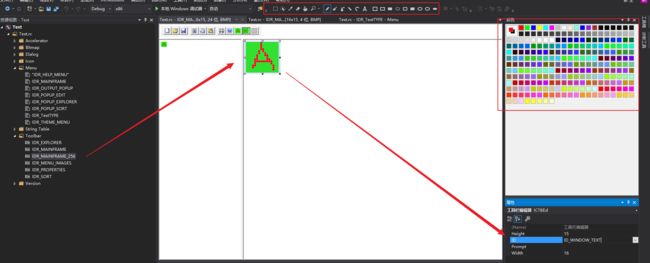
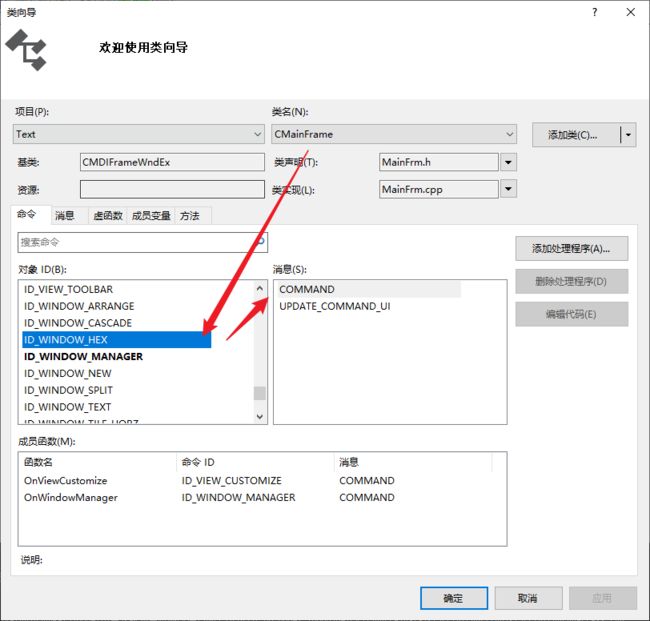
| UI 对象 | 消息 | 消息处理函数 |
|---|---|---|
| ID_WINDOW_TEXT | COMMAND | OnWindowText |
| ID_WINDOW_HEX | COMMAND | OnWindowHex |
增加如下代码:
// in TEXT.H
class CTextApp : public CWinApp
{
public:
 CMultiDocTemplate* m_pTemplateTxt;
 CMultiDocTemplate* m_pTemplateHex;
 ...
};

// in TEXT.CPP
...
#include "TextView.h"
#include "CHexView.h"
...
BOOL CTextApp::InitInstance()
{
 ...
 CMultiDocTemplate* pDocTemplate;
 pDocTemplate = new CMultiDocTemplate(
 IDR_TEXTTYPE,
 RUNTIME_CLASS(CTextDoc),
 RUNTIME_CLASS(CChildFrame), // custom MDI child frame
 RUNTIME_CLASS(CTextView));
 AddDocTemplate(pDocTemplate);
 m_pTemplateTxt = new CMultiDocTemplate(
 IDR_TextTYPE,
 RUNTIME_CLASS(CTextDoc),
 RUNTIME_CLASS(CChildFrame), // custom MDI child frame
 RUNTIME_CLASS(CTextView));
 m_pTemplateHex = new CMultiDocTemplate(
IDR_TextTYPE,
 RUNTIME_CLASS(CTextDoc),
 RUNTIME_CLASS(CChildFrame), // custom MDI child frame
 RUNTIME_CLASS(CHexView));
 ...
}
int CTextApp::ExitInstance()
{
 delete m_pTemplateTxt;
 delete m_pTemplateHex;
 return CWinApp::ExitInstance();
}
修改CTextDoc
// in TEXTDOC.H
class CTextDoc : public CDocument
{
public:
 CStringArray m_stringArray;
...


// in TEXTDOC.CPP
BOOL CTextDoc::OnNewDocument()
{
 if (!CDocument::OnNewDocument())
 return FALSE;
 m_stringArray.SetSize(10);
 m_stringArray[0] = "If you love me let me know, ";
 m_stringArray[1] = "if you don't then let me go, ";
 m_stringArray[2] = "I can take another minute ";
 m_stringArray[3] = " of day without you in it. ";
 m_stringArray[4] = " ";
 m_stringArray[5] = "If you love me let it be, ";
 m_stringArray[6] = "if you don't then set me free";
 m_stringArray[7] = "... ";
 m_stringArray[8] = "SORRY, I FORGET IT! ";
 m_stringArray[9] = " J.J.Hou 1995.03.22 19:26";
 return TRUE;
}
};
修改CTextView::OnDraw 函数
void CTextView::OnDraw(CDC* pDC)
{
	CTextDoc* pDoc = GetDocument();
	ASSERT_VALID(pDoc);
	if (!pDoc)
		return;

	int i, j, nHeight;
	TEXTMETRIC tm;
	pDC->GetTextMetrics(&tm);
	nHeight = tm.tmHeight + tm.tmExternalLeading;
	j = pDoc->m_stringArray.GetSize();
	for (i = 0; i < j; i++) {
		pDC->TextOut(10, i*nHeight, pDoc->m_stringArray[i]);
	}
	// TODO: 在此处为本机数据添加绘制代码
}
修改CHexView
#include "stdafx.h"
#include "Text.h"
#include "TextDoc.h"
#include "HexView.h"
...
void CHexView::OnDraw(CDC* pDC)
{
	//CDocument* pDoc = GetDocument();
	// TODO:  在此添加绘制代码
	CTextDoc *pDoc = (CTextDoc *)GetDocument();
	int i, j, k, l, nHeight;
	long n;
	TCHAR temp[10];
	CString Line;
	TEXTMETRIC tm;
	pDC->GetTextMetrics(&tm);
	nHeight = tm.tmHeight + tm.tmExternalLeading;
	j = pDoc->m_stringArray.GetSize();
	for (i = 0; i < j; i++)
	{
		wsprintf(temp, _T("%02x "), i);
		Line = temp;
		l = pDoc->m_stringArray[i].GetLength();
		for (k = 0; k < l; k++)
		{
			n = pDoc->m_stringArray[i][k] & 0x00FF;
			wsprintf(temp, _T("%02lx "), n);
			Line += temp;
		}
		pDC->TextOut(10, i * nHeight, Line);
	}
}
修改OnWindowText 和OnWindowHex
void CMainFrame::OnWindowText()
{
    CMDIChildWnd *pActiveChild = MDIGetActive();
    CDocument *pDocument;
    if (pActiveChild == NULL ||
        (pDocument = pActiveChild->GetActiveDocument()) == NULL)
    {
        TRACE0("Warning: No active document for WindowNew command\n");
        AfxMessageBox(AFX_IDP_COMMAND_FAILURE);
        return; // command failed
    }
    // otherwise we have a new frame!
    CDocTemplate *pTemplate = ((CTextApp *)AfxGetApp())->m_pTemplateTxt;
    ASSERT_VALID(pTemplate);
    CFrameWnd *pFrame = pTemplate->CreateNewFrame(pDocument, pActiveChild);
    if (pFrame == NULL)
    {
        TRACE0("Warning: failed to create new frame\n");
        AfxMessageBox(AFX_IDP_COMMAND_FAILURE);
        return; // command failed
    }
    pTemplate->InitialUpdateFrame(pFrame, pDocument);
}
void CMainFrame::OnWindowHex()
{
    CMDIChildWnd *pActiveChild = MDIGetActive();
    CDocument *pDocument;
    if (pActiveChild == NULL ||
        (pDocument = pActiveChild->GetActiveDocument()) == NULL)
    {
        TRACE0("Warning: No active document for WindowNew command\n");
        AfxMessageBox(AFX_IDP_COMMAND_FAILURE);
        return; // command failed
    }
    // otherwise we have a new frame!
    CDocTemplate *pTemplate = ((CTextApp *)AfxGetApp())->m_pTemplateHex;
    ASSERT_VALID(pTemplate);
    CFrameWnd *pFrame = pTemplate->CreateNewFrame(pDocument, pActiveChild);
    if (pFrame == NULL)
    {
        TRACE0("Warning: failed to create new frame\n");
        AfxMessageBox(AFX_IDP_COMMAND_FAILURE);
        return; // command failed
    }
    pTemplate->InitialUpdateFrame(pFrame, pDocument);
}

但是如果CMDIFrameWnd::OnWindowNew 内容改了,你就得注意本节这个方法还能适用否
多文件
在graph基础上增加一个类CNewDoc:

修改序列化函数:
void CNewDoc::Serialize(CArchive& ar)
{
	if (ar.IsStoring())
	{
		// TODO:  在此添加存储代码
	}
	else
	{
		// TODO:  在此添加加载代码
	}
	((CEditView*)m_viewList.GetHead())->SerializeRaw(ar);
}
修改Graph.cpp
#include "stdafx.h"
#include "Graph.h"
#include "MainFrm.h"
#include "ChildFrm.h"
#include "GraphDoc.h"
#include "GraphView.h"
#include "CNewDoc.h"
...
BOOL CGraphApp::InitInstance()
{
 ...
 CMultiDocTemplate* pDocTemplate;
 pDocTemplate = new CMultiDocTemplate(
 IDR_GRAPHTYPE,
 RUNTIME_CLASS(CGraphDoc),
 RUNTIME_CLASS(CChildFrame), // custom MDI child frame
 RUNTIME_CLASS(CGraphView));
 AddDocTemplate(pDocTemplate);
 pDocTemplate = new CMultiDocTemplate(
 IDR_NEWTYPE,
 RUNTIME_CLASS(CNewDoc),
 RUNTIME_CLASS(CMDIChildWnd), // use directly
 RUNTIME_CLASS(CEditView));
 AddDocTemplate(pDocTemplate);
 ...
}
CMultiDocTemplate 的第一个参数 是自行设计一套适用于NewDoc 文件类型的UI 系统出来的ID
第十四章 MFC 多线程
从操作系统层面看执行线程
模块:由系统创建一个名为Module Database(MDB)数据结构来管理它,就是一个模块。
进程:操作系统使用一个名为Process Database(PDB)数据结构,来记录(管理)进程所拥有的一切。
线程:由系统创建一个名为(Thread Database,TDB)数据结构来管理它,记录线程的所有相关资料,包括执行线程区域储存空间(Thread Local Storage,TLS)、消息队列、handle 表格、地址空间(Memory Context)等等。
进程(PDB ) 通过过「MODREF 串行」连接到其所使用的所有模块:

进程包含了:
a. 一个虚拟的内存空间 所有程序的代码和数据都在这片内存空间中。
b. 内存空间中排布了很多的模块
c. 至少有一个线程
在进程的虚拟内存中,一般会加载一个exe,很多的dll。他们都称之为模块。
进程本身是一个综合了各种资源的东西,是不能执行代码,能够执行代码的是归属于进程的线程。
每一个线程都是一个独立的执行单元:
1 每一个线程有自己的一块堆栈。
2 每一个线程有自己的执行环境。线程发生切换,实际就是切换线程的执行环境
模块指的是可执行文件或动态链接库 (DLL)。每个进程包含一个或多个模块。
线程优先级
每个线程都有优先级,在较高优先级的线程完成任务的时候,较低优先级的线程可能会被迫等待。
线程优先级可以在CreateProcess 的参数中设定,或者继承创建者的优先权等级;可通过::SetThreadPriority 调整优先级.
base priority,范围从0~31数值愈高优先权愈高。
线程的优先级可以由用户手动设置,此外系统也会根据不同情形调整优先级。通常情况下,频繁地进入等待状态(进入等待状态会放弃之前仍可占用的时间份额)的线程(如IO线程),比频繁进行大量计算以至于每次都把所有时间片全部用尽的线程更受操作系统的欢迎。因为频繁进入等待的线程只会占用很少的时间,这样操作系统可以处理更多的任务。我们把频繁等待的线程称之为IO密集型线程(IO Bound Thread),而把很少等待的线程称之为CPU密集型线程(CPU Bound Thread)。IO密集型线程总是比CPU密集型线程更容易得到优先级的提升。原文链接:https://blog.csdn.net/luoweifu/article/details/46701167
参考阅读:https://blog.csdn.net/luoweifu/article/details/46595285
大部分操作系统(如Windows、Linux)的任务调度是采用时间片轮转的抢占式调度方式,也就是说一个任务执行一小段时间后强制暂停去执行下一个任务,每个任务轮流执行。任务执行的一小段时间叫做时间片,任务正在执行时的状态叫运行状态,任务执行一段时间后强制暂停去执行下一个任务,被暂停的任务就处于就绪状态等待下一个属于它的时间片的到来。这样每个任务都能得到执行,由于CPU的执行效率非常高,时间片非常短,在各个任务之间快速地切换,给人的感觉就是多个任务在“同时进行”,这也就是我们所说的并发(别觉得并发有多高深,它的实现很复杂,但它的概念很简单,就是一句话:多个任务同时执行)。
从程序设计层面看执行线程
| 与执行线程有关的Win32 API | 功能 |
|---|---|
| AttachThreadInput | 将某个执行线程的输入导向另一个执行线程 |
| CreateThread | 产生一个执行线程 |
| ExitThread | 结束一个执行线程 |
| GetCurrentThread | 取得目前执行线程的handle |
| GetCurrentThreadId | 取得目前执行线程的ID |
| GetExitCodeThread | 取得某一执行线程的结束代码(可用以决定执行线程是否已结束) |
| GetPriorityClass | 取得某一进程的优先权等级 |
| GetQueueStatus | 传回某一执行线程的消息队列状态 |
| GetThreadContext | 取得某一执行线程的context |
| GetThreadDesktop | 取得某一执行线程的desktop 对象 |
| GetThreadPriority | 取得某一执行线程的优先权 |
| GetThreadSelectorEntry | 除错器专用,传回指定之执行线程的某个selector 的LDT 记录项 |
| ResumeThread | 将某个冻结的执行线程恢复执行 |
| SetPriorityClass | 设定优先权等级 |
| SetThreadPriority | 设定执行线程的优先权 |
| Sleep | 将某个执行线程暂时冻结。其它执行线程将获得执行权。 |
| SuspendThread | 冻结某个执行线程 |
| TerminateThread | 结束某个执行线程 |
| TlsAlloc | 配置一个TLS(Thread Local Storage) |
| TlsFree | 释放一个TLS(Thread Local Storage) |
| TlsGetValue | 取得某个TLS(Thread Local Storage)的内容 |
| TlsSetValue | 设定某个TLS(Thread Local Storage)的内容 |
| WaitForInputIdle | 等待,直到不再有输入消息进入某个执行线程中 |
多线程并不能让程序执行得比较快(除非是在多CPU 机器上,并且使用支持symmetric multiprocessing 的操作系统),只是能够让程序执行时更容易对其他操作做出反应。
Worker Threads 和 U I Threads
从Windows 操作系统的角度来看,线程就是线程,并未再有什么分类。但从MFC的角度看,则把线程划分为和使用者接口无关的worker threads,以及和使用者接口(UI)有关的UI threads。
1、线程分为UI线程和工作者线程,UI线程有窗口,窗口自建了消息队列,这个UI线程维护“消息队列”,“消息队列”是界面线程和工作者线程的最大区别。所以有用户界面的一般称为UI线程,没有界面的称之为工作者线程,UI线程因为有界面,所以系统会给它维护一个消息队列,工作者线程就没有消息队列。
2、工作者线程原本是没有消息队列,但是你可以强制加一个,一般只要你的线程中出现了GDI的调用就会出现一个消息队列,线程中如果调用了GetMessage(),就可以强制加入了一个消息循环,系统就会给该线程加一个消息队列,同样用PeekMessage()也可以强制系统加入一个消息队列.工作者线程的消息传递是通过PostThreadMessage函数发送的。即:工作线程函数里面如果调用了有关消息的函数,操作系统自动为工作线成创建消息队列。
3、所谓的UI线程有窗口,窗口自建了消息队列。所谓的工作者线程初始状态没有自建消息队列。
4、UI线程消息处理过程
只有在使用MFC框架时才有UI线程和工作者线程之分。UI线程与工作者线程的区别是操作系统为UI线程创建并维护了一个消息队列。
其实线程在创建时(无论是API还是MFC),都是工作者线程。当线程调用发送消息或提取消息或图形用户界面相关的函数时,系统才为其创建一个消息队列和THREADINFO结构,这时的线程才称为UI线程。
VC开发的控制台程序的主线程是工作线程,其他程序的主线程为UI线程。_beginthreadex/CreateThread等函数创建的线程默认为工作线程,AfxBeginThread可以根据参数创建工作者线程和UI线程。
原文链接:https://blog.csdn.net/libaineu2004/article/details/40398405
多线程的使用时机:如果你的程序有许多事要忙,但是你还要随时保持注意某些外部事件(可能来自硬件或来自使用者),这时就适合使用多执行线程来帮忙。
MFC 多线程程序设计
程序产生第一个进程和执行线程,是系统加载器以及核心模块(KERNEL32)合作的结果。这块不会在代码跟踪中看到CreateProcess CreateThread。
CWinThread::CreateThread 或AfxBeginThread 内部调用了::CreateThread 或_beginthreadex ( 事实上答案是_beginthreadex)
CWinThread 的相关源代码
// in MFC 4.2 THRDCORE.CPP
CWinThread::CWinThread(AFX_THREADPROC pfnThreadProc, LPVOID pParam)
{
    m_pfnThreadProc = pfnThreadProc;
    m_pThreadParams = pParam;
    CommonConstruct();
}
CWinThread::CWinThread()
{
    m_pThreadParams = NULL;
    m_pfnThreadProc = NULL;
    CommonConstruct();
}
void CWinThread::CommonConstruct()
{
    m_pMainWnd = NULL;
    m_pActiveWnd = NULL;
    // no HTHREAD until it is created
    m_hThread = NULL;
    m_nThreadID = 0;
// initialize message pump
#ifdef _DEBUG
    m_nDisablePumpCount = 0;
#endif
    m_msgCur.message = WM_NULL;
    m_nMsgLast = WM_NULL;
    ::GetCursorPos(&m_ptCursorLast);
    // most threads are deleted when not needed
    m_bAutoDelete = TRUE;
    // initialize OLE state
    m_pMessageFilter = NULL;
    m_lpfnOleTermOrFreeLib = NULL;
}
CWinThread *AFXAPI AfxBeginThread(AFX_THREADPROC pfnThreadProc, LPVOID pParam,
                                  int nPriority, UINT nStackSize, DWORD dwCreateFlags,
                                  LPSECURITY_ATTRIBUTES lpSecurityAttrs)
{
    CWinThread *pThread = DEBUG_NEW CWinThread(pfnThreadProc, pParam);
    if (!pThread->CreateThread(dwCreateFlags | CREATE_SUSPENDED, nStackSize,
                               lpSecurityAttrs))
    {
        pThread->Delete();
        return NULL;
    }
    VERIFY(pThread->SetThreadPriority(nPriority));
    if (!(dwCreateFlags & CREATE_SUSPENDED))
        VERIFY(pThread->ResumeThread() != (DWORD)-1);
    return pThread;
}
CWinThread *AFXAPI AfxBeginThread(CRuntimeClass *pThreadClass,
                                  int nPriority, UINT nStackSize, DWORD dwCreateFlags,
                                  LPSECURITY_ATTRIBUTES lpSecurityAttrs)
{
    ASSERT(pThreadClass != NULL);
    ASSERT(pThreadClass->IsDerivedFrom(RUNTIME_CLASS(CWinThread)));
    CWinThread *pThread = (CWinThread *)pThreadClass->CreateObject();
    pThread->m_pThreadParams = NULL;
    if (!pThread->CreateThread(dwCreateFlags | CREATE_SUSPENDED, nStackSize,
                               lpSecurityAttrs))
    {
        pThread->Delete();
        return NULL;
    }
    VERIFY(pThread->SetThreadPriority(nPriority));
    if (!(dwCreateFlags & CREATE_SUSPENDED))
        VERIFY(pThread->ResumeThread() != (DWORD)-1);
    return pThread;
}
BOOL CWinThread::CreateThread(DWORD dwCreateFlags, UINT nStackSize,
                              LPSECURITY_ATTRIBUTES lpSecurityAttrs)
{
    // setup startup structure for thread initialization
    _AFX_THREAD_STARTUP startup;
    memset(&startup, 0, sizeof(startup));
    startup.pThreadState = AfxGetThreadState();
    startup.pThread = this;
    startup.hEvent = ::CreateEvent(NULL, TRUE, FALSE, NULL);
    startup.hEvent2 = ::CreateEvent(NULL, TRUE, FALSE, NULL);
    startup.dwCreateFlags = dwCreateFlags;
    ...
        // create the thread (it may or may not start to run)
        m_hThread = (HANDLE)_beginthreadex(lpSecurityAttrs, nStackSize,
                                           &_AfxThreadEntry, &startup, dwCreateFlags | CREATE_SUSPENDED, (UINT *)&m_nThreadID);
    ...
}
因为CWinThread::CreateThread 和AfxBeginThread 不只是::CreateThread 的一层包装,更做了一些application framework 所需的内部数据初始化工作,并确保使用正确的C runtimelibrary 版本,所以不直接用::CreateThread 或_beginthreadex而是要通过CWinThread 对象。
工作线程
CWinThread* AFXAPI AfxBeginThread(
	AFX_THREADPROC pfnThreadProc,					//线程函数
 	LPVOID pParam,									//传给线程函数的参数
 	int nPriority = THREAD_PRIORITY_NORMAL,			//优先级,默认THREAD_PRIORITY_NORMAL,也就是没有微调。
 	UINT nStackSize = 0,							//堆栈的大小,默认值0 则表示堆栈最大容量为1MB。
 	DWORD dwCreateFlags = 0,						//如果为默认值0,就表示线程产生后立刻开始执行
 					//如果为CREATE_SUSPENDED,就表示线程产生后先暂停执行,之后可以使用CWinThread::ResumeThread 重新执行它
 	LPSECURITY_ATTRIBUTES lpSecurityAttrs = NULL	//安全属性 默认值NULL 表示与其产生者的属性相同
 );
线程函数是由系统调用的,也就是个callback 函数,不容许有this 指针参数。所以任何一般的C++ 的类成员函数都不能够拿来当做线程函数。它必须是个全局函数,或是个C++ 类的static 成员函数。
线程函数的格式:UINT ThreadFunc (LPVOID pParam);
线程函数使用全局变量或静态变量时,数据共享可能会引发冲突。至于放置在堆栈中的变量或对象,都不会有问题,因为每一个线程自有一个堆栈。
UI线程
UI线程要处理消息,它需要一个消息回路。CWinThread::Run 里头就有一个消息循环。所以,我们应该先从CWinThread派生一个自己的类,再调用AfxBeginThread 产生一个CWinThread 对象
class CMyThread : public CWinThread
{
 DECLARE_DYNCREATE(CMyThread)
public:
 void BOOL InitInstance();
};
IMPLEMENT_DYNCREATE(CMyThread, CWinThread)
BOOL CMyThread::InitInstance()
{
...
}
CWinThread *pThread = AfxBeginThread(RUNTIME_CLASS(CMyThread));
其中CWinThread
class CWinThread : public CCmdTarget
{
 DECLARE_DYNAMIC(CWinThread)
 BOOL CreateThread(DWORD dwCreateFlags = 0, UINT nStackSize = 0,
 LPSECURITY_ATTRIBUTES lpSecurityAttrs = NULL);
 ...
 int GetThreadPriority();
 BOOL SetThreadPriority(int nPriority);
 DWORD SuspendThread();
 DWORD ResumeThread();
 BOOL PostThreadMessage(UINT message, WPARAM wParam, LPARAM lParam);
 ...
};
RUNTIME_CLASS(CMyThread)应该是返回的CRuntimeClass结构体,也可以用在这里作为参数吗?
执行线程的结束
可以调用AfxEndThread,结束一个线程。
UI 线程因为有消息循环的关系,必须在消息队列中放一个WM_QUIT,才能结束线程。可以调用::PostQuitMessage 。亦或者,
在线程的任何一个函数中调用AfxEndThread,也可以结束线程。
AfxEndThread 其实也是个外包装,其内部调用_endthreadex。
当线程结束,记得把CWinThread对象释放掉(利用delete)
线程同步
多个线程操作一块内存时会有冲突,也称为竞态条件。
Windows 系统提供四种同步机制,帮助程序进行这种工作:
- Critical Section(关键代码段)
- Semaphore(信号)
- Event(事件)
- Mutex(Mutual Exclusive,互斥量)
具体使用需要自己查询了,范例程序跳过。
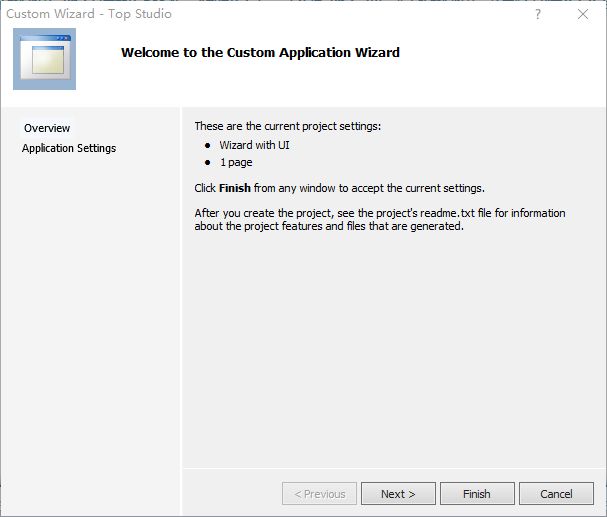
第十五章 定制向导
就是代码工程的模板。
参考了https://blog.csdn.net/hudfang/article/details/44410059?spm=1001.2101.3001.6650.11&utm_medium=distribute.pc_relevant.none-task-blog-2%7Edefault%7EBlogCommendFromBaidu%7ERate-11-44410059-blog-5259104.235%5Ev32%5Epc_relevant_default_base3&depth_1-utm_source=distribute.pc_relevant.none-task-blog-2%7Edefault%7EBlogCommendFromBaidu%7ERate-11-44410059-blog-5259104.235%5Ev32%5Epc_relevant_default_base3&utm_relevant_index=20
但是还是没结果,放弃这块了
第十六章 组件与ActiveX Control
components
没有找到component gallery,用的VS2017,大致就是某些功能的模板,选用后会自动插入代码中。
如使用Splash Screen 和System Info for About Dlg 和Tips of the Day 三个组件(启动成功前的一个界面展示、系统存储使用信息、使用技巧弹窗提示)后新增的代码:
STDAFX.H
#include COMTEST.H
class CComTestApp : public CWinApp
{
public:
 virtual BOOL PreTranslateMessage(MSG* pMsg);
 CComTestApp();
...
private:
 void ShowTipAtStartup(void);
private:
 void ShowTipOfTheDay(void);
}
COMTEST.CPP
#include "Splash.h"
#include COMTEST.RC
IDB_SPLASH BITMAP DISCARDABLE "Splsh16.bmp"
...
IDD_TIP DIALOG DISCARDABLE 0, 0, 231, 164
STYLE DS_MODALFRAME | WS_POPUP | WS_CAPTION | WS_SYSMENU
CAPTION "Tip of the Day"
FONT 8, "MS Sans Serif"
BEGIN
 CONTROL "",-1,"Static",SS_BLACKFRAME,12,11,207,123
 LTEXT "Some String",IDC_TIPSTRING,28,63,177,60
 CONTROL "&Show Tips on StartUp",IDC_STARTUP,"Button",
 BS_AUTOCHECKBOX | WS_GROUP | WS_TABSTOP,13,146,85,10
 PUSHBUTTON "&Next Tip",IDC_NEXTTIP,109,143,50,14,WS_GROUP
 DEFPUSHBUTTON "&Close",IDOK,168,143,50,14,WS_GROUP
 CONTROL "",IDC_BULB,"Static",SS_BITMAP,20,17,190,111
END
...
STRINGTABLE DISCARDABLE
BEGIN
 CG_IDS_PHYSICAL_MEM "%lu KB"
 CG_IDS_DISK_SPACE "%lu KB Free on %c:"
 CG_IDS_DISK_SPACE_UNAVAIL "Unavailable"
 CG_IDS_TIPOFTHEDAY "Displays a Tip of the Day."
 CG_IDS_TIPOFTHEDAYMENU "Ti&p of the Day..."
 CG_IDS_DIDYOUKNOW "Did You Know..."
CG_IDS_FILE_ABSENT "Tips file does not exist in the prescribed directory¡ ¨
END
STRINGTABLE DISCARDABLE
BEGIN
 CG_IDP_FILE_CORRUPT "Trouble reading the tips file"
 CG_IDS_TIPOFTHEDAYHELP "&Help"
END
MAINFRM.H
class CMainFrame : public CMDIFrameWnd
{
...
// Overrides
 // ClassWizard generated virtual function overrides
 //{{AFX_VIRTUAL(CMainFrame)
 virtual BOOL PreCreateWindow(CREATESTRUCT& cs);
 //}}AFX_VIRTUAL
...
// Generated message map functions
protected:
 afx_msg void OnInitMenu(CMenu* pMenu);
 ...
};
MAINFRM.CPP
...
#include "Splash.h"
    ... int
    CMainFrame::OnCreate(LPCREATESTRUCT lpCreateStruct)
{
    ...
        // CG: The following line was added by the Splash Screen component.
        CSplashWnd::ShowSplashScreen(this);
    return 0;
}
...
    /
    // CMainFrame message handlers
    void
    CMainFrame::OnInitMenu(CMenu *pMenu)
{
    CMDIFrameWnd::OnInitMenu(pMenu);
    // CG: This block added by 'Tip of the Day' component.
    {
        // TODO: This code adds the "Tip of the Day" menu item
        // on the fly. It may be removed after adding the menu
        // item to all applicable menu items using the resource
        // editor.
        // Add Tip of the Day menu item on the fly!
        static CMenu *pSubMenu = NULL;
        CString strHelp;
        strHelp.LoadString(CG_IDS_TIPOFTHEDAYHELP);
        CString strMenu;
        int nMenuCount = pMenu->GetMenuItemCount();
        BOOL bFound = FALSE;
        for (int i = 0; i < nMenuCount; i++)
        {
            pMenu->GetMenuString(i, strMenu, MF_BYPOSITION);
            if (strMenu == strHelp)
            {
                pSubMenu = pMenu->GetSubMenu(i);
                bFound = TRUE;
                ASSERT(pSubMenu != NULL);
            }
        }
        CString strTipMenu;
        strTipMenu.LoadString(CG_IDS_TIPOFTHEDAYMENU);
        if (!bFound)
        {
            // Help menu is not available. Please add it!
            if (pSubMenu == NULL)
            {
                // The same pop-up menu is shared between mainfrm andframe
                // with the doc.
                static CMenu popUpMenu;
                pSubMenu = &popUpMenu;
                pSubMenu->CreatePopupMenu();
                pSubMenu->InsertMenu(0, MF_STRING | MF_BYPOSITION,
                                     CG_IDS_TIPOFTHEDAY, strTipMenu);
            }
            pMenu->AppendMenu(MF_STRING | MF_BYPOSITION | MF_ENABLED | MF_POPUP,
                              (UINT)pSubMenu->m_hMenu, strHelp);
            DrawMenuBar();
        }
        else
        {
            // Check to see if the Tip of the Day menu has already been added.
            pSubMenu->GetMenuString(0, strMenu, MF_BYPOSITION);
            if (strMenu != strTipMenu)
            {
                // Tip of the Day submenu has not been added to the
                // first position, so add it.
                pSubMenu->InsertMenu(0, MF_BYPOSITION); // Separator
                pSubMenu->InsertMenu(0, MF_STRING | MF_BYPOSITION,
                                     CG_IDS_TIPOFTHEDAY, strTipMenu);
            }
        }
    }
}
SPLASH.H (新增文件)
// CG: This file was added by the Splash Screen component.
#ifndef _SPLASH_SCRN_
#define _SPLASH_SCRN_
// Splash.h : header file
/
// Splash Screen class
class CSplashWnd : public CWnd
{
    // Construction
protected:
    CSplashWnd();
    // Attributes:
public:
    CBitmap m_bitmap;
    // Operations
public:
    static void EnableSplashScreen(BOOL bEnable = TRUE);
    static void ShowSplashScreen(CWnd *pParentWnd = NULL);
    static BOOL PreTranslateAppMessage(MSG *pMsg);
    // Overrides
    // ClassWizard generated virtual function overrides
    //{{AFX_VIRTUAL(CSplashWnd)
    //}}AFX_VIRTUAL
    // Implementation
public:
    ~CSplashWnd();
    virtual void PostNcDestroy();

protected:
    BOOL Create(CWnd *pParentWnd = NULL);
    void HideSplashScreen();
    static BOOL c_bShowSplashWnd;
    static CSplashWnd *c_pSplashWnd;
    // Generated message map functions
protected:
    //{{AFX_MSG(CSplashWnd)
    afx_msg int OnCreate(LPCREATESTRUCT lpCreateStruct);
    afx_msg void OnPaint();
    afx_msg void OnTimer(UINT nIDEvent);
    //}}AFX_MSG
    DECLARE_MESSAGE_MAP()
};
#endif
SPLASH.CPP(新增文件)
// CG: This file was added by the Splash Screen component.
// Splash.cpp : implementation file
#include "stdafx.h"   // e. g. stdafx.h
#include "resource.h" // e.g. resource.h
#include "Splash.h"   // e.g. splash.h
#ifdef _DEBUG
#define new DEBUG_NEW
#undef THIS_FILE
static char BASED_CODE THIS_FILE[] = __FILE__;
#endif
/
// Splash Screen class
BOOL CSplashWnd::c_bShowSplashWnd;
CSplashWnd *CSplashWnd::c_pSplashWnd;
CSplashWnd::CSplashWnd()
{
}
CSplashWnd::~CSplashWnd()
{
    // Clear the static window pointer.
    ASSERT(c_pSplashWnd == this);
    c_pSplashWnd = NULL;
}
BEGIN_MESSAGE_MAP(CSplashWnd, CWnd)
//{{AFX_MSG_MAP(CSplashWnd)
ON_WM_CREATE()
ON_WM_PAINT()
ON_WM_TIMER()
//}}AFX_MSG_MAP
END_MESSAGE_MAP()
void CSplashWnd::EnableSplashScreen(BOOL bEnable /*= TRUE*/)
{
    c_bShowSplashWnd = bEnable;
}
void CSplashWnd::ShowSplashScreen(CWnd *pParentWnd /*= NULL*/)
{
    if (!c_bShowSplashWnd || c_pSplashWnd != NULL)
        return;
    // Allocate a new splash screen, and create the window.
    c_pSplashWnd = new CSplashWnd;
    if (!c_pSplashWnd->Create(pParentWnd))
        delete c_pSplashWnd;
    else
        c_pSplashWnd->UpdateWindow();
}
BOOL CSplashWnd::PreTranslateAppMessage(MSG *pMsg)
{
    if (c_pSplashWnd == NULL)
        return FALSE;
    // If we get a keyboard or mouse message, hide the splash screen.
    if (pMsg->message == WM_KEYDOWN ||
        pMsg->message == WM_SYSKEYDOWN ||
        pMsg->message == WM_LBUTTONDOWN ||
        pMsg->message == WM_RBUTTONDOWN ||
        pMsg->message == WM_MBUTTONDOWN ||
        pMsg->message == WM_NCLBUTTONDOWN ||
        pMsg->message == WM_NCRBUTTONDOWN ||
        pMsg->message == WM_NCMBUTTONDOWN)
    {
        c_pSplashWnd->HideSplashScreen();
        return TRUE; // message handled here
    }
    return FALSE; // message not handled
}
BOOL CSplashWnd::Create(CWnd *pParentWnd /*= NULL*/)
{
    if (!m_bitmap.LoadBitmap(IDB_SPLASH))
        return FALSE;
    BITMAP bm;
    m_bitmap.GetBitmap(&bm);
    return CreateEx(0,
                    AfxRegisterWndClass(0, AfxGetApp()->LoadStandardCursor(IDC_ARROW)),
                    NULL, WS_POPUP | WS_VISIBLE, 0, 0, bm.bmWidth, bm.bmHeight, pParentWnd->GetSafeHwnd(), NULL);
}
void CSplashWnd::HideSplashScreen()
{
    // Destroy the window, and update the mainframe.
    DestroyWindow();
    AfxGetMainWnd()->UpdateWindow();
}
void CSplashWnd::PostNcDestroy()
{
    // Free the C++ class.
    delete this;
}
int CSplashWnd::OnCreate(LPCREATESTRUCT lpCreateStruct)
{
    if (CWnd::OnCreate(lpCreateStruct) == -1)
        return -1;
    // Center the window.
    CenterWindow();
    // Set a timer to destroy the splash screen.
    SetTimer(1, 750, NULL);
    return 0;
}
void CSplashWnd::OnPaint()
{
    CPaintDC dc(this);
    CDC dcImage;
    if (!dcImage.CreateCompatibleDC(&dc))
        return;
    BITMAP bm;
    m_bitmap.GetBitmap(&bm);
    // Paint the image.
    CBitmap *pOldBitmap = dcImage.SelectObject(&m_bitmap);
    dc.BitBlt(0, 0, bm.bmWidth, bm.bmHeight, &dcImage, 0, 0, SRCCOPY);
    dcImage.SelectObject(pOldBitmap);
}
void CSplashWnd::OnTimer(UINT nIDEvent)
{
    // Destroy the splash screen window.
    HideSplashScreen();
}
TIPDLG.H(新增文件)
#if !defined(TIPDLG_H_INCLUDED_)
#define TIPDLG_H_INCLUDED_
// CG: This file added by 'Tip of the Day' component.
/
// CTipDlg dialog
class CTipDlg : public CDialog
{
    // Construction
public:
    CTipDlg(CWnd *pParent = NULL); // standard constructor
    // Dialog Data
    //{{AFX_DATA(CTipDlg)
    // enum { IDD = IDD_TIP };
    BOOL m_bStartup;
    CString m_strTip;
    //}}AFX_DATA
    FILE *m_pStream;
    // Overrides
    // ClassWizard generated virtual function overrides
    //{{AFX_VIRTUAL(CTipDlg)
protected:
    virtual void DoDataExchange(CDataExchange *pDX); // DDX/DDV support
    //}}AFX_VIRTUAL
    // Implementation
public:
    virtual ~CTipDlg();

protected:
    // Generated message map functions
    //{{AFX_MSG(CTipDlg)
    afx_msg void OnNextTip();
    afx_msg HBRUSH OnCtlColor(CDC *pDC, CWnd *pWnd, UINT nCtlColor);
    virtual void OnOK();
    virtual BOOL OnInitDialog();
    afx_msg void OnPaint();
    //}}AFX_MSG
    DECLARE_MESSAGE_MAP()
    void GetNextTipString(CString &strNext);
};
#endif // !defined(TIPDLG_H_INCLUDED_)
TIPDLG.CPP(新文件)
#include "stdafx.h"
#include "resource.h"
// CG: This file added by 'Tip of the Day' component.
#include 生成后只需要按照自己的需求修改相应地方的代码即可(如修改提示信息详情,展示图片的资源ID等),此处跳过
ActiveX Controls
由于微软把它所有的Internet 技术都称为ActiveX,所以OLE Controls 就变成了ActiveX Controls(OCX)。
ActiveX Control 基础观念:Properties 、Methods、Event
ActiveX control 的三个接口:
- property - 相当于C++ 类的成员变量
- method - 相当于C++ 类的成员函数
- event - 相当于Windows 控制组件发出的notification 消息
ActiveX Control 的method 极类似C++ 类中的成员函数。但它们被限制在一个有限的集合之中,集合内的名单包括AddItem、RemoveItem、Move 和Refresh 等等。并不是所有的ActiveX Controls 都对每一个method 产生反应,例如Move 就不能够在每一个ActiveX Control 中运作自如。
有一组所谓的properties 标准集合(被称为stock properties),内含BackColor、FontName、Caption 等等properties,是每个ActiveX control 都会拥有的。一般而言properties 可分为四种类型:
■ Ambient properties
■ Extended properties
■ Stock properties
■ Custom properties
Events 的发射可以使ActiveX Control 有能力通知其宿主(container,也就是VC 程序),于是对方有机会处理。大部份ActiveX Controls 送出标准的events,例如CLICK、KEYDOWN、KEYUP等等,某些ActiveX Controls 会送出独一无二的消息(例如ROWCOLCHANGE)。
一般而言events 可分为两种类型:
■ Stock events
■ Custom events
ActiveX Controls的使用
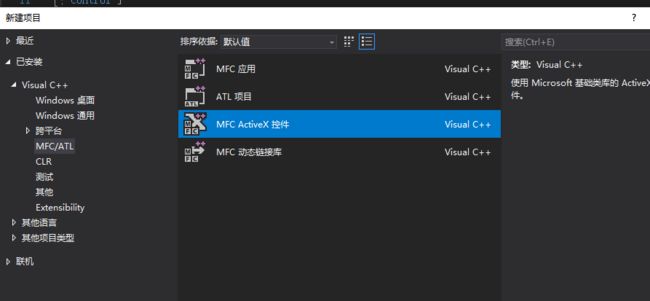
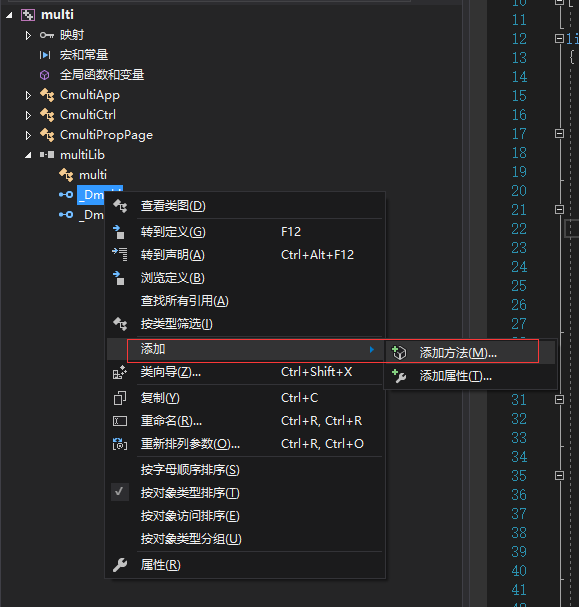
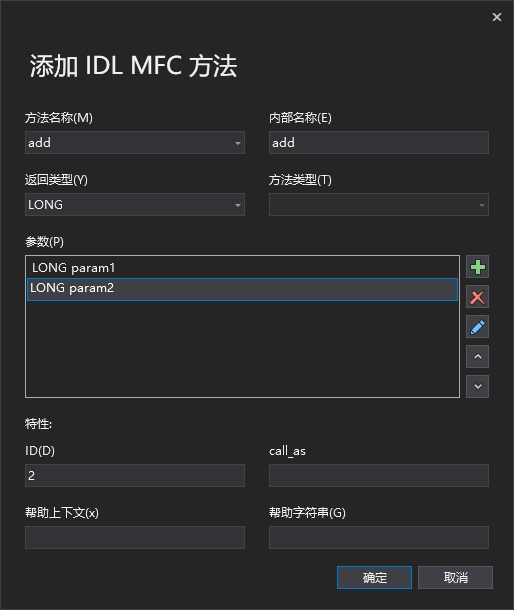
没有作者的控件,自己写了一个,只有函数方法,创建过程参考https://blog.csdn.net/dong123ohyes/article/details/119953800;
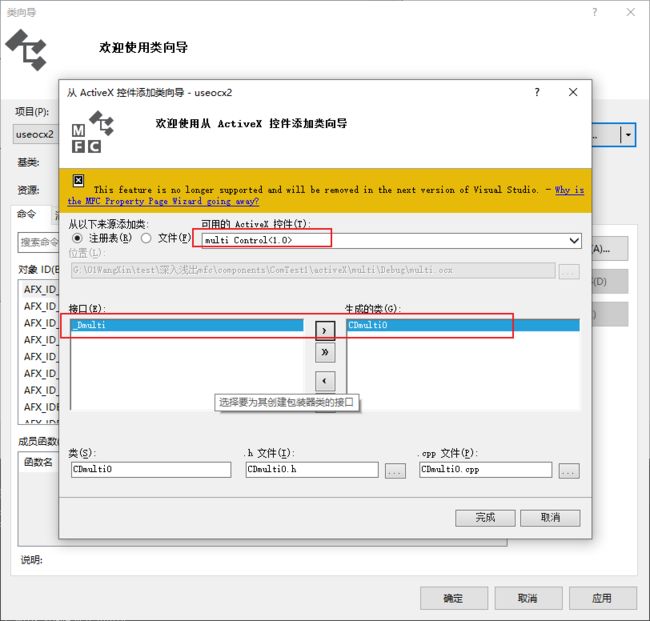
在mfc中使用参考https://blog.csdn.net/bluefire1126/article/details/120528072
使用前需要注册

