如何从 Windows Phone 的陀螺仪传感器获取数据
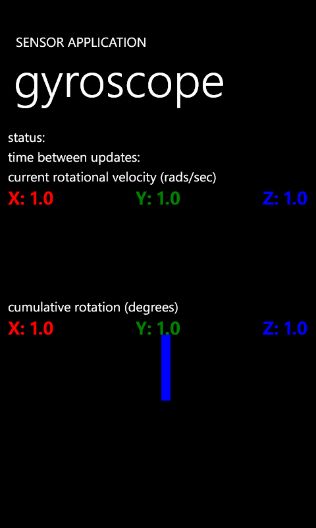
本主题将带您完成创建陀螺仪应用程序,该应用程序为您提供陀螺仪数据的数字显示以及图形表示。本示例应用程序还向您显示如何计算传感器读数的总和来确定设备的累计旋转。
陀螺仪传感器测量设备沿着其三个主轴的旋转速度。当设备静止时,所有轴的陀螺仪读数都为零。如果设备面向您围绕其中心点旋转,就像飞机螺旋桨一样,那么 Z 轴上的旋转速度值将大于零,设备旋转的速度越快,该值越大。旋转速度的测量以弧度/秒为单位,其中 2 * Pi 弧度就是全程旋转。如果您对确定设备在空间的绝对方向(yaw、pitch、roll)感兴趣,我们建议您使用组合运动 API,可以使用 Motion 类访问此 API。
以下步骤向您介绍如何创建陀螺仪应用程序。
创建陀螺仪应用程序的步骤
在 Visual Studio 中,创建一个新的“Windows Phone 应用程序项目”。此模板在“Silverlight for Windows Phone”类别中。
该应用程序需要引用包含传感器 API 和 XNA Framework 的程序集,因为陀螺仪数据采用 XNA Framework Vector3 对象的形式传递。从“项目”菜单中,单击“添加引用...”,选择“Microsoft.Devices.Sensors”和“Microsoft.Xna.Framework”,然后单击“确定”。
在 MainPage.xaml 文件中,将以下 XAML 代码放置在名为“ContentPanel”的 Grid 元素中。该代码创建 TextBlock 元素,这些元素用于显示应用程序的当前状态以及以数字形式显示当前陀螺仪读数。还有三个 Line 元素,它们用于以图形形式表示沿着每个轴的旋转速度。由于该应用程序也会保留设备旋转的累积总数,因此提供另一组 TextBlock 和 Line 元素,用于显示累积的旋转。
<StackPanel Orientation="Vertical">

  <StackPanel Orientation="Vertical">

    <TextBlock Height="30" Name="statusTextBlock" Text="status: " VerticalAlignment="Top"  />

    <TextBlock Height="30" Name="timeBetweenUpdatesTextBlock" Text="time between updates: " VerticalAlignment="Top"/>

  </StackPanel>

  <TextBlock Text="current rotational velocity (rads/sec)"></TextBlock>

  <Grid>

    <TextBlock Height="30" HorizontalAlignment="Left" Name="currentXTextBlock" Text="X: 1.0" VerticalAlignment="Top" Foreground="Red" FontSize="28" FontWeight="Bold"/>

    <TextBlock Height="30" HorizontalAlignment="Center" Name="currentYTextBlock" Text="Y: 1.0" VerticalAlignment="Top" Foreground="Green" FontSize="28" FontWeight="Bold"/>

    <TextBlock Height="30" HorizontalAlignment="Right"  Name="currentZTextBlock" Text="Z: 1.0" VerticalAlignment="Top"  Foreground="Blue" FontSize="28" FontWeight="Bold"/>

  </Grid>

  <Grid Height="140">

    <Line x:Name="currentXLine" X1="240" Y1="40" X2="240" Y2="40" Stroke="Red" StrokeThickness="14"></Line>

    <Line x:Name="currentYLine" X1="240" Y1="70" X2="240" Y2="70" Stroke="Green" StrokeThickness="14"></Line>

    <Line x:Name="currentZLine" X1="240" Y1="100" X2="240" Y2="100" Stroke="Blue" StrokeThickness="14"></Line>

  </Grid>

  <TextBlock Text="cumulative rotation (degrees)"></TextBlock>

  <Grid>

    <TextBlock Height="30" HorizontalAlignment="Left" Name="cumulativeXTextBlock" Text="X: 1.0" VerticalAlignment="Top" Foreground="Red" FontSize="28" FontWeight="Bold"/>

    <TextBlock Height="30" HorizontalAlignment="Center" Name="cumulativeYTextBlock" Text="Y: 1.0" VerticalAlignment="Top" Foreground="Green" FontSize="28" FontWeight="Bold"/>

    <TextBlock Height="30" HorizontalAlignment="Right" Name="cumulativeZTextBlock" Text="Z: 1.0" VerticalAlignment="Top"  Foreground="Blue" FontSize="28" FontWeight="Bold"/>

  </Grid>

  <Grid Height="200"  Name="cumulativeGrid">

    <Line x:Name="cumulativeXLine" X1="240" Y1="100" X2="240" Y2="0" Stroke="Red" StrokeThickness="14"></Line>

    <Line x:Name="cumulativeYLine" X1="240" Y1="100" X2="240" Y2="0" Stroke="Green" StrokeThickness="14"></Line>

    <Line x:Name="cumulativeZLine" X1="240" Y1="100" X2="240" Y2="0" Stroke="Blue" StrokeThickness="14"></Line>

  </Grid>

</StackPanel>
这就是显示 UI 的方式。

向 MainPage.xaml 中添加的最后一个 UI 代码是具有一个按钮的应用程序栏的定义,该按钮将开始和停止从罗盘获取数据。将以下代码粘贴到项目模板中包含的已注释掉的应用程序栏代码上。
<phone:PhoneApplicationPage.ApplicationBar>

  <shell:ApplicationBar IsVisible="True" IsMenuEnabled="True">

    <shell:ApplicationBarIconButton IconUri="/Images/onoff.png" Text="on/off" Click="ApplicationBarIconButton_Click"/>

  </shell:ApplicationBar>

</phone:PhoneApplicationPage.ApplicationBar>
现在,打开 MainPage.xaml.cs 代码隐藏页面并向该页面顶部的其他 using 指令中添加传感器和 XNA Framework 命名空间的 using 指令。该应用程序将使用 DispatcherTimer 来更新 UI,以便也包含 System.Windows.Threading 命名空间。
using Microsoft.Devices.Sensors;

using Microsoft.Xna.Framework;

using System.Windows.Threading;
在 MainPage 类定义的顶部声明一些成员变量。
public partial class MainPage : PhoneApplicationPage

{

  Gyroscope gyroscope;

  DispatcherTimer timer;


  Vector3 currentRotationRate = Vector3.Zero;

  Vector3 cumulativeRotation = Vector3.Zero;

  DateTimeOffset lastUpdateTime = DateTimeOffset.MinValue;

  bool isDataValid;
第一个变量是 Gyroscope 类型的对象,它将用于从罗盘传感器获取数据。接下来,声明一个 DispatcherTimer,它将用于定期更新 UI。currentRotationRate 和 cumulativeRotation 变量将用于将获取的数据存储在 Gyroscope 类的 CurrentValueChanged 事件中并且将用于在 DispatcherTimer 的 Tick 事件中更新 UI。lastUpdateTime 将用于计算累积旋转并且 isDataValid 将跟踪当前陀螺仪是否处于活动状态。
在页面的构造函数中,查看其上运行应用程序的设备是否支持陀螺仪传感器。并非所有设备都支持所有传感器,因此使用传感器之前您应该始终进行检查。如果不支持陀螺仪,则会向用户显示一个消息并且隐藏应用程序栏。如果支持陀螺仪,则会初始化 DispatcherTimer 并分配一个事件处理程序,但此时不启动计时器。用下面的代码替换现有的页面构造函数。
// Constructor

public MainPage()

{

  InitializeComponent();

  if (!Gyroscope.IsSupported)

  {

    // The device on which the application is running does not support

    // the gyroscope sensor. Alert the user and hide the

    // application bar.

    statusTextBlock.Text = "device does not support gyroscope";

    ApplicationBar.IsVisible = false;

  }

  else

  {

    // Initialize the timer and add Tick event handler, but don't start it yet.

    timer = new DispatcherTimer();

    timer.Interval = TimeSpan.FromMilliseconds(60);

    timer.Tick += new EventHandler(timer_Tick);

  }

}
为应用程序栏按钮添加 Click 事件的处理程序。根据上面添加 XAML 代码的方式,Visual Studio 可能已为您添加此处理程序。如果是这样,则删除该处理程序中的任何代码。如果该处理程序是自动添加的,请将以下空函数复制并粘贴到 MainPage 类定义中。
private void ApplicationBarIconButton_Click(object sender, EventArgs e)

{


}
在应用程序栏按钮单击处理程序中,首先查看 Gyroscope 对象是否不为 null 以及是否正在接收数据。如果是这种情况,则用户单击该按钮以停止陀螺仪,以便为 Gyroscope 和 DispatcherTimer 调用 Stop()()()()。将以下代码粘贴到空的按钮单击处理程序中。
  if (gyroscope != null && gyroscope.IsDataValid)

  {

    // Stop data acquisition from the gyroscope.

    gyroscope.Stop();

    timer.Stop();

    statusTextBlock.Text = "gyroscope stopped.";

  }
接下来,该代码将处理用户正在启动陀螺仪的情况。如果 Gyroscope 对象为 null,则创建一个新的实例。设置所需的更新时间间隔。请注意,不同设备上的传感器支持不同的更新间隔;在此示例中,该属性将在设置之后进行查询,以便向用户显示传感器的实际间隔。接下来,为陀螺仪具有新数据时引发的 CurrentValueChanged 事件添加一个事件处理程序。将该代码粘贴到按钮单击处理程序中,放置在之前的代码部分之后。
  else

  {

    if (gyroscope == null)

    {

      // Instantiate the Gyroscope.

      gyroscope = new Gyroscope();


      // Specify the desired time between updates. The sensor accepts

      // intervals in multiples of 20 ms.

      gyroscope.TimeBetweenUpdates = TimeSpan.FromMilliseconds(20);


      // The sensor may not support the requested time between updates.

      // The TimeBetweenUpdates property reflects the actual rate.

      timeBetweenUpdatesTextBlock.Text = "time between updates: " + gyroscope.TimeBetweenUpdates.TotalMilliseconds + " ms";


      gyroscope.CurrentValueChanged += new EventHandler<SensorReadingEventArgs<GyroscopeReading>>(gyroscope_CurrentValueChanged);

    }
现在,使用 Start()()()() 方法启动陀螺仪。调用 Start 有可能会失败,因此您应该将此调用放置在一个 try 块中。在 catch 块中,您可以警告用户陀螺仪可能无法启动。该代码还启动 DispatcherTimer。将该代码粘贴到按钮单击处理程序中,放置在之前的代码部分之后。
    try

    {

      statusTextBlock.Text = "starting gyroscope.";

      gyroscope.Start();

      timer.Start();

    }

    catch (InvalidOperationException ex)

    {

      statusTextBlock.Text = "unable to start gyroscope.";

    }

  }
现在,实现 CurrentValueChanged 事件处理程序。具有新陀螺仪数据的系统会以使用 TimeBetweenUpdates 指定的频率调用该方法。该处理程序接收包含陀螺仪数据的 GyroscopeReading 对象。在对 UI 没有访问权限的后台线程上调用该处理程序。因此,如果您想通过该方法修改 UI,则必须使用 Dispatcher.Invoke 方法在 UI 线程上调用指定的代码。本示例使用一个计时器来更新 UI,因此不需要这样做。该代码将 isDataValid 变量设置为 Gyroscope 对象的 IsDataValid 成员。接下来,该代码查看之前是否已设置 lastUpdateTime 成员。如果未设置,则将该变量设置为陀螺仪读数的 Timestamp 属性并退出该方法。如果之前已设置 lastUpdateTime,则 currentRotationRate 变量设置为 GyroscopeReading 类的 RotationRate 成员。接下来,从 TimeStamp 值中减去 lastUpdateTime 以确定更新之间经过的时间(秒的小数)。自从上次读数更新以来旋转的数量为当前的旋转速率乘以自从上次更新以来的秒数。将这两个的乘积与 cumulativeRotation 变量相加。最后,将 lastUpdateTime 变量更新到当前时间戳。
void gyroscope_CurrentValueChanged(object sender, SensorReadingEventArgs<GyroscopeReading> e)

{

  // Note that this event handler is called from a background thread

  // and therefore does not have access to the UI thread. To update

  // the UI from this handler, use Dispatcher.BeginInvoke() as shown.

  // Dispatcher.BeginInvoke(() => { statusTextBlock.Text = "in CurrentValueChanged"; });


  isDataValid = gyroscope.IsDataValid;


  if (lastUpdateTime.Equals(DateTimeOffset.MinValue))

  {

    // If this is the first time CurrentValueChanged was raised,

    // only update the lastUpdateTime variable.

    lastUpdateTime = e.SensorReading.Timestamp;

  }

  else

  {

    // Get the current rotation rate. This value is in

    // radians per second.

    currentRotationRate = e.SensorReading.RotationRate;


    // Subtract the previous timestamp from the current one

    // to determine the time between readings

    TimeSpan timeSinceLastUpdate = e.SensorReading.Timestamp - lastUpdateTime;


    // Obtain the amount the device rotated since the last update

    // by multiplying by the rotation rate by the time since the last update.

    // (radians/second) * secondsSinceLastReading = radiansSinceLastReading

    cumulativeRotation += currentRotationRate * (float)(timeSinceLastUpdate.TotalSeconds);


    lastUpdateTime = e.SensorReading.Timestamp;

  }

}
实现将向用户显示陀螺仪数据的 DispatcherTimer Tick 事件处理程序。此方法首先更新状态 TextBlock 以指示正在接收数据。接下来,更新 TextBlock 对象以显示围绕传感器每个轴的旋转加速度数值以及累积旋转。最后,更新 Line 对象以采用图形的形式演示加速度和旋转。
void timer_Tick(object sender, EventArgs e)

{

  if (isDataValid)

  {

    statusTextBlock.Text = "receiving data from gyroscope.";

  }


  currentXTextBlock.Text = currentRotationRate.X.ToString("0.000");

  currentYTextBlock.Text = currentRotationRate.Y.ToString("0.000");

  currentZTextBlock.Text = currentRotationRate.Z.ToString("0.000");


  cumulativeXTextBlock.Text = MathHelper.ToDegrees(cumulativeRotation.X).ToString("0.00");

  cumulativeYTextBlock.Text = MathHelper.ToDegrees(cumulativeRotation.Y).ToString("0.00");

  cumulativeZTextBlock.Text = MathHelper.ToDegrees(cumulativeRotation.Z).ToString("0.00");


  double centerX = cumulativeGrid.ActualWidth / 2.0;

  double centerY = cumulativeGrid.ActualHeight / 2.0;


  currentXLine.X2 = centerX + currentRotationRate.X * 100;

  currentYLine.X2 = centerX + currentRotationRate.Y * 100;

  currentZLine.X2 = centerX + currentRotationRate.Z * 100;


  cumulativeXLine.X2 = centerX - centerY * Math.Sin(cumulativeRotation.X);

  cumulativeXLine.Y2 = centerY - centerY * Math.Cos(cumulativeRotation.X);

  cumulativeYLine.X2 = centerX - centerY * Math.Sin(cumulativeRotation.Y);

  cumulativeYLine.Y2 = centerY - centerY * Math.Cos(cumulativeRotation.Y);

  cumulativeZLine.X2 = centerX - centerY * Math.Sin(cumulativeRotation.Z);

  cumulativeZLine.Y2 = centerY - centerY * Math.Cos(cumulativeRotation.Z);

}
