Ubuntu 18.04 安装MySQL及修改默认密码
一、Ubuntu 18.04 安装mysql 步骤
1、检查系统中是否已经安装了MySQL
sudo netstat -tap | grep mysql
如果有信息显示mysql,说明就已经安装过了。
2、安装:
在安装过程中,系统将提示您创建root密码。选择一个安全的,并确保记住它,因为后面需要用到这个密码。实际操作中并未要求我创建密码。
sudo apt-get update #更新软件源
sudo apt-get install mysql-server #安装mysql
#安装的时候会提示要设置root密码,如果你没有在卸载的时候去清理残留数据是不会提示你去设置root密码的,可以用下面的方法修改密码
sudo apt-get install mysql-client mysql-server

#检查mysql是不是在运行
sudo service mysql status
3、测试是否安装成功
sudo netstat -tap | grep mysql
4、登录
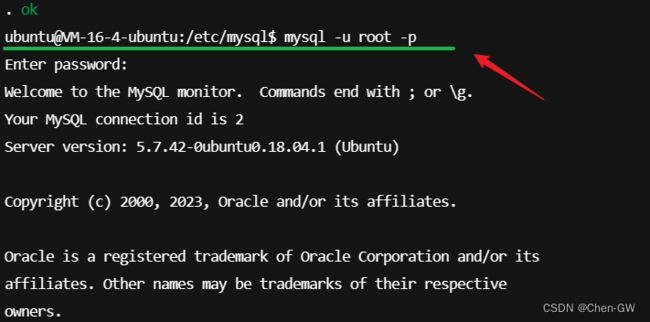
mysql -u 用户名 -p 回车
5、启动和关闭mysql服务器
一般安装完成之后都是会自动运行的,如果没有运行可以start
sudo service mysql start
关闭mysql服务
sudo service mysql stop
确认是否启动成功,mysql节点处于LISTEN状态表示启动成功
sudo netstat -tap | grep mysql
6 、卸载:
sudo apt purge mysql-*
sudo rm -rf /etc/mysql/ /var/lib/mysql
sudo apt autoremove
二、修改默认密码及用户名
Ubuntu16安装mysql5.7未提示输入密码,安装后修改mysql密码默认密码
mysql默认密码为空;
但是使用mysql -uroot -p 命令连接mysql时,报错
ERROR 1045 (28000): Access denied for user ‘root’@‘localhost’
此时需要修改默认密码即可。
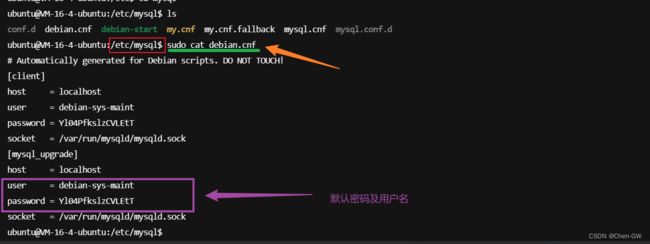
1.进入到etc/mysql 目录下,查看debian.cnf文件
进入到etc/mysql 目录下,输入sudo cat debian.cnf 命令,找到用户名及密码 ,使用此账号登录mysql。
或者在终端输入:sudo cat /etc/mysql/debian.cnf 直接查看debian.cnf文件。
2.使用默认用户名及密码登录mysql
用户名:debian-sys-maint
密码:Yl04PfkslzCVLEtT
登录:mysql -u debian-sys-maint -p Yl04PfkslzCVLEtT

3.修改root用户的的密码
在mysql中执行下面语句修改密码:
show databases;#查看所有数据库
use mysql; #连接到mysql数据库
# update user set authentication_string=PASSWORD("自定义密码") where user='root';
update user set authentication_string=PASSWORD("root123456") where user='root';#密码为:root123;用户名为:root。
update user set plugin="mysql_native_password";
flush privileges; #立即生效
quit;#退出
-- 记得语句的结果,一定要加 ; 哦
- 注:找到:update user set authentication_string=PASSWORD(“自定义密码”) where user=‘root’;将这一行注释掉,即在前面加"#";
然后重新复制一行:update user set authentication_string=PASSWORD(“root123”) where user=‘root’;
把用户名改成了:"root " 密码为:“root123” - 注:修改过程(了解)
- 此外要注意英文的双引号和分号!!
- 5.7版本下的mysql数据库下已经没有password这个字段了,password字段改成了authentication_string
>mysql -u root -p
Enter password: ********
Welcome to the MySQL monitor.  Commands end with ; or \g.
Your MySQL connection id is 12
Server version: 5.7.18-log MySQL Community Server (GPL)

Copyright (c) 2000, 2017, Oracle and/or its affiliates. All rights reserved.

Oracle is a registered trademark of Oracle Corporation and/or its
affiliates. Other names may be trademarks of their respective
owners.

Type 'help;' or '\h' for help. Type '\c' to clear the current input statement.

mysql> use mysql;
Database changed
mysql> select User from user;  #此处为查询用户命令
+-----------+
| User      |
+-----------+
| *******  |
| mysql.sys |
| root      |
+-----------+
3 rows in set (0.00 sec)

mysql> update user set password=password("*******") where user="*******";  #修改密码报错
ERROR 1054 (42S22): Unknown column 'password' in 'field list'
mysql> update mysql.user set authentication_string=password('*******') where user='*******';  #修改密码成功
Query OK, 1 row affected, 1 warning (0.00 sec)
Rows matched: 1  Changed: 1  Warnings: 1

mysql> flush privileges;  #立即生效
Query OK, 0 rows affected (0.00 sec)

mysql> quit
Bye

n>mysql -u ******* -p #以该用户登录成功.
Enter password: ********
…………………………
mysql>
4.修改完密码,需要重启mysql
终端输入:/etc/init.d/mysql restart; 重启mysql。

5.再次登录
终端输入:mysql -u root -p 密码;

登录成功!
数据库安装后的目录结构(只针对于使用apt-get install 在线安装)
- 数据库存放目录: /var/lib/mysql/
- 相关配置文件存放目录: /usr/share/mysql
- 相关命令存放目录: /usr/bin(mysqladmin mysqldump等命令)
- 启动脚步存放目录: /etc/rc.d/init.d/
三、MySQL数据库基本使用
1、启动MySQL数据库服务
sudo service mysql start
或
sudo systemctl start mysql.service
2、重启MySQL数据库服务
sudo service mysql restart
或
sudo systemctl restart mysql.service
3、停止MySQL数据库服务
sudo service mysql stop
或
sudo systemctl stop mysql.service
4、查看MySQL运行状态
sudo service mysql status
或
sudo systemctl status mysql.service
##5、 设置MySQL服务开机自启动
sudo service mysql enable
或
sudo systemctl enable mysql.service
6、停止MySQL服务开机自启动
sudo service mysql disable
或
sudo systemctl disable mysql.service
7、配置MySQL远程登录
有时候,为了开发方便,我们需要使用本地电脑远程访问和管理MySQL数据库。默认情况下,为了安全MySQL只允许本地登录,如果要开启远程连接,则需要修改MySQL的配置文件:
正常情况下,mysql占用的3306端口只是在IP 127.0.0.1上监听,拒绝了其他IP的访问。
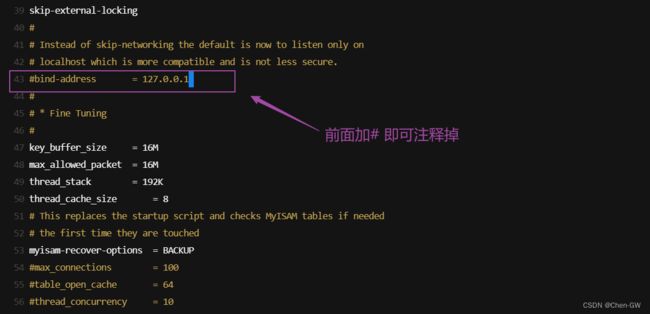
需要将 /etc/mysql/mysql.conf.d 目录下 mysqld.cnf中的 bind-address = 127.0.0.1 注释掉。
sudo vi /etc/mysql/mysql.conf.d/mysqld.cnf
打开配置文件,找到bind-address = 127.0.0.1这一行
改为bind-address = 0.0.0.0即可或简单一点注释掉(前面加 “#”)也行。

修改完成保存后,需要重启MySQL服务才会生效。
8、解决远程连接mysql错误1130代码的方法
在用远程连接Mysql服务器的数据库,不管怎么弄都是连接不到,错误代码是1130,ERROR 1130: Host xxxxxxx is not allowed to connect to this MySQL server
是因为无法给远程连接的用户权限问题。
在本机登入mysql后,更改 “mysql” 数据库里的 “user” 表里的 “host” 项,从”localhost”改称’%’。
mysql -u root -p
mysql>use mysql;
mysql>select 'host' from user where user='root';
mysql>update user set host = '%' where user ='root';
mysql>flush privileges;
mysql>select 'host'   from user where user='root';
第一句是以权限用户root登录
第二句:选择mysql库
第三句:查看mysql库中的user表的host值(即可进行连接访问的主机/IP名称)
第四句:修改host值(以通配符%的内容增加主机/IP地址),当然也可以直接增加IP地址
第五句:刷新MySQL的系统权限相关表
第六句:再重新查看user表时,有修改。。
重起mysql服务即可完成。

