gulimall-首页渲染-域名搭建
首页渲染与nginx域名搭建
- 前言
- 一、首页
-
- 1.1 整合 thymeleaf
- 1.2 整合 dev-tools
- 1.3 渲染分类数据
- 二、Nginx 域名搭建
-
- 2.1 搭建域名访问环境
- 2.2 nginx 配置文件
- 2.3 总结
前言
本文继续记录B站谷粒商城项目视频 P136-140 的内容,做到知识点的梳理和总结的作用。
一、首页
- 项目微服务介绍
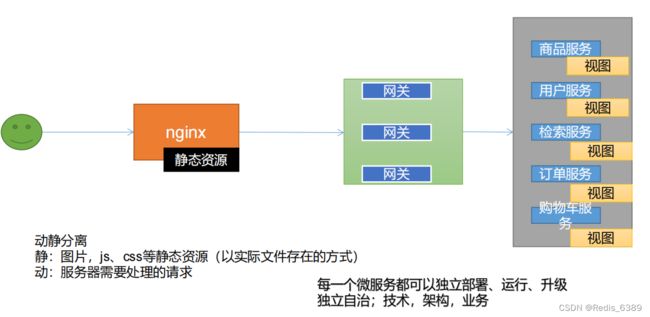
将静态资源保存在 nginx 的 index 目录下,所有请求过来先经过 nginx 服务器,根据 nginx 的动静分离特点静态资源直接返回数据,动态资源再经过服务器处理后返回,达到减轻每个微服务的压力,提升服务器的吞吐量。
1.1 整合 thymeleaf
- 导入依赖
<dependency>
    <groupId>org.springframework.bootgroupId>
    <artifactId>spring-boot-starter-thymeleafartifactId>
dependency>
- 将静态资源导入到 product 项目中,静态资源都放在 static 文件夹下就可以按照路径直接访问,页面放在 templates 下,直接访问,SpringBoot 访问项目的时候,默认会找 index。
- 关闭缓存
spring:
  thymeleaf:
    cache: false
- 访问项目效果如下图
1.2 整合 dev-tools
- 首页渲染一级分类
@GetMapping({"/","/index.html"})
public String indexPage(Model model){
    //Model是springmvc里面的,它会帮我们把值放到请求域中
    //1.查出所有的1级分类
    List<CategoryEntity> categoryEntities = categoryService.getLevel1Categorys();

    //视图解析器进行拼串;
    //classpath:/templates/ +返回值+ .html
    model.addAttribute("categorys",categoryEntities);
    return "index";
}
- 查询所有一级分类数据
@Override
public List<CategoryEntity> getLevel1Categorys() {
    log.info("getLevel1Categories.....");
    //要得到集合 所以用selectList
    long startTime = System.currentTimeMillis();
    List<CategoryEntity> categoryEntities =
            baseMapper.selectList(new QueryWrapper<CategoryEntity>().eq("parent_cid", 0));
    long endTime = System.currentTimeMillis();
    log.info("消耗时间:{}",(endTime - startTime));
    return categoryEntities;
}
- dev-tools工具,调整页面数据的时候,我们不希望通过项目重启的方式,就可以使用dev-tools工具,CTRL+F9 即可刷新界面。
<dependency>
    <groupId>org.springframework.bootgroupId>
    <artifactId>spring-boot-devtoolsartifactId>
    <optional>trueoptional>
dependency>
1.3 渲染分类数据
- 根据 JSON 数据封装 VO
/**
 * 2级分类vo
 */
@NoArgsConstructor
@AllArgsConstructor
@Data
public class Catelog2Vo {
    //一级父分类(这里我们以2级菜单为中心写的vo)
    private String catalog1Id;
    //三级子分类
    private List<Catelog3Vo> catalog3List;
    private String id;
    private String name;

    /**
     * 3级分类vo
     */
    @NoArgsConstructor
    @AllArgsConstructor
    @Data
    public static class Catelog3Vo{
        //父分类,2级分类id
        private String catalog2Id;
        private String id;
        private String name;
    }
}
- 编写接口
/**
 * index/catalog.json
 *
 * @return
 */
@ResponseBody
@GetMapping("/index/catalog.json")
public Map<String, List<Catelog2Vo>> getCatalogJson(){
    Map<String, List<Catelog2Vo>> catalogJson = categoryService.getCatalogJson();
    return catalogJson;
}
- 业务代码
@Override
  public Map<String, List<Catelog2Vo>> getCatalogJson() {
      System.out.println("查询了数据库....");
      //1、将数据库的多次查询变为一次,查询所有分类信息
      List<CategoryEntity> selectList = baseMapper.selectList(null);
      //1、查出所有1级分类
      List<CategoryEntity> level1Categorys = getParent_cid(selectList, 0L);
      //2、封装数据
      Map<String, List<Catelog2Vo>> parent_cid = level1Categorys.stream().collect(Collectors.toMap(k -> k.getCatId().toString(), v -> {
      //1、每一个的一级分类,查到这个一级分类的二级分类
       List<CategoryEntity> categoryEntities = getParent_cid(selectList, v.getCatId());
       //2、封装上面的结果
       List<Catelog2Vo> catelog2Vos = null;
       if (categoryEntities != null) {
           catelog2Vos = categoryEntities.stream().map(l2 -> {
               Catelog2Vo catelog2Vo = new Catelog2Vo(v.getCatId().toString(), null, l2.getCatId().toString(), l2.getName());
               //1、找当前二级分类的三级分类封装成vo
               List<CategoryEntity> level3Catelog = getParent_cid(selectList, l2.getCatId());
               if (level3Catelog != null) {
                   List<Catelog2Vo.Catelog3Vo> collect = level3Catelog.stream().map(l3 -> {
                      //2、封装成指定格式
                      Catelog2Vo.Catelog3Vo catelog3Vo = new Catelog2Vo.Catelog3Vo(l2.getCatId().toString(), l3.getCatId().toString(), l3.getName());
                      return catelog3Vo;
                    }).collect(Collectors.toList());
                    catelog2Vo.setCatalog3List(collect);
                }

                return catelog2Vo;
            }).collect(Collectors.toList());
        }

        return catelog2Vos;
    }));

    return parent_cid;
}
- 返回数据

二、Nginx 域名搭建
2.1 搭建域名访问环境
- 示例图

- 正向代理与反向代理

2.2 nginx 配置文件
-
示例图
-
修改 host 文件,将虚拟机地址映射为 gulimall.com 域名

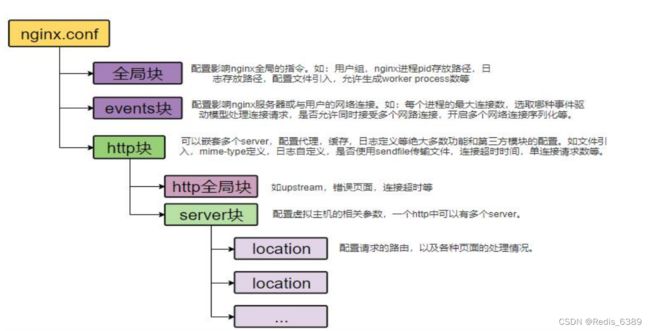
- 查看 nginx.conf
[root@localhost conf]# cat nginx.conf

user  nginx;
worker_processes  1;

error_log  /var/log/nginx/error.log warn;
pid        /var/run/nginx.pid;


events {
    worker_connections  1024;
}


http {
    include       /etc/nginx/mime.types;
    default_type  application/octet-stream;

    log_format  main  '$remote_addr - $remote_user [$time_local] "$request" '
                      '$status $body_bytes_sent "$http_referer" '
                      '"$http_user_agent" "$http_x_forwarded_for"';

    access_log  /var/log/nginx/access.log  main;

    sendfile        on;
    #tcp_nopush     on;

    keepalive_timeout  65;

    #gzip  on;
    upstream gulimall{
       server 192.168.57.1:88;
    }

    include /etc/nginx/conf.d/*.conf;
}
- 网关配置:将 nginx 转发过来的 gulimall.com 域名请求转发到商品服务
- id: gulimall_host_route
  uri: lb://gulimall-product
  predicates:
    - Host=gulimall.com,item.gulimall.com
- gulimall.conf 配置

- 效果如下图
- 域名映射效果
- 请求接口 gulimall.com
- 请求页面 gulimall.com
- nginx直接代理给网关,网关判断
- 如果/api/****,转交给对应的服务器
- 如果是满足域名,转交给对应的服务
2.3 总结
浏览器输入 gulimall.com 回车,由于 windows 的 host 文件配置了域名规则,浏览器会去访问 192.168.57.129 虚拟机地址,又因为虚拟机里面安装了 nginx 且默认会监听 80 端口,且 gulimall.com 域名符合 gulimall.conf 配置的 server_name gulimall.com -> nginx 就将其代理到
proxy_pass http://gulimall -> nginx.conf 的 server 192.168.57.1:88 -> 网关再路由到商品服务。