图像处理技巧形态学滤波之膨胀操作
1. 引言
欢迎回来,我的图像处理爱好者们!今天,让我们继续研究图像处理领域中的形态学计算。在本篇中,我们将重点介绍腐蚀操作的反向效果膨胀操作。
闲话少说,我们直接开始吧!
2. 膨胀操作原理
膨胀操作为腐蚀操作的作用相反,这是图像处理中最常使用的另一种形态学操作,它主要通过在图像边界上扩展像素来实现扩宽图像中对象的作用。膨胀操作通过考虑每个像素的邻域并将其值设置为该邻域中所有像素中的最大值来实现的。对于二值图像,如果任何相邻像素的值为1,则输出像素也被设置为1。
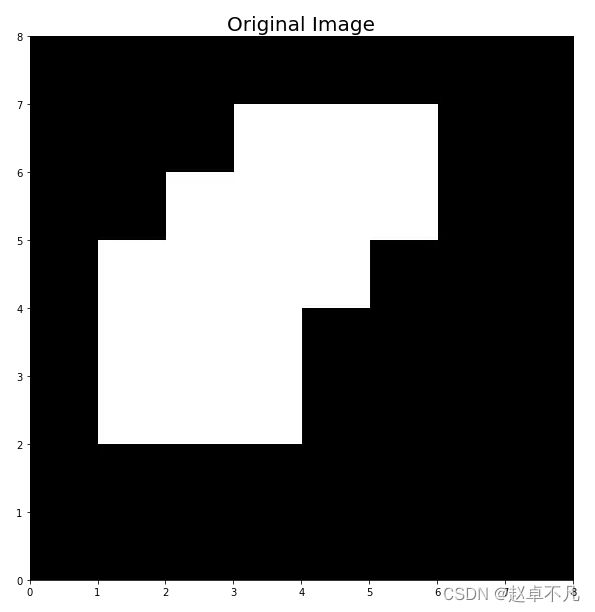
接着,让我们通过具体示例来进行讲解,首先导入我们今天的图像,代码如下:
# Define the image
original_image = np.array([[0, 0, 0, 0, 0, 0, 0, 0],
                           [0, 0, 0, 1, 1, 1, 0, 0],
                           [0, 0, 1, 1, 1, 1, 0, 0],
                           [0, 1, 1, 1, 1, 0, 0, 0],
                           [0, 1, 1, 1, 0, 0, 0, 0],
                           [0, 1, 1, 1, 0, 0, 0, 0],
                           [0, 0, 0, 0, 0, 0, 0, 0],
                           [0, 0, 0, 0, 0, 0, 0, 0]])

plt.figure(figsize=(10,10))
plt.imshow(original_image, cmap='gray', extent=[0, 8, 0, 8])
plt.title('Original Image', fontsize=20);
3. 定义结构化元素
和上一节腐蚀操作类似,我们选择同样的十字架结构化元素模板,代码如下:
# Define the structuring element
selem_cross = np.array([[0,1,0],
                        [1,1,1],
                        [0,1,0]])
plt.figure(figsize=(9,9))
plt.imshow(selem_cross, cmap='gray')
plt.title('Structuring Element: Cross', fontsize=20);
4. 膨胀操作效果
经过上述操作,我们定义了需要操作的原始图像和相应的结构化模板元素,接着我们使用函数apply_erosion来将上述结构化模板元素作用于相应的图像中,进而得到我们膨胀操作的效果,代码如下:
def apply_erosion(image, selem):
    # Perform erosion on the given image using the structuring element, selem
    eroded_image = erosion(image, selem)

    # Display the original and eroded images
    fig, axes = plt.subplots(1, 3, figsize=(15, 10))
    ax = axes.ravel()

    ax[0].imshow(selem, cmap='gray',
                 extent=[0, selem.shape[1], 0, selem.shape[0]])
    ax[0].set_title('Structuring Element', fontsize=20)

    ax[1].imshow(image, cmap='gray',
                 extent=[0, image.shape[1], 0, image.shape[0]])
    ax[1].set_title('Original Image', fontsize=20)

    ax[2].imshow(eroded_image, cmap='gray',
                 extent=[0, image.shape[1], 0, image.shape[0]])
    ax[2].set_title('Eroded Image', fontsize=20)

    plt.tight_layout()
    plt.show()

apply_erosion(original_image, selem_cross)
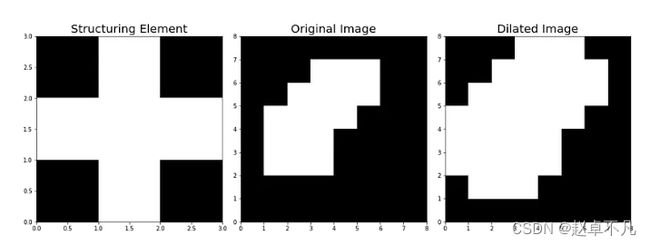
最终膨胀操作的效果如下:

观察上述输出,可以看到经过膨胀操作后的图相比原始图像的扩大版。大家可以通过下列动图进行更加详细的理解,样例图如下:
5. 其他效果
需要注意的是,和腐蚀操作类似,膨胀操作中使用的邻域大小或结构元素的选择会对结果产生不同的影响。
这里,如果选择使用上一篇节中得正方形作为测试结构元素,相应得效果如下:

6. 总结
本文重点介绍了和腐蚀操作相反作用得膨胀操作,并通过具体例子进行了原理讲解,同时给出了相应得代码示例。
您学废了嘛?

