SpringSecurity +oauth2+JWT实现统一授权和认证(一)
一 SpringSecurity 简单介绍
Spring Security 是强大的且容易定制的,基于 Spring 开发的实现认证登录与资源授权的应用安全框架
核心功能:
Authentication:身份认证,用户登陆的验证
Authorization:访问授权,授权系统资源的访问权限。安全防护,防止跨站请求,session 攻击等,如用户菜单权限等
主要配置类
a configure(HttpSecurity httpSecurity)
用于配置需要拦截的 url 路径、jwt 过滤器及出异常后的处理器
b configure(AuthenticationManagerBuilder auth)
用于配置 UserDetailsService 及 PasswordEncoder
c RestfulAccessDeniedHandler
当用户没有访问权限时的处理器,用于返回 JSON 格式的处理结果
d RestAuthenticationEntryPoint
当未登录或 token 失效时,返回 JSON 格式的结果
e UserDetailsService
SpringSecurity 定义的核心接口,用于根据用户名获取用户信息,需要自行实现
f UserDetails
SpringSecurity 定义用于封装用户信息的类(主要是用户信息和权限),需要自行实现
g PasswordEncoder
SpringSecurity 定义的用于对密码进行编码及比对的接口,目前使用的是 BCryptPasswordEncoder
h JwtAuthenticationTokenFilter
在用户名和密码校验前添加的过滤器,如果有 jwt 的 token,会自行根据 token 信息进行登录
二 oauth2介绍
OAuth是一个开放标准,也就是一个授权框架,使应用程序能够访问其它公司提供的资源,允许用户在第三方应用访问存储在其他服务器上的私密资源,而在整个过程不需要提供用户名和密码给到第三方应用,可以通过提供一个令牌(token)实现该功能,采用令牌的方式可以让用户灵活的对第三方应用授权或收回权限。OAuth2.0是OAuth协议的延续版本,但不兼容OAuth 1.0,即完全废止了OAuth1.0。
oauth2的角色:
1.资源所有者(Resource Owner):即代表用户本身
2.资源服务器(Resource Server):存储受保护的账号信息
3.授权服务器(Authorization Server):在成功验证用户身份,并获得授权后,给客户端派发访问资源令牌
4.客户端(Client):即代表你访问的第三方应用
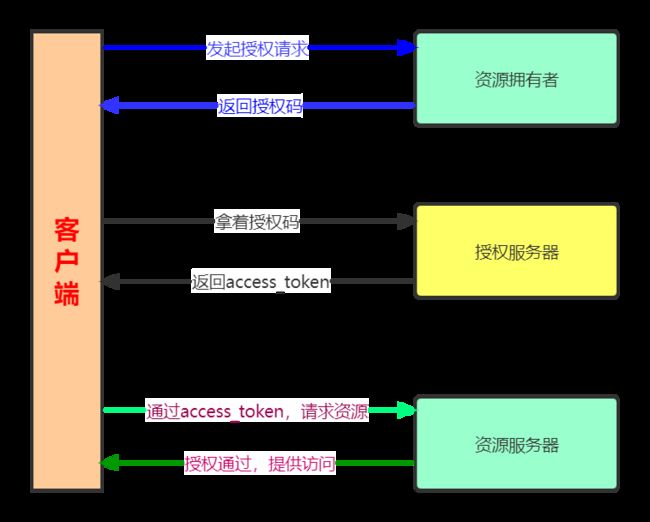
认证流程:
oauth2的四种授权模式:
1 授权码模式
授权码模式(authorization code)是功能最完整、流程最严密的授权模式。同时也是安全性最高,它适用于那些有后端的 Web 应用。授权码通过前端传送,令牌则是储存在后端,而且所有与资源服务器的通信都在后端完成。可以避免令牌泄漏。
流程步骤如下:
1:用户访问页面
2:访问的页面将请求重定向到认证服务器
3:认证服务器向用户展示授权页面,等待用户授权
4:用户授权,认证服务器生成一个code和带上client_id发送给应用服务器,然后,应用服务器拿到code,并用client_id去后台查询对应的client_secret
5:将code、client_id、client_secret传给认证服务器换取access_token和refresh_token
6:将access_token和refresh_token传给应用服务器
7:验证token,访问真正的资源页面
2 密码模式
密码模式(Resource Owner Password Credentials Grant)中,用户向客户端提供自己的用户名和密码。客户端使用这些信息,向"服务商提供商"索要授权。在这种模式中,用户必须把自己的密码给客户端,但是客户端不得储存密码。这通常用在用户对客户端高度信任的情况下。一般不支持refresh token。
步骤如下:
用户向客户端提供用户名和密码。
客户端将用户名和密码发给认证服务器,向后者请求令牌。
认证服务器确认无误后,向客户端提供访问令牌。
3 简化模式
简化模式(implicit grant type)不通过第三方应用程序的服务器,直接在浏览器中向认证服务器申请令牌,跳过了"授权码"这个步骤,因此得名。所有步骤在浏览器中完成,令牌对访问者是可见的,且客户端不需要认证。
步骤:
1 客户端将用户导向认证服务器。
2 用户决定是否给于客户端授权。
3 假设用户给予授权,认证服务器将用户导向客户端指定的"重定向URI",并在URI的Hash部分包含了访问令牌。
4 浏览器向资源服务器发出请求,其中不包括上一步收到的Hash值。
5 资源服务器返回一个网页,其中包含的代码可以获取Hash值中的令牌。
6 浏览器执行上一步获得的脚本,提取出令牌。
7 浏览器将令牌发给客户端
4 客户端模式(Client Credentials Grant)
应用场景
适用于没有前端的命令行应用,即在命令行下请求令牌
1:用户访问应用客户端
2:通过客户端定义的验证方法,拿到token,无需授权
3:访问资源服务器A
4:拿到一次token就可以畅通无阻的访问其他的资源页面
如果你高度信任某个应用,RFC 6749 也允许用户把用户名和密码,直接告诉该应用。该应用就使用你的密码,申请令牌,这种方式称为"密码式"(password)
granttype:表示授权类型,此处的值固定为"clientcredentials",必选项。
scope:表示权限范围,可选项。
三 oauth2系统搭建-搭建oauth_8500系统

密码模式(以下为密码模式的系统搭建)
3.1 引入依赖
    org.springframework.boot
    spring-boot-starter-web


    org.springframework.cloud
    spring-cloud-starter-security


    org.springframework.cloud
    spring-cloud-starter-oauth2


    org.springframework.security
    spring-security-jwt
    1.0.10.RELEASE
3.2 修改配置文件
server:
  port: 8500
  servlet:
    context-path: /oauth_api

#MySQL
spring:
  datasource:
    url: jdbc:mysql://localhost:3306/yty_oauth?useUnicode=true&characterEncoding=UTF-8&useSSL=false&serverTimezone=UTC
    username: root
    password: root
    type: com.alibaba.druid.pool.DruidDataSource
    driver-class-name: com.mysql.jdbc.Driver
# mybatis-plus相关配置
mybatis-plus:
  # xml扫描,多个目录用逗号或者分号分隔(告诉 Mapper 所对应的 XML 文件位置)
  mapper-locations: classpath:mapper/*.xml

  # 以下配置均有默认值,可以不设置
  global-config:
    db-config:
      #主键类型 AUTO:"数据库ID自增" INPUT:"用户输入ID",ID_WORKER:"全局唯一ID (数字类型唯一ID)", UUID:"全局唯一ID UUID";
      id-type: auto
      #字段策略 IGNORED:"忽略判断"  NOT_NULL:"非 NULL 判断")  NOT_EMPTY:"非空判断"
      field-strategy: NOT_EMPTY
      #数据库类型
      db-type: MYSQL
  configuration:
    # 是否开启自动驼峰命名规则映射:从数据库列名到Java属性驼峰命名的类似映射
    map-underscore-to-camel-case: true
    # 如果查询结果中包含空值的列,则 MyBatis 在映射的时候,不会映射这个字段
    call-setters-on-nulls: true
    # 这个配置会将执行的sql打印出来,在开发或测试的时候可以用
    log-impl: org.apache.ibatis.logging.stdout.StdOutImpl

oauth:
  client: client
  secret: 123123
  access_token_validity_seconds: 3600
  refresh_token_validity_seconds: 864000
3.3 新建配置文件
a OauthConfig.java
package com.yty.system.oauth.config;

import lombok.Data;
import org.springframework.beans.factory.annotation.Value;
import org.springframework.stereotype.Component;

@Component
@Data
public class OauthConfig {

    @Value("${oauth.client}")
    private String client;

    @Value("${oauth.secret}")
    private String secret;

    @Value("${oauth.access_token_validity_seconds}")
    private int accessTokenValiditySeconds;

    //配置刷新token的有效期
    @Value("${oauth.refresh_token_validity_seconds}")
    private int refreshTokenValiditySeconds;

}
对象:SysUser.java SecurityUser.java
SysUser.java内容:
package com.yty.system.oauth.entity;

import com.baomidou.mybatisplus.annotation.TableName;
import com.baomidou.mybatisplus.annotation.IdType;
import java.time.LocalDateTime;
import com.baomidou.mybatisplus.annotation.TableId;
import java.io.Serializable;
import lombok.Data;
import lombok.EqualsAndHashCode;
import lombok.experimental.Accessors;

/**
 *
 *
 *
 *
 * @author
 * @since 2022-06-15
 */
@Data
@EqualsAndHashCode(callSuper = false)
@Accessors(chain = true)
@TableName("sys_user")
public class SysUser implements Serializable {

    private static final long serialVersionUID = 1L;

    @TableId(value = "id", type = IdType.ID_WORKER)
    private String id;

    private String username;

    private String password;

    private LocalDateTime createTime;
}
SecurityUser.java内容:
package com.yty.system.oauth.entity.vo;

import com.baomidou.mybatisplus.annotation.IdType;
import com.baomidou.mybatisplus.annotation.TableId;
import com.baomidou.mybatisplus.annotation.TableName;
import com.yty.system.oauth.entity.SysUser;
import lombok.Data;
import lombok.EqualsAndHashCode;
import lombok.experimental.Accessors;
import org.springframework.security.core.GrantedAuthority;
import org.springframework.security.core.userdetails.User;

import java.io.Serializable;
import java.time.LocalDateTime;
import java.util.Collection;

/**
 *
 *
 *
 *
 * @author
 * @since 2022-06-15
 */
@EqualsAndHashCode(callSuper = false)
@Accessors(chain = true)
public class SecurityUser extends User {

    private SysUser sysUser;


    public SecurityUser(String username, String password, Collection authorities) {
        super(username, password, authorities);
    }

    public SysUser getSysUser() {
        return sysUser;
    }

    public void setSysUser(SysUser sysUser) {
        this.sysUser = sysUser;
    }
}
新建UserDetailService.java类,该类很重要,实现UserDetailsService类,内容如下:
package com.yty.system.oauth.config;

import com.yty.system.oauth.entity.SysUser;
import com.yty.system.oauth.entity.vo.SecurityUser;
import com.yty.system.oauth.service.IUserService;
import org.springframework.beans.factory.annotation.Autowired;
import org.springframework.security.core.authority.AuthorityUtils;
import org.springframework.security.core.userdetails.User;
import org.springframework.security.core.userdetails.UserDetails;
import org.springframework.security.core.userdetails.UserDetailsService;
import org.springframework.security.core.userdetails.UsernameNotFoundException;
import org.springframework.security.crypto.password.PasswordEncoder;
import org.springframework.stereotype.Service;

@Service
public class UserDetailService implements UserDetailsService {

    @Autowired
    private PasswordEncoder passwordEncoder;
    @Autowired
    private IUserService userService;

    @Override
    public UserDetails loadUserByUsername(String username) throws UsernameNotFoundException {
        SysUser user = userService.findByUserName(username);
        if (user == null){
            throw new RuntimeException("用户名或密码错误!");
        }
        String password = passwordEncoder.encode(user.getPassword());
        SecurityUser securityUser  = new SecurityUser(user.getUsername(), password, AuthorityUtils.commaSeparatedStringToAuthorityList(user.getUsername()));
        securityUser.setSysUser(user);
        return securityUser;
    }
}
oauth认证相关:
配置认证管理
WebSecurityConfig.java
package com.yty.system.oauth.config.jwt;

import org.springframework.context.annotation.Bean;
import org.springframework.context.annotation.Configuration;
import org.springframework.security.authentication.AuthenticationManager;
import org.springframework.security.config.annotation.web.builders.HttpSecurity;
import org.springframework.security.config.annotation.web.configuration.EnableWebSecurity;
import org.springframework.security.config.annotation.web.configuration.WebSecurityConfigurerAdapter;
import org.springframework.security.crypto.bcrypt.BCryptPasswordEncoder;
import org.springframework.security.crypto.password.PasswordEncoder;

/**
 * 配置认证管理
 */

@Configuration
@EnableWebSecurity
public class WebSecurityConfig extends WebSecurityConfigurerAdapter {

    // 密码编码器
    @Bean
    public PasswordEncoder passwordEncoder() {
        return new BCryptPasswordEncoder();
    }

    // 身份验证管理器
    @Bean
    @Override
    public AuthenticationManager authenticationManagerBean() throws Exception {
        return super.authenticationManagerBean();
    }

    @Override
    protected void configure(HttpSecurity http) throws Exception {
        // 关闭csrf
        http.csrf().disable()

                // 认证所有请求,将所有请求放行,因为我们使用oauth2进行认证的
                .authorizeRequests()
                .anyRequest().permitAll()

                // 允许表单登录便于用户填写认证信息
                .and()
                .formLogin()

                // 允许登出
                .and()
                .logout();
    }
}
新建AuthorizationServerConfig.java
package com.yty.system.oauth.config.jwt;

import com.yty.system.oauth.config.OauthConfig;
import org.springframework.beans.factory.annotation.Autowired;
import org.springframework.beans.factory.annotation.Qualifier;
import org.springframework.context.annotation.Configuration;
import org.springframework.http.HttpMethod;
import org.springframework.security.authentication.AuthenticationManager;
import org.springframework.security.core.userdetails.UserDetailsService;
import org.springframework.security.crypto.password.PasswordEncoder;
import org.springframework.security.oauth2.config.annotation.configurers.ClientDetailsServiceConfigurer;
import org.springframework.security.oauth2.config.annotation.web.configuration.AuthorizationServerConfigurerAdapter;
import org.springframework.security.oauth2.config.annotation.web.configuration.EnableAuthorizationServer;
import org.springframework.security.oauth2.config.annotation.web.configurers.AuthorizationServerEndpointsConfigurer;
import org.springframework.security.oauth2.config.annotation.web.configurers.AuthorizationServerSecurityConfigurer;
import org.springframework.security.oauth2.provider.token.TokenStore;
import org.springframework.security.oauth2.provider.token.store.JwtAccessTokenConverter;

@Configuration
@EnableAuthorizationServer
public class AuthorizationServerConfig extends AuthorizationServerConfigurerAdapter {

    @Autowired
    private PasswordEncoder passwordEncoder;
    @Autowired
    UserDetailsService userDetailsService;
    @Autowired
    @Qualifier("jwtTokenStore")
    private TokenStore tokenStore;
    @Autowired
    private JwtAccessTokenConverter jwtAccessTokenConverter;
    @Autowired
    private AuthenticationManager authenticationManagerBean;
    @Autowired
    private OauthConfig oauthConfig;

    @Override
    public void configure(AuthorizationServerEndpointsConfigurer endpoints) throws Exception {
        endpoints.authenticationManager(authenticationManagerBean) // 使用密码模式必须配置
                .tokenStore(tokenStore)//配置存储令牌策略
                .accessTokenConverter(jwtAccessTokenConverter)//使用jwt
                .reuseRefreshTokens(false)//refresh_tokens是否重复使用
                .userDetailsService(userDetailsService)//刷新令牌授权是否包含对用户信息的检查
                .allowedTokenEndpointRequestMethods(HttpMethod.GET, HttpMethod.POST);//支持get和post请求
    }

    @Override
    public void configure(AuthorizationServerSecurityConfigurer security) throws Exception {
        //允许表单认证
        security.allowFormAuthenticationForClients();
    }

    @Override
    public void configure(ClientDetailsServiceConfigurer clients) throws Exception {
        clients.inMemory()
                //配置client_id
                .withClient(oauthConfig.getClient())
                //配置client‐secret
                .secret(passwordEncoder.encode(oauthConfig.getSecret()))
                //配置访问token的有效期
                .accessTokenValiditySeconds(oauthConfig.getAccessTokenValiditySeconds())
                //配置刷新token的有效期
                .refreshTokenValiditySeconds(oauthConfig.getRefreshTokenValiditySeconds())
                //配置申请的权限范围
                .scopes("all")
                //配置grant_type,表示授权类型
                .authorizedGrantTypes("authorization_code", "password", "client_credentials", "refresh_token");
    }
}
新建jwt工具配置类:JwtTokenStoreConfig.java
package com.yty.system.oauth.config.jwt;

import org.springframework.beans.factory.annotation.Value;
import org.springframework.context.annotation.Bean;
import org.springframework.context.annotation.Configuration;
import org.springframework.security.oauth2.provider.token.DefaultAccessTokenConverter;
import org.springframework.security.oauth2.provider.token.TokenStore;
import org.springframework.security.oauth2.provider.token.store.JwtAccessTokenConverter;
import org.springframework.security.oauth2.provider.token.store.JwtTokenStore;

/*jwt配置*/
@Configuration
public class JwtTokenStoreConfig {

    @Value("${oauth.secret}")
    private String secret;

    @Bean
    public TokenStore jwtTokenStore() {
        return new JwtTokenStore(jwtAccessTokenConverter());
    }

    @Bean
    public JwtAccessTokenConverter jwtAccessTokenConverter() {
        JwtAccessTokenConverter accessTokenConverter = new JwtAccessTokenConverter();

        DefaultAccessTokenConverter defaultAccessTokenConverter = new DefaultAccessTokenConverter();
        defaultAccessTokenConverter.setUserTokenConverter(new DefineUserAuthenticationConverter());
        // 赋予新的Token转换器。
        accessTokenConverter.setAccessTokenConverter(defaultAccessTokenConverter);
        //配置JWT使用的秘钥
        accessTokenConverter.setSigningKey(secret);

        return accessTokenConverter;
    }
}
至此,密码模式搭建完成,使用postman访问结果:
获取token接口,get请求:
http://localhost:8500/oauth_api/oauth/token?username=admin&password=admin&grant_type=password&client_id=client&client_secret=123123

得到access_token,携带token访问后台接口