使用VS Code编写、调试和运行C++程序。
上次提到的是VS Code怎么编写、调试和运行pytho程序,这次来说说使用VS Code来对C++程序操作是怎么个流程和注意哪些问题。
环境说明:
Ubuntu18.04
VS Code
g++编译
sudo apt-get install g++    #安装g++
g++ -v                      #检验/查看g++版本
gdb
sudo apt-get install gdb    #安装g++
gdb -v                      #检验/查看g++版本
1、编辑一个C++可执行程序
(1)、自定义一个cpp文件,命名为test_run,然后把以下代码粘贴到里边,
#include
using namespace std;
int main()
{
	cout<<"This is c++."<
(2)、在该cpp文件目录下,打开终端,输入,
g++ -o test_run test_run.cpp这句命令是编译刚才的代码,然后生成一个可执行程序,test_run,然后在终端输入,
./test_run运行程序,会出现以下界面,

这就表示,咱们自己写的程序在终端中运行是ok的,接下来,我们在VS Code中运行它。
2、VS Code运行程序
(1)、安装程序运行插件,按照下图所示,安装Code Runner

(2)、在VS Code中打开该cpp文件,File->Open File,找到刚才创建的cpp文件并且打开

(3)、点击右上角的三角形,即可运行程序,

(4)、在下边会弹窗运行窗口,运行效果如下,

可以看出,这与咱们在终端中运行的结果一致。
3、VS Code编辑,调试,运行C++程序
(1)、在刚才cpp文件的目录先,打开终端,输入,
code .这时候进入VS Code中,可以看出,整个文件夹都导入到VS Code中,为了简洁,我是专门建立了一个文件夹来存放cpp文件,大家可以参考我这种做法。
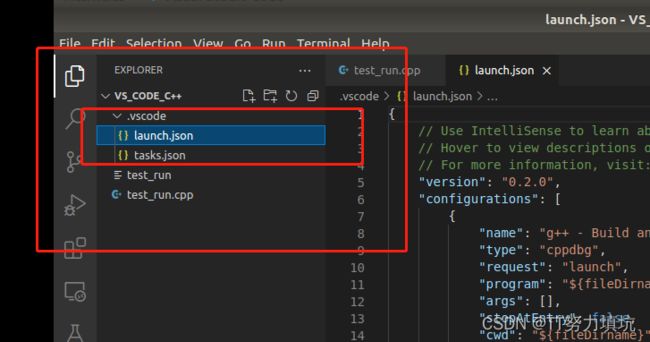
(2)、 文件夹下会出现一个.vscode的文件夹,如下图所示,

(3)、点击右栏的Debug and Run,选择 Debug and Run,如下图,

然后,选择GDB/LLDB编译如以下图所示,

然后,选择如以下图所示,

(4)、选择完成后,会发现文件夹下多了两个文件(launch,json和tasks,json),如下图所示,
双击编辑它们,把以下内容覆盖到里边去,
launch,json,ctrl + s保存,
{
    "version": "0.2.0",
    "configurations": [
        {
            "name": "C/C++",
            "type": "cppdbg",
            "request": "launch",
            "program": "${fileDirname}/${fileBasenameNoExtension}",
            "args": [],
            "stopAtEntry": false,
            "cwd": "${workspaceFolder}",
            "environment": [],
            "externalConsole": false,
            "MIMode": "gdb",
            "preLaunchTask": "compile",
            "setupCommands": [
                {
                    "description": "Enable pretty-printing for gdb",
                    "text": "-enable-pretty-printing",
                    "ignoreFailures": true
                }
            ]
        }
    ]
}
tasks,json,ctrl + s保存,
{
    "version": "2.0.0",
    "tasks": [{
            "label": "compile",
            "command": "g++",
            "args": [
                "-g",
                "${file}",
                "-o",
                "${fileDirname}/${fileBasenameNoExtension}"
            ],
            "problemMatcher": {
                "owner": "cpp",
                "fileLocation": [
                    "relative",
                    "${workspaceRoot}"
                ],
                "pattern": {
                    "regexp": "^(.*):(\\d+):(\\d+):\\s+(warning|error):\\s+(.*)$",
                    "file": 1,
                    "line": 2,
                    "column": 3,
                    "severity": 4,
                    "message": 5
                }
            },
            "group": {
                "kind": "build",
                "isDefault": true
            }
        }
    ]
}
(5)、双击打开建立的cpp文件;然后右侧工具栏选择Debug and Run,然后点击绿色方框,设置断点,运行程序。

(6)、运行效果如下图所示,

C++的编辑,编译,运行通过VS Code实现就先说到这里,下节,咱们来谈论讨论VS Code是怎么实现ROS一些功能的。