【Pytroch】基于支持向量机算法的数据分类预测(Excel可直接替换数据)
【Pytroch】基于支持向量机算法的数据分类预测(Excel可直接替换数据)
- 1.模型原理
- 2.数学公式
- 3.文件结构
- 4.Excel数据
- 5.下载地址
- 6.完整代码
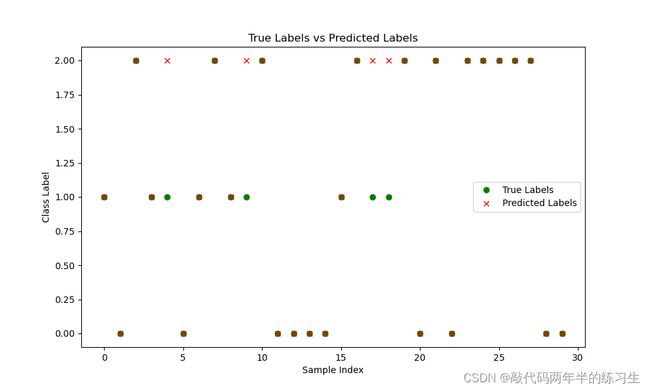
- 7.运行结果
1.模型原理
支持向量机(Support Vector Machine,SVM)是一种强大的监督学习算法,用于二分类和多分类问题。它的主要思想是找到一个最优的超平面,可以在特征空间中将不同类别的数据点分隔开。
下面是使用PyTorch实现支持向量机算法的基本步骤和原理:
-
数据准备: 首先,你需要准备你的训练数据。每个数据点应该具有特征(Feature)和对应的标签(Label)。特征是用于描述数据点的属性,标签是数据点所属的类别。
-
数据预处理: 根据SVM的原理,数据点需要线性可分。因此,你可能需要进行一些数据预处理,如特征缩放或标准化,以确保数据线性可分。
-
定义模型: 在PyTorch中,你可以定义一个支持向量机模型作为一个线性模型,例如使用
nn.Linear。 -
定义损失函数: SVM的目标是最大化支持向量到超平面的距离,即最大化间隔(Margin)。这可以通过最小化损失函数来实现,通常使用
hinge loss(合页损失)。PyTorch提供了nn.MultiMarginLoss损失函数,它可以用于SVM训练。 -
定义优化器: 选择一个优化器,如
torch.optim.SGD,来更新模型的参数以最小化损失函数。 -
训练模型: 使用训练数据对模型进行训练。在每个训练步骤中,计算损失并通过优化器更新模型参数。
-
预测: 训练完成后,你可以使用训练好的模型对新的数据点进行分类预测。对于二分类问题,可以使用模型的输出值来判断数据点所属的类别。
2.数学公式
当使用支持向量机(SVM)进行数据分类预测时,目标是找到一个超平面(或者在高维空间中是一个超曲面),可以将不同类别的数据点有效地分隔开。以下是SVM的数学原理:
-
超平面方程: 在二维情况下,超平面可以表示为
w 1 x 1 + w 2 x 2 + b = 0 w_1 x_1 + w_2 x_2 + b = 0 w1x1+w2x2+b=0
-
决策函数: 数据点 (x) 被分为两个类别的决策函数为
f ( x ) = w T x + b f(x) = w^T x + b f(x)=wTx+b
-
间隔(Margin): 对于一个给定的超平面,数据点到超平面的距离被称为间隔。支持向量机的目标是找到能最大化间隔的超平面。间隔可以用下面的公式计算:
间隔 = 2 ∥ w ∥ \text{间隔} = \frac{2}{\|w\|} 间隔=∥w∥2
-
支持向量: 支持向量是离超平面最近的那些数据点。这些点对于确定超平面的位置和间隔非常重要。支持向量到超平面的距离等于间隔。
-
最大化间隔: SVM 的目标是找到一个超平面,使得所有支持向量到该超平面的距离(即间隔)都最大化。这等价于最小化法向量的范数 (|w|),即:
最小化 1 2 ∥ w ∥ 2 \text{最小化} \quad \frac{1}{2}\|w\|^2 最小化21∥w∥2
-
对偶问题和核函数: 对偶问题的解决方法涉及到拉格朗日乘子,可以得到一个关于训练数据点的内积的表达式。这样,如果直接在高维空间中计算内积是非常昂贵的,可以使用核函数来避免高维空间的计算。核函数将数据映射到更高维的空间,并在计算内积时使用高维空间的投影,从而实现了在高维空间中的计算,但在计算上却更加高效。
总之,SVM利用线性超平面来分隔不同类别的数据点,通过最大化支持向量到超平面的距离来实现分类。对偶问题和核函数使SVM能够处理非线性问题,并在高维空间中进行计算。以上是SVM的基本数学原理。
3.文件结构
iris.xlsx						% 可替换数据集
Main.py							% 主函数
4.Excel数据
5.下载地址
- 资源下载地址
6.完整代码
import torch
import torch.nn as nn
import pandas as pd
import numpy as np  # Don't forget to import numpy for the functions using it
import matplotlib.pyplot as plt  # Import matplotlib for plotting
from sklearn.model_selection import train_test_split
from sklearn.preprocessing import LabelEncoder
from sklearn.metrics import confusion_matrix

class SVM(nn.Module):
    def __init__(self, input_size, num_classes):
        super(SVM, self).__init__()
        self.linear = nn.Linear(input_size, num_classes)

    def forward(self, x):
        return self.linear(x)


def train(model, X, y, num_epochs, learning_rate):
    criterion = nn.CrossEntropyLoss()  # Use CrossEntropyLoss for multi-class classification
    optimizer = torch.optim.SGD(model.parameters(), lr=learning_rate)

    for epoch in range(num_epochs):
        inputs = torch.tensor(X, dtype=torch.float32)
        labels = torch.tensor(y, dtype=torch.long)  # Use long for class indices

        optimizer.zero_grad()
        outputs = model(inputs)

        loss = criterion(outputs, labels)
        loss.backward()
        optimizer.step()

        if (epoch + 1) % 100 == 0:
            print(f'Epoch [{epoch + 1}/{num_epochs}], Loss: {loss.item():.4f}')


def test(model, X, y):
    inputs = torch.tensor(X, dtype=torch.float32)
    labels = torch.tensor(y, dtype=torch.long)  # Use long for class indices

    with torch.no_grad():
        outputs = model(inputs)
        _, predicted = torch.max(outputs, 1)
        accuracy = (predicted == labels).float().mean()
        print(f'Accuracy on test set: {accuracy:.2f}')

# Define the plot functions
def plot_confusion_matrix(conf_matrix, classes):
    plt.figure(figsize=(8, 6))
    plt.imshow(conf_matrix, cmap=plt.cm.Blues, interpolation='nearest')
    plt.title("Confusion Matrix")
    plt.colorbar()
    tick_marks = np.arange(len(classes))
    plt.xticks(tick_marks, classes)
    plt.yticks(tick_marks, classes)
    plt.xlabel("Predicted Label")
    plt.ylabel("True Label")
    plt.tight_layout()
    plt.show()

def plot_predictions_vs_true(y_true, y_pred):
    plt.figure(figsize=(10, 6))
    plt.plot(y_true, 'go', label='True Labels')
    plt.plot(y_pred, 'rx', label='Predicted Labels')
    plt.title("True Labels vs Predicted Labels")
    plt.xlabel("Sample Index")
    plt.ylabel("Class Label")
    plt.legend()
    plt.show()


def main():
    data = pd.read_excel('iris.xlsx')
    X = data.iloc[:, :-1].values
    y = data.iloc[:, -1].values

    label_encoder = LabelEncoder()
    y = label_encoder.fit_transform(y)

    X_train, X_test, y_train, y_test = train_test_split(X, y, test_size=0.2, random_state=42)

    num_classes = len(label_encoder.classes_)
    model = SVM(X_train.shape[1], num_classes)
    num_epochs = 1000
    learning_rate = 0.001

    train(model, X_train, y_train, num_epochs, learning_rate)

    # Call the test function to get predictions
    inputs = torch.tensor(X_test, dtype=torch.float32)
    labels = torch.tensor(y_test, dtype=torch.long)
    with torch.no_grad():
        outputs = model(inputs)
        _, predicted = torch.max(outputs, 1)

    # Convert torch tensors back to numpy arrays
    y_true = labels.numpy()
    y_pred = predicted.numpy()

    test(model, X_test, y_test)

    # Call the plot functions
    conf_matrix = confusion_matrix(y_true, y_pred)
    plot_confusion_matrix(conf_matrix, label_encoder.classes_)
    plot_predictions_vs_true(y_true, y_pred)


if __name__ == '__main__':
    main()


