VUE-基础八-路由
路由安装与配置
- npm安装依赖
npm install vue-router@4
- 新建文件夹router然后在文件夹中新增index.js路由的配置文件
import   {createRouter,createWebHashHistory }   from 'vue-router'

// 1. 定义路由组件.
// 也可以从其他文件导入
import Home from "../view/Home";
import About from "../view/About";
// 2. 定义一些路由
// 每个路由都需要映射到一个组件。
// 我们后面再讨论嵌套路由。
const routes = [
    { path: '/', name:'/',component: Home },
    { path: '/about',name:'About', component: About },
]

// 3. 创建路由实例并传递 `routes` 配置
// 你可以在这里输入更多的配置,但我们在这里
// 暂时保持简单
const router = createRouter({
    // 4. 内部提供了 history 模式的实现。为了简单起见,我们在这里使用 hash 模式。
    history: createWebHashHistory(),
    routes, // `routes: routes` 的缩写
})

export default router
其中引入的两个组件文件,如下
<template>
  <h1>this is home </h1>
</template>

<script>
export default {
  name: "Home"
}
</script>

<style scoped>

</style>
<template>
  <h1>this is about </h1>
</template>

<script>
export default {
  name: "About"
}
</script>

<style scoped>

</style>
- 然后在main.js中使用路由
import { createApp } from 'vue'
import App from './App.vue'
import router from './router/index'


const app =createApp(App).use(router).mount('#app')
运行项目就可以看到效果了
路由功能
路由懒加载与模式切换
路由懒加载
- 首先我们先打包项目
可以看到js中有app和chunk两个js。 - 新建user组件
<template>
  <h1>this is user</h1>
</template>

<script>
export default {
  name: "User"
}
</script>

<style scoped>

</style>
- 配置路由与页面跳转
// index.js -->
{
        path: '/user',
        name:'User',
        // 懒加载,按需加载   打包后不一样
        component: ()=>import ("../view/User")
}
//    app.vue-->
<router-link to="/user">User</router-link>
- 页面可以跳转,并且打包后多出来一个chunk
打开后可以看到里面的内容是user组件的。这样就可以按需加载了
路由模式
几种模式暂时还不是很了解,建议使用 createWebHistory 模式
命名视图
当一个页面包含多个路由的时候,就需要用到命名视图了。
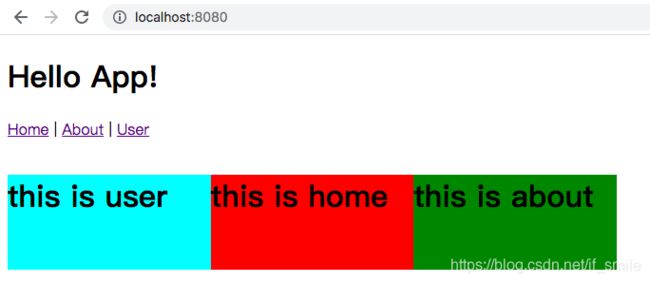
例如上面的例子,把三个组件都放在首页。
- 配置三个路由出口,并添加clss样式
  <!-- 路由匹配到的组件将渲染在这里 -->
  <router-view class="one" />
  <router-view class="two" />
  <router-view class="three"/>
样式只有背景颜色不一样,其他都一样
.one{
    float: left;
    width: 15%;
    height: 100px;
    background-color: aqua;
  }
  .two{
    float: left;
    width: 15%;
    height: 100px;
    background-color: red;
  }
  .three{
    float: left;
    width: 15%;
    height: 100px;
    background-color: green;
  }
- 使用命名路由
首先在路由出口上面添加name属性,值对应下面配置的组件
这边两个配置值,一个不配置
<router-view class="one" name="User"/>
<router-view class="two" />
<router-view class="three" name="About"/>
- 然后路由的首页配置修改
注意,component改为components了
path: '/',
        // component: Home
        components: {
            default:Home,
            User,
            About
        }
如果文件中没有引入User,则进行import。然后查看页面就可以多路由在一个页面并且按照顺序排列。

路由扩展功能
修改路由默认样式
可以看到页面路由跳转的链接是a标签,如果想改成按钮的样式,只需要按下面配置即可。
<router-link to="/user" custom v-slot="{ navigate }">
      <button @click="navigate" @keypress.enter="navigate" role="link">User</button>
</router-link>
$router与$route
$router 路由对象 $router.push() $router.go()
$route 当前访问对象 $route.path 当前访问路径
新增button按钮,并定义点击事件
<button @click="$router.push('about')">about</button>
<b>{{ $route.path}}</b>
动态路由
动态路由也可以理解为路径传参,路径参数 用冒号 : 表示。当一个路由被匹配时,它的 params 的值将在每个组件中以 this.$route.params 的形式暴露出来。
| 匹配模式 | 匹配路径 | $route.params |
|---|---|---|
| /users/:username | /users/eduardo | { username: ‘eduardo’ } |
| /users/:username/posts/:postId | /users/eduardo/posts/123 | { username: ‘eduardo’, postId: ‘123’ } |
示例
- 更改user子页面的 one和two的路由如下
{
                path:'one/:id/:name',
                name:'One',
                component:()=> import('../view/user/One')
            },
            {
                path:'two/:id',
                name:'Two',
                component:()=> import('../view/user/Two')
            }
- 修改router-link
<router-link to="/user/one/123/wanghao">onerouter-link>
<router-link to="/user/two">tworouter-link>
- 在one与two页面打印参数
<p>参数id: {{$route.params.id}} ,name: {{ $route.params.name}}p>
捕获404
this.$router.push({
  name: 'NotFound',
  params: { pathMatch: this.$route.path.split('/') },
})
路由传参
其实上面的动态路由就可以当做路径传参
下面还有两种传参方式i:
    <router-link :to="{name:'User',params:{id:1,name:2}}" >userrouter-link> |


    <router-link :to="{ path: '/user', query: { id: 'private',name:'ni de mingzi' }}">
      Register
    router-link>
获取参数使用 $route.query.name 即可,name为参数名称
动态路由与路由传参的区别
传递参数主要有两种类型:params和query
params的类型:
配置路由格式: /user/:id (动态路由)
传递的方式: 在path后面对应的值 :to=”’/user/’+uid”
传递后形成的路径:/user/9, /user/zs
接收参数:$route.params.idquery的类型:
配置路由格式: /user, 正常配置
传递的方式: 对象中使用query的key作为传递方式:to={path:’/’, query:>>{id:1,name:‘abc’}}
传递后形成的路径:/user?id=9, /user?id=zs
接收参数:$route.query.name
重定向与别名
重定向
//重定向:
//重定向也在routes配置中完成,要从重定向/a到/b
const routes = [{ path: '/home', redirect: '/' }]
const routes = [{ path: '/home', redirect: { name: 'homepage' } }]
path: '/search/:searchText',
    redirect: to => {
         return { path: '/search', query: { q: to.params.searchText } }
    },
别名
相当于别名路径与path路径都可以访问配置的组件
//别名:
//别名/as/home表示用户访问时/home,URL保持不变/home,但将被匹配,就像用户正在访问时一样/。
const routes = [{ path: '/', component: Homepage, alias: '/home' }]
alias: ['people', 'list']
alias: ['/:id', '']
路由守卫
全局路由前后置守卫
const router = createRouter({
    // 4. 内部提供了 history 模式的实现。为了简单起见,我们在这里使用 hash 模式。
    // history: createWebHashHistory(),
    history: createWebHistory(),
    routes, // `routes: routes` 的缩写
})


// 全局路由守卫
router.beforeEach((to,from)=>{
//    前置守卫,跳转守卫之前调用

})
router.afterEach((to,from)=>{
//    后置钩子,跳转守卫之后调用
})
路由独享守卫
在路由配置下面添加守卫
const routes = [
  {
    path: '/users/:id',
    component: UserDetails,
    beforeEnter: (to, from) => {
      // reject the navigation
      return false
    },
  },
]
beforeEnter 守卫 只在进入路由时触发,不会在 params、query 或 hash 改变时触发。例如,从 /users/2 进入到 /users/3 或者从 /users/2#info 进入到 /users/2#projects。它们只有在 从一个不同的 路由导航时,才会被触发。
组件独享守卫
类似生命周期方法如下:
const UserDetails = {
  template: `...`,
  beforeRouteEnter(to, from) {
    // 在渲染该组件的对应路由被验证前调用
    // 不能获取组件实例 `this` !
    // 因为当守卫执行时,组件实例还没被创建!
  },
  beforeRouteUpdate(to, from) {
    // 在当前路由改变,但是该组件被复用时调用
    // 举例来说,对于一个带有动态参数的路径 `/users/:id`,在 `/users/1` 和 `/users/2` 之间跳转的时候,
    // 由于会渲染同样的 `UserDetails` 组件,因此组件实例会被复用。而这个钩子就会在这个情况下被调用。
    // 因为在这种情况发生的时候,组件已经挂载好了,导航守卫可以访问组件实例 `this`
  },
  beforeRouteLeave(to, from) {
    // 在导航离开渲染该组件的对应路由时调用
    // 与 `beforeRouteUpdate` 一样,它可以访问组件实例 `this`
  },
}
路由元信息
路由配置的时候添加meta属性,该属性是对象。如:
meta: { requiresAuth: true }
里面属性可以自定义填写,路由携带的属性。


