React Native 路由与导航
简介
在 React 中实现路由,有两种方案,分别对应两个不同的场景
-
React-Router
React-Router 适用于 Web 项目。 -
React-Navigation
React Native 没有像浏览器那样的内置导航 API (location对象,history对象)。React Native 中的导航是通过React-Navigation来完成的。React Native 把导航和路由都集中到了 React-Navigation 中。RN 0.44 之前,React-Navigation 在核心中维护,0.44 之后,与核心分离,独立维护。
官网:https://reactnavigation.org/ 中文手册:
https://reactnavigation.org/docs/zh-Hans/getting-started.html
注意:本节使用 React-Navigation 5.x 的版本来讲解
React-Navigation 常用的组件有四个(之后我们会依次介绍)
-
StackNavigator
栈导航器在 React Native 中的作用,相当于 BOM 中的 history 对象。用来跳转页面和传递参数。与浏览器端导航不同的是。StackNavigator还提供了路由之间的手势和动画。只有声明了栈导航之后,才能在 React Native 中执行跳转。 -
TabNavigator
标签导航器(例如:底部标签栏),用来区分模块。 -
DrawerNavigator
抽屉导航器,在 App 侧面划出的导航页面。 -
MaterialTopTabNavigator
支持左右滑动的 Tab 菜单
基础安装
在正式开始学习 React Native 路由之前,我们需要先安装相关的组件和依赖
-
安装组件
#安装react-navigation核心组件 yarn add @react-navigation/native@^5.x #安装相关的依赖 yarn add react-native-reanimated react-native-gesture-handler react-native-screens react-native-safe-area-context @react-native-community/masked-view -
链接组件
安装完成之后,我们还需要将相关组件和依赖,连接到操作系统平台中(Android 或 iOS)。
从 0.60 之后, 链接会自动执行. 因此,我们不再需要运行react-nativelink
但是,如果你是在 iOS 下,还需要运行下面的命令来完成链接npx pod-install ios -
添加头部组件
最后一步,你需要将如下代码,放到应用的头部(例如:放到index.js或App.js文件的头部)import 'react-native-gesture-handler'; //其他引入注意:如果你忽略了这一步,你的应用上线后可能会崩溃(虽然开发环境一切正常
-
添加导航容器
我们需要在入口文件中,把整个应用,包裹在导航容器(NavigationContainer)中(例如:在index.js或App.js文件中)。然后将其他应用代码,写在 NavigationContainer 组件中间。import 'react-native-gesture-handler'; import * as React from 'react'; import { NavigationContainer } from '@react-navigation/native'; export default function App() { return ( <NavigationContainer> {/* /*具体的导航*/ */} </NavigationContainer> ); } -
使用具体的导航
完成以上 4 个步骤后,就可以在导航容器中使用具体的导航了。下面我们会一一介绍具体的导航。主要包括:
Stack 导航
BottomTab 导航
Drawer 导航
MaterialTopTab 导航
Stack 导航
在浏览器中,我们可以通过标签,来实现不同页面之间的跳转。当用户点击链接时,URL 地址会被推送到 history 的栈中。当用户点击回退按钮时,浏览器会从 history 栈的顶部弹出一项,然后我们所处的当前页面,其实就是之前访问过的页面。但是,RN 中没有浏览器的内置 history 栈。而 ReactNavigation 的Stack 导航实现了类似浏览器端 history 栈的功能。可以在 RN 的不用屏幕之间进行跳转,并管理跳转地址。在 RN 中,如果想做跳转。
必须先声明 Stack 导航
-
安装组件
yarn add @react-navigation/stack -
使用组件
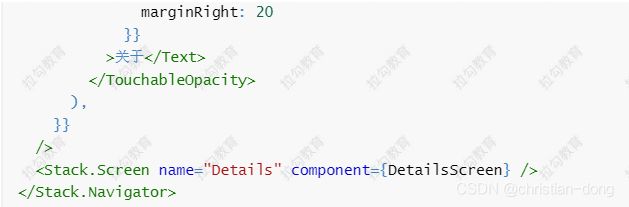
import React, { Component } from 'react'
import { Text, StyleSheet, View, Button, TouchableOpacity } from 'react-native'
import { createStackNavigator } from '@react-navigation/stack'

function HomeScreen(prop) {
  return (
    <View style={[styles.container]}>
      <Text style={[styles.text]}>Home Screen</Text>
      <Button title={"跳到新闻页面"} onPress={() => prop.navigation.navigate('News')} />
    </View>
  )
}

function NewsScreen(prop) {
  return (
    <View style={[styles.container]}>
      <Text style={[styles.text]}>News Screen</Text>
      <Button title={"跳到 Home 页面"} onPress={() => prop.navigation.navigate('Home')} />
    </View>
  )
}

const Stack = createStackNavigator()

export default class index extends Component {
  render() {
    return (
      <Stack.Navigator
        initialRouteName="News"
        // headerMode={'none'}
      >
        <Stack.Screen name="Home" component={HomeScreen}
          options={{
            title: "首页",
            headerStyle: {
              backgroundColor: 'tomato'
            },
            headerRight: () => (
              <TouchableOpacity onPress={() => alert('Hello')}>
                <Text>Hello</Text>
              </TouchableOpacity>
            )
          }}
        />
        <Stack.Screen name="News" component={NewsScreen} />
      </Stack.Navigator>
    )
  }
}

const styles = StyleSheet.create({
  container: {
    flex: 1,
    justifyContent: 'center',
    alignItems: 'center'
  },
  text: {
    fontSize: 40
  }
})
我们可以通过 Screen 组件来声明路由。
Screen 组件有两个必选属性,分别是 name 和 component。-
name 是路由名称
-
component 是组件名称(不接受函数)
路由声明之后,我们可以通过 navigate 方法来执行屏幕间的跳转。如下图:
类组件可以通过this.props.navigation.navigate(路由名称)方式来跳转 -
-
扩展属性
-
Navigator 扩展
-
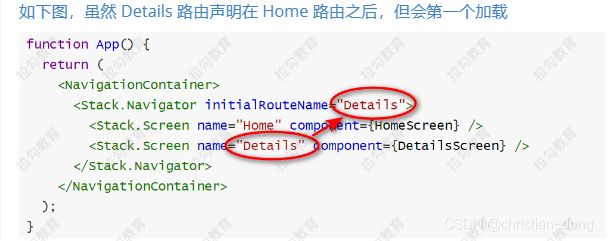
initialRouteName 导航初始化路由名称(第一个加载的路由)。注意:initialRouteName发生改变时,需要重新启动应用。RN 的热更新对initialRouteName 不起作用。
-
headerMode
- float:iOS 的通用模式
- screen:Android 的通用模式
- none:隐藏 header (包括 screen 的header)
-
-
Screen 扩展
- options
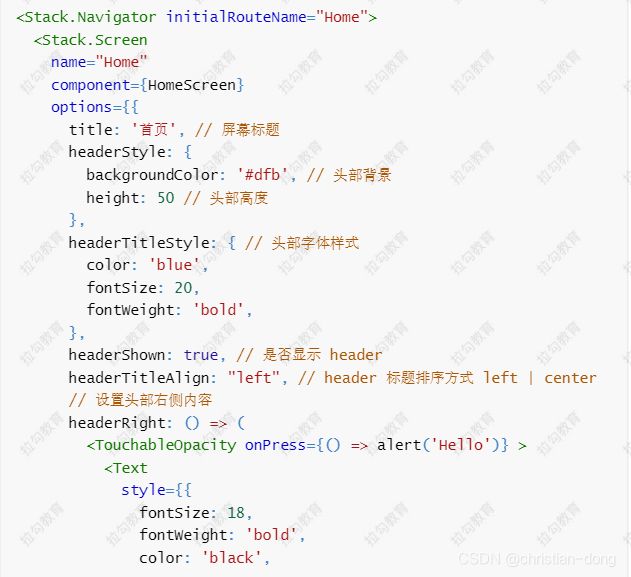
options 选项,主要用来设置屏幕头部信息,例如:高度,颜色,字体大小等
- options
-
BottomTab 导航
-
安装组件
yarn add @react-navigation/bottom-tabs -
使用组件
import React, { Component } from 'react' import { Text, StyleSheet, View, Button } from 'react-native' import { createBottomTabNavigator } from '@react-navigation/bottom-tabs' import Ionicons from 'react-native-vector-icons/Ionicons' function HomeScreen(prop) { return ( <View style={[styles.container]}> <Text style={[styles.text]}>Home Screen</Text> </View> ) } function NewsScreen(prop) { return ( <View style={[styles.container]}> <Text style={[styles.text]}>News Screen</Text> </View> ) } const Tab = createBottomTabNavigator() export default class index extends Component { render() { return ( <Tab.Navigator screenOptions={({ route }) => ({ tabBarIcon: ({ focused, color, size }) => { let iconName if (route.name === 'Home') { iconName = focused ? 'add-circle' : 'add-circle-outline' } else if (route.name === 'News') { iconName = focused ? 'person' : 'person-outline' } return <Ionicons name={iconName} size={size} color={color} /> } })} tabBarOptions={{ activeTintColor: 'tomato', inactiveTintColor: 'gray' }} > <Tab.Screen name="Home" component={HomeScreen} /> <Tab.Screen name="News" component={NewsScreen} /> </Tab.Navigator> ) } } const styles = StyleSheet.create({ container: { flex: 1, justifyContent: 'center', alignItems: 'center' }, text: { fontSize: 40 } }) -
为 Tab 导航菜单,设置小图标
-
安装图标组件
React-native-vector-icons是著名的图标组件,包含了世界各大公司的矢量图标。使用之前先安装
npm install --save react-native-vector-icons -
将图标文件关联到应用
不同环境下的关联方式不同,详情查看 https://github.com/oblador/react-native-vector-icons-
iOS
项目根目录下运行:react-native link react-native-vector-icons如果不能正常运行,请参考官方文档
-
Android
编辑android/app/build.gradle ( 不是android/build.gradle ) 并添加如下内容:apply from: "../../node_modules/react-native-vector-icons/fonts.gradle"然后重新运行项目。
-
-
Drawer 导航
-
安装组件
yarn add @react-navigation/drawer -
使用组件
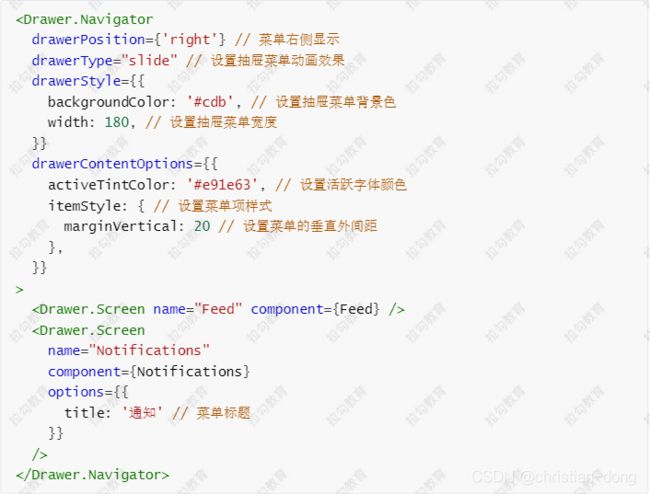
import React, { Component } from 'react' import { Text, StyleSheet, View, Button } from 'react-native' import { createDrawerNavigator } from '@react-navigation/drawer' import Ionicons from 'react-native-vector-icons/Ionicons' function HomeScreen(prop) { return ( <View style={[styles.container]}> <Text style={[styles.text]}>Home Screen</Text> <Button title={"Open Drawer"} onPress={() => prop.navigation.openDrawer()} /> <Button title={"Toggle Drawer"} onPress={() => prop.navigation.toggleDrawer()} /> </View> ) } function NewsScreen(prop) { return ( <View style={[styles.container]}> <Text style={[styles.text]}>News Screen</Text> <Button title={"Open Drawer"} onPress={() => prop.navigation.openDrawer()} /> <Button title={"跳到 Home 页面"} onPress={() => prop.navigation.navigate('Home')} /> </View> ) } const Drawer = createDrawerNavigator() export default class index extends Component { render() { return ( <Drawer.Navigator drawerStyle={{ width: 180, backgroundColor: '#dfb' }} drawerPosition={'right'} drawerType={'slide'} drawerContentOptions={{ activeTintColor: 'red', itemStyle: { // 设置菜单项的样式 marginVertical: 20 } }} > <Drawer.Screen name="Home" component={HomeScreen} options={{ title: "首页", drawerIcon: ({ focused, color, size }) => { let iconName iconName = focused ? 'home' : 'home-outline' return <Ionicons name={iconName} size={size} color={color} /> } }} /> <Drawer.Screen name="News" component={NewsScreen} options={{ title: "新闻", drawerIcon: ({ focused, color, size }) => { let iconName iconName = focused ? 'person' : 'person-outline' return <Ionicons name={iconName} size={size} color={color} /> } }} /> </Drawer.Navigator> ) } } const styles = StyleSheet.create({ container: { flex: 1, justifyContent: 'center', alignItems: 'center' }, text: { fontSize: 40 } }) -
扩展属性
MaterialTopTab 导航
生成可以左右滑动的 Tab 导航
-
安装
yarn add @react-navigation/material-top-tabsreact-native-tab-view -
使用
import React, { Component } from 'react' import { Text, StyleSheet, View, Button } from 'react-native' import { createMaterialTopTabNavigator } from '@react-navigation/material-top-tabs' import Ionicons from 'react-native-vector-icons/Ionicons' function OrderunpayScreen() { return ( <View style={[styles.container]}> <Text style={[styles.text]}>待付款</Text> </View> ) } function OrderPaidScreen() { return ( <View style={[styles.container]}> <Text style={[styles.text]}>待发货</Text> </View> ) } function OrderSentScreen() { return ( <View style={[styles.container]}> <Text style={[styles.text]}>待收货</Text> </View> ) } function OrderFinishScreen() { return ( <View style={[styles.container]}> <Text style={[styles.text]}>待评价</Text> </View> ) } const MTab = createMaterialTopTabNavigator() export default class index extends Component { render() { return ( <MTab.Navigator tabBarPosition="bottom" tabBarOptions={{ tabStyle: { borderWidth: 1, borderColor: 'red' }, labelStyle: { fontSize: 20 }, activeTintColor: 'red', inactiveTintColor: '#666', showIcon: true }} > <MTab.Screen name="OrderUnpay" component={OrderunpayScreen} options={{ title: '待付款', tabBarIcon: ({ focused, color }) => { return ( <Ionicons name="hammer-outline" size={20} color={color} /> ) } }} /> <MTab.Screen name="OrderPaid" component={OrderPaidScreen} options={{ title: '待发货', tabBarIcon: ({ focused, color }) => { return ( <Ionicons name="arrow-redo-circle-outline" size={20} color={color} /> ) } }} /> <MTab.Screen name="OrderSent" component={OrderSentScreen} options={{ title: '待收货', tabBarIcon: ({ focused, color }) => { return ( <Ionicons name="arrow-redo-outline" size={20} color={color} /> ) } }} /> <MTab.Screen name="OrderFinish" component={OrderFinishScreen} options={{ title: '待评价', tabBarIcon: ({ focused, color }) => { return ( <Ionicons name="chatbubble-ellipses-outline" size={20} color={color} /> ) } }} /> </MTab.Navigator> ) } } const styles = StyleSheet.create({ container: { flex: 1, justifyContent: 'center', alignItems: 'center' }, text: { fontSize: 40 } }) -
属性配置
- Navigator 属性
-
tabBarPosition
标签显示的位置,默认是 top,如果想把标签设置在底部,可以使用 bottom。 -
tabBarOptions
包含 tabBar 组件属性的对象。- activeTintColor - 当前标签的标签或图标颜色。
- inactiveTintColor - 非当前标签的标签或图标颜色。
- showIcon - 是否显示图标, 默认是 false。
- showLabel - 是否显示文字, 默认是 true。
- tabStyle - 标签样式对象。
- labelStyle - 标签文字样式对象。这里指定的颜色,会覆盖activeTintColor和inactiveTintColor的值。
- iconStyle - 图标样式对象。
-
- Screen 属性
- options
设置 Screen 组件的对象- title - 设置标签文字
- tabBarIcon - 设置标签图标。需要现在 Navigator 中指定 showIcon: true。其值为函数,包含两个参数:{ focused: boolean, color: string }。
- focused 用来判断标签是否获取焦点,
- color 为当前标签的颜色
- tabBarLabel - 设置标签文字内容(当未定义时,会使用 title 字段)其值为函数,包含两个参数:{ focused: boolean, color: string }。
- options
- Navigator 属性