VNC 远程重装 Centos 系统
一、环境
1、环境准备
两台设备,一台为重装 Centos 机器( IP:192.168.206.30,hostname:centos1) ,确保 centos1本身开启了图形化界面GNOME,不是最小化安装的Linux 。一台为重装时,从获取安装程序( IP: 192.168.206.7,hostname:master03)
2、重装流程
第一步:centos1 安装 vnc-server,本地 windows 安装 vnc 客户端,并确保 windows vnc 客户端能够连接 centos1 的 vnc,显示出 centos1 的画面
第二步:master03 安装 httpd,将CentOS-7-x86_64-DVD-2009.iso 镜像文件解压,并通过httpd做代理,做成yum源
第三步:配置centos1启动方式,让其从新安装系统,也启动vnc
第四步:使用windows 安装 vnc 客户端 连接第三步的Linux 的vnc,重装系统
二、安装 windows vnc 客户端
tightVNC 下载地址:http://www.tightvnc.com/download.php
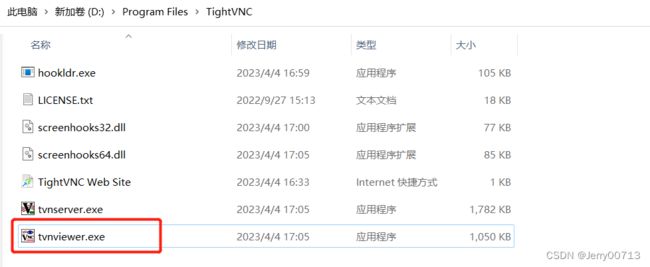
规划好路径,一路下一步安装,tvnviewer.exe则是tightVNC
三、部署vnc-server(centos1操作)
1、部署vnc-server
查看是否安装了 vnc-server ,比如如下 tigervnc-server-1.8.0-25.el7_9.x86_64 为 vnc-server
[root@master03 ~]# rpm -qa |grep vnc
tigervnc-server-minimal-1.8.0-25.el7_9.x86_64
tigervnc-server-1.8.0-25.el7_9.x86_64
tigervnc-server-module-1.8.0-25.el7_9.x86_64
tigervnc-icons-1.8.0-25.el7_9.noarch
tigervnc-1.8.0-25.el7_9.x86_64
tigervnc-license-1.8.0-25.el7_9.noarch
[root@master03 ~]#
通过 yum 安装 vnc-server
yum install -y tigervnc-server通过 rpm 安装 vnc-server,适用于访问不了外网和内网没有 yum 源
# 找一台外网机器安装 tigervnc-server ,并将安装包相关下载出来
yum -y install tigervnc-server --downloadonly  --downloaddir /opt/tigervnc-server

# 将/opt/tigervnc-server目录拷贝至内网重装机器,随后
sudo rpm -Uvh *.rpm --force --nodeps
2、配置vnc-server
切换到计划登录vnc服务的账户并运行vncserver命令
注意:你将会被提示输入并且确认一个密码,并且是否设置一个仅仅查看的密码。如果你选择设置一个仅仅查看的密码,这个用户将不能通过键盘和鼠标和 VNC 实例进行交互。因此我此处选择则“n”。
第一次运行vncserver命令,它将会在~/.vnc目录下创建并且存储密码文件(这是个隐藏文件,可通过 "ls -a"查看)。如果该文件夹没有被创建,那么首先会创建该文件夹。
# 随机生成桌面号
vncsever

# 生成固定的桌面号,我们使用 vncserver :1
vncserver :1

# 随后可以设置密码
请留意上面主机名后面的:1。则表示 正在运行的 VNC 服务器上的显示端口号。在我们的例子中,服务器运行在 TCP 端口5901(5900+1)。如果你创建了第二个实例,他将会运行到下一个闲置的端口上,例如::2,这意味着,服务器运行在端口号5902(5900+2)上。
在和 VNC 服务器上工作的时候,最重要的一点就是,:X就是显示端口号,即:5900+X。
3、访问测试
注意:如果是临时连接,那现在通过防火墙开放5901端口,就可以在windows上用vnc工具进行访问了。打开 tvnviewer.exe ,写IP::5901
4、后续启动vnc-server、自启(不影响vnc重装系统,可不做)
4.1、启动服务
vnc-server 默认启动的命令:vncserver
重启vnc服务:
vncserver -kill :1
vncserver :1
通过systemctl
sudo systemctl restart vncserver@\:1.service
4.2、自启动方式一(自启动通过添加/etc/rc.d/rc.local )
[root@centos1 ~]# which vncserver
/usr/bin/vncserver

[root@centos1 ~]# echo "/usr/bin/vncserver" >>/etc/rc.local

[root@centos1 ~]# chmod +x /etc/rc.d/rc.local
4.3、自启动方式二(systemctl)
Unit files 允许你很容易地启动,停止,和重启服务。拷贝默认的 vncserver unit 文件,我们在新文件名中输入的“ 1”是将用于该特定服务实例的显示号。知道这一点很重要,因为它还会确定VNC服务器将侦听的TCP端口,即5900 +显示号:第一个是5901,然后是5902,依此类推:
sudo cp /usr/lib/systemd/system/[email protected] /etc/systemd/system/vncserver@:1.service

sudo vi /etc/systemd/system/vncserver@:1.service
sudo systemctl daemon-reload
# 重新加载某个服务的配置文件,如果新安装了一个服务,归属于 systemctl 管理,要是新服务的服务程序配置文件生效,需重新加载systemctl enable vncserver@:1.service
# 设置开机自启动
systemctl disable vncserver@:1.service
# 禁止开机自启动5、修改屏幕分辨率(不影响vnc重装系统,可不做)
(直接启动与接下来介绍的配置文件启动更改分辨率都在此处)
# 修改.vnc目录先的config配置文件
vi ~/.vnc/config
四、配置 yum 源(master01 操作)
1、将 iso 挂载
mkdir /media/iso/ /media/cdrom/
cd /media/iso/
rz CentOS-7-x86_64-DVD-2009.iso
mount -o loop /media/iso/CentOS-7-x86_64-DVD-2009.iso /media/cdrom/
2、配置httpd
yum -y install httpd
mkdir -p  /var/www/html/CentOS-7.9
cp -r /media/cdrom/* /var/www/html/CentOS-7.9/
systemctl start httpd;systemctl enable httpd
3、访问 yum 源
http://192.168.206.7/CentOS-7.9/
五、配置 Centos 重做系统加载(centos1操作)
目前CentOS 7主要使用的引导方式是grub2,这与过去的grub1差别其实是很大的
1、 确定基本信息
[root@localhost /]# ip a
[root@localhost /]# ip route show
IP、网卡名称、网关、子网掩码你
192.168.206.10 ens33 192.168.206.2 255.255.255.0
2、下载 CentOS 的 bootstrap 文件
yum install wget
cd /boot
wget http://192.168.206.7/CentOS-7.9/images/pxeboot/vmlinuz -O vmlinuz-7
wget http://192.168.206.7/CentOS-7.9/images/pxeboot/initrd.img -O initrd-7.img

或者

wget http://mirror.centos.org/centos/7/os/x86_64/isolinux/vmlinuz -O vmlinuz-7
wget http://mirror.centos.org/centos/7/os/x86_64/isolinux/initrd.img -O initrd-7.img
3、添加grub启动条目
启动分为 bios启动 和 efi 启动,先看biso启动,如果有/boot/grub2/grub.cfg文件,就是bios启动,如果没有是efi 启动,故操作3.1 或者 3.2
3.1、bios启动
查看/boot/grub2/grub.cfg,找到如下代码部分:
menuentry 'CentOS Linux (0-rescue-709fd4bae8ca4481aefa4ba62a2a5ef5) 7 (Core)' --class centos --class gnu-linux --class gnu --class os --unrestricted $menuentry_id_option 'gnulinux-0-rescue-709fd4bae8ca4481aefa4ba62a2a5ef5-advanced-bb22a4ef-15a0-412b-8835-b590f240ded1' {
        load_video
        insmod gzio
        insmod part_msdos
        insmod xfs
        set root='hd0,msdos1'
        if [ x$feature_platform_search_hint = xy ]; then
          search --no-floppy --fs-uuid --set=root --hint-bios=hd0,msdos1 --hint-efi=hd0,msdos1 --hint-baremetal=ahci0,msdos1 --hint='hd0,msdos1'  c7c23a04-4448-4a56-a79c-9a312297efea
        else
          search --no-floppy --fs-uuid --set=root c7c23a04-4448-4a56-a79c-9a312297efea
        fi
        linux16 /vmlinuz-0-rescue-709fd4bae8ca4481aefa4ba62a2a5ef5 root=/dev/mapper/centos-root ro crashkernel=auto rd.lvm.lv=centos/root rd.lvm.lv=centos/swap rhgb quiet
        initrd16 /initramfs-0-rescue-709fd4bae8ca4481aefa4ba62a2a5ef5.img
}
然后把这一段拷贝修改追加到 /etc/grub.d/40_custom 中如下:
[root@centos1 ~]# cat /etc/grub.d/40_custom
#!/bin/sh
exec tail -n +3 $0
# This file provides an easy way to add custom menu entries.  Simply type the
# menu entries you want to add after this comment.  Be careful not to change
# the 'exec tail' line above.

menuentry 'NetInstall' {
        set gfxpayload=keep
        load_video
        insmod gzio
        insmod part_msdos
        insmod xfs
        set root='hd0,msdos1'
        if [ x$feature_platform_search_hint = xy ]; then
          search --no-floppy --fs-uuid --set=root --hint-bios=hd0,msdos1 --hint-efi=hd0,msdos1 --hint-baremetal=ahci0,msdos1 --hint='hd0,msdos1'  c7c23a04-4448-4a56-a79c-9a312297efea
        else
          search --no-floppy --fs-uuid --set=root c7c23a04-4448-4a56-a79c-9a312297efea
        fi
        linux16 /vmlinuz-7 inst.vnc inst.vncpassword=12345678 inst.headless ip=192.168.206.30::192.168.206.2:255.255.255.0::ens33:none inst.repo=http://192.168.206.7/CentOS-7.9/ inst.lang=en_US inst.keymap=us
        initrd16 /initrd-7.img
}

[root@centos1 ~]#
此处解释一下格式:
inst.vnc #启用vnc
inst.vncpassword=12345678 # vnc 登陆密码(至少是8个及其以上的字符),此处密码随意,在系统启动会,会获取inst.vncpassword中的数值,当作密码
inst.headless iinst.headless ip=192.168.206.30::192.168.206.2:255.255.255.0::ens33:none # ip=ip::网关:子网掩码::设备名称:none
inst.repo=http://192.168.206.7/CentOS-7.9/  # yum源地址
inst.lang=en_US # 默认语言
inst.keymap=us # 键盘模式
配置/etc/default/grub
vi /etc/default/grub
GRUB_DEFAULT=saved          # 修改 GRUB_DEFAULT=0 为 GRUB_DEFAULT=saved
GURB_DEFAULT="NetInstall"   # 增加一条,其中 NetInstall 是 /etc/grub.d/40_custom 定义的
重建配置,使配置生效
# 重建grub配置
grub2-mkconfig -o /boot/grub2/grub.cfg# 列出所有启动条目
awk -F\' '$1=="menuentry " {print $2}' /etc/grub2.cfg# 下一次系统启动后,使用NetInstall 定义的配置,仅使用一次,再一次重启后,会走默认的,故不建议配置 ceho 'GRUB_DEFAULT="NetInstall" ' >> /etc/default/grub
grub2-reboot NetInstall# 重启系统
reboot重启后一段时间如下
3.2、efi启动
efi启动是没有 /boot/grub2/grub.cfg,对应的有/boot/efi/EFI/centos/grub.cfg找到如下代码部分:
menuentry 'CentOS Linux (0-rescue-709fd4bae8ca4481aefa4ba62a2a5ef5) 7 (Core)' --class centos --class gnu-linux --class gnu --class os --unrestricted $menuentry_id_option 'gnulinux-0-rescue-709fd4bae8ca4481aefa4ba62a2a5ef5-advanced-bb22a4ef-15a0-412b-8835-b590f240ded1' {
        load_video
        insmod gzio
        insmod part_msdos
        insmod xfs
        set root='hd0,msdos1'
        if [ x$feature_platform_search_hint = xy ]; then
          search --no-floppy --fs-uuid --set=root --hint-bios=hd0,msdos1 --hint-efi=hd0,msdos1 --hint-baremetal=ahci0,msdos1 --hint='hd0,msdos1'  c7c23a04-4448-4a56-a79c-9a312297efea
        else
          search --no-floppy --fs-uuid --set=root c7c23a04-4448-4a56-a79c-9a312297efea
        fi
        linux16 /vmlinuz-0-rescue-709fd4bae8ca4481aefa4ba62a2a5ef5 root=/dev/mapper/centos-root ro crashkernel=auto rd.lvm.lv=centos/root rd.lvm.lv=centos/swap rhgb quiet
        initrd16 /initramfs-0-rescue-709fd4bae8ca4481aefa4ba62a2a5ef5.img
}
然后把这一段拷贝修改追加到 /etc/grub.d/40_custom 中如下:
[root@centos1 ~]# cat /etc/grub.d/40_custom ## 改最后两行
#!/bin/sh
exec tail -n +3 $0
# This file provides an easy way to add custom menu entries.  Simply type the
# menu entries you want to add after this comment.  Be careful not to change
# the 'exec tail' line above.

menuentry 'NetInstall' {
        set gfxpayload=keep
        load_video
        insmod gzio
        insmod part_msdos
        insmod xfs
        set root='hd0,msdos1'
        if [ x$feature_platform_search_hint = xy ]; then
          search --no-floppy --fs-uuid --set=root --hint-bios=hd0,msdos1 --hint-efi=hd0,msdos1 --hint-baremetal=ahci0,msdos1 --hint='hd0,msdos1'  c7c23a04-4448-4a56-a79c-9a312297efea
        else
          search --no-floppy --fs-uuid --set=root c7c23a04-4448-4a56-a79c-9a312297efea
        fi
        linuxefi /vmlinuz-7 inst.vnc inst.vncpassword=12345678 inst.headless ip=192.168.206.30::192.168.206.2:255.255.255.0::ens33:none inst.repo=http://192.168.206.7/CentOS-7.9/ inst.lang=en_US inst.keymap=us
        linuxefi /initrd-7.img
}

[root@centos1 ~]#
此处解释一下格式:
inst.vnc #启用vnc
inst.vncpassword=12345678 # vnc 登陆密码(至少是8个及其以上的字符),此处密码随意,在系统启动会,会获取inst.vncpassword中的数值,当作密码
inst.headless iinst.headless ip=192.168.206.30::192.168.206.2:255.255.255.0::ens33:none # ip=ip::网关:子网掩码::设备名称:none
inst.repo=http://192.168.206.7/CentOS-7.9/  # yum源地址
inst.lang=en_US # 默认语言
inst.keymap=us # 键盘模式
配置/etc/default/grub
vi /etc/default/grub
GRUB_DEFAULT=saved          # 修改 GRUB_DEFAULT=0 为 GRUB_DEFAULT=saved
GURB_DEFAULT="NetInstall"   # 增加一条,其中 NetInstall 是 /etc/grub.d/40_custom 定义的
重建配置,使配置生效
# 重建grub配置
grub2-mkconfig -o /boot/efi/EFI/centos/grub.cfg# 列出所有启动条目
awk -F\' '$1=="menuentry " {print $2}' /boot/efi/EFI/centos/grub.cfg# 下一次系统启动后,使用NetInstall 定义的配置,仅使用一次,再一次重启后,会走默认的,故不建议配置 ceho 'GRUB_DEFAULT="NetInstall" ' >> /etc/default/grub
grub2-reboot NetInstall# 重启系统
reboot重启后一段时间如下
六. 使用VNC安装CentOS系统
密码就是上面设置的 inst.vncpassword=12345678
此时 ssh 是连接不上的
此时如果不想装系统时候,按ctrl +alt 后执行 reboot


