CentOS系统环境搭建(九)——centos系统下使用docker部署项目
centos系统环境搭建专栏点击跳转
关于Docker-compose安装请看CentOS系统环境搭建(三)——Centos7安装Docker&Docker Compose,该文章同样收录于centos系统环境搭建专栏。
Centos7部署项目
- 采用前后端分离的形式部署。
- 使用Docker运行项目。
- 使用Docker Compose创建项目容器。
- 使用git管理项目的更新。
文章目录
- Centos7部署项目
-
- Centos7安装git
- Centos7从github拉取代码
-
- 配置git
-
- 配置用于提交代码的用户名
- 配置用户邮箱
- 生成公钥
- 效果如下
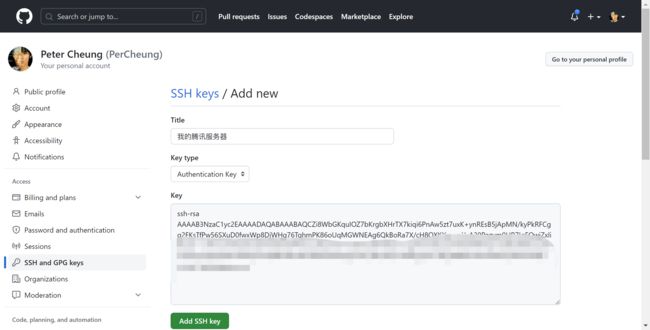
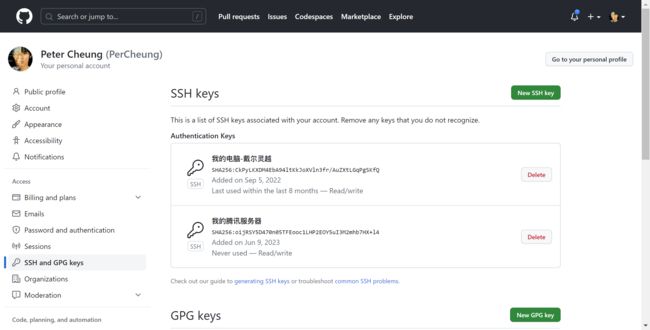
- github添加SSH key
-
- 打开你的GitHub
- 获取ssh key公钥内容
- 验证
- 拉取项目
-
- 新建空白文件夹
- 拉取项目
- 使用Docker Compose创建项目容器
-
- 创建docker-compose.yaml
- 启动项目
- 配置前端
-
- 新建空白文件夹
- 拉取前端代码
- 创建nginx.conf
- 创建docker-compose.yaml
- 启动服务
- 查看是否在运行
Centos7安装git
安装
yum install git
验证
git --version
Centos7从github拉取代码
配置git
配置用于提交代码的用户名
git config --global user.name "Your Name"
配置用户邮箱
git config --global user.email "Your email"
生成公钥
ssh-keygen -t rsa -C "Your email"
效果如下
ssh-keygen -t rsa -C "你的email"
Generating public/private rsa key pair.
Enter file in which to save the key (/root/.ssh/id_rsa):
Enter passphrase (empty for no passphrase):
Enter same passphrase again:
Your identification has been saved in /root/.ssh/id_rsa.
Your public key has been saved in /root/.ssh/id_rsa.pub.
The key fingerprint is:
SHA256:一串密码 email
The key's randomart image is:
密码图
可知,Your public key has been saved in /root/.ssh/id_rsa.pub.
这里就是你密钥的位置。
[root@VM-4-17-centos srv]# cd /root/.ssh/
[root@VM-4-17-centos .ssh]# ll
total 8
-rw------- 1 root root 1679 Jun  9 14:57 id_rsa
-rw-r--r-- 1 root root  400 Jun  9 14:57 id_rsa.pub
github添加SSH key
打开你的GitHub
获取ssh key公钥内容
id_rsa.pub就是你的公钥,参考上面步骤,进入对应文件夹下查看公钥。
cat /root/.ssh/id_rsa.pub
将它复制到github。
验证
ssh -T [email protected]
成功后如下所示。
[root@VM-4-17-centos .ssh]# ssh -T [email protected]
Hi PerCheung! You've successfully authenticated, but GitHub does not provide shell access.
拉取项目
新建空白文件夹
mkdir /srv/tencent
mkdir /srv/tencent/server
我将会把github代码拉取到/srv/tencent/server
拉取项目
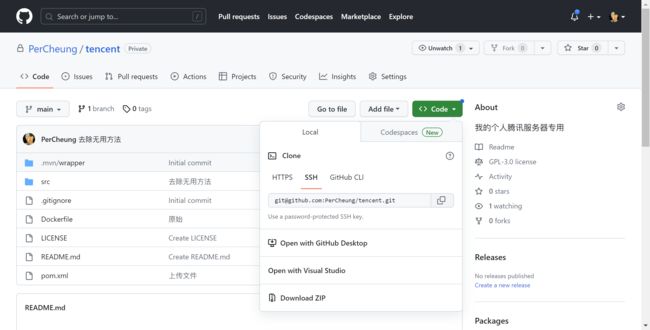
复制ssh地址
进入/srv/tencent/server执行下面的命令
git clone [email protected]:PerCheung/tencent.git
效果如下
[root@VM-4-17-centos server]# git clone [email protected]:PerCheung/tencent.git
Cloning into 'tencent'...
remote: Enumerating objects: 352, done.
remote: Counting objects: 100% (352/352), done.
remote: Compressing objects: 100% (210/210), done.
remote: Total 352 (delta 136), reused 289 (delta 77), pack-reused 0
Receiving objects: 100% (352/352), 111.94 KiB | 0 bytes/s, done.
Resolving deltas: 100% (136/136), done.
[root@VM-4-17-centos server]# ll
total 4
drwxr-xr-x 5 root root 4096 Jun  9 15:31 tencent
使用Docker Compose创建项目容器
创建docker-compose.yaml
/srv/tencent/server下创建docker-compose.yaml
# 指定 Docker Compose 文件版本
version: '3'

# 定义服务
services:
  # 定义名为 tencent 的服务
  tencent:
    # 自定义容器名
    container_name: tencent_server
    # 始终重启该容器
    restart: always
    # 使用当前目录下的 Dockerfile 构建容器镜像
    build: ./tencent
    # 赋予容器更高的权限,以便容器内的进程可以拥有更高的权限
    privileged: true
    # 容器内的工作目录
    working_dir: /tencent
    # 将主机的 ~/.m2 目录映射到容器内的 /root/.m2 目录,以便容器内的应用程序可以访问主机上的 Maven 仓库
    volumes:
      - ./tencent:/tencent
      - ~/.m2:/root/.m2
    # 将容器的网络模式设置为主机模式,使得容器内的应用程序可以直接使用主机的网络资源,提高应用程序的网络性能
    network_mode: host
    # 容器启动时执行的命令,清除 Maven 缓存并启动 Spring Boot 应用程序
    command: mvn clean spring-boot:run
启动项目
docker-compose up
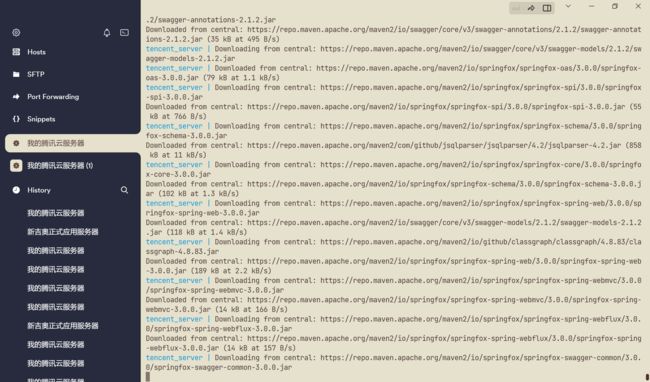
之后将会下载大量jar包到你的本地maven仓库。
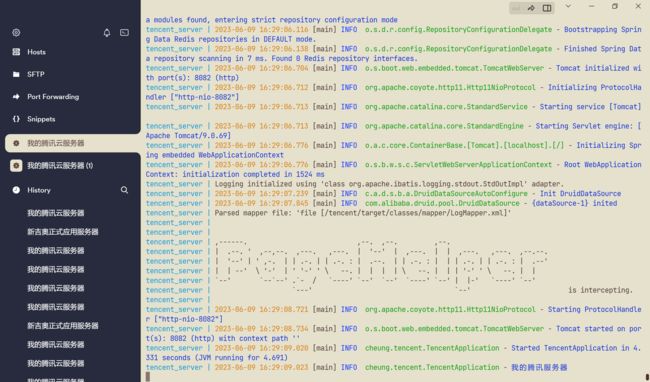
成功后有如下信息。
这证明项目可以顺利启动,使用ctrl+C结束,换这个命令运行我们的项目。
docker-compose up -d
可以看到项目已经正在运行。
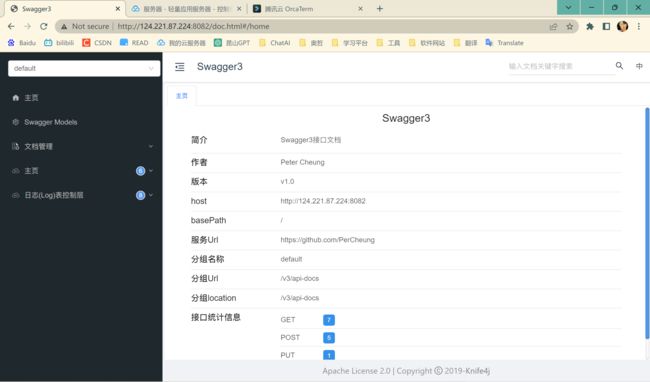
通过网页即可访问。
配置前端
同理,以上的步骤就是在配置后端,配置前端模仿即可。
新建空白文件夹
mkdir /srv/tencent
mkdir /srv/tencent/page
拉取前端代码
/srv/tencent/page下执行
git clone [email protected]:PerCheung/mytencentpage.git
创建nginx.conf
/srv/tencent/page下创建nginx.conf如下
server {
    # 监听端口号为 8080
    listen 8080;
    # 服务器名为 localhost
    server_name localhost;
    # 设置字符集为 utf-8
    charset utf-8;
    # 设置根目录为 /usr/share/nginx/files
    root /usr/share/nginx/files;
}
创建docker-compose.yaml
/srv/tencent/page下创建docker-compose.yaml如下
version: '3'
services:
  tencent_page:
    # 使用 nginx:1.21.1 镜像作为容器
    image: nginx:1.21.1
    # 设置容器名称为 tencent_page
    container_name: tencent_page
    # 启用特权模式,以便容器内部可以执行一些特殊操作
    privileged: true
    # 挂载本地 dist 目录到容器内的 /usr/share/nginx/files 目录
    volumes:
      - ./mytencentpage/dist:/usr/share/nginx/files
    # 挂载本地 nginx.conf 文件到容器内的 /etc/nginx/conf.d/default.conf 文件
      - ./nginx.conf:/etc/nginx/conf.d/default.conf
    # 将容器内的 8080 端口映射到宿主机的 80 端口
    ports:
      - 80:8080
    # 启动容器时执行的命令,创建 /usr/share/nginx/files 目录并启动 nginx 服务
    command: /bin/bash -c "mkdir -p /usr/share/nginx/files && nginx -g 'daemon off;'"
启动服务
docker-compose up -d


