Mybatis-Plus
目录
一、SpringBoot整合MyBatisPlus入门程序
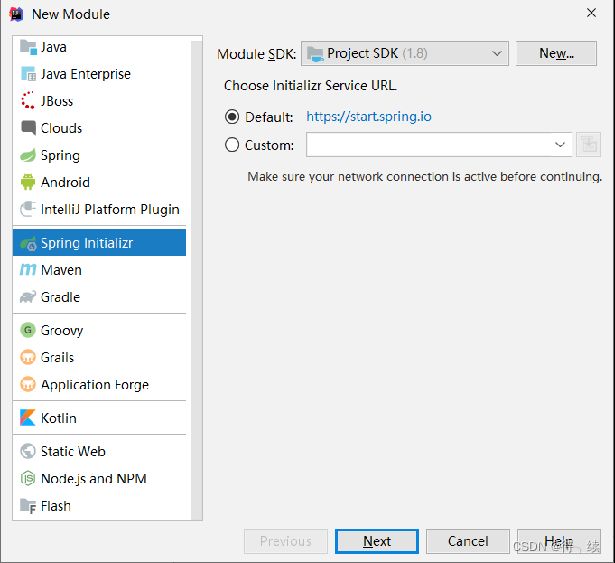
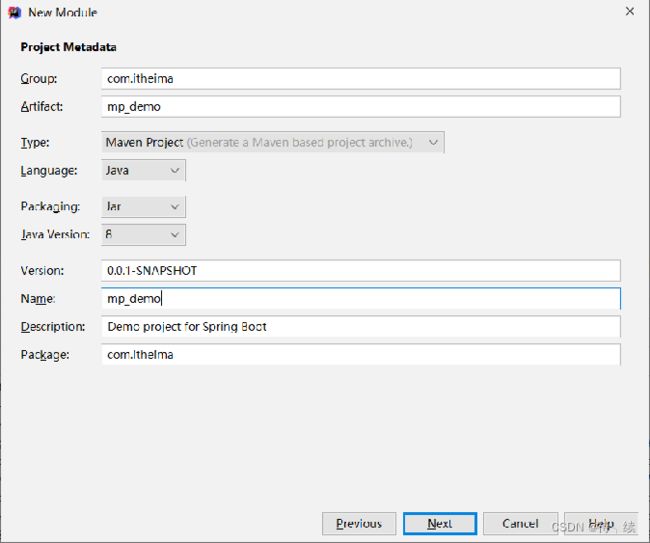
1. 创建新模块,选择Spring初始化,并配置模块相关基础信息
2. 选择当前模块需要使用的技术集(仅保留JDBC)
3. 手动添加mp起步依赖
4. 制作实体类与表结构
5. 设置Jdbc参数(application.yml)
6. 定义数据接口,继承BaseMapper
7. 测试类中注入dao接口,测试功能
二、Mybatis-Plus概念
1. Mybatis-Plus介绍
2. 特性
3. 架构编辑
4. 作者
三、标准数据层开发
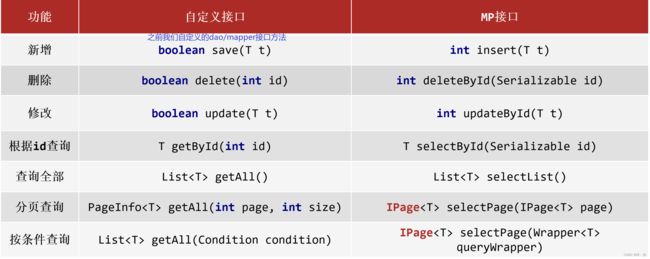
1. MyBatisPlus的CRUD操作
2. Lombok插件介绍
3. MyBatisPlus日志
(1)开启MyBatisPlus日志
(2)解决日志打印过多问题
①取消初始化spring日志打印
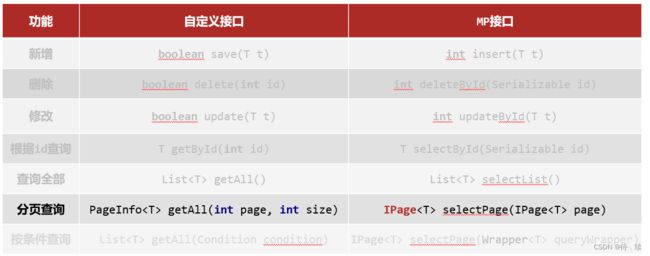
4. MyBatisPlus分页功能
(1)MyBatisPlus分页使用
四、DQL编程控制
1. 条件查询方式
(1)条件查询
(2)组合条件
(3) NULL值处理
a. if语句控制条件追加
b. 条件参数控制
c. 条件参数控制(链式编程)
2. 查询投影-设置【查询字段、分组、分页】
(1)查询结果包含模型类中部分属性
3. 查询条件设定
(1)查询条件
a. 用户登录(eq匹配)
b. 购物设定价格区间、户籍设定年龄区间(le ge匹配 或 between匹配)
c. 查信息,搜索新闻(非全文检索版:like匹配)
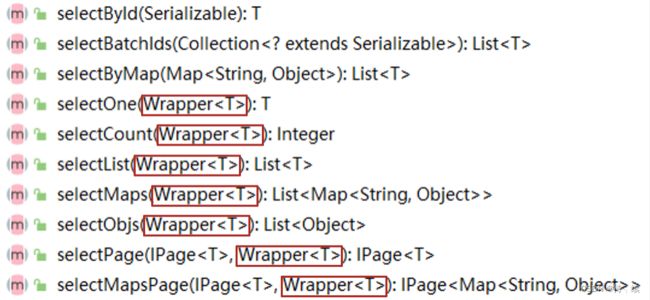
(2)查询API
4. 字段映射与表名映射
(1)问题一:表字段与编码属性设计不同步
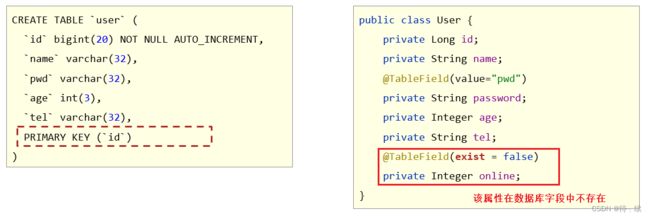
(2)问题二:编码中添加了数据库中未定义的属性
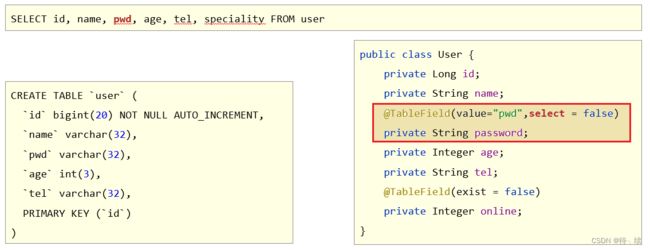
(3)问题三:采用默认查询开放了更多的字段查看权限
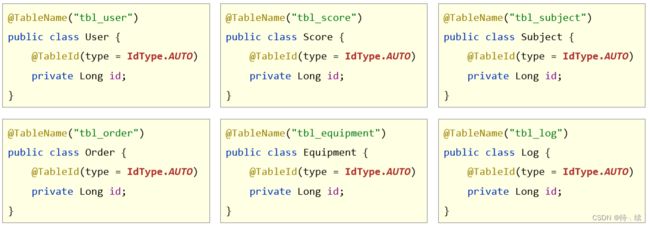
(4) 问题四:表名与编码开发设计不同步
五、DML编程控制
1. id生成策略控制(Insert)
(1)id生成策略控制(@TableId注解)
(2) 全局策略配置
a. id生成策略全局配置
b. 表名前缀全局配置
2. 多记录操作(批量Delete/Select)
(1)按照主键删除多条记录
(2)根据主键查询多条记录
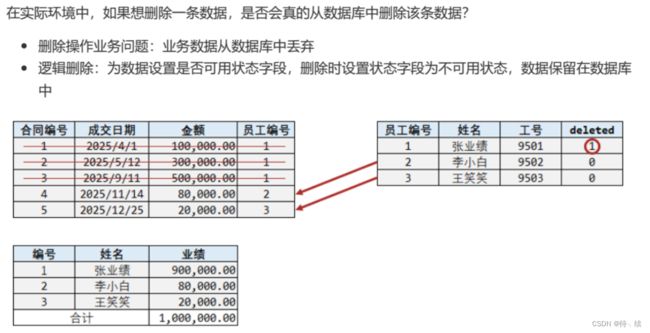
3. 逻辑删除(Delete/Update)
(1)逻辑删除操作(案例)
①:数据库表中添加逻辑删除标记字段
②:实体类中添加对应字段,并设定当前字段为逻辑删除标记字段
③:配置逻辑删除字面值
(2)逻辑删除本质
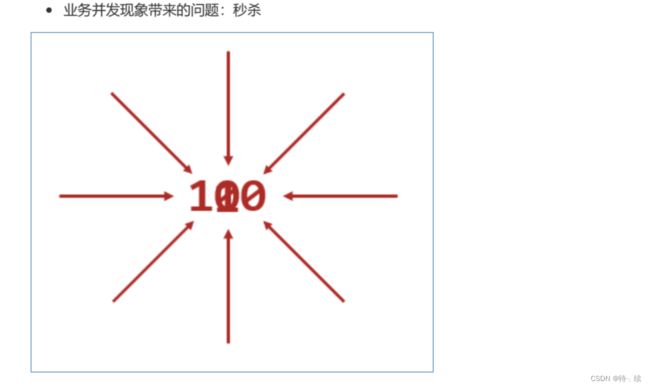
4. 乐观锁(Update)
(1)乐观锁操作(案例)
①:数据库表中添加锁标记字段
②:实体类中添加对应字段,并设定当前字段为逻辑删除标记字段
③:配置乐观锁拦截器实现锁机制对应的动态SQL语句拼装
④:使用乐观锁机制在修改前必须先获取到对应数据的verion方可正常进行
六、快速开发-代码生成器
1. MyBatisPlus提供模板
2. 工程搭建和基本代码编写
3. 开发者自定义配置
(1)设置全局配置
(2)设置包名相关配置
(3)策略设置
一、SpringBoot整合MyBatisPlus入门程序
1. 创建新模块,选择Spring初始化,并配置模块相关基础信息
2. 选择当前模块需要使用的技术集(仅保留JDBC)
3. 手动添加mp起步依赖
com.baomidou
mybatis-plus-boot-starter
3.4.1


com.alibaba
druid
1.1.16
注意事项1:由于mp并未被收录到idea的系统内置配置,无法直接选择加入
注意事项2:如果使用Druid数据源,需要导入对应坐标
4. 制作实体类与表结构
(类名与表名对应,属性名与字段名对应)
create database if not exists mybatisplus_db character set utf8;
use mybatisplus_db;
CREATE TABLE user (
id bigint(20) primary key auto_increment,
name varchar(32) not null,
password varchar(32) not null,
age int(3) not null ,
tel varchar(32) not null
);
insert into user values(null,'tom','123456',12,'12345678910');
insert into user values(null,'jack','123456',8,'12345678910');
insert into user values(null,'jerry','123456',15,'12345678910');
insert into user values(null,'tom','123456',9,'12345678910');
insert into user values(null,'snake','123456',28,'12345678910');
insert into user values(null,'张益达','123456',22,'12345678910');
insert into user values(null,'张大炮','123456',16,'12345678910');
public class User {
private Long id;
private String name;
private String password;
private Integer age;
private String tel;
//自行添加getter、setter、toString()等方法
}5. 设置Jdbc参数(application.yml)
spring:
datasource:
type: com.alibaba.druid.pool.DruidDataSource
driver-class-name: com.mysql.cj.jdbc.Driver
url: jdbc:mysql://localhost:3306/mybatisplus_db?serverTimezone=UTC
username: root
password: root
6. 定义数据接口,继承BaseMapper
package com.itheima.dao;
import com.baomidou.mybatisplus.core.mapper.BaseMapper;
import com.itheima.domain.User;
import org.apache.ibatis.annotations.Mapper;
@Mapper
public interface UserDao extends BaseMapper {
}
7. 测试类中注入dao接口,测试功能
package com.itheima;
import com.itheima.dao.UserDao;
import com.itheima.domain.User;
import org.junit.jupiter.api.Test;
import org.springframework.beans.factory.annotation.Autowired;
import org.springframework.boot.test.context.SpringBootTest;
import java.util.List;
@SpringBootTest
public class Mybatisplus01QuickstartApplicationTests {
@Autowired
private UserDao userDao;
@Test
void testGetAll() {
List userList = userDao.selectList(null);
System.out.println(userList);
}
}
二、Mybatis-Plus概念
1. Mybatis-Plus介绍
MyBatisPlus(简称MP)是基于MyBatis框架基础上开发的增强型工具,只做增强不做改变,旨在简化开发、提高效率
官网:https://mybatis.plus/ https://mp.baomidou.com/
Mybatis-Plus 介绍
2. 特性
⽆侵⼊:只做增强不做改变,引⼊它不会对现有⼯程产⽣影响,如丝般顺滑

损耗⼩:启动即会⾃动注⼊基本 CURD,性能基本⽆损耗,直接⾯向对象操作

强⼤的 CRUD 操作:内置通⽤ Mapper、通⽤ Service,仅仅通过少量配置即可实现单表⼤部分CRUD 操作,
                 更有强⼤的条件构造器,满⾜各类使⽤需求

⽀持 Lambda 形式调⽤:通过 Lambda 表达式,⽅便的编写各类查询条件,⽆需再担⼼字段写错

⽀持主键⾃动⽣成:⽀持多达 4 种主键策略(内含分布式唯⼀ ID ⽣成器 - Sequence),可⾃由配置,
                 完美解决主键问题

⽀持 ActiveRecord 模式:⽀持 ActiveRecord 形式调⽤,
                       实体类只需继承 Model 类即可进⾏强⼤的 CRUD 操作

⽀持⾃定义全局通⽤操作:⽀持全局通⽤⽅法注⼊( Write once, use anywhere )

内置代码⽣成器:采⽤代码或者 Maven 插件可快速⽣成 Mapper 、 Model 、 Service 、
              Controller 层代码,⽀持模板引擎,更有超多⾃定义配置等您来使⽤

内置分⻚插件:基于 MyBatis 物理分⻚,开发者⽆需关⼼具体操作,配置好插件之后,
             写分⻚等同于普通 List 查询

分⻚插件⽀持多种数据库:⽀持 MySQL、MariaDB、Oracle、DB2、H2、HSQL、SQLite、
                      Postgre、SQLServer 等多种数据库

内置性能分析插件:可输出 Sql 语句以及其执⾏时间,建议开发测试时启⽤该功能,能快速揪出慢查询

内置全局拦截插件:提供全表 delete 、 update 操作智能分析阻断,也可⾃定义拦截规则,预防误操作
3. 架构
4. 作者
Mybatis-Plus 是由 baomidou (苞⽶⾖)组织开发并且开源的,⽬前该组织⼤概有 30 ⼈左右。
码云地址: https://gitee.com/organizations/baomidou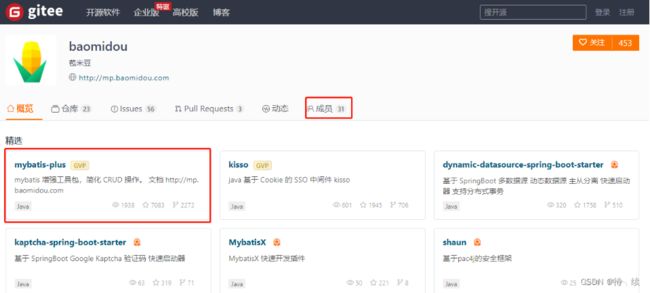
三、标准数据层开发
1. MyBatisPlus的CRUD操作
package com.itheima;
import com.itheima.dao.UserDao;
import com.itheima.domain.User;
import org.junit.jupiter.api.Test;
import org.springframework.beans.factory.annotation.Autowired;
import org.springframework.boot.test.context.SpringBootTest;
import java.util.List;

package com.itheima;
import com.itheima.dao.UserDao;
import com.itheima.domain.User;
import org.junit.jupiter.api.Test;
import org.springframework.beans.factory.annotation.Autowired;
import org.springframework.boot.test.context.SpringBootTest;
import java.util.List;

@Test
void testUpdate() {
User user = new User();
user.setId(1L);
user.setName("Tom888");
user.setPassword("tom888");
userDao.updateById(user);
}
@Test
void testGetById() {
User user = userDao.selectById(2L);
System.out.println(user);
}

@Test
void testGetAll() {
List userList = userDao.selectList(null);
System.out.println(userList);
}
}
2. Lombok插件介绍
Lombok,一个Java类库,提供了一组注解,简化POJO实体类开发。
org.projectlombok
lombok
1.18.12
常用注解:@Data,为当前实体类在编译期设置对应的get/set方法,无参/无参构造方法,
toString方法,hashCode方法,equals方法等
package com.itheima.domain;
import lombok.*;
/*
1 生成getter和setter方法:@Getter、@Setter
生成toString方法:@ToString
生成equals和hashcode方法:@EqualsAndHashCode
2 统一成以上所有:@Data
3 生成空参构造: @NoArgsConstructor
生成全参构造: @AllArgsConstructor
4 lombok还给我们提供了builder的方式创建对象,好处就是可以链式编程。 @Builder【扩展】
*/
@Data
public class User {
private Long id;
private String name;
private String password;
private Integer age;
private String tel;
}
3. MyBatisPlus日志
(1)开启MyBatisPlus日志
spring:
datasource:
type: com.alibaba.druid.pool.DruidDataSource
driver-class-name: com.mysql.cj.jdbc.Driver
url: jdbc:mysql://localhost:3306/mybatisplus_db?serverTimezone=UTC
username: root
password: root
# 开启mp的日志(输出到控制台)
mybatis-plus:
configuration:
log-impl: org.apache.ibatis.logging.stdout.StdOutImpl
(2)解决日志打印过多问题
①取消初始化spring日志打印
做法:在resources下新建一个logback.xml文件,名称固定,内容如下:
关于logback参考播客:https://www.jianshu.com/p/75f9d11ae011
② 取消SpringBoot启动banner图标
spring:
main:
banner-mode: off # 关闭SpringBoot启动图标(banner)
③取消MybatisPlus启动banner图标
# mybatis-plus日志控制台输出
mybatis-plus:
configuration:
log-impl: org.apache.ibatis.logging.stdout.StdOutImpl
global-config:
banner: off # 关闭mybatisplus启动图标
4. MyBatisPlus分页功能
(1)MyBatisPlus分页使用
①:设置分页拦截器作为Spring管理的bean
package com.itheima.config;
import com.baomidou.mybatisplus.extension.plugins.MybatisPlusInterceptor;
import
com.baomidou.mybatisplus.extension.plugins.inner.PaginationInnerInterceptor;
import org.springframework.context.annotation.Bean;
import org.springframework.context.annotation.Configuration;
@Configuration
public class MybatisPlusConfig {
@Bean
public MybatisPlusInterceptor mybatisPlusInterceptor(){
//1 创建MybatisPlusInterceptor拦截器对象
MybatisPlusInterceptor mpInterceptor=new MybatisPlusInterceptor();
//2 添加分页拦截器
mpInterceptor.addInnerInterceptor(new PaginationInnerInterceptor());
return mpInterceptor;
}
}
②:执行分页查询
//分页查询
@Test
void testSelectPage(){
//1 创建IPage分页对象,设置分页参数
IPage page=new Page<>(1,3);
//2 执行分页查询
userDao.selectPage(page,null);
//3 获取分页结果
System.out.println("当前页码值:"+page.getCurrent());
System.out.println("每页显示数:"+page.getSize());
System.out.println("总页数:"+page.getPages());
System.out.println("总条数:"+page.getTotal());
System.out.println("当前页数据:"+page.getRecords());
}
四、DQL编程控制
1. 条件查询方式
MyBatisPlus将书写复杂的SQL查询条件进行了封装,使用编程的形式完成查询条件的组合
(1)条件查询
方式一:按条件查询
//方式一:按条件查询
QueryWrapper qw=new QueryWrapper<>();
qw.lt("age", 18);
List userList = userDao.selectList(qw);
System.out.println(userList);
方式二:lambda格式按条件查询
//方式二:lambda格式按条件查询
QueryWrapper qw = new QueryWrapper();
qw.lambda().lt(User::getAge, 10);
List userList = userDao.selectList(qw);
System.out.println(userList);
方式三:lambda格式按条件查询(推荐)
//方式三:lambda格式按条件查询
LambdaQueryWrapper lqw = new LambdaQueryWrapper();
lqw.lt(User::getAge, 10);
List userList = userDao.selectList(lqw);
System.out.println(userList);
(2)组合条件
a. 并且关系(and)
//并且关系
LambdaQueryWrapper lqw = new LambdaQueryWrapper();
//并且关系:10到30岁之间
lqw.lt(User::getAge, 30).gt(User::getAge, 10);
List userList = userDao.selectList(lqw);
System.out.println(userList);
b. 或者关系(or)
//或者关系
LambdaQueryWrapper lqw = new LambdaQueryWrapper();
//或者关系:小于10岁或者大于30岁
lqw.lt(User::getAge, 10).or().gt(User::getAge, 30);
List userList = userDao.selectList(lqw);
System.out.println(userList);
(3) NULL值处理
在多条件查询中,有条件的值为空应该怎么解决?
a. if语句控制条件追加
Integer minAge=10; //将来有用户传递进来,此处简化成直接定义变量了
Integer maxAge=null; //将来有用户传递进来,此处简化成直接定义变量了
LambdaQueryWrapper lqw = new LambdaQueryWrapper();
if(minAge!=null){
lqw.gt(User::getAge, minAge);
}
if(maxAge!=null){
lqw.lt(User::getAge, maxAge);
}
List userList = userDao.selectList(lqw);
userList.forEach(System.out::println);
b. 条件参数控制
Integer minAge=10; //将来有用户传递进来,此处简化成直接定义变量了
Integer maxAge=null; //将来有用户传递进来,此处简化成直接定义变量了
LambdaQueryWrapper lqw = new LambdaQueryWrapper();
//参数1:如果表达式为true,那么查询才使用该条件
lqw.gt(minAge!=null,User::getAge, minAge);
lqw.lt(maxAge!=null,User::getAge, maxAge);
List userList = userDao.selectList(lqw);
userList.forEach(System.out::println);
c. 条件参数控制(链式编程)
Integer minAge=10; //将来有用户传递进来,此处简化成直接定义变量了
Integer maxAge=null; //将来有用户传递进来,此处简化成直接定义变量了
LambdaQueryWrapper lqw = new LambdaQueryWrapper();
//参数1:如果表达式为true,那么查询才使用该条件
lqw.gt(minAge!=null,User::getAge, minAge)
.lt(maxAge!=null,User::getAge, maxAge);
List userList = userDao.selectList(lqw);
userList.forEach(System.out::println);
2. 查询投影-设置【查询字段、分组、分页】
(1)查询结果包含模型类中部分属性
/*LambdaQueryWrapper lqw = new LambdaQueryWrapper();
lqw.select(User::getId, User::getName, User::getAge);*/
//或者
QueryWrapper lqw = new QueryWrapper();
lqw.select("id", "name", "age", "tel");
List userList = userDao.selectList(lqw);
System.out.println(userList);
(2) 查询结果包含模型类中未定义的属性
QueryWrapper lqw = new QueryWrapper();
lqw.select("count(*) as count, tel");
lqw.groupBy("tel");
List> userList = userDao.selectMaps(lqw);
System.out.println(userList);
3. 查询条件设定
多条件查询有哪些组合?
(1)查询条件
a. 用户登录(eq匹配)
LambdaQueryWrapper lqw = new LambdaQueryWrapper();
//等同于=
lqw.eq(User::getName, "Jerry").eq(User::getPassword, "jerry");
User loginUser = userDao.selectOne(lqw);
System.out.println(loginUser);
b. 购物设定价格区间、户籍设定年龄区间(le ge匹配 或 between匹配)
LambdaQueryWrapper lqw = new LambdaQueryWrapper();
//范围查询 lt le gt ge eq between
lqw.between(User::getAge, 10, 30);
List userList = userDao.selectList(lqw);
System.out.println(userList);
c. 查信息,搜索新闻(非全文检索版:like匹配)
LambdaQueryWrapper lqw = new LambdaQueryWrapper();
//模糊匹配 like
lqw.likeLeft(User::getName, "J");
List userList = userDao.selectList(lqw);
System.out.println(userList);
d. 统计报表(分组查询聚合函数)
QueryWrapper qw = new QueryWrapper();
qw.select("gender","count(*) as nums");
qw.groupBy("gender");
List> maps = userDao.selectMaps(qw);
System.out.println(maps);
(2)查询API
更多查询条件设置参看 https://mybatis.plus/guide/wrapper.html#abstractwrapper
4. 字段映射与表名映射
(1)问题一:表字段与编码属性设计不同步
在模型类属性上方,使用@TableField属性注解,通过==value==属性,设置当前属性对应的数据库表中的字段关系。
(2)问题二:编码中添加了数据库中未定义的属性
在模型类属性上方,使用@TableField注解,通过==exist==属性,设置属性在数据库表字段中是否存在,默认为true。此属性无法与value合并使用。
(3)问题三:采用默认查询开放了更多的字段查看权限
在模型类属性上方,使用@TableField注解,通过==select==属性:设置该属性是否参与查询。此属性与select()映射配置不冲突。
(4) 问题四:表名与编码开发设计不同步
在模型类上方,使用@TableName注解,通过==value==属性,设置当前类对应的数据库表名称。
@Data
@TableName("tbl_user")
public class User {
/*
id为Long类型,因为数据库中id为bigint类型,
并且mybatis有自己的一套id生成方案,生成出来的id必须是Long类型
*/
private Long id;
private String name;
@TableField(value = "pwd",select = false)
private String password;
private Integer age;
private String tel;
@TableField(exist = false) //表示online字段不参与CRUD操作
private Boolean online;
}
五、DML编程控制
1. id生成策略控制(Insert)
(1)id生成策略控制(@TableId注解)
(2) 全局策略配置
mybatis-plus:
global-config:
db-config:
id-type: assign_id
table-prefix: tbl_,
a. id生成策略全局配置
b. 表名前缀全局配置
2. 多记录操作(批量Delete/Select)
(1)按照主键删除多条记录
//删除指定多条数据
List list = new ArrayList<>();
list.add(1402551342481838081L);
list.add(1402553134049501186L);
list.add(1402553619611430913L);
userDao.deleteBatchIds(list);
(2)根据主键查询多条记录
//查询指定多条数据
List list = new ArrayList<>();
list.add(1L);
list.add(3L);
list.add(4L);
userDao.selectBatchIds(list);
3. 逻辑删除(Delete/Update)
(1)逻辑删除操作(案例)
①:数据库表中添加逻辑删除标记字段
②:实体类中添加对应字段,并设定当前字段为逻辑删除标记字段
package com.itheima.domain;
import com.baomidou.mybatisplus.annotation.*;
import lombok.Data;
@Data
public class User {
private Long id;
@TableLogic
private Integer deleted;
}
③:配置逻辑删除字面值
mybatis-plus:
global-config:
db-config:
table-prefix: tbl_
# 逻辑删除字段名
logic-delete-field: deleted
# 逻辑删除字面值:未删除为0
logic-not-delete-value: 0
# 逻辑删除字面值:删除为1
logic-delete-value: 1(2)逻辑删除本质
逻辑删除的本质其实是修改操作。如果加了逻辑删除字段,查询数据时也会自动带上逻辑删除字段。
4. 乐观锁(Update)
(1)乐观锁操作(案例)
①:数据库表中添加锁标记字段
②:实体类中添加对应字段,并设定当前字段为逻辑删除标记字段
package com.itheima.domain;
import com.baomidou.mybatisplus.annotation.TableField;
import com.baomidou.mybatisplus.annotation.TableLogic;
import com.baomidou.mybatisplus.annotation.Version;
import lombok.Data;
@Data
public class User {
private Long id;
@Version
private Integer version;
}
③:配置乐观锁拦截器实现锁机制对应的动态SQL语句拼装
package com.itheima.config;
import com.baomidou.mybatisplus.extension.plugins.MybatisPlusInterceptor;
import
com.baomidou.mybatisplus.extension.plugins.inner.OptimisticLockerInnerIntercepto
r;
import
com.baomidou.mybatisplus.extension.plugins.inner.PaginationInnerInterceptor;
import org.springframework.context.annotation.Bean;
import org.springframework.context.annotation.Configuration;
@Configuration
public class MpConfig {
@Bean
public MybatisPlusInterceptor mpInterceptor() {
//1.定义Mp拦截器
MybatisPlusInterceptor mpInterceptor = new MybatisPlusInterceptor();
//2.添加乐观锁拦截器
mpInterceptor.addInnerInterceptor(new
OptimisticLockerInnerInterceptor());
return mpInterceptor;
}
}
④:使用乐观锁机制在修改前必须先获取到对应数据的verion方可正常进行
@Test
public void testUpdate() {
/*User user = new User();
user.setId(3L);
user.setName("Jock666");
user.setVersion(1);
userDao.updateById(user);*/
//1.先通过要修改的数据id将当前数据查询出来
//User user = userDao.selectById(3L);
//2.将要修改的属性逐一设置进去
//user.setName("Jock888");
//userDao.updateById(user);
//1.先通过要修改的数据id将当前数据查询出来
User user = userDao.selectById(3L); //version=3
User user2 = userDao.selectById(3L); //version=3
user2.setName("Jock aaa");
userDao.updateById(user2); //version=>4
user.setName("Jock bbb");
userDao.updateById(user); //verion=3?条件还成立吗?
}
六、快速开发-代码生成器
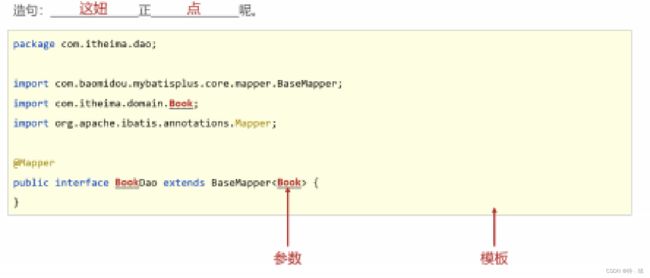
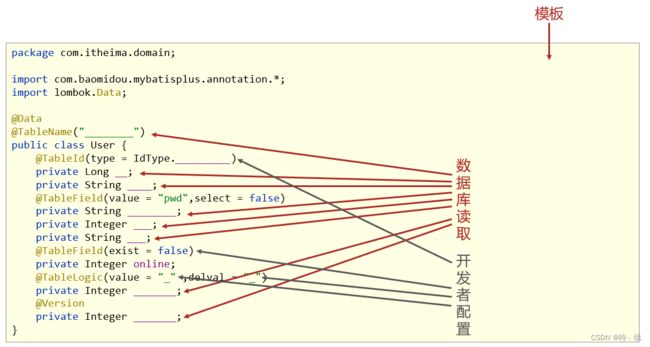
1. MyBatisPlus提供模板
(1)Mapper接口模板
(2)实体对象类模板
2. 工程搭建和基本代码编写
(1) 第一步:创建SpringBoot工程,添加代码生成器相关依赖,其他依赖自行添加
com.baomidou
mybatis-plus-generator
3.4.1


org.apache.velocity
velocity-engine-core
2.3
(2)第二步:编写代码生成器类
package com.itheima;
import com.baomidou.mybatisplus.generator.AutoGenerator;
import com.baomidou.mybatisplus.generator.config.DataSourceConfig;
public class Generator {
public static void main(String[] args) {
//1. 创建代码生成器对象,执行生成代码操作
AutoGenerator autoGenerator = new AutoGenerator();
//2. 数据源相关配置:读取数据库中的信息,根据数据库表结构生成代码
DataSourceConfig dataSource = new DataSourceConfig();
dataSource.setDriverName("com.mysql.cj.jdbc.Driver");
dataSource.setUrl("jdbc:mysql://localhost:3306/mybatisplus_db?
serverTimezone=UTC");
dataSource.setUsername("root");
dataSource.setPassword("root");
autoGenerator.setDataSource(dataSource);
//3. 执行生成操作
autoGenerator.execute();
}
}
3. 开发者自定义配置
(1)设置全局配置
//设置全局配置
GlobalConfig globalConfig = new GlobalConfig();
globalConfig.setOutputDir(System.getProperty("user.dir")+"/mybatisplus_04_genera
tor/src/main/java"); //设置代码生成位置
globalConfig.setOpen(false); //设置生成完毕后是否打开生成代码所在的目录
globalConfig.setAuthor("黑马程序员"); //设置作者
globalConfig.setFileOverride(true); //设置是否覆盖原始生成的文件
globalConfig.setMapperName("%sDao"); //设置数据层接口名,%s为占位符,指代模块名称
globalConfig.setIdType(IdType.ASSIGN_ID); //设置Id生成策略
autoGenerator.setGlobalConfig(globalConfig);
(2)设置包名相关配置
//设置包名相关配置
PackageConfig packageInfo = new PackageConfig();
packageInfo.setParent("com.aaa"); //设置生成的包名,与代码所在位置不冲突,二者叠加组成
完整路径
packageInfo.setEntity("domain"); //设置实体类包名
packageInfo.setMapper("dao"); //设置数据层包名
autoGenerator.setPackageInfo(packageInfo);
(3)策略设置
//策略设置
StrategyConfig strategyConfig = new StrategyConfig();
strategyConfig.setInclude("tbl_user"); //设置当前参与生成的表名,参数为可变参数
strategyConfig.setTablePrefix("tbl_"); //设置数据库表的前缀名称,模块名 = 数据库表名 -
前缀名 例如: User = tbl_user - tbl_
strategyConfig.setRestControllerStyle(true); //设置是否启用Rest风格
strategyConfig.setVersionFieldName("version"); //设置乐观锁字段名
strategyConfig.setLogicDeleteFieldName("deleted"); //设置逻辑删除字段名
strategyConfig.setEntityLombokModel(true); //设置是否启用lombok
autoGenerator.setStrategy(strategyConfig);