Springboot自动装配
1. 复习
在开始之前,先回顾一下Spring中bean的三种注入方式:
@Data
@NoArgsConstructor
@AllArgsConstructor
public class Person {
    private String name;
    private Integer age;
    private Boolean sex;
}
注意:是在spring中(不是在springboot中)
创建maven项目,添加依赖
 <dependency>
            <groupId>org.projectlombok</groupId>
            <artifactId>lombok</artifactId>
            <version>RELEASE</version>
            <scope>compile</scope>
        </dependency>

        <!--Spring的核心工具包-->
        <dependency>
            <groupId>org.springframework</groupId>
            <artifactId>spring-core</artifactId>
            <version>4.3.7.RELEASE</version>
        </dependency>

        <!--Spring IOC的基础实现,包含访问配置文件、创建和管理bean等。-->
        <dependency>
            <groupId>org.springframework</groupId>
            <artifactId>spring-beans</artifactId>
            <version>4.3.7.RELEASE</version>
        </dependency>

        <!--在基础IOC功能上提供扩展服务,此外还提供许多企业级服务的支持,
        有邮件服务、任务调度、JNDI定位,EJB集成、远程访问、缓存以及多种视图层框架的支持。-->
        <dependency>
            <groupId>org.springframework</groupId>
            <artifactId>spring-context</artifactId>
            <version>4.3.7.RELEASE</version>
        </dependency>

        <!-- 2.Spring dao依赖 -->
        <!-- spring-jdbc包括了一些如jdbcTemplate的工具类 -->
        <!--对JDBC 的简单封装-->
        <dependency>
            <groupId>org.springframework</groupId>
            <artifactId>spring-jdbc</artifactId>
            <version>4.3.7.RELEASE</version>
        </dependency>

        <!--为JDBC、Hibernate、JDO、JPA等提供的一致的声明式和编程式事务管理。-->
        <dependency>
            <groupId>org.springframework</groupId>
            <artifactId>spring-tx</artifactId>
            <version>4.3.7.RELEASE</version>
        </dependency>

        <!-- 3.Spring web依赖 -->
        <!--包含Web应用开发时,用到Spring框架时所需的核心类,包括自动载入
        WebApplicationContext特性的类、Struts与JSF集成类、文件上传的支持类、
        Filter类和大量工具辅助类。-->
        <dependency>
            <groupId>org.springframework</groupId>
            <artifactId>spring-web</artifactId>
            <version>4.3.7.RELEASE</version>
        </dependency>

        <!--包含SpringMVC框架相关的所有类。包含国际化、标签、Theme、视图展现的FreeMarker、JasperReports、 Tiles、Velocity、XSLT相关类。
        当然,如果你的应用使用了独立的MVC框架,则无需这个JAR文件里的任何类。-->
        <dependency>
            <groupId>org.springframework</groupId>
            <artifactId>spring-webmvc</artifactId>
            <version>4.3.7.RELEASE</version>
        </dependency>

        <!-- 4.Spring test依赖:方便做单元测试和集成测试 -->
        <!--对JUNIT等测试框架的简单封装-->
        <dependency>
            <groupId>org.springframework</groupId>
            <artifactId>spring-test</artifactId>
            <version>4.3.7.RELEASE</version>
        </dependency>
1.1 setter注入
setter注入是最基本的注入方式
首先创建applicationContext.xml文件,并在里面添加:
<beans xmlns="http://www.springframework.org/schema/beans"
       xmlns:xsi="http://www.w3.org/2001/XMLSchema-instance" xmlns:context="http://www.springframework.org/schema/context"
       xmlns:mvc="http://www.springframework.org/schema/mvc" xmlns:aop="http://www.springframework.org/schema/aop"
       xmlns:task="http://www.springframework.org/schema/task"
       xsi:schemaLocation="http://www.springframework.org/schema/mvc http://www.springframework.org/schema/mvc/spring-mvc-4.2.xsd
		http://www.springframework.org/schema/beans http://www.springframework.org/schema/beans/spring-beans-4.2.xsd
		http://www.springframework.org/schema/context http://www.springframework.org/schema/context/spring-context-4.2.xsd
		http://www.springframework.org/schema/aop http://www.springframework.org/schema/aop/spring-aop-4.2.xsd
	 	http://www.springframework.org/schema/task http://www.springframework.org/schema/task/spring-task-3.2.xsd">

    <bean id="person" class="com.czy.pojo.Person">
        <property name="name" value="lisi"/>
        <property name="sex" value="true"/>
        <property name="age" value="18"/>
    </bean>
</beans>
接着测试:
public class Test {

    public static void main(String[] args) {
        ApplicationContext ac  = new ClassPathXmlApplicationContext("applicationContext.xml");
        Person person = ac.getBean("person", Person.class);
        System.out.println(person);
    }
}
使用了ClassPathXmlApplicationContext来加载spring配置文件并读取其中定义的bean,然后使用getBean方法使用id和类来获取这个Person的Bean对象,输出结果:

1.2 构造器注入
接下来使用构造器注入,需要修改applicationContext.xml配置文件:
<beans xmlns="http://www.springframework.org/schema/beans"
       xmlns:xsi="http://www.w3.org/2001/XMLSchema-instance" xmlns:context="http://www.springframework.org/schema/context"
       xmlns:mvc="http://www.springframework.org/schema/mvc" xmlns:aop="http://www.springframework.org/schema/aop"
       xmlns:task="http://www.springframework.org/schema/task"
       xsi:schemaLocation="http://www.springframework.org/schema/mvc http://www.springframework.org/schema/mvc/spring-mvc-4.2.xsd
		http://www.springframework.org/schema/beans http://www.springframework.org/schema/beans/spring-beans-4.2.xsd
		http://www.springframework.org/schema/context http://www.springframework.org/schema/context/spring-context-4.2.xsd
		http://www.springframework.org/schema/aop http://www.springframework.org/schema/aop/spring-aop-4.2.xsd
	 	http://www.springframework.org/schema/task http://www.springframework.org/schema/task/spring-task-3.2.xsd">

<!--    <bean id="person" class="com.czy.pojo.Person">-->
<!--        <property name="name" value="lisi"/>-->
<!--        <property name="sex" value="true"/>-->
<!--        <property name="age" value="18"/>-->
<!--    </bean>-->

    <bean id="person" class="com.czy.pojo.Person">
        <constructor-arg name="name" value="zhangsan"/>
        <constructor-arg name="age" value="18"/>
        <constructor-arg name="sex" value="false"/>
    </bean>
</beans>
测试不变,输出结果:

1.3 属性注入
使用注解方式注入bean是比较优雅的做法
首先需要在applicationContext.xml配置文件中开启注解支持和自动包扫描:
<context:annotation-config></context:annotation-config>
<context:component-scan base-package="com.czy.pojo"/>
在Person类上添加注解:
@Data
@NoArgsConstructor
@AllArgsConstructor
@Component
public class Person {
    @Value("张三")
    private String name;
    @Value("10")
    private Integer age;
    @Value("false")
    private Boolean sex;
}
测试类不变,输出结果:

2.再复习
接下来聊一聊Spring的两种配置方式:基于XML的配置和基于javaConfig类的配置方式,这对于理解Springboot的自动装配原理非常重要。
首先在Person的基础上再创建两个类:
//person
@Data
@NoArgsConstructor
@AllArgsConstructor
public class Person {

    private String name;

    private Integer age;

    private Boolean sex;

    private Dog dog;

    private Car car;
}
//Dog
@Data
@NoArgsConstructor
@AllArgsConstructor
public class Dog {
    private String name;
    private Integer age;
}
//Car
@Data
@NoArgsConstructor
@AllArgsConstructor
public class Car {
    private String brand;
    private Integer price;
}
2.1 基于xml配置
   <bean id="person" class="com.czy.pojo.Person">
        <property name="name" value="lisi"/>
        <property name="sex" value="true"/>
        <property name="age" value="18"/>
        <property name="dog" ref="dog"/>
        <property name="car" ref="car"/>
    </bean>
    <bean id="dog" class="com.czy.pojo.Dog">
        <property name="name" value="小狗"/>
        <property name="age" value="3"/>
    </bean>

    <bean id="car" class="com.czy.pojo.Car">
        <property name="brand" value="BWG"/>
        <property name="price" value="15000"/>
    </bean>
测试类不变,输出结果:
![]()
2.2 基于javaConfig类配置
创建javaConfig类,并在类上添加@Configuration注解
@Configuration
@ComponentScan("com.czy.pojo")
public class JavaConfig {

    @Bean("person")
    public Person person(Dog dog, Car car){
        return new Person("czy",20,true,dog,car);
    }

    @Bean("dog")
    public Dog dog(){
        return new Dog("小狗",3);
    }

    @Bean("car")
    public Car car(){
        return new Car("BWG",10);
    }
}
此时我们的XML配置文件可以完全为空了,此时应该使用AnnotationConfigApplicationContext来获取注解配置
public class Test {

    public static void main(String[] args) {
//        ApplicationContext ac  = new ClassPathXmlApplicationContext("applicationContext.xml");
//        Person person = ac.getBean("person", Person.class);
//        System.out.println(person);
        ApplicationContext ac = new AnnotationConfigApplicationContext(JavaConfig.class);
        Person person =    ac.getBean("person",Person.class);
        System.out.println(person);
    }
}
输出结果:

3. BeanDefiniton
是spring中所有bean的抽象定义对象,翻译成bean定义
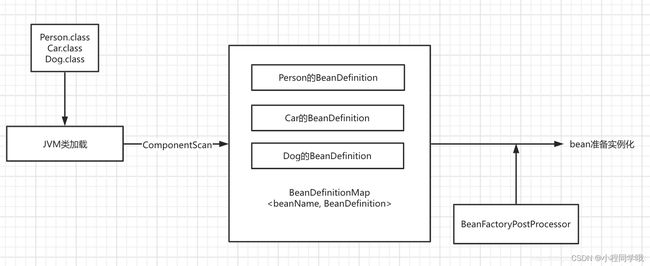
当bean.class 被JVM类加载到内存中时,会被spring扫描到一个map容器中:
BeanDefinitionMap<beanName,BeanDefinition>
这个容器存储了bean定义,但是bean此时还没有进行实例化,在进行实例化之前,还有一个
BeanFactoryPostProcessor
可以对bean对象进行一些自定义处理
点开BeanFactoryPostProcessor源码可以看到这么一段话
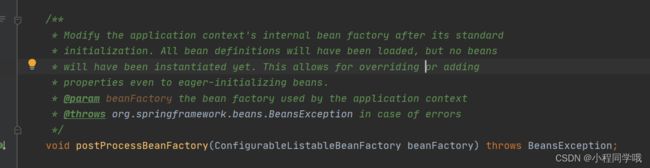
大概意思就是:在spring完成标准的初始化过程后,实现BeanFactoryPostProcessor接口的对象可以用于定制bean factory,所有的beanDefinition都会被加载,但此时还没有实例化,这个接口允许对一些bean定义做出属性上的改动。
大致流程就是:
4. BeanDefinition结构
来看一下BeanDefinition里面究竟定义了什么
点进AbstractBeanDefinition这个类:
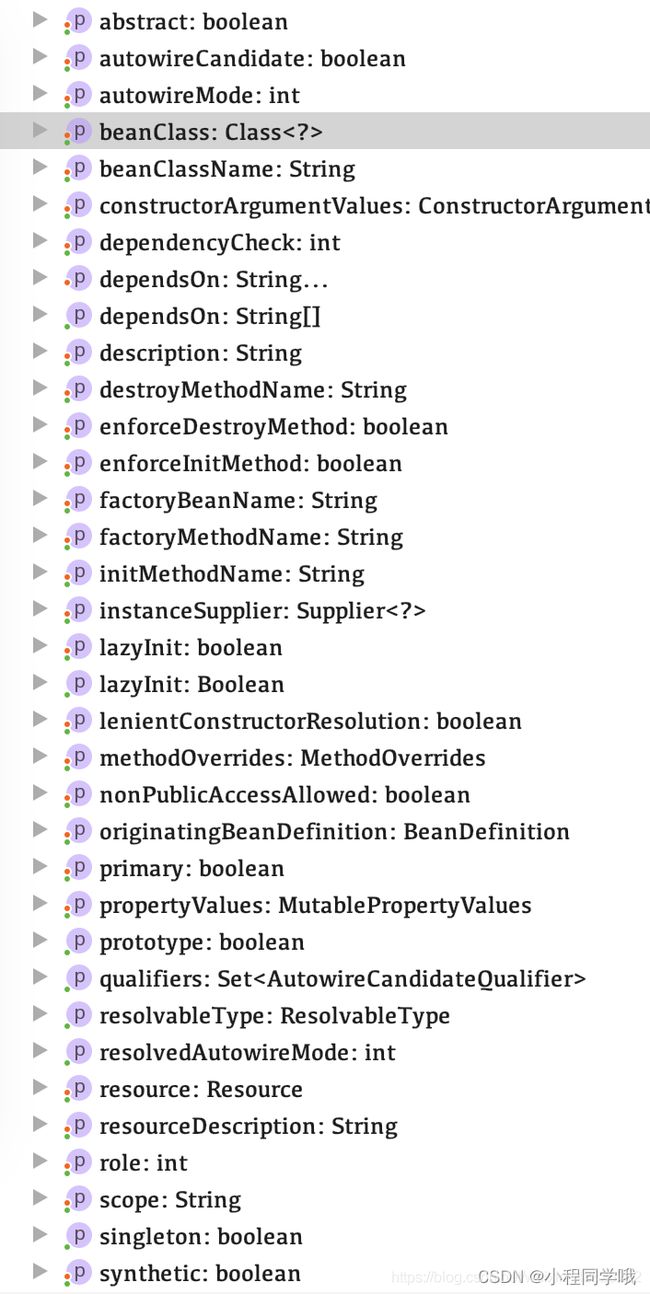
很多的成员变量,看的人都麻了。
我们重点关注的是下面三个变量:
private volatile Object beanClass;
private int autowireMode = AUTOWIRE_NO;
private ConstructorArgumentValues constructorArgumentValues;
4.1 beanClass
这个属性决定了该Bean定义的真正的class到底是谁,接下来我们做点实验:
我们定义两个bean类,A和B
@Component
public class A {
    @Value("我是AAA")
    private String name;
}
@Component
public class B {
    @Value("我是BBB")
    private String name;
}
接下来我们实现上面的BeanFactoryPostProcessor接口,来创建一个自定义的bean后置处理器
/**
 * 自定义bean的后置处理器,
 * 通过这个类,修改bean定义的属性
 */
@Component
public class MyBeanFactoryPostProcessor implements BeanFactoryPostProcessor {
    @Override
    public void postProcessBeanFactory(ConfigurableListableBeanFactory beanFactory) throws BeansException {
       GenericBeanDefinition defA =  (GenericBeanDefinition)beanFactory.getBeanDefinition("a");
        System.out.println("这里是MyBeanPostProcessor,我拿到了:"+defA.getBeanClassName());
    }
}
最后在XML配置文件中开启包扫描
<context:component-scan base-package="pojo"/>
<context:annotation-config />
测试类:
public class Test {

    public static void main(String[] args) {
        ApplicationContext ac  = new ClassPathXmlApplicationContext("applicationContext.xml");
//        Person person = ac.getBean("person", Person.class);
//        System.out.println(person);
//        ApplicationContext ac = new AnnotationConfigApplicationContext(JavaConfig.class);
        A a =    ac.getBean("a", A.class);
        System.out.println("最终拿到了==》"+a);
    }
}
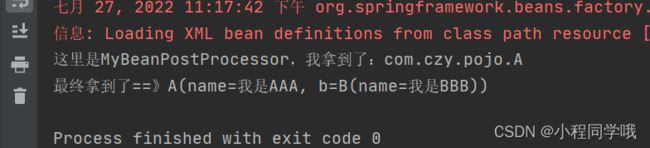
输出结果:

可以看到MyBeanPostProcessor成功拿到了A的BeanDefinition,并输出了提示信息
接下来我们可以这样修改BeanDefinition
我们在MyBeanPostProcessor中修改A的Bean对象,将A的beanClass修改为B.class
System.out.println("这里是MyBeanPostProcessor,我修改了:"+ defA.getBeanClassName() + " 的class为 B.class");
// 把A的class改成B
defA.setBeanClass(B.class);
重新运行Test类,输出了一些信息后:报错了!
这里是MyBeanPostProcessor,我拿到了:pojo.A
这里是MyBeanPostProcessor,我修改了:pojo.A 的class为 B.class

BeanNotOfRequiredTypeException:
	Bean named 'a' is expected to be of type 'pojo.A' but was actually of type 'pojo.B'
综上所述,我们可以得出beanClass属性控制bean定义的类
4.2 autowireMode
接着看第二个属性:autowireMode,自动装配模式
我们在AbstractBeanDefiniton源码中可以看到:
private int autowireMode = AUTOWIRE_NO;
自动装配模式是AUTOWIRE_NO,就是不开启自动装配
可选的常量值有以下四种:不自动装配,通过名称装配,通过类型装配,通过构造器装配
-
AUTOWIRE_NO
-
AUTOWIRE_BY_NAME
-
AUTOWIRE_BY_TYPE
-
AUTOWIRE_CONSTRUCTOR
接下来我们来模拟一个自动装配场景,仍然是A和B两个类,现在在A类中添加B类对象
@Component
public class A {
    @Value("我是AAA")
    private String name;

    @Autowired
    private B b;
}
我们希望B对象能自动装配,于是我们给它加上@Autowired注解,其他不变,测试结果:

自动装配成功了,拿到A类对象里面注入了B对象。
如果不加@Autowired注解,自动装配会成功吗?

显然是不成功的
但是我就是想要不加@Autowired注解,仍然可以实现自动装配,需要怎么做?
这时就要我们在MyBeanFactoryPostProcessor做文章了,加入以下内容:
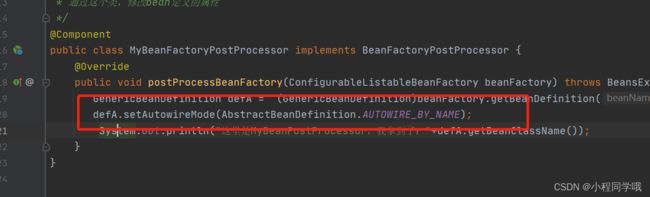
输出结果:
自动装配成功了,这次没有加@Autowired。在自定义的bean后置处理器中设置了autowiredMode属性,也实现了自动装配。
可以看出,autowiredMode属性就是用来控制自动装配模式的,默认是不自动装配的。
5. 装配对象
现在我们把目光放在Springboot的自动装配上,原来在真正进行bean实例化对象之前,我们前面还有这些过程,尤其是存在使用了BeanFactoryPostProcessor来对bean定义进行各种自定义修改操作。
经过上面的研究,我们可以等到一个结论:spring自动装配的对象是:Bean定义(BeanDefinition)
6. DIY自动装配
可能你会有误解,上面的介绍都是自动装配了,我在配置文件或者注解类都配置了变量的值,然后加个@Autowired注解就ok了,spring也是帮我们自动去装配。再高端一点的话,就把xml文件写成javaCofig配置类,然后使用@Configuration注解,这样也能自动装配。
6.1 自动装配再思考
上面的自动装配,我们至少写一个配置文件,无论是什么形式,我们都至少需要一个文件把它全部写下来,就算这个文件的内容是固定的,但是为了装配这个对象,我们不得不写。
我们甚至都可以做成模板了,比如我在学习spring框架整合时,把经常写的都搞成了模板:
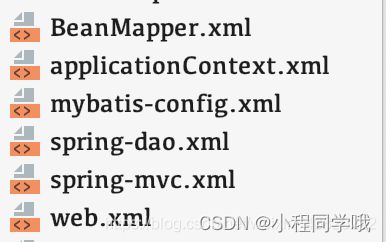
有了这些模板,我们只需要点点点,再进行修改,就能用了。
这样做确实很好,可是对于越来越成型的项目体系,我们每次都搞一些重复动作,是会厌烦的。而且面对这么多xml配置文件,人都麻了。
这个时候springboot出现了。
6.2 一个栗子
让我们在"偷懒"的路上继续前进
仍然是A类和B类,其中A类仍然引用了B类,
public class A {

    private String name;

    private B b;
}


public class B {

    private String name;
}
测试类如下:
@Test
public void test(){
AnnotationConfigApplicationContext ac = new AnnotationConfigApplicationContext(MyAutoConfig.class);
A aaa = ac.getBean("a", A.class);
System.out.println(aaa);
}
我们这里使用了AnnotationConfigApplicationContext这个JavaConfig配置类会使用到的加载类,于是我们顺利成章地点开它所加载的MyAutoConfig类文件:
@Configuration
@MyEnableAutoConfig
public class MyAutoConfig {
    // bean 都去哪了 ???
}
什么情况?我要声明的Bean对象都去哪了,而且这时候applicationContext.xml是空的呀
运行一下测试类:
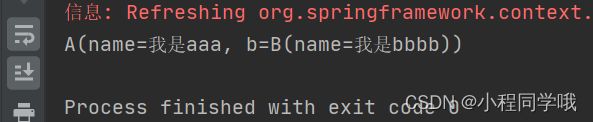
竟然成功运行了,这是什么情况?
可能有的朋友发现了,@MyEnableAutoConfig这注解,打眼一看就是自定义的注解,点进去注解看一下
@Target(ElementType.TYPE)
@Documented
@Retention(RetentionPolicy.RUNTIME)
@Import(MyImportSelector.class)  //导入bean定义
public @interface MyEnableAutoConfig {
}
原来如此,原来是使用了@Import注解导入了Bean定义,但是它导入的是MyimportSelector这个bean,而不是A也不是B呀,带着这些疑问,我们就先了解一下@Import这个注解吧。
6.3 @Import
@Import的功能就是导入配置类或者一些需要前置加载的类,主要有三种形式:
@Import(A.class)
@Import(MyImportBeanDefinitionRegister.class)
@Import(MyImportSelector.class)
6.3.1 @Import(A.class)
一. 直接导入一个普通类:
看例子:
新建一个TestA
public class TestA {

    public void fun(String str) {
        System.out.println(str);
    }

    public void printName() {
        System.out.println("类名 :" + Thread.currentThread().getStackTrace()[1].getClassName());
    }
}
新建一个ImportConfig,在类上加上@Configuration,加上@Configuration是为了让spring扫描到这个类,并且直接通过@Import引入TestA类
@Import({TestA.class})
@Configuration
public class ImportConfig {
}
测试:
@RunWith(SpringJUnit4ClassRunner.class)
@SpringBootTest(classes = ApplicationMain.class)
public class ImportAnnotionTest {

    @Autowired
    TestA testA;

    @Test
    public void TestA() {
        testA.printName();
    }
}
结果:
类名 :com.test.importdemo.TestA
TestA是一个普通类,现在可以被@Autowired注解调用,接直接说明了已经被spring注入并管理了,普通的类都是需要先实例化
二.导入带有@Configuration的配置类
看例子:
新建TestB
@Configuration
public class TestB {
    public void fun(String str) {
        System.out.println(str);
    }

    public void printName() {
        System.out.println("类名 :" + Thread.currentThread().getStackTrace()[1].getClassName());
    }
}
在ImportConfig.class里面直接引入TestB
@Import({TestA.class,TestB.class})
@Configuration
public class ImportConfig {
}
测试:
@Autowired
    TestB testB;


    @Test
    public void TestB(){
        testB.printName();
    }
结果:
类名 :com.test.importdemo.TestB
TestB.class 的类上面已经有了@Configuration注解,本身就会被spring扫到并实例,@import引入带有@Configuration的配置文件,是需要先实例这个配置文件再进行相关操作
6.3.2 @Import(MyImportBeanDefinitionRegister.class)
这种方式传递了一个bean定义注册器,这个注册器的具体内容如下:
public class MyImportBeanDefinitionRegister implements ImportBeanDefinitionRegistrar {
    @Override
    public void registerBeanDefinitions(AnnotationMetadata importingClassMetadata, BeanDefinitionRegistry registry) {

        RootBeanDefinition aDef = new RootBeanDefinition(A.class);
        registry.registerBeanDefinition("a", aDef);

    }
}
这个注册器实现了ImportBeanDefinitionRegistrar接口,并且重写了里面的registerBeanDefinitions方法
看他做了什么事:创建了一个新的bean定义,他的类型就是A,然后把这个bean定义注册到BeanDefinitionMap(还记得吧!)里面,key值我们可以人为设置,这里就设置成"a"
这样在传递一个注册器的时候,我们就可以把注册器中新增的bean定义注册进来使用
6.3.3 @Import(MyImportSelector.class)
可以看到,这种使用方式就是我们刚才的注解中使用的方式
他传递了一个叫MyImportSelector的类,这个类依然是我们自己定义的,具体内容如下:
public class MyImportSelector implements ImportSelector {
    @Override
    public String[] selectImports(AnnotationMetadata importingClassMetadata) {
        // 导入配置类
        return new String[]{"config.MyConfig"};
    }
}
这个类实现了ImportSelector接口,并且重写了selectImports方法,返回一个字符串数组
可以看到,返回的字符串数组中是我们要导入类的全类名
这个Importer返回的类如果是组件bean对象,就会被加载进来使用;如果是一个配置类,就会加载这个配置类
第三种和第二种的区别是第三种可以一次性写很多类,而且比较简洁,只需要清楚类的全包名即可。而第二种方式需要自己清楚包类名,手动创建bean定义,然后手动加入BeanDefinitionMap。