Uploadify上传Excel到数据库
前两章简单的介绍了Uploadify上传插件的基本使用和相关的属性说明。这一章结合Uploadify+ssh框架+jquery实现Excel上传并保存到数据库。
以前写的这篇文章
Jqgrid demo-史上最强大,没有之一 已经能够对学生增删改查了,为什么还要通过这种方式来新增数据呢?想想也知道的,通过以前的方式新增数据效率非常慢。维护较少的数据还好点。如果一次性维护几百条、几千条数据比较多,那还是够呛。通过EXCEL上传数据批量新增即简单又不费事。
demo只是引导大家如何去做,漏洞也是有的,至于具体的细节还需要各位自己把控。为了方便起见,还是以原来的维护学生信息为原型。实现思路:
前台通过Uploadify插件上传Excel数据,后台接收到数据后通过POI解析数据并将数据持久化。
如果你对Uploadify插件还不了解,可以参考我之前写的有关的博文。值得一提的是,在Uploadify的属性里面新增了两个属性:fileTypeDesc和fileTypeExts,通过这两个属性来限制上传文件的类型。别的就没什么了。
ACTION中接收上传的EXCEL文件并解析,然后调用service层的方法新增到数据库中。关键代码如下:
|
1
2
3
4
5
6
7
8
9
10
11
12
13
14
15
16
17
18
19
20
21
22
23
24
25
26
27
28
29
30
31
32
33
34
35
36
37
38
39
40
41
42
43
44
|
public
class
UploadAction {
private
File uploadFile;
// 封装文件属性
private
String uploadFileFileName;
// 文件名称
private
String msg;
private
StudentService studentService;
public
String upload() {
try
{
String extName =
""
;
String newFileName =
""
;
// 设置传入的文件的编码
HttpServletResponse response = ServletActionContext.getResponse();
response.setCharacterEncoding(
"utf-8"
);
// 服务器目录
String targetDirectory = ServletActionContext.getServletContext()
.getRealPath(
"/upload"
);
// 获取扩展名
if
(uploadFileFileName.lastIndexOf(
"."
) >=
0
) {
extName = uploadFileFileName.substring(uploadFileFileName
.lastIndexOf(
"."
));
}
// 设置上传文件的新文件名
String nowTime =
new
SimpleDateFormat(
"yyyymmddHHmmss"
)
.format(
new
Date());
// 当前时间
newFileName = nowTime + extName;
// 生成上传的文件对象
File targetFile =
new
File(targetDirectory, newFileName);
// 文件已经存在删除原有文件
if
(targetFile.exists()) {
targetFile.delete();
}
// 复制file对象上传
FileUtils.copyFile(uploadFile, targetFile);
// 上传数据到数据库
msg = studentService.doUploadStudentData(targetFile);
// 删除上传数据
targetFile.delete();
}
catch
(Exception e) {
e.printStackTrace();
msg =
"上传出现异常!"
;
}
return
"success_upload"
;
}
|
doUploadStudentData方法:解析excel并调用新增方法,POI解析excel的代码在网上实在太多了。还是贴出来吧。关键代码:
|
1
2
3
4
5
6
7
8
9
10
11
12
13
14
15
16
17
18
19
20
21
22
23
24
25
26
27
28
29
30
31
32
33
34
35
36
37
38
39
40
41
42
43
44
45
46
47
48
49
50
51
52
53
54
55
56
57
58
59
60
61
62
63
64
65
66
67
68
69
|
public
String doUploadStudentData(File file) {
Workbook wb =
null
;
Sheet sheet =
null
;
String value =
null
;
Row row =
null
;
// 表格行
Student stu =
null
;
String msg =
null
;
// 返回消息
int
count =
0
;
// 成功上传条数
try
{
// 将文件转成文件输入流
InputStream is =
new
FileInputStream(file);
// 判断Excel版本
if
(file.getName().toUpperCase().endsWith(
".XLSX"
)) {
wb =
new
XSSFWorkbook(is);
// Excel 2007
}
else
{
wb =
new
HSSFWorkbook(is);
// Excel 2003
}
FormulaEvaluator formulaEvaluator = wb.getCreationHelper()
.createFormulaEvaluator();
// 解析公式结果
// 获得第一个表格页
sheet = wb.getSheetAt(
0
);
System.out.println(sheet.getLastRowNum() +
"记录长度"
);
// 遍历数据
for
(
int
j =
1
; j <= sheet.getLastRowNum(); j++) {
stu =
new
Student();
// 获取某一行
row = sheet.getRow(j);
stu.setId(row.getRowNum());
// 姓名
value = ExcelUtil.getValue(row.getCell(
0
), formulaEvaluator);
if
(StringUtils.isNotBlank(value)) {
stu.setName(value);
}
// 年龄
value = ExcelUtil.getValue(row.getCell(
1
), formulaEvaluator);
if
(StringUtils.isNotBlank(value)) {
stu.setAge(value.indexOf(value));
}
// 性别
value = ExcelUtil.getValue(row.getCell(
2
), formulaEvaluator);
if
(StringUtils.isNotBlank(value)) {
stu.setSex(value);
}
// 家庭住址
value = ExcelUtil.getValue(row.getCell(
3
), formulaEvaluator);
if
(StringUtils.isNotBlank(value)) {
stu.setAddress(value);
}
// 联系方式
value = ExcelUtil.getValue(row.getCell(
4
), formulaEvaluator);
if
(StringUtils.isNotBlank(value)) {
stu.setPhone(value.indexOf(value));
}
// 兴趣
value = ExcelUtil.getValue(row.getCell(
5
), formulaEvaluator);
if
(StringUtils.isNotBlank(value)) {
stu.setLikedo(value);
}
count++;
this
.studentDao.createOrUpdate(stu);
}
msg =
"数据上传成功,一共上传"
+ count +
"条!"
;
}
catch
(Exception e) {
e.printStackTrace();
msg = e.getMessage();
}
return
msg;
}
|
getValue方法主要是判断单元格数据的类型,就不贴出来了哈。如果想弄明白,可以去我的百度网盘下载,地址在最下方。用两张图片说明问题吧。
我先把数据库的数据全部删掉。如:

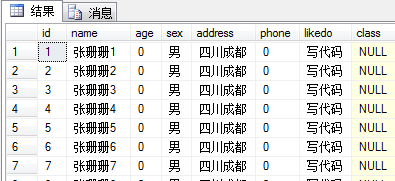
启动项目,找到上传的EXCEL。点击上传按钮,提示上传成功。如:

重新查询数据库,EXCEL中的数据全部都添加到数据库了。方便吧。

由于时间仓促,没有把demo做的完美,希望各位谅解。代码毕竟枯燥。直接拿去用吧,地址:明天更新,百度网盘太慢了。
原创文章,转载请注明: 转载自java开发者
本文链接地址: Uploadify上传Excel到数据库