第4.1.1章 WEB系统最佳实践页面实例-bootstrap登录页面
当我输入http://localhost:8096/fontal,出现了登录页面http://localhost:8096/fontal/login
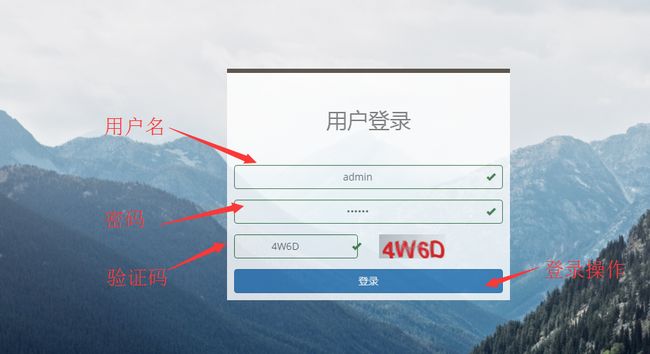
1 页面跳转到下面的登录页面的呢
我的login.jsp在WEB-INF/views目录下面,我输入的是http://localhost:8096/fontal,为什么他能自己跳转到http://localhost:8096/fontal/login,这个/login是如何出现的呢?页面又是如何渲染的呢?

首先看spring-mvc.xml中
/login
当重定向到http://localhost:8096/fontal/login,浏览器将向后台发送get请求,现在可以看看后台是怎么做的。
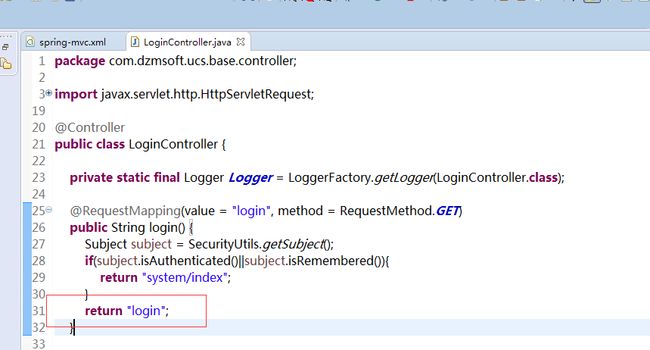
这里返回的是login的字符串,这跟login.jsp页面有什么关系呢?
还是回到spring-mvc.xml中的配置,springmvc将为您将在/WEB-INF/views/中找到 login.jsp的文件,找到了就会把它渲染出来。那么也就是我们看到了登录页面。
	<bean id="viewResolver"
		class="org.springframework.web.servlet.view.InternalResourceViewResolver">
		<property name="viewClass"
			value="org.springframework.web.servlet.view.JstlView">property>
		<property name="prefix" value="/WEB-INF/views/" />
		<property name="suffix" value=".jsp" />
	bean>
2 点击登录按钮发生了什么
看看登录页面,有四个主要的角色:用户名、密码、验证码、登录按钮.
我这里使用的是requirejs,点击登录按钮,执行了什么。首先要找到对应的js文件。
从下图找到了login.jsp需要login.js,但是下图的方框中只有login的名称,没有js具体的路径,怎么办呢?

这个时候就需要去找rqconfig.js,因为我们用的requirejs,所以需要使用rqconfig,对requirejs进行相关配置,从下图找打了一个baseUrl路径,这里是我们用到js文件的基础路径。
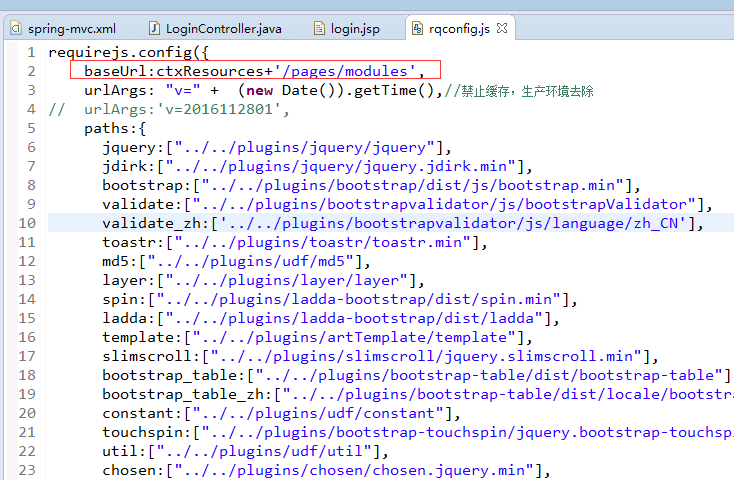
从下图文件路径,您可以在page/modules下面找到了login.js文件了

下面看看login.js中initConfig对登录表单采用bootstrapvalidate设置了规则做校验,而initAction中通过jQuery对btnSubmit进行绑定click事件,也就是说当你点击登录按钮的时候,就会触发登录事件了。
define(function(require, exports, module) {
	// 引入js和css
	require('validate');
	require('md5');
	var $ = require('jquery');
	var toastr = require('toastr');
	var Ladda = require('ladda');
	// 初始化区域
	$(function(){
		init();
	});
	function init(){
		initConfig();
		initAction();
	}
	function initConfig(){
		$('#loginForm').bootstrapValidator({
			message : '非法值',
			feedbackIcons : {
				valid : 'glyphicon glyphicon-ok',
				invalid : 'glyphicon glyphicon-remove',
				validating : 'glyphicon glyphicon-refresh'
			},
			fields:{
				username:{validators:{notEmpty:{message:'用户名不能为空'},stringLength:{min:2,max:20,message:'用户名长度应在2-20位'}}},
				password:{validators:{notEmpty:{message:'密码不能为空'},stringLength:{min:6,max:20,message:'密码长度应在6-20位'}}},
				captcha:{validators:{notEmpty:{message:'验证码不能为空'},stringLength:{min:4,max:4,message:'验证码长度不正确'}}}
			}
		}).on('success.form.bv',function(e){
			e.preventDefault();
			var $form = $(e.target);
			doLogin($form);
		});
	}
	function initAction(){
		$('#btnSubmit').on('click',function(e){
			$('#loginForm').bootstrapValidator('validate');
		})
		$('#img_captcha').on('click',function(e){
			document.getElementById("img_captcha").src=ctxResources + "/images/kaptcha.jpg?t=" + Math.random();
		})
		$("#loginForm input").each(function(){
			$(this).bind('keypress',function(event){
		        if(event.keyCode == "13") {
		        	$('#loginForm').bootstrapValidator('validate');
		        	return false;
		        }
		    });
		});
	}
	// 业务逻辑区域
	function doLogin(form){
		var md5Pass = hex_md5(hex_md5($("#password").val()));
		$("#password").val(md5Pass);
		var process= Ladda.create($('#btnSubmit')[0]);
		process.start();
		$.ajax({
			url:ctx+'/login',
			type:'post',
			data:form.serialize(),
			success:function(resp){
				if (!resp.success){
					toastr.error(resp.msg);
					//
					form.data('bootstrapValidator').resetForm(true);
					$('#img_captcha')[0].click();
				} else{
					window.location.href = ctx+'/index';
				}
			}
		}).always(function(){process.stop();});
	}
});
3 点击验证码是怎么刷新的
先看login.jsp,这里的图片引用的是 /resources/images/kaptcha.jpg,
div class="col-sm-6">

但是你会发现我们的images里面并没有kaptcha.jpg,为什么呢?这个时候需要找到web.xml,您可以找到kaptcha的配置,这里定义一个生成验证码的servlet,图片就是这么产生的。

刷新验证也更简单,更改img的src就可以
document.getElementById("img_captcha").src=ctxResources + "/images/kaptcha.jpg?t=" + Math.random();
4 登录逻辑是什么
看看LoginController.java中登录的逻辑,从下图红色圈圈中,我们这里的登录使用到了apache shiro。
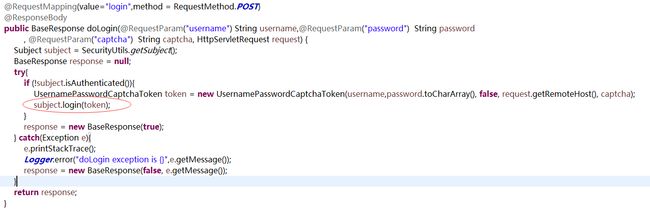
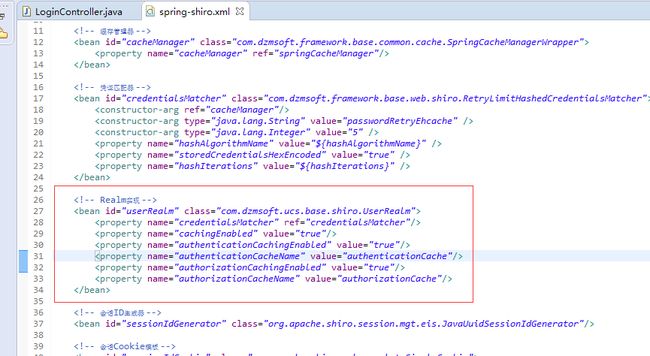
找到spring-shiro.xml中下图框框的内容,您就知道了上图subject.login(token);将会进入什么类中,哦是UserRealm
下面就是login进入UserRealm的代码,他会将登录成功之后的用户session信息托管给shiro,让shiro进行保存。
/**
     * 认证回调函数,登录时调用.
     *
     * @see org.apache.shiro.realm.AuthenticatingRealm#doGetAuthenticationInfo(org.apache.shiro.authc.AuthenticationToken)
     */
    @Override
    protected AuthenticationInfo doGetAuthenticationInfo(AuthenticationToken token)
            throws AuthenticationException {
        UsernamePasswordCaptchaToken authcToken = null;
        try {
            authcToken = (UsernamePasswordCaptchaToken) token;
        } catch (Exception e) {
            logger.error("doGetAuthenticationInfo 失败原因:{}", e.getMessage());
            throw new IllegalArgumentException("参数异常");
        }
        // 验证码校验
        if (doCaptchaValidate(authcToken)) {
            // 根据用户名获取账号信息
            UcsUser ucsUser = ucsUserService.selectByUsername(authcToken.getUsername());
            // 验证码校验
            if (null == ucsUser) {
                throw new UnknownAccountException("不存在此用户");// 没找到帐号
            }
            String ciphertextPassword = new SimpleHash(hashAlgorithmName, authcToken.getPassword(),
                    ByteSource.Util.bytes(ucsUser.getSalt()), hashIterations).toHex();
            if (!ciphertextPassword.equals(ucsUser.getPassword())) {
                throw new UnknownAccountException("用户名或密码错误");// 没找到帐号
            }
            // 验证用户状态的合法性
            if (!BaseConstant.Status.ENABLE.equals(ucsUser.getStatus())) {
                throw new IncorrectCredentialsException("授权失败");
            }
            ShiroUser shiroUser = new ShiroUser(ucsUser.getId(), ucsUser.getUsername(),
                    ucsUser.getName());
            return new SimpleAuthenticationInfo(shiroUser, ucsUser.getPassword(),
                    ByteSource.Util.bytes(ucsUser.getSalt()), getName());
        }
        return null;
    }
5 验证码是如何校验呢
看看下面的代码,你可以直观的明白验证码是如何匹配正确性的,这里是将用户名、密码、验证码一起form提交校验,如果您的系统需要先校验系统,那么就将下面的代码稍作调整,使用controller对其封装就可以了。
 protected boolean doCaptchaValidate(UsernamePasswordCaptchaToken token) {
        String captcha = (String) SecurityUtils.getSubject().getSession()
                .getAttribute(com.google.code.kaptcha.Constants.KAPTCHA_SESSION_KEY);
        if (captcha != null && !captcha.equalsIgnoreCase(token.getCaptcha())) {
            throw new CaptchaException("验证码错误!");
        }
        return true;
    }
6 登录成功后如何跳转到首页的
login.js中doLogin方法window.location.href = ctx+'/index';,登录成功将后台发起index的get请求,我们再看看LoginController中,这里返回的字符串是system/index,按照上面说的,我们从view/modules中找到了index.jsp,springmvc将对其进行渲染,于是首页你就可以看到了
@RequestMapping(value = "/index")
    public String index(){
        return "system/index";
    }
