sublime text 2代码片段(Snippet)功能的使用
“snippet”在英语里面是“片段”的意思。当我们编码时候,通常想要打几个简略的字符串,就出来一些固定的模板。
例如:使用snippet在新建文件时快速生成HTML头部信息等。
定义很简单,菜单:tools->new snippets,会新建一个xml文件页签:
<snippet>

    <content><![CDATA[

Hello, ${1:this} is a ${2:snippet}.

]]></content>

    <!-- Optional: Set a tabTrigger to define how to trigger the snippet -->

    <!-- <tabTrigger>hello</tabTrigger> -->

    <!-- Optional: Set a scope to limit where the snippet will trigger -->

    <!-- <scope>source.python</scope> -->

</snippet>
是不是看的有点眼晕,那我们看下完整的结构和说明:
<snippet>

    <content><![CDATA[ 你需要插入的代码片段${1:this} ]]></content>

    <!-- 可选:快捷键,利用Tab自动补全代码的功能 -->

    <tabTrigger>hello</tabTrigger>

    <!-- 可选:使用范围,不填写代表对所有文件有效。附:source.css和text.html分别对应不同文件。 -->

    <scope>source.python</scope>

    <!-- 可选:在snippet菜单中的显示说明(支持中文)。如果不定义,菜单则显示当前文件的文件名。 -->

    <description>My Fancy Snippet</description>

</snippet>
现在对以上的参数进行说明:
content:是你要定义的模板内容;
===========================================================================
其中${序号:默认值} 表示序号相同的地方,光标会同时停在那,进行多处同时编辑;其中【:默认值】为自定义参数(可选),其中的【默认值】会直接输出在文件中;
如果是${序号}表示代码插入后,按Tab键,光标会根据顺序跳转到相应位置(以此类推);
序号大小就是tabindex;
在实际使用代码的时候,可以使用tab切换光标位置。
===========================================================================
tabTrigger:是你按tab键之前需要输入的快捷字符串,输了该字符串后,按tab键,就在光标处插入content中的内容。
scope:这个很重要,表示这个snippet在什么文件或什么内容下有效,是对文件格式的限制,比如,html格式的要设置为text.html。
===========================================================================
如果你不知道如何设置scope,才会让sinppet正常响应,可以参考:https://gist.github.com/iambibhas/4705378
如果设置错误,就会无效啦。
scope列表如下:

 1 ActionScript: source.actionscript.2

 2 AppleScript: source.applescript

 3 ASP: source.asp

 4 Batch FIle: source.dosbatch

 5 C#: source.cs

 6 C++: source.c++

 7 Clojure: source.clojure

 8 CSS: source.css

 9 D: source.d

10 Diff: source.diff

11 Erlang: source.erlang

12 Go: source.go

13 GraphViz: source.dot

14 Groovy: source.groovy

15 Haskell: source.haskell

16 HTML: text.html(.basic)

17 JSP: text.html.jsp

18 Java: source.java

19 Java Properties: source.java-props

20 Java Doc: text.html.javadoc

21 JSON: source.json

22 Javascript: source.js

23 BibTex: source.bibtex

24 Latex Log: text.log.latex

25 Latex Memoir: text.tex.latex.memoir

26 Latex: text.tex.latex

27 TeX: text.tex

28 Lisp: source.lisp

29 Lua: source.lua

30 MakeFile: source.makefile

31 Markdown: text.html.markdown

32 Multi Markdown: text.html.markdown.multimarkdown

33 Matlab: source.matlab

34 Objective-C: source.objc

35 Objective-C++: source.objc++

36 OCaml campl4: source.camlp4.ocaml

37 OCaml: source.ocaml

38 OCamllex: source.ocamllex

39 Perl: source.perl

40 PHP: source.php

41 Regular Expression(python): source.regexp.python

42 Python: source.python

43 R Console: source.r-console

44 R: source.r

45 Ruby on Rails: source.ruby.rails

46 Ruby HAML: text.haml

47 SQL(Ruby): source.sql.ruby

48 Regular Expression: source.regexp

49 RestructuredText: text.restructuredtext

50 Ruby: source.ruby

51 Scala: source.scala

52 Shell Script: source.shell

53 SQL: source.sql

54 TCL: source.tcl

55 HTML(TCL): text.html.tcl

56 Plain text: text.plain

57 Textile: text.html.textile

58 XML: text.xml

59 XSL: text.xml.xsl

60 YAML: source.yaml
===========================================================================
现在,我们有了个大致的了解,那我们就开始自己动手编写一个实例:
<snippet> <content> <![CDATA[ <footer> <p>Copyright © 2012 ${1:feige}.com</p> <p>增值电信业务经营许可证 赣A2-${2} <a href="#">赣ICP备号${3}</a></p> </footer> ]]> </content> <tabTrigger>cft</tabTrigger> <description>custom-footer</description> <scope>text.html</scope> </snippet>
创建完毕以后,保存在\Packages\User目录下(例 X:\Sublime Text 2.0\Data\Packages\User),文件命名为cft-code,后缀名.sublime-snoppet。
重启sublime text 2,该snippet即可使用了。
此时我们打开一个html文件,输入cft,再按Tab键,刚才我们所编写的代码段,就插入了进来。
并且此时的光标停留在我们所标记的${1}位置处,如果我们再按下Tab,那么光标就跳转到${2}的位置。
由于我们在scope中定义了仅在html文件中使用,所以此时如果我们打开的是css或其他格式的文件,那将无法插入代码段。
补充:除了利用快捷键Tab出代码之外,我们还能通过菜单来加载,打开Tools > Snippet,选择Snippet: custom-footer。如果你没有定义description,那此时便会看到以我们文件名为命名的Snippet: cft-code选项。
要是还没有看懂,那我们在来一个例子,下面是html5代码片段的定义:
<snippet>

    <content><![CDATA[

<!doctype html>

<html>

<head>

    <meta charset="utf-8">

    <title>${1}</title>

</head>

<body>

    <h1>${1}</h1>

    Hello, ${2:this} is a ${3:snippet}.

</body>

</html>

]]></content>


    <tabTrigger>html5</tabTrigger>

    <scope>text.html</scope>

</snippet>
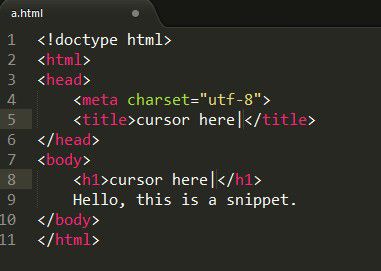
保存完重启Sublime text 2,新建文件:输入html5,tab会出现如下效果:

${1}出现了两次,所以我们看到2个光标,这样我们就可以同时编辑图中两处。
${2:this},所以在2处出现this默认值。
${3:snippet},所以在3处出现snippet默认值。
${1}处编辑完按tab就到${2}处。
