一起来学k8s 27.二进制k8s集群安装helm
二进制k8s集群安装helm
环境准备
##/etc/hosts
192.168.48.101 master01
192.168.48.102 master02
192.168.48.103 master03
192.168.48.201 node01
192.168.48.202 node02
192.168.48.54  nfs
## keepalived的vip
192.168.48.66
| IP | Hostname | CPU | Memory |
|---|---|---|---|
| 192.168.48.101 | master01 | 2 | 4G |
| 192.168.48.102 | master02 | 2 | 4G |
| 192.168.48.103 | master03 | 2 | 4G |
| 192.168.48.201 | node01 | 2 | 4G |
| 192.168.48.202 | node02 | 2 | 4G |
| 192.168.48.54 | nfs | 2 | 4G |
| 软件 | 版本 |
|---|---|
| kubernetes | 1.15.2 |
| docker-ce | 19.03 |
| calico | 3.8 |
| etcd | 3.3.13 |
| CNI | 0.8.1 |
| coredns | 1.4.0 |
| metrics-server | 0.3.3 |
| ingress-controller | 0.25.0 |
| dashboard | 1.10.1 |
| Weave Scope | 1.11.4 |
| nfs | v4 |
| helm | 2.14.3 |
用途
做为 Kubernetes 的一个包管理工具,Helm具有如下功能:
- 创建新的 chart
- chart 打包成 tgz 格式
- 上传 chart 到 chart 仓库或从仓库中下载 chart
- 在
Kubernetes集群中安装或卸载 chart - 管理用
Helm安装的 chart 的发布周期
重要概念
Helm 有三个重要概念:
- chart:包含了创建
Kubernetes的一个应用实例的必要信息 - config:包含了应用发布配置信息
- release:是一个 chart 及其配置的一个运行实例
- repository:charts仓库,用于存储charts
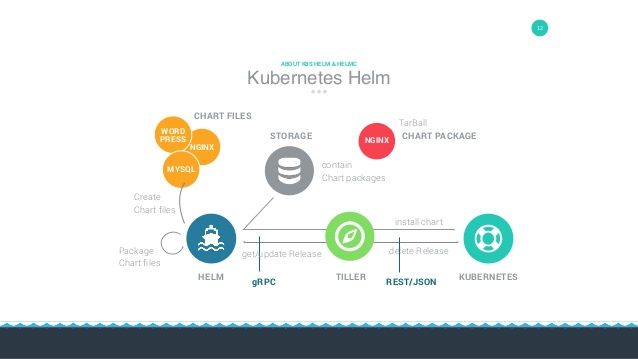
Helm组件
Helm 有以下三个组成部分:
-
Helm Client 是 Helm 客户端,可以在本地执行
-
Tiller 是服务器端组件,在 Kubernetes 群集上运行,并管理 Kubernetes 应用程序的生命周期
-
Repository 是 Chart 仓库,Helm客户端通过HTTP协议来访问仓库中Chart的索引文件和压缩包。
Helm Client 是用户命令行工具,其主要负责如下:
- 本地 chart 开发
- 仓库管理
- 与 Tiller sever 交互
- 发送预安装的 chart
- 查询 release 信息
- 要求升级或卸载已存在的 release
Tiller Server是一个部署在Kubernetes集群内部的 server,其与 Helm client、Kubernetes API server 进行交互。Tiller server 主要负责如下:
- 监听来自 Helm client 的请求
- 通过 chart 及其配置构建一次发布
- 安装 chart 到
Kubernetes集群,并跟踪随后的发布 - 通过与
Kubernetes交互升级或卸载 chart - 简单的说,client 管理 charts,而 server 管理发布 release
安装Helm-Client
官方地址
https://github.com/helm/helm/releases
下载
wget https://get.helm.sh/helm-v2.14.3-linux-amd64.tar.gz
[root@master01 ~]# tar xvf helm-v2.14.3-linux-amd64.tar.gz
linux-amd64/
linux-amd64/helm
linux-amd64/README.md
linux-amd64/LICENSE
linux-amd64/tiller

[root@master01 ~]# mv linux-amd64/helm  /usr/local/bin
安装Tiller Server
所有节点安装依赖socat
yum install -y socat
创建rbac
需要为Tiller创建一个ServiceAccount,让他拥有执行的权限,创建rbac.yaml文件
vim tiller-rbac.yaml

apiVersion: v1
kind: ServiceAccount
metadata:
  name: tiller
  namespace: kube-system
---
apiVersion: rbac.authorization.k8s.io/v1beta1
kind: ClusterRoleBinding
metadata:
  name: tiller
roleRef:
  apiGroup: rbac.authorization.k8s.io
  kind: ClusterRole
  name: cluster-admin
subjects:
  - kind: ServiceAccount
    name: tiller
    namespace: kube-system
[root@master01 ~]# kubectl apply -f tiller-rbac.yaml
serviceaccount/tiller created
clusterrolebinding.rbac.authorization.k8s.io/tiller created
helm init
在 Kubernetes 群集上安装 Tiller
因特殊原因,自己得需要相应添加代理
export https_proxy='http://192.168.50.66:8888'
export no_proxy='192.168.48.0/24,127.0.0.1/8'
[root@master01 ~]# helm init --upgrade --service-account tiller
Creating /root/.helm
Creating /root/.helm/repository
Creating /root/.helm/repository/cache
Creating /root/.helm/repository/local
Creating /root/.helm/plugins
Creating /root/.helm/starters
Creating /root/.helm/cache/archive
Creating /root/.helm/repository/repositories.yaml
Adding stable repo with URL: https://kubernetes-charts.storage.googleapis.com
Adding local repo with URL: http://127.0.0.1:8879/charts
$HELM_HOME has been configured at /root/.helm.

Tiller (the Helm server-side component) has been installed into your Kubernetes Cluster.

Please note: by default, Tiller is deployed with an insecure 'allow unauthenticated users' policy.
To prevent this, run `helm init` with the --tiller-tls-verify flag.
For more information on securing your installation see: https://docs.helm.sh/using_helm/#securing-your-helm-installation
由于国内网络的问题,在安装 Tiller 的时候,需要下载镜像 gcr.io/kubernetes-helm/tiller:v2.14.3和官方repo。init会失败。所以如果你没有代理得话,我们这里使用阿里镜像来安装Tiller,添加微软的repo
[root@master01 ~]# helm init --upgrade -i registry.cn-hangzhou.aliyuncs.com/google_containers/tiller:v2.14.3 --stable-repo-url http://mirror.azure.cn/kubernetes/charts --service-account tiller
官方tiller镜像下载
gcr.io/kubernetes-helm/tiller:v2.14.3
[root@master01 ~]# docker pull gcr.azk8s.cn/kubernetes-helm/tiller:v2.14.3

[root@master01 ~]# docker tag gcr.azk8s.cn/kubernetes-helm/tiller:v2.14.3  gcr.io/kubernetes-helm/tiller:v2.14.3
下载地址
链接: https://pan.baidu.com/s/184mv_Plgs3Xf6Oeo6V8pyg 提取码: p8q7
docker load -i tillerv2.14.3.tar.gz
查看tiller是否安装完成
[root@master01 ~]# kubectl get pod -n kube-system | grep tiller
tiller-deploy-8557598fbc-rfdhd             1/1     Running   0          11m
