Kubernetes控制平面组件:APIServer 基于 Webhook Toeken令牌 的认证机制详解
云原生学习路线导航页(持续更新中)
- kubernetes学习系列快捷链接
- Kubernetes架构原则和对象设计(一)
- Kubernetes架构原则和对象设计(二)
- Kubernetes架构原则和对象设计(三)
- Kubernetes控制平面组件:etcd(一)
- Kubernetes控制平面组件:etcd(二)
- Kubernetes控制平面组件:etcd常用配置参数
- Kubernetes控制平面组件:etcd高可用集群搭建
- Kubernetes控制平面组件:etcd高可用解决方案
- Kubernetes控制平面组件:Kubernetes如何使用etcd
- kubectl 和 kubeconfig 基本原理
- kubeadm 升级 k8s集群 1.17到1.20
- Kubernetes常见问题解答
- 查看云机器的一些常用配置
本文主要对kubernetes API Server 认证机制中的 Webhook令牌 认证进行介绍,包括Webhook令牌的设计理念、实现原理、认证流程、实操案例,还对 Operator Webhook 进行了异同辨析,最后给出了API Server集成企业认证系统的完整流程
1.辨析:APIServer Webhook令牌认证 和 Operator Webhook 有何异同
- APIServer Webhook令牌认证
- 在认证阶段,允许 Kubernetes API Server 将客户端请求中的
Bearer Token转发到外部服务进行验证。侧重于 认证请求的身份 - 这种机制适用于需要集成企业自有认证系统(如 OAuth2、LDAP、JWT 等)的场景
- 在认证阶段,允许 Kubernetes API Server 将客户端请求中的
- Operator 的 Mutating/ValidatingAdmissionWebhook
- 在准入阶段,决定是否要对 k8s对象做一些修改和额外的验证工作。侧重于 修改验证k8s对象
- 能到达此处,说明 客户端对k8s资源的操作 已经通过了认证,到达准入阶段,只不过准入的时候还允许用户自定义一些准入逻辑,提高扩展性
- Mutating/ValidatingAdmissionWebhook 内部的 client-config
- apiserver 和 Mutating/ValidatingAdmissionWebhook 之间的交互又产生了新的请求
- client-config.caBundle 是用来认证 Mutating/ValidatingAdmissionWebhook 身份的,本质上用的是 基于x509证书的 认证方式,和APIServer Webhook令牌认证没有关系
2.APIServer Webhook令牌认证简介
- Webhook 令牌身份认证 允许 Kubernetes API Server 将客户端请求中的
Bearer Token转发到外部服务进行验证。 - 这种机制适用于需要集成企业自有认证系统(如 OAuth2、LDAP、JWT 等)的场景。
- 核心参数
参数 作用 默认值 --authentication-token-webhook-config-file指定 Webhook 服务的连接配置(kubeconfig 格式) 无(必须显式配置) --authentication-token-webhook-cache-ttl设置认证结果的缓存时间 2m(2 分钟) - 注意: Webhook的这种认证方式只能使用Token令牌认证
3.APIServer Webhook令牌配置文件详解
- 配置文件为标准的 config 格式,或者json格式,示例如下:
apiVersion: v1 kind: Config clusters: - name: auth-webhook cluster: certificate-authority-data: LS0tLS1CRUdJTiBDRVJUSUZJQ0FURS0tLS0t... # Webhook 服务的 CA 证书(Base64 编码) server: https://auth-service.example.com:8443/validate # Webhook 服务地址 contexts: - name: webhook-auth context: cluster: auth-webhook user: api-server current-context: webhook-auth users: - name: api-server user: token: "s3cr3t-t0ken" # 可选:用于双向认证的静态令牌 - 2. 关键字段说明
字段 说明 clusters[*].cluster.certificate-authority-dataWebhook 服务的 CA 证书,用于验证其 TLS 证书 clusters[*].cluster.serverWebhook 服务的 HTTPS 端点(必须支持 POST 请求) users[*].user.token可选静态令牌,用于 Webhook 服务验证 API Server 身份(双向认证)
4.APIServer Webhook令牌认证流程
4.1.完整流程
+------------+       +--------------+       +-----------------+
|   Client   |       | API Server   |       | Webhook Service |
+------------+       +--------------+       +-----------------+
      | 1. 请求携带Token      |                     |
      |--------------------->|                     |
      |                      | 2. 检查本地缓存     |
      |                      |--+                  |
      |                      |  | 缓存命中 → 直接认证 |
      |                      |<-+                  |
      |                      | 3. 缓存未命中 → 转发请求 |
      |                      |-------------------->|
      |                      |                     | 4. 验证Token
      |                      |                     |--+
      |                      |                     |  | 返回认证结果
      |                      |                     |<-+
      |                      | 5. 缓存结果并响应    |
      |<---------------------|                     |
4.2.详细步骤
- 从交互协议上也可以看出,Webhook的这种认证方式只能使用Token认证
-
客户端发起请求
客户端在 HTTP 头部中携带Authorization: Bearer,例如:GET /api/v1/pods HTTP/1.1 Authorization: Bearer eyJhbGciOiJIUzI1NiIsInR5cCI6IkpXVCJ9... -
API Server 检查缓存
- 如果该 Token 的认证结果在缓存中且未过期,直接使用缓存结果。
- 如果缓存未命中或已过期,继续执行 Webhook 调用。
-
API Server 转发请求
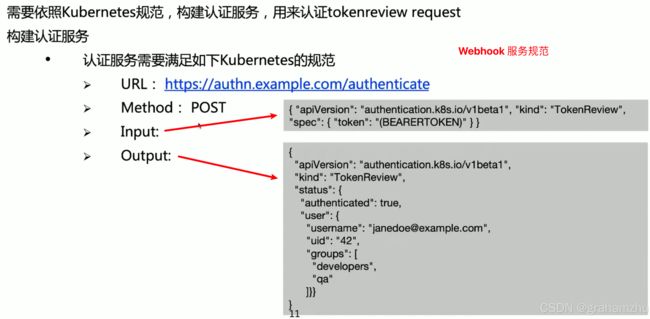
向 Webhook 服务发送 JSON 格式的TokenReview请求:{ "apiVersion": "authentication.k8s.io/v1", "kind": "TokenReview", "spec": { "token": "eyJhbGciOiJIUzI1NiIsInR5cCI6IkpXVCJ9...", "audiences": ["kubernetes"] // 可选:目标受众 } } -
Webhook 服务验证 Token
返回认证结果(JSON 格式):{ "apiVersion": "authentication.k8s.io/v1", "kind": "TokenReview", "status": { "authenticated": true, "user": { "username": "admin", "uid": "12345", "groups": ["system:masters"] } } } -
API Server 处理响应
- 若
authenticated: true,允许请求继续处理。 - 若
authenticated: false,返回401 Unauthorized。
- 若
5.API Server 的缓存机制与调优
5.1.缓存行为
- 缓存键:Token 字符串的哈希值。
- 缓存淘汰:基于 TTL 的定时清理。
- 副作用:短时间内相同 Token 的重复请求不会触发 Webhook 调用。
5.2.配置建议
| 场景 | 推荐 TTL | 说明 |
|---|---|---|
| 生产环境(高安全性要求) | 1m |
缩短缓存时间以确保权限变更及时生效 |
| 开发环境(高负载测试) | 5m |
减少 Webhook 调用频率,提升性能 |
| 静态 Token 场景 | 0(禁用缓存) |
每次请求均触发 Webhook 验证 |
调整 TTL 示例:
# 修改 API Server 启动参数
--authentication-token-webhook-cache-ttl=30s
6.安全最佳实践
-
强制 HTTPS
Webhook 服务必须启用 TLS,且 API Server 配置正确的 CA 证书。 -
双向 TLS 认证(mTLS)
users: - name: api-server user: client-certificate-data: -
定期轮换证书
使用工具(如cert-manager)自动化管理证书生命周期。 -
限制 Webhook 访问
- 通过 NetworkPolicy 限制只允许 API Server 访问 Webhook。
- 使用防火墙规则限制源 IP。
7.实操案例
完整代码参考:https://github.com/cncamp/101/tree/master/module6/authn-webhook
7.1.编写 Webhook认证服务
-
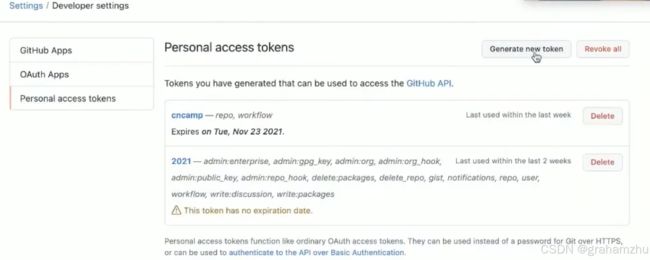
这里我们为了真实性,使用github的认证服务,github中有 个人开发者access tokens,可以到你的github账户-settings-developer-personal access tokens中,创建一个,作为测试token
-
在使用curl模拟kubernetes发送TokenReview到webhook时,将你自己的token填入TokenReview中
-
案例完整流程如下:
- kubernetes 发送携带 token 的 TokenReview 到 我们编写的webhook
- webhook 将token发给github进行认证
- 根据认证结果,返回对应的 TokenReview 给 kubernetes
package main

import (
	"context"
	"encoding/json"
	"log"
	"net/http"

	"github.com/google/go-github/github"
	"golang.org/x/oauth2"
	authentication "k8s.io/api/authentication/v1beta1" // k8s 认证 API v1beta1 版本
)

func main() {
	// 启动 HTTP 服务,监听 /authenticate 端点处理认证请求
	http.HandleFunc("/authenticate", func(w http.ResponseWriter, r *http.Request) {
		// 解析客户端提交的 TokenReview 请求体
		decoder := json.NewDecoder(r.Body)
		var tr authentication.TokenReview
		if err := decoder.Decode(&tr); err != nil {
			log.Println("[Error] 解码 TokenReview 失败:", err)
			// 返回无效请求响应
			w.WriteHeader(http.StatusBadRequest)
			json.NewEncoder(w).Encode(map[string]interface{}{
				"apiVersion": "authentication.k8s.io/v1beta1",
				"kind":       "TokenReview",
				"status": authentication.TokenReviewStatus{
					Authenticated: false,
				},
			})
			return
		}
		log.Println("收到认证请求")

		// 使用 GitHub 的 OAuth2 令牌验证用户身份
		ts := oauth2.StaticTokenSource(
			&oauth2.Token{AccessToken: tr.Spec.Token}, // 从请求中提取访问令牌
		)
		tc := oauth2.NewClient(context.Background(), ts)      // 创建 GitHub 客户端
		client := github.NewClient(tc)                      // 初始化 GitHub API 客户端

		// 获取 GitHub 用户信息(需确保令牌有效)
		user, _, err := client.Users.Get(context.Background(), "")
		if err != nil {
			log.Println("[Error] GitHub 用户查询失败:", err)
			// 返回未授权响应
			w.WriteHeader(http.StatusUnauthorized)
			json.NewEncoder(w).Encode(map[string]interface{}{
				"apiVersion": "authentication.k8s.io/v1beta1",
				"kind":       "TokenReview",
				"status": authentication.TokenReviewStatus{
					Authenticated: false,
				},
			})
			return
		}

		// 构造认证成功响应(用户名和 UID 均使用 GitHub 登录名)
		log.Printf("[Success] 用户 %s 通过认证", *user.Login)
		w.WriteHeader(http.StatusOK)
		json.NewEncoder(w).Encode(map[string]interface{}{
			"apiVersion": "authentication.k8s.io/v1beta1",
			"kind":       "TokenReview",
			"status": authentication.TokenReviewStatus{
				Authenticated: true,
				User: authentication.UserInfo{
					Username: *user.Login, // GitHub 用户名作为认证用户名
					UID:      *user.Login,  // GitHub 用户名作为唯一标识符
				},
			},
		})
	})

	log.Println("认证服务已启动,监听端口 :3000")
	log.Fatal(http.ListenAndServe(":3000", nil))
}
7.2.构建打包
- 可以创建一个Makefile文件,用于构建应用
build:
	echo "building authn-webhook binary"
	mkdir -p bin/amd64
	CGO_ENABLED=0 GOOS=linux GOARCH=amd64 go build -o bin/amd64 .
7.3.配置 API Server 调用 auth-webhook
-
创建文件:
vim /etc/config/webhook-config.json{ "kind": "Config", "apiVersion": "v1", "preferences": {}, "clusters": [ { "name": "github-authn", "cluster": { "server": "http://192.168.34.2:3000/authenticate" } } ], "users": [ { "name": "authn-apiserver", "user": { "token": "secret" } } ], "contexts": [ { "name": "webhook", "context": { "cluster": "github-authn", "user": "authn-apiserver" } } ], "current-context": "webhook" } ``` -
修改 API Server 的配置,此处为修改静态pod文件:
/etc/kubernetes/manifests/kube-apiserver.yaml- 添加
--authentication-token-webhook-config-file=/etc/config/webhook-config.json - 修改静态pod文件保存后,apiserver会自动重启
-
注意:如果你把webhook-config.json放在其他路径下,记得要mount到apiserver的pod中,否则直接指定 启动参数,是找不到webhook-config.json的
7.3.运行测试
- 编译运行:
make && ./authn-webhook
- 测试验证:
# 有效Token测试
curl -k -X POST http://localhost:3000/authenticate -d '{
  "apiVersion": "authentication.k8s.io/v1",
  "kind": "TokenReview",
  "spec": {
    # 记得更换成你在github中创建的token
    "token": "合法的token"
  }
}'

# 预期响应:
# {
#   "apiVersion": "authentication.k8s.io/v1",
#   "kind": "TokenReview",
#   "status": {
#     "authenticated": true,
#     "user": {
#       "username": "xxx",
#       "uid": "xxx",
#       "groups": ["xxx"]
#     }
#   }
# }

# 无效Token测试
curl -k -X POST https://localhost:8443/validate -d '{
  "apiVersion": "authentication.k8s.io/v1",
  "kind": "TokenReview",
  "spec": {
    "token": "非法的token"
  }
}'

# 预期响应:
# {
#   "apiVersion": "authentication.k8s.io/v1",
#   "kind": "TokenReview",
#   "status": {
#     "authenticated": false,
#     "error": "Invalid token"
#   }
# }
8.故障排查
8.1.常见错误
| 错误现象 | 可能原因 | 解决方案 |
|---|---|---|
Failed calling webhook |
Webhook 服务不可达 | 检查网络连通性和服务状态 |
x509: certificate signed by unknown authority |
CA 证书配置错误 | 验证 certificate-authority-data 是否正确 |
the server could not find the requested resource |
Webhook 路径错误 | 确认 server 字段包含正确路径 |
8.2.日志检查
# 查看 API Server 日志
journalctl -u kube-apiserver | grep -i webhook

# 查看 Webhook 服务日志
kubectl logs -n auth-system deploy/auth-webhook
9.API Server 如何集成企业的认证系统?
- 经过了上述了学习,我们知道 使用webhook机制可以接入第三方认证系统,那么这个完整流程是什么样的?
- 比如企业已经有了一个认证系统,叫做 Auth-app
- 业务应用:在需要处理权限时,先从Auth-app获取该用户的token,或者用户自行携带发送到业务应用
- API Server:如果业务应用需要访问 API Server,需要将token放入请求头,发给 API Server,API Server先进行基础的一些认证方式,不行的时候就会 将token封装到一个TokenReview,发送给 企业自行开发的webhook
- 企业自行开发的webhook:将 API Server 发过来的 token,发给 Auth-app 进行认证,并根据认证结果 响应 API Server,决定是否通过
- API Server:拿到webhook的认证结果后,决定是否通过认证