python图片相似度计算与滑块验证码移动距离识别
在UI自动化测试或者做爬虫的过程中,难免会碰到滑块验证码的场景,故此将自己本次遇到的情况与解决思路记录一下
1.缺口图片下载
目前所用的自动化框架是基于java写的,所以下载该缺口图片的代码也是java代码,后续的图片识别对比是基于python
String yzmPath="D:\\yanzhengma.png";
// wd为webdriver对象
TakesScreenshot takesScreenshot=(TakesScreenshot)wd;
WebElement we = wd.findElement(By.xpath("//*[@id='slideVerify']/canvas[1]"));
Point location = we.getLocation();
Dimension size = we.getSize();
// 创建全屏截图。
BufferedImage originalImage =ImageIO.read(new ByteArrayInputStream(takesScreenshot.getScreenshotAs(OutputType.BYTES)));
// 截取webElement所在位置的子图。
BufferedImage croppedImage = originalImage.getSubimage(
        location.getX(),
        location.getY(),
        size.getWidth(),
        size.getHeight());
File f = new File(yzmPath);
//写入保存图片
ImageIO.write(croppedImage,"PNG",f);
2.完整图片下载
因为是公司内部项目,发现滑块验证码的图片总共只有三张,所以直接将三张完整的图片全部下载下来了,如果是做第三方的爬虫的话,可能需要找别的办法下载原图进行对比

3.图片相似度对比
因为将三张完整的图片全部下载下来了,所以下载了缺口图片后,首先要从三张图片中找到与缺口图片最相似的那张,如果直接有确定原图的可以跳过该步骤
# 对图片进行统一化处理
def get_thum(image, size=(64, 64), greyscale=False):
    # 利用image对图像大小重新设置, Image.ANTIALIAS为高质量的
    image = image.resize(size, Image.ANTIALIAS)
    if greyscale:
        # 将图片转换为L模式,其为灰度图,其每个像素用8个bit表示
        image = image.convert('L')
    return image


# 计算图片的余弦距离
def image_similarity_vectors_via_numpy(image1, image2):
    image1 = get_thum(image1)
    image2 = get_thum(image2)
    images = [image1, image2]
    vectors = []
    norms = []
    for image in images:
        vector = []
        for pixel_tuple in image.getdata():
            vector.append(average(pixel_tuple))
        vectors.append(vector)
        norms.append(linalg.norm(vector, 2))
    a, b = vectors
    a_norm, b_norm = norms
    res = dot(a / a_norm, b / b_norm)
    return res


def getSimilarityImgPath(resourcePath,pngName):
    """
    # 获取预期图片中与验证码图片最相似图片的路径
    :param resourcePath: 图片存放目录
    :param pngName: 验证码图片
    :return:
    """
    verificationPath=os.path.join(resourcePath,pngName)
    verificationImg=Image.open(verificationPath)
    cosin=0
    expectImgPath=""
    for root, dirs, files in os.walk(resourcePath):
        for f in files:
            # 缺口图片和目标图片存在同一个目录,所以排除掉自己
            if f==pngName:
                continue

            tempPath=os.path.join(resourcePath,f)
            expectImg=Image.open(tempPath)
            temp=image_similarity_vectors_via_numpy(expectImg,verificationImg)
            if temp>cosin:
                cosin=temp
                expectImgPath=os.path.join(resourcePath,f)

    return expectImgPath
4.缺口距离计算
之前在网上找的算法,很多都是基于一个像素一个像素对比的,很容易出现误判,所以想了一个思路就是,将图片分割成N多个10x10的小图片,然后逐步对比每个小图片的相似度,当相似度超过一定数值时,则判断是缺口的位置。 注:(需要保持原始图片和缺口图片的图片尺寸一致)
def pil_image_similarity(image1, image2):
    '''
    对比图片相似度
    :param image1:
    :param image2:
    :return:
    '''
    h1 = image1.histogram()
    h2 = image2.histogram()
    rms = math.sqrt(reduce(operator.add,  list(map(lambda a,b: (a-b)**2, h1, h2)))/len(h1))
    return rms


def diffImg(image1,image2):
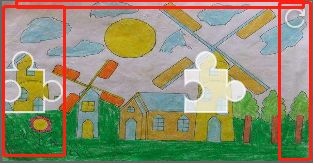
    # 把左侧区域,顶部和右上角刷新按钮都截掉,具体说明可以看下图
	 # 因为我的原始图片大小为310*160,所以具体需要裁剪的距离可以根据自己的实际情况调整
    image1 = image1.crop((60, 10, 280, 160))
    image2 = image2.crop((60, 10, 280, 160))

    # 将大图分割成10x10的多个小图,逐一进行相似度对比
    for x in range(int(image1.size[0]/10)):
        for y in range(int(image1.size[1]/10)):
            tempImage1=image1.crop(((x-1)*10,(y-1)*10,x*10,y*10))
            tempImage2=image2.crop(((x-1)*10,(y-1)*10,x*10,y*10))
            rms=pil_image_similarity(tempImage1,tempImage2)
            # 按照实践,目前当返回的差异度大于2时,就是差异较大的区域
            if rms>2:
                # 找到差异度大的图片块之后,将左侧裁掉的距离加上该图片所在的x距离,即为需要滑动的距离
                return 60+(x-1)*10
代码中间对图片做了裁剪,是裁掉了下图的区域
左侧的原始滑块所在的区域,顶部经常会出现一个黑边也裁掉了,右侧的刷新按钮也裁掉了

5.完整代码
import math
import operator
import os
from functools import reduce

from PIL import Image
from numpy import average, dot, linalg


# 对图片进行统一化处理
def get_thum(image, size=(64, 64), greyscale=False):
    # 利用image对图像大小重新设置, Image.ANTIALIAS为高质量的
    image = image.resize(size, Image.ANTIALIAS)
    if greyscale:
        # 将图片转换为L模式,其为灰度图,其每个像素用8个bit表示
        image = image.convert('L')
    return image


# 计算图片的余弦距离
def image_similarity_vectors_via_numpy(image1, image2):
    image1 = get_thum(image1)
    image2 = get_thum(image2)
    images = [image1, image2]
    vectors = []
    norms = []
    for image in images:
        vector = []
        for pixel_tuple in image.getdata():
            vector.append(average(pixel_tuple))
        vectors.append(vector)
        norms.append(linalg.norm(vector, 2))
    a, b = vectors
    a_norm, b_norm = norms
    res = dot(a / a_norm, b / b_norm)
    return res


def getSimilarityImgPath(resourcePath,pngName):
    """
    # 获取预期图片中与验证码图片最相似图片的路径
    :param resourcePath: 图片存放目录
    :param pngName: 验证码图片
    :return:
    """
    verificationPath=os.path.join(resourcePath,pngName)
    verificationImg=Image.open(verificationPath)
    cosin=0
    expectImgPath=""
    for root, dirs, files in os.walk(resourcePath):
        for f in files:
            # 排除掉自己
            if f==pngName:
                continue

            tempPath=os.path.join(resourcePath,f)
            expectImg=Image.open(tempPath)
            temp=image_similarity_vectors_via_numpy(expectImg,verificationImg)
            if temp>cosin:
                cosin=temp
                expectImgPath=os.path.join(resourcePath,f)

    return expectImgPath


def pil_image_similarity(image1, image2):
    '''
    对比图片相似度
    :param image1:
    :param image2:
    :return:
    '''
    h1 = image1.histogram()
    h2 = image2.histogram()
    rms = math.sqrt(reduce(operator.add,  list(map(lambda a,b: (a-b)**2, h1, h2)))/len(h1))
    return rms


def diffImg(image1,image2):
    # 把左侧区域,顶部和右上角刷新按钮都截掉
    image1 = image1.crop((60, 10, 280, 160))
    image2 = image2.crop((60, 10, 280, 160))

    # 将大图分割成10x10的多个小图,逐一进行相似度对比
    for x in range(int(image1.size[0]/10)):
        for y in range(int(image1.size[1]/10)):
            tempImage1=image1.crop(((x-1)*10,(y-1)*10,x*10,y*10))
            tempImage2=image2.crop(((x-1)*10,(y-1)*10,x*10,y*10))
            rms=pil_image_similarity(tempImage1,tempImage2)
            # 按照实践,目前当返回的差异度大于2时,就是差异较大的区域
            if rms>2:
                # 找到差异度大的图片块之后,将左侧裁掉的距离加上该图片所在的x距离,即为需要滑动的距离
                return 60+(x-1)*10

    return 0


if __name__ == '__main__':

    filePath = os.path.dirname(os.path.dirname(__file__))
    resourcePath = os.path.join(filePath, "resource")

    # 缺口图片
    verificationPath = os.path.join(resourcePath, "quekou.png")
    verificationImg = Image.open(verificationPath)
    # 原始完整图片
    expectPath=getSimilarityImgPath(resourcePath,"quekou.png")
    expectImg=Image.open(expectPath)

    # 打印缺口距离
    print(diffImg(verificationImg,expectImg))
