bootstrap + django的简单后台管理系统
文章目录
- 登录页面
-
- Form和MiddleForm的书写
- HTML代码:
- 信息管理页面
-
- 母版HTML代码
- 管理员信息
-
- 各种功能页面
- Ajax数据传输
-
- JS部分
- 数据统计页面
-
- JS部分
- 文件上传
-
- HTML部分代码
- Python代码部分
-
- media配置
- 补充
登录页面
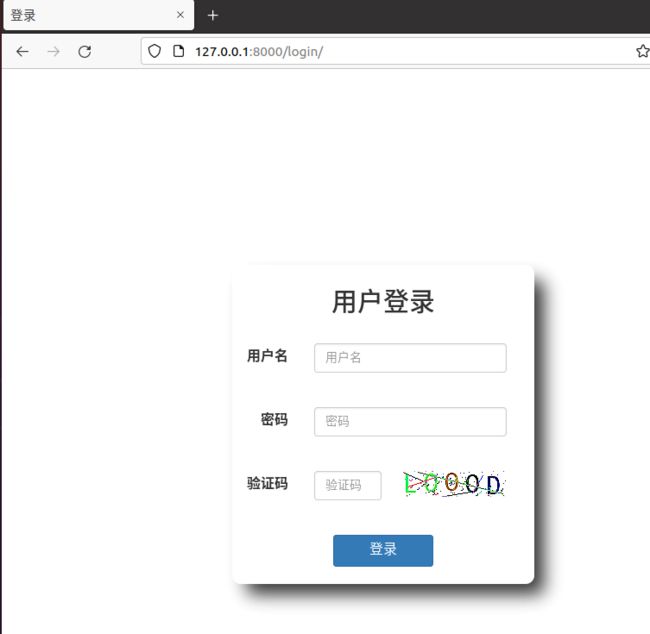
需要实现功能:
1、用户输入的用户名,密码和验证码能在后台获取
2、将获取的数据进入到数据库查找
3、成功登录后,将用户存储一个cookie在浏览器的session里面
4、判断本机用户是否有cookie存储在session里,有就可以访问系统里的所有页面,否则直接跳到登录页面。
采用form组件来实现数据的改查,MiddleForm中间件来控制访问其他页面的条件,未登录过则不可以访问系统其他页面。
Form和MiddleForm的书写
# 登录Form
class LoginForm(BootstrapForm):
    username = forms.CharField(label="用户名",
                               widget=forms.TextInput)
    password = forms.CharField(label="密码",
                               widget=forms.PasswordInput(render_value=True))
    image_code = forms.CharField(label='验证码', widget=forms.TextInput)

    def clean_password(self):
        """将得到的密码加密"""
        pwd = self.cleaned_data.get('password')
        return md5(pwd)


# 中间件
class M1(MiddlewareMixin):
    """中间件设置每个网页的访问限制"""
    def process_request(self, request):
        # 判断地址栏地址决定网页是否可直接访问
        if request.path_info in ['/login/', '/img_code/']:
            return  # return 后执行下一步方法

        # 判断该用户是否在session里有存储信息,有则可以进入
        if request.session.get('info'):
            return

        # 无存储信息,进入到登录页面
        return redirect('/login')

    # def process_response(self, request, response):
    #     print("走了")
    #     return response  # 不能忘了这一步
HTML代码:
DOCTYPE html>
{% load static %}
<html lang="en">
<head>
    <meta charset="UTF-8">
    <title>登录title>
    <link rel="stylesheet" type="text/css" href="{%static 'css/bootstrap.min.css'%}">
    <script src="{% static 'plugin/jquery-3.6.0.js' %}">script>
    <script src="{% static 'plugin/bootstrap.min.js' %}">script>
    <style type="text/css">
        .login_form{
            position: fixed;
            width: 350px;
            height: 370px;
            top: 0;
            bottom: 0;
            right: 0;
            left: 0;
            margin:auto;
            border-radius: 10px;
            box-shadow: 14px 15px 19px -3px;
        }

        h2{
            text-align: center;
            margin-bottom: 18px;
            margin-top: 30px;
        }

        input{
            margin: 10px 0;
        }

        .form-group{
            height: 74px;
            margin-bottom: 0;
        }

        .form-group label{
            height: 30px;
            font-size: 16px;
            margin-top: 8px;
        }

        input[type="submit"]{
            font-size: 16px;
        }

        #id_image_code{
            width: 61%;
        }
        img{
            margin-top: 10px;
            margin-left: -40px;
        }

    style>
head>
<body>
    <div class="container">
        <div class="login_form">
            <h2>用户登录h2>
            <form class="form-horizontal" method="POST" novalidate>
                {% csrf_token %}
                <div class="form-group">
                    <label class="control-label col-sm-3">用户名label>
                    <div class="col-sm-8">
                      {{forms.username}}
                      <span style="color: red;">{{forms.username.errors.0}}span>
                    div>
                div>
                <div class="form-group">
                    <label class="control-label col-sm-3">密码label>
                    <div class="col-sm-8">
                      {{forms.password}}
                      <span style="color: red;">{{forms.password.errors.0}}span>
                    div>
                div>
                <div class="form-group">
                    <label class="control-label col-sm-3">验证码label>
                    <div class="col-sm-5">
                        {{forms.image_code}}
                        <span style="color: red;">{{forms.image_code.errors.0}}span>
                    div>
                    <div class="col-sm-4" style="padding: 0"><img src="/img_code">div>
                div>
                <input type="submit" class="btn btn-primary col-sm-4 col-sm-offset-4" value="登录">
            form>
        div>
    div>


body>
html>
信息管理页面
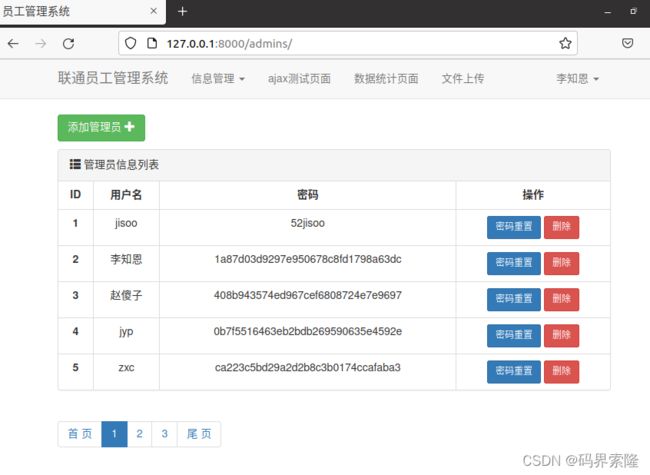
其中包括了员工信息管理,部门信息管理,靓号信息管理,管理员信息管理和订单信息管理。
这些页面的样式基本一致,只是存在着部分功能的不同,因此,采用django中模板继承的方法,将公共部分都写在母版里,再通过模板语言书写不同的样式部分。
母版HTML代码
DOCTYPE html>
{% load static %}
<html lang="en">
<head>
    <meta charset="UTF-8">
    <title>员工管理系统title>
    <link rel="stylesheet" href="{% static 'css/bootstrap.min.css' %}">
    {%block css %}{%endblock%}
    <script src="{% static 'plugin/jquery-3.6.0.js' %}">script>
    <script src="{% static 'plugin/bootstrap.min.js' %}">script>
    {%block js%}{%endblock%}
    <style type="text/css">
        th,td{
            text-align: center;
        }
    style>
head>
<body style="position: relative;">
    <nav class="navbar navbar-default">
        <div class="container">
            <div class="navbar-header">
                <button type="button" class="navbar-toggle collapsed" data-toggle="collapse" data-target="#bs-example-navbar-collapse-1" aria-expanded="false">
                <span class="sr-only">Toggle navigationspan>
                <span class="icon-bar">span>
                <span class="icon-bar">span>
                <span class="icon-bar">span>
                button>
                <a class="navbar-brand" href="/staffsInfo">联通员工管理系统a>
            div>
        <div class="collapse navbar-collapse" id="bs-example-navbar-collapse-1">

            <ul class="nav navbar-nav">
                <li class="dropdown">
                    <a href="#" class="dropdown-toggle" data-toggle="dropdown" role="button" aria-haspopup="true" aria-expanded="false">信息管理 <span class="caret">span>a>
                    <ul class="dropdown-menu">
                        <li><a href="/staffsInfo">员工信息管理a>li>
                        <li ><a href="/departsInfo">部门管理a>li>
                        <li><a href="/niceTels">靓号管理a>li>
                        <li><a href="/admins">管理员信息a>li>
                        <li><a href="/orders">订单信息a>li>
                    ul>
                li>
                <li><a href="/tasks">ajax测试页面a>li>
                <li><a href="/data_show">数据统计页面a>li>
                <li><a href="/upload">文件上传a>li>

            ul>
            <ul class="nav navbar-nav navbar-right">
                <li class="dropdown">
                  <a href="#" class="dropdown-toggle" data-toggle="dropdown" role="button" aria-haspopup="true" aria-expanded="false">{{request.session.info.name}}
                    <span class="caret">
                        <ul class="dropdown-menu">
                            <li><a href="#">个人中心a>li>
                            <li><a href="#">我的信息a>li>
                            <li role="separator" class="divider">li>
                            <li><a href="/logout">注销a>li>
                        ul>
                  span>a>
                li>
            ul>
            div>
        div>
    nav>
    <div>
        {% block content %}{% endblock%}
    div>

    <div class="container">
        <nav aria-label="...">
            <ul class="pagination">
            {{pages}}
            ul>
        nav>
    div>
body>
html>
- {% load static %} : 用于导入应用下的静态文件
- {%block css %} {%endblock%} : 中间填写每个页面独有的css
- {%block js%} {%endblock%} : 中间填写每个页面独有的js
- {% block content %} {% endblock%} : 中间填写每个页面独有的html
管理员信息
{% extends 'layout.html' %}

{% block content %}
    <div class="main">
        <div class="container">
            <div style="margin-bottom: 10px;">
                <a href="add/" class="btn btn-success">
                添加管理员
                <span class="glyphicon glyphicon-plus">span>
                a>
            div>
            <div class="panel panel-default ">
                <div class="panel-heading">
                    <span class="glyphicon glyphicon-th-list">span>
                    管理员信息列表
                div>
                <table class="table table-bordered">
                        <thead >
                            <tr>
                                <th>IDth>
                                <th>用户名th>
                                <th>密码th>
                                <th>操作th>
                            tr>
                        thead>
                        <tbody>
                            {% for admin in admins %}
                            <tr>
                                <th scope="row">{{admin.id}}th>
                                <td>{{admin.username}}td>
                                <td>{{admin.password}}td>
                                <td>
                                    <a href="update/{{admin.id}}" class="btn btn-primary btn-sm">密码重置a>
                                    <a href="delete/{{admin.id}}" class="btn btn-danger btn-sm">删除a>
                                td>
                            tr>
                            {% endfor %}
                        tbody>
                    table>
            div>
        div>
    div>
{% endblock %}
以下代码使用模板语言中的循环,获取数据库中对应的数据信息,然后展示在页面中。
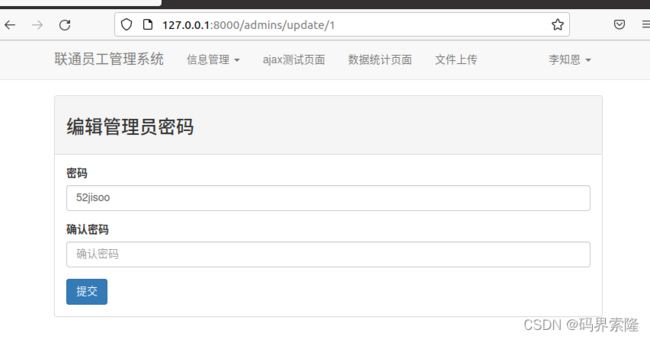
其中密码重置和删除的地址对应的是视图函数所绑定的url执行对应的功能
      {% for admin in admins %}
        <tr>
            <th scope="row">{{admin.id}}th>
            <td>{{admin.username}}td>
            <td>{{admin.password}}td>
            <td>
                <a href="update/{{admin.id}}" class="btn btn-primary btn-sm">密码重置a>
                <a href="delete/{{admin.id}}" class="btn btn-danger btn-sm">删除a>
            td>
        tr>
        {% endfor %}
各种功能页面
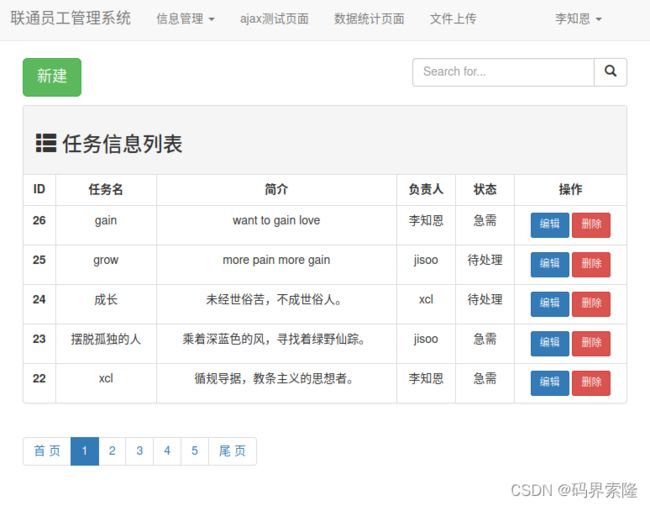
点击删除后直接从数据库中删除对应数据。
Ajax数据传输
JS部分
{%block js%}
<script type="text/javascript">
	$(function(){
		var $btn_new = $('#btn_new')
		var $btn1 = $('#btn1')
		$btn_new.click(function(){
			// alert('ok')
			$('#myModal').modal('show')
		})
		$btn1.click(function(){
			$('.error').empty(); //点击一开始就清空错误信息,在重新获取错误
			$.ajax({
				url: "/tasks/ajax/",
				type: "post",
				dataType: 'JSON',
				data: $('#form').serialize() //转换以字典的格式传给后台
				})
			.done(function(dat){
				console.log(dat.statu)
				if (dat.statu == true){
					// console.log('ok')
					alert('添加成功!');
					// 获取的是个Queryset,得取其中的对象,才能清空表单内容
					$('#form')[0].reset();
					// 添加成功后隐藏模态框
					$('#myModal').modal('hide');
					location.reload();
				}
				else {
					$.each(dat.errors,function(name, error){
					$('#id_' + name).next().html(error)
					$('#id_' + name).focus(function(){
						$(this).next().empty()
					})
				})
				}
			})
			.fail(function(){
				console.log('失败了')
			})
		})


	})
script>

{%endblock%}
数据统计页面
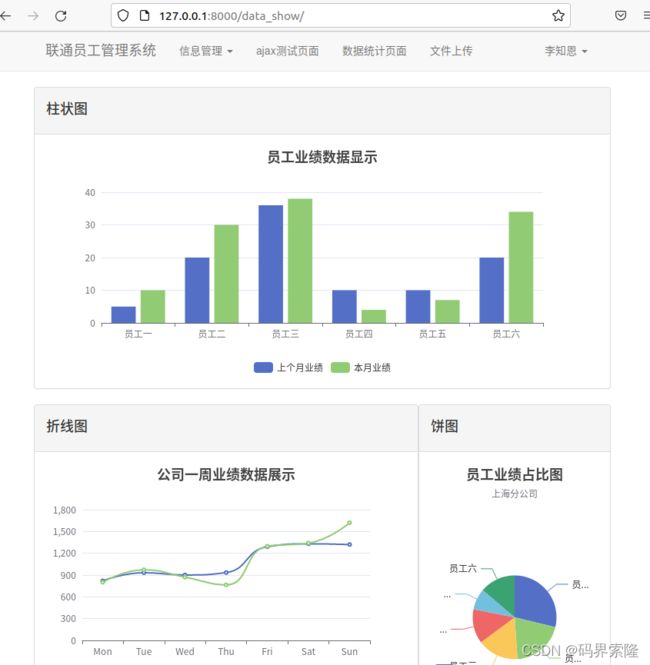
使用的是百度的echarts来进行绘图,还可以使用highcharts,echarts是借鉴于highcharts。数据暂时是在后台写定,实际是从数据库获取,但是基本写法一致。
JS部分
{% load static %}

{%block js%}
<script type="text/javascript" src="{% static 'js/echarts.js' %}">script>
<script type="text/javascript">
    /**
     *
    报错:
     Uncaught Error: Initialize failed: invalid dom.
        init$1 http://127.0.0.1:8000/static/js/echarts.js:30192
         http://127.0.0.1:8000/data_show/:21
    原因:
        我的js代码段写在body标签之前,浏览器加载时会先去解析js代码,当浏览器执行document.getElementById('main')时,由于id为main的dom对象还未被创建,报错Initialize failed: invalid dom.
    解决:
        加上jquery的ready方法
     **/

     $(function(){
        Initbar();
        Initline();
        Initpie();
        })

     function AjaxDatas(dat, option, myChart){
        $.ajax({
            url: '/data_show/data_request/',
            type: 'POST',
            data: {num: dat},
            dataType:'JSON'
        }).done(function(data){
            console.log(data);
            if (dat == 3){
                option.series[0].data = data.series;
            }
            else{
                option.legend.data = data.legend_data;
                option.xAxis.data = data.xAxis_data;
                option.series = data.series;
            }
            // 使用刚指定的配置项和数据显示图表。
            myChart.setOption(option);
        })
     }

    function Initbar(){
        // 基于准备好的dom,初始化echarts实例
        var myChart = echarts.init(document.getElementById('bar'));

        // 指定图表的配置项和数据
        var option = {
            title: {
            text: '员工业绩数据显示',
            left: 'center'
            },
            tooltip: {},
            legend: {
            data: [],
            bottom: 0
            },
            xAxis: {
            data: [],
            bottom: 0
            },
            yAxis: {},
            series: []
        };
        AjaxDatas(1, option, myChart);
    }

    function Initline(){
        var chartDom = document.getElementById('line');
        var myChart = echarts.init(chartDom);
        var option;
        option = {
            title: {
                text: '公司一周业绩数据展示',
                left: 'center'
                },
            tooltip: {},
            legend: {
            data: [],
            bottom: 0
            },
          xAxis: {
            type: 'category',
            data: []
          },
          yAxis: {
            type: 'value'
          },
          series: []
        };

        AjaxDatas(2, option, myChart);
    }

    function Initpie(){
        var chartDom = document.getElementById('pie');
        var myChart = echarts.init(chartDom);
        var option;

        option = {
          title: {
            text: '员工业绩占比图',
            subtext: '上海分公司',
            left: 'center'
          },
          tooltip: {
            trigger: 'item'
          },
          legend: {
            orient: 'vertical',
            left: 'left',
            bottom:0
          },
          series: [
            {
              name: '业绩量',
              type: 'pie',
              radius: '50%',
              data: [],
              emphasis: {
                itemStyle: {
                  shadowBlur: 10,
                  shadowOffsetX: 0,
                  shadowColor: 'rgba(0, 0, 0, 0.5)'
                }
              }
            }
          ]
        };

        AjaxDatas(3, option, myChart);
    }

script>
{%endblock%}
文件上传
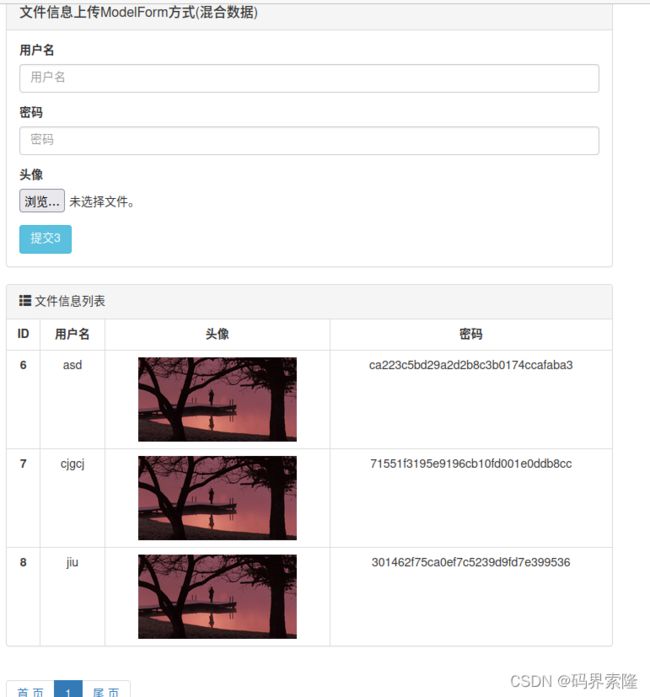
能够上传各种数据,例子为上传图片,读取后并将其存储在数据库,存取的图片信息是展示地址,通过浏览器地址栏输入地址就可以访问。
HTML部分代码
        <div class="panel panel-default">
            <div class="panel-heading">
                <h3 class="panel-title">文件信息上传ModelForm方式(混合数据)h3>
            div>
            <div class="panel-body">
                <form method="POST" enctype="multipart/form-data" novalidate>


                    {% csrf_token %}
                    {% for form in forms2 %}
                    <div class="form-group" >
                        <label>{{form.label}}label>
                        {{form}}
                        <span class="error" style="color: red">{{form.errors.0}}span>
                    div>
                    {% endfor %}
                    <input type="submit" value="提交3" class="btn btn-info" name="submit">
                form>
            div>
        div>
    div>
    <div class="main">
        <div class="container">
            <div class="panel panel-default ">
                <div class="panel-heading">
                    <span class="glyphicon glyphicon-th-list">span>
                    文件信息列表
                div>
                <table class="table table-bordered">
                        <thead >
                            <tr>
                                <th>IDth>
                                <th>用户名th>
                                <th>头像th>
                                <th>密码th>
                            tr>
                        thead>
                        <tbody>
                            {% for file in files %}
                            <tr>
                                <th scope="row">{{file.id}}th>
                                <td>{{file.username}}td>
                                <td>
                                    <img src="/{{file.file}}" style="height: 100px;">
                                td>
                                <td>{{file.password}}td>
                            tr>
                            {% endfor %}
                        tbody>
                    table>
            div>
        div>
    div>
关键部分:
  {% csrf_token %}
  {% for form in forms2 %}
  <div class="form-group" >
      <label>{{form.label}}label>
      {{form}}

      <span class="error" style="color: red">{{form.errors.0}}span>
  div>
  {% endfor %}
Python代码部分
import os.path
from django.conf import settings
from InfosShow import models
from django.http import HttpResponse
from django.shortcuts import render, redirect
from InfosShow.static.utils.pagination import Pagination
from InfosShow.static.utils.form import FileForm, FileModelForm


def upload(request):
    forms1 = FileForm()
    forms2 = FileModelForm()
    files = models.FileInfo.objects.all()
    pagination = Pagination(request, files, plus=3)
    content = {
        'forms1': forms1,
        'forms2': forms2,
        'files': pagination.queryset_list,
        'pages': pagination.run()
    }
    if request.method == 'GET':
        return render(request, 'upload_test.html', content)
    # 读取上传来的文件,获得一个对象
    file_object = request.FILES.get('file')
    submit = request.POST.get('submit')
    img_show_path = ''
    if file_object:
        print(submit)
        name = file_object.name
        print(request.POST.get('submit'))
        print(name)
        # 地址拼接
        # 网页查看图片的地址
        # static使用与存放静态文件js, css, html等的,而么media是用于存放上传来的数据的。
        # media/img1.jpg
        img_show_path = os.path.join('media', name)  # 相对路径
        # 图片保存位置
        # /home/jisoo/Django_project/SIMS/media/img1.jpg
        # img_show_path = os.path.join(settings.MEDIA_ROOT, name)  # 绝对路径
        # img_path = os.path.join('InfosShow', 'static', 'img', name)  # 保存在static下的路径
        f = open(img_show_path, mode='wb')
        # 上传的文件是一块一块的,因此需要一块块读取然后进行存储。用到chunks方法
        for chunk in file_object.chunks():
            f.write(chunk)
        f.close()
    if submit == '提交2':
        forms1 = FileForm(data=request.POST, files=request.FILES)
        if forms1.is_valid():
            print(forms1.cleaned_data)
        else:
            print(forms1.errors)
            return render(request, 'upload_test.html', {'forms1': forms1, 'forms2': forms2})
    elif submit == '提交3':
        forms2 = FileModelForm(data=request.POST, files=request.FILES)
        if forms2.is_valid():
            forms2.instance.file = img_show_path
            forms2.save()
        else:
            return render(request, 'upload_test.html', {'forms1': forms1, 'forms2': forms2})

    return redirect('/upload')
要是media得需要提前配置
media配置
在urls.py中进行配置:
from django.urls import path, re_path
from django.views.static import serve
from django.conf import settings

urlpatterns = [
	re_path(r'^media/(?P.*)$', serve, {'document_root': settings.MEDIA_ROOT}, name='media'),
]
在settings.py中进行配置:
import os

MEDIA_ROOT = os.path.join(BASE_DIR, "media")
MEDIA_URL = "/media/"
补充
具体的一些细节功能没有拉出来单讲,比如
- 验证码的实现
- 分页功能的实现
- 编辑,删除,添加功能的具体实现
- 登录后导航栏显示用户名,点击注销后,浏览器里session关于该用户的cookie会被删除,要访问系统页面需要重新登录。
看到这的大神或是跟我一样的初学者,如果我这有任何问题,或是你有相关这些的问题,欢迎私信评论,我会认真学习,并讨论。
