【Spring Cloud 八】Spring Cloud Gateway网关
gateway网关
- 系列博客
- 背景
- 一、什么是Spring Cloud Gateway
- 二、为什么要使用Spring Cloud Gateway
- 三、 Spring Cloud Gateway 三大核心概念
-
- 4.1 Route(路由)
- 4.2 Predicate(断言)
- 4.3 Filter(过滤)
- 五、Spring Cloud Gateway是如何工作的
- 四、 如何使用Spring Cloud Gateway进行服务路由
-
- 4.1搭建服务A
-
- pom文件
- yml配置文件
- 启动类
- controller类
- 4.2 搭建服务B
-
- pom文件
- yml配置文件
- 启动类
- controller类
- 4.3搭建Spring Cloud Gateway服务
-
- pom文件
- yml配置文件
- 启动类
- 4.4启动项目
- 4.5动态路由
- 五、gateway过滤器
-
- 5.1自定义全局过滤器
- 六、使用gateway做token校验
-
- 6.1实现的大致流程示意图:
- 6.2实现代码
-
- gateway服务
-
- pom.xml文件
- TokenCheckFilter类
- login-service服务
-
- pom.xml文件
- LoginController类
- 访问测试
- 总结
- 升华
系列博客
【Spring Cloud一】微服务基本知识
【Spring Cloud 三】Eureka服务注册与服务发现
【Spring Cloud 四】Ribbon负载均衡
【Spring Cloud 五】OpenFeign服务调用
【Spring Cloud 六】Hystrix熔断
【Spring Cloud 七】Sleuth+Zipkin 链路追踪
背景
在项目中是使用了Gateway做统一的请求的入口,以及统一的跨域处理以及统一的token校验。但是这些工作都是之前的同事来做的,正好在新项目中也需要使用其进行统一的token校验。本着对Gateway更精进一步所以博主就对Gateway进行了较为全面的学习了解,包括动态路由、自定义过滤器、token校验和续活。
一、什么是Spring Cloud Gateway
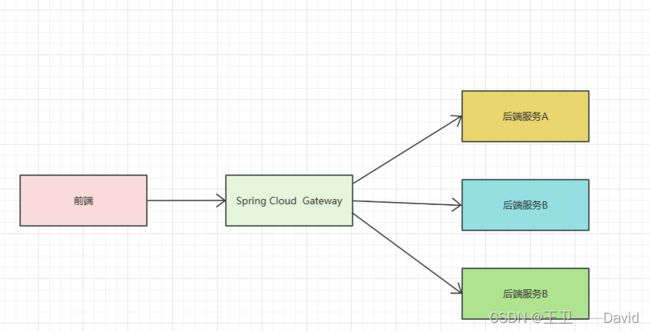
Spring Cloud Gateway提供一种简单有效的方法来路由到对应的API上,并可以提供一些额外的功能,安全性、监控、度量、负载等等。
我们可以这样理解,Spring Cloud Gateway将该项目中所有服务对外提供的API聚集起来,并向外提供唯一的入口,同时提供了一些额外的功能,安全性、监控、度量、负载等等。
没使用Spring Cloud Gateway 之前的示意图:

使用Spring Cloud Gateway之后的示意图:
二、为什么要使用Spring Cloud Gateway
- 统一入口并解除客户端与服务端的耦合:在微服务架构中,每个微服务都有自己入口,在没有它的时候客户端需要大量微服务的地址,会照成复杂的客户端代码。并且会暴露服务端的细节,如果服务端发生变化,可能会影响到客户端代码,导致维护困难。
- 动态路由和负载均衡:Spring Cloud GateWay 提供动态路由来应对当;网关来能够在多个服务实例之间进行负载均衡,提供整个系统的高可用。
- 请求过滤:在微服务架构中,可能需要对请求进行鉴权、身份验证一个中心化的地方来处理这些请求过滤和处理逻辑可以减少重复的代码和逻辑。
- 反应式和高性能:由于微服务架构的复杂性,需要一个能够处理高并发请求的解决方案,以确保系统在高负载情况下保持稳定。Spring Cloud Gateway是基于webFlux框架实现的,而webFlux框架底层使用了高性能Reactor模式通信框架的Netty。
三、 Spring Cloud Gateway 三大核心概念
4.1 Route(路由)
路由是由一个ID、一个目的URI、一组断言、一组Filter组成。
如果路由断言为真,那么说明这个路由被匹配上了。
4.2 Predicate(断言)
是一个java8函数断言。输入类型是一个Spring Framewordk ServerWebExchange。可以让你匹配HTTP上的任何请求。比如请求头和参数。
4.3 Filter(过滤)
是Spring WebFilter的实例,Spring Cloud Gateway中的Filter分为两种,分贝是Gateway Filter和Global Filter(一个是针对某一个路由的filter,例如对某一个接口做限流;一个是针对全局的filter,例如token校验,ip黑名单)。过滤器Filter将会对请求和响应进行修改处理。
五、Spring Cloud Gateway是如何工作的
Spring 官网
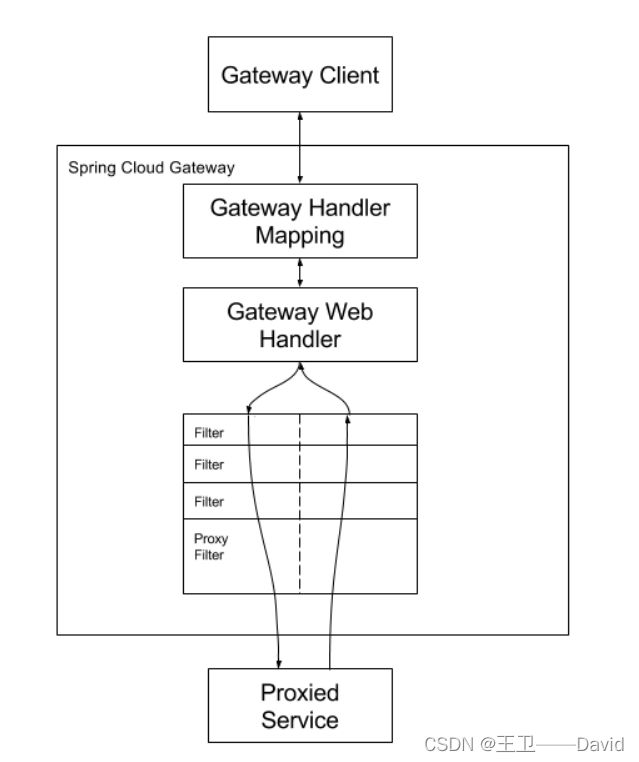
客户端向Spring Cloud Gateway发出请求。如果网关处理器映射器确定请求与路由匹配,则会将其发送到网关web处理器。它通过特定的过滤器链来运行请求。过滤器被虚线分割的原因是过滤器可以在发送代理请求之前和之后运行对应的逻辑。
四、 如何使用Spring Cloud Gateway进行服务路由
示例项目示意图:
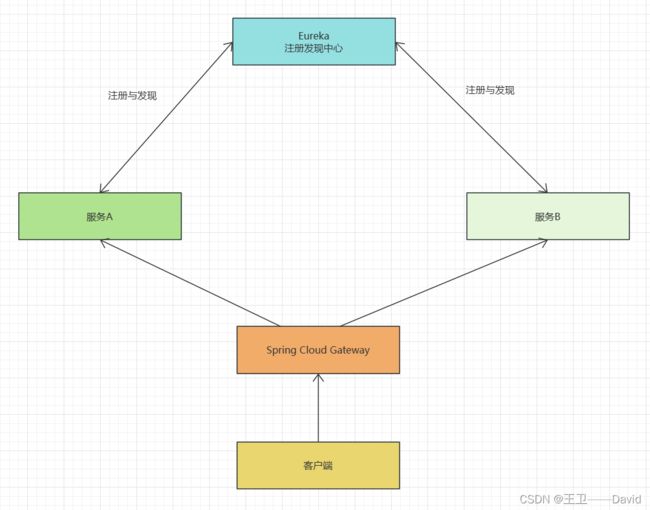
备注:Eureka的搭建可以参考这篇博客:【Spring Cloud 三】Eureka服务注册与服务发现
这里之所以使用Eureka是为了之后做动态路由和负载均衡。
4.1搭建服务A
pom文件
<project xmlns="http://maven.apache.org/POM/4.0.0" xmlns:xsi="http://www.w3.org/2001/XMLSchema-instance"
	xsi:schemaLocation="http://maven.apache.org/POM/4.0.0 https://maven.apache.org/xsd/maven-4.0.0.xsd">
	<modelVersion>4.0.0modelVersion>
	<parent>
		<groupId>org.springframework.bootgroupId>
		<artifactId>spring-boot-starter-parentartifactId>
		<version>2.3.12.RELEASEversion>
		<relativePath/>
	parent>
	<groupId>com.wangweigroupId>
	<artifactId>login-serviceartifactId>
	<version>0.0.1-SNAPSHOTversion>
	<name>login-servicename>
	<description>login-servicedescription>
	<properties>
		<java.version>8java.version>
		<spring-cloud.version>Hoxton.SR12spring-cloud.version>
	properties>
	<dependencies>


		<dependency>
			<groupId>org.projectlombokgroupId>
			<artifactId>lombokartifactId>
		dependency>

		<dependency>
			<groupId>org.springframework.cloudgroupId>
			<artifactId>spring-cloud-starter-netflix-eureka-clientartifactId>
		dependency>
		<dependency>
			<groupId>org.springframework.bootgroupId>
			<artifactId>spring-boot-starter-webartifactId>
		dependency>

		<dependency>
			<groupId>org.springframework.bootgroupId>
			<artifactId>spring-boot-starter-testartifactId>
			<scope>testscope>
		dependency>
	dependencies>

	<dependencyManagement>
		<dependencies>
			<dependency>
				<groupId>org.springframework.cloudgroupId>
				<artifactId>spring-cloud-dependenciesartifactId>
				<version>${spring-cloud.version}version>
				<type>pomtype>
				<scope>importscope>
			dependency>
		dependencies>
	dependencyManagement>

	<build>
		<plugins>
			<plugin>
				<groupId>org.springframework.bootgroupId>
				<artifactId>spring-boot-maven-pluginartifactId>
			plugin>
		plugins>
	build>

project>
yml配置文件
server:
  port: 8081

spring:
  application:
    name: login-service

eureka:
  client:
    service-url:
      defaultZone: http://localhost:8761/eureka
    register-with-eureka: true #设置为fasle 不往eureka-server注册,默认为true
    fetch-registry: true #应用是否拉取服务列表到本地
    registry-fetch-interval-seconds: 10 #为了缓解服务列表的脏读问题,时间越短脏读越少 性能相应的消耗回答


  instance: #实例的配置
    instance-id: ${eureka.instance.hostname}:${spring.application.name}:${server.port}
    hostname: localhost #主机名称或者服务ip
    prefer-ip-address: true #以ip的形式显示具体的服务信息
    lease-renewal-interval-in-seconds: 10 #服务实例的续约时间间隔
启动类
@SpringBootApplication
@EnableEurekaClient
public class LoginServiceApplication {

	public static void main(String[] args) {
		SpringApplication.run(LoginServiceApplication.class, args);
	}

}
controller类
@RestController
public class LoginController {
    @GetMapping("doLogin")
    public String doLogin(){
       return "登陆成功";
    }
}
4.2 搭建服务B
pom文件
<project xmlns="http://maven.apache.org/POM/4.0.0" xmlns:xsi="http://www.w3.org/2001/XMLSchema-instance"
         xsi:schemaLocation="http://maven.apache.org/POM/4.0.0 https://maven.apache.org/xsd/maven-4.0.0.xsd">
    <modelVersion>4.0.0modelVersion>
    <parent>
        <groupId>org.springframework.bootgroupId>
        <artifactId>spring-boot-starter-parentartifactId>
        <version>2.3.12.RELEASEversion>
        <relativePath/>
    parent>
    <groupId>com.wangweigroupId>
    <artifactId>teacher-serviceartifactId>
    <version>0.0.1-SNAPSHOTversion>
    <name>teacher-servicename>
    <description>teacher-servicedescription>
    <properties>
        <java.version>8java.version>
        <spring-cloud.version>Hoxton.SR12spring-cloud.version>
    properties>
    <dependencies>
        <dependency>
            <groupId>org.springframework.bootgroupId>
            <artifactId>spring-boot-starter-webartifactId>
        dependency>
        <dependency>
            <groupId>org.springframework.cloudgroupId>
            <artifactId>spring-cloud-starter-netflix-eureka-clientartifactId>
        dependency>

        <dependency>
            <groupId>org.springframework.bootgroupId>
            <artifactId>spring-boot-starter-testartifactId>
            <scope>testscope>
        dependency>
    dependencies>
    <dependencyManagement>
        <dependencies>
            <dependency>
                <groupId>org.springframework.cloudgroupId>
                <artifactId>spring-cloud-dependenciesartifactId>
                <version>${spring-cloud.version}version>
                <type>pomtype>
                <scope>importscope>
            dependency>
        dependencies>
    dependencyManagement>

    <build>
        <plugins>
            <plugin>
                <groupId>org.springframework.bootgroupId>
                <artifactId>spring-boot-maven-pluginartifactId>
            plugin>
        plugins>
    build>

project>
yml配置文件
server:
  port: 8082

spring:
  application:
    name: teacher-service

eureka:
  client:
    service-url:
      defaultZone: http://localhost:8761/eureka
    register-with-eureka: true #设置为fasle 不往eureka-server注册,默认为true
    fetch-registry: true #应用是否拉取服务列表到本地
    registry-fetch-interval-seconds: 10 #为了缓解服务列表的脏读问题,时间越短脏读越少 性能相应的消耗回答


  instance: #实例的配置
    instance-id: ${eureka.instance.hostname}:${spring.application.name}:${server.port}
    hostname: localhost #主机名称或者服务ip
    prefer-ip-address: true #以ip的形式显示具体的服务信息
    lease-renewal-interval-in-seconds: 10 #服务实例的续约时间间隔
启动类
@SpringBootApplication
@EnableEurekaClient
public class TeacherServiceApplication {

    public static void main(String[] args) {
        SpringApplication.run(TeacherServiceApplication.class, args);
    }

}
controller类
@RestController
public class TeacherController {
    @GetMapping("teach")
    public String teach(){
        return "教书学习";
    }
}
4.3搭建Spring Cloud Gateway服务
pom文件
<project xmlns="http://maven.apache.org/POM/4.0.0" xmlns:xsi="http://www.w3.org/2001/XMLSchema-instance"
	xsi:schemaLocation="http://maven.apache.org/POM/4.0.0 https://maven.apache.org/xsd/maven-4.0.0.xsd">
	<modelVersion>4.0.0modelVersion>
	<parent>
		<groupId>org.springframework.bootgroupId>
		<artifactId>spring-boot-starter-parentartifactId>
		<version>2.3.12.RELEASEversion>
		<relativePath/>
	parent>
	<groupId>com.wangweigroupId>
	<artifactId>gateway-serverartifactId>
	<version>0.0.1-SNAPSHOTversion>
	<name>gateway-servername>
	<description>gateway-serverdescription>
	<properties>
		<java.version>8java.version>
		<spring-cloud.version>Hoxton.SR12spring-cloud.version>
	properties>
	<dependencies>


		<dependency>
			<groupId>org.springframework.cloudgroupId>
			<artifactId>spring-cloud-starter-netflix-eureka-clientartifactId>
		dependency>
		<dependency>
			<groupId>org.springframework.cloudgroupId>
			<artifactId>spring-cloud-starter-gatewayartifactId>
		dependency>

		<dependency>
			<groupId>org.springframework.bootgroupId>
			<artifactId>spring-boot-starter-testartifactId>
			<scope>testscope>
		dependency>
	dependencies>
	<dependencyManagement>
		<dependencies>
			<dependency>
				<groupId>org.springframework.cloudgroupId>
				<artifactId>spring-cloud-dependenciesartifactId>
				<version>${spring-cloud.version}version>
				<type>pomtype>
				<scope>importscope>
			dependency>
		dependencies>
	dependencyManagement>

	<build>
		<plugins>
			<plugin>
				<groupId>org.springframework.bootgroupId>
				<artifactId>spring-boot-maven-pluginartifactId>
			plugin>
		plugins>
	build>

project>
yml配置文件
server:
  port: 81 #?????80


spring:
  application:
    name: gateway-server
  cloud:
    gateway:
      enabled: true
      routes:
        - id: login-service-route # 路由的id  保持唯一
          uri: http://localhost:8081 #uri统一资源标识符  url 统一资源定位符
          #uri: lb://login-service #??lb负载均衡
          predicates: # 断言是给某一个路由来设定的一种匹配规则 默认不能作用在动态路由上
            - Path=/doLogin # 匹配规则 只要你Path配置上了/doLogin 就往uri转发并将路径带上
        - id: teacher-service-route
          url:  http://localhost:8082
          predicates:
            - Path=/teach


eureka:
  client:
    service-url:
      defaultZone: http://localhost:8761/eureka
    register-with-eureka: true #设置为fasle 不往eureka-server注册,默认为true
    fetch-registry: true #应用是否拉取服务列表到本地
    registry-fetch-interval-seconds: 10 #为了缓解服务列表的脏读问题,时间越短脏读越少 性能相应的消耗回答


  instance: #实例的配置
    instance-id: ${eureka.instance.hostname}:${spring.application.name}:${server.port}
    hostname: localhost #主机名称或者服务ip
    prefer-ip-address: true #以ip的形式显示具体的服务信息
    lease-renewal-interval-in-seconds: 10 #服务实例的续约时间间隔
启动类
@SpringBootApplication
@EnableEurekaClient
public class GatewayServerApplication {

	public static void main(String[] args) {
		SpringApplication.run(GatewayServerApplication.class, args);
	}

}
4.4启动项目
依次启动Eureka服务,gateway服务和两个服务A和服务B。
进行调用服务A和服务B:
如下图所示通过gateway的ip+端口+路径调用到对应的服务A中和服务B中。


4.5动态路由
在微服务中通常一个服务的实例有多个,那我们网关如何做负载均衡呢?
gateway帮我们做了很多东西,只要我们集成注册中心(nacos、Eureka、zoomkeeper)并添加对应的配置gateway就可以自动帮我们进行负载均衡。
方式一:
添加对应的配置信息,来开启动态路由
    gateway:
      enabled: true
      routes:
        - id: login-service-route # 路由的id  保持唯一
          uri: http://localhost:8081 #uri统一资源标识符  url 统一资源定位符
          #uri: lb://login-service #??lb负载均衡
          predicates: # 断言是给某一个路由来设定的一种匹配规则 默认不能作用在动态路由上
            - Path=/doLogin # 匹配规则 只要你Path配置上了/doLogin 就往uri转发并将路径带上
        - id: teacher-service-route
          uri:  http://localhost:8082
          predicates:
            - Path=/teach
      discovery:
        locator:
          enabled: true #开启动态路由  开启通过应用名称找到服务的功能
          lower-case-service-id: true  # 开启服务名称小写
请求服务时需要带上对应的服务名称

方式二:
添加对应的配置:uri: lb://login-service #lb负载均衡
    gateway:
      enabled: true
      routes:
        - id: login-service-route # 路由的id  保持唯一
          #uri: http://localhost:8081 #uri统一资源标识符  url 统一资源定位符
          uri: lb://login-service #lb负载均衡
          predicates: # 断言是给某一个路由来设定的一种匹配规则 默认不能作用在动态路由上
            - Path=/doLogin # 匹配规则 只要你Path配置上了/doLogin 就往uri转发并将路径带上
        - id: teacher-service-route
          uri:  http://localhost:8082
          predicates:
            - Path=/teach

推荐使用方式一进行统一的配置负载均衡。
五、gateway过滤器
过滤器按照作用范围可以分为两种,Gateway Filter和Global Filter。
Gateway Filter:网关过滤器需要通过 spring.cloud.routes.filters 配置在具体路由下,只作用在当前路由上或通过 spring.cloud.default-filters 配置在全局,作用在所有路由上。
Global Filter:全局过滤器,不需要配置路由,系统初始化作用在所有路由上。
全局过滤器一般用于:统计请求次数、限流、token校验、ip黑名单拦截等。
5.1自定义全局过滤器
@Component
public class MyGlobalFilter implements GlobalFilter, Ordered {
    /**
     * 过滤的方法
     * 职责链模式
     * 网关里面有使用 mybatis的二级缓存有变种职责链模式
     * @param exchange
     * @param chain
     * @return
     */
    @Override
    public Mono<Void> filter(ServerWebExchange exchange, GatewayFilterChain chain) {
        //针对请求的过滤 拿到请求 header url 参数。。。
        ServerHttpRequest request = exchange.getRequest();
        //HttpServletRequest 这个是web里面的
        //ServerHttpRequest webFlux里面 响应式里面的
        String path=request.getURI().getPath();
        System.out.println(path);
        HttpHeaders headers=request.getHeaders();
        System.out.println(headers);
        String name = request.getMethod().name();
        String hostString = request.getHeaders().getHost().getHostString();
        System.out.println(hostString);

        //响应相关数据
        ServerHttpResponse response = exchange.getResponse();
        //微服务 肯定是前后端分离的 一般前后端通过数据传输是json格式
        //{"code":200,"msg":"ok"}
        //设置编码 响应头

        response.getHeaders().set("content-type","application/json;charset=utf-8");
        //组装业务返回值
        HashMap<String ,Object> map=new HashMap<>(4);
        map.put("code", HttpStatus.UNAUTHORIZED.value());
        map.put("msg","你未授权");
        ObjectMapper objectMapper=new ObjectMapper();
        //把一个map转换为字节
        byte[] bytes = new byte[0];
        try {
            bytes = objectMapper.writeValueAsBytes(map);
        } catch (JsonProcessingException e) {
            throw new RuntimeException(e);
        }
        //通过buffer工厂将字节数组包装成一个数据报
        DataBuffer wrap = response.bufferFactory().wrap(bytes);
        return response.writeWith(Mono.just(wrap));
        //放行,到下一个过滤器
        //return chain.filter(exchange);
    }

    /**
     * 制定顺序的方法
     * 越小越先执行
     * @return
     */
    @Override
    public int getOrder() {
        return 0;
    }
}
请求接口进行访问,可以发现当前请求已经被拦截下来。

六、使用gateway做token校验
6.1实现的大致流程示意图:
6.2实现代码
gateway服务
pom.xml文件
在pom文件中新增redis的依赖
		<dependency>
			<groupId>org.springframework.bootgroupId>
			<artifactId>spring-boot-starter-data-redisartifactId>
		dependency>
注意博主是在本机安装的redis所以不需要在服务中添加对应的redis配置。
TokenCheckFilter类
新建TokenCheckFilter类并实现全局过滤器和Ordered
package com.wangwei.gatewayserver.filter;

import com.fasterxml.jackson.core.JsonProcessingException;
import com.fasterxml.jackson.databind.ObjectMapper;
import org.springframework.beans.factory.annotation.Autowired;
import org.springframework.cloud.gateway.filter.GatewayFilterChain;
import org.springframework.cloud.gateway.filter.GlobalFilter;
import org.springframework.core.Ordered;
import org.springframework.core.io.buffer.DataBuffer;
import org.springframework.data.redis.core.StringRedisTemplate;
import org.springframework.http.HttpStatus;
import org.springframework.http.server.reactive.ServerHttpRequest;
import org.springframework.http.server.reactive.ServerHttpResponse;
import org.springframework.stereotype.Component;
import org.springframework.util.CollectionUtils;
import org.springframework.util.StringUtils;
import org.springframework.web.server.ServerWebExchange;
import reactor.core.publisher.Mono;

import java.util.Arrays;
import java.util.HashMap;
import java.util.List;


@Component
public class TokenCheckFilter implements GlobalFilter, Ordered {
    /**
     * 指定好放行的路径,白名单
     */
    public static final List<String> ALLOW_URL= Arrays.asList("/doLogin","/myUrl");

    @Autowired
    private StringRedisTemplate redisTemplate;
    /**
     * 和前端约定好 一般放在请求头类里面一般key为 Authorization value bearer token
     * 1.拿到请求url
     * 2.判断放行
     * 3.拿到请求头
     * 4.拿到token
     * 5.校验
     * 6.放行/拦截
     * @param exchange
     * @param chain
     * @return
     */
    @Override
    public Mono<Void> filter(ServerWebExchange exchange, GatewayFilterChain chain) {
        ServerHttpRequest request = exchange.getRequest();
        String path = request.getURI().getPath();
        if (ALLOW_URL.contains(path)) {
            return chain.filter(exchange);
        }
        //检查
        List<String> authorization = request.getHeaders().get("Authorization");
        if (!CollectionUtils.isEmpty(authorization)){
            String token = authorization.get(0);
            if(StringUtils.hasText(token)){
                //约定好的有前缀的bearer token
                String realToken = token.replaceFirst("bearer ", "");
                if (StringUtils.hasText(realToken)&&redisTemplate.hasKey(realToken)){
                    return chain.filter(exchange);
                }
            }
        }
        //拦截
        ServerHttpResponse response = exchange.getResponse();
        response.getHeaders().set("content-type","application/json;charset=utf-8");
        //组装业务返回值
        HashMap<String ,Object> map=new HashMap<>(4);
        map.put("code", HttpStatus.UNAUTHORIZED);
        map.put("msg","未授权");
        ObjectMapper objectMapper=new ObjectMapper();
        //把一个map转换为字节
        byte[] bytes = new byte[0];
        try {
            bytes = objectMapper.writeValueAsBytes(map);
        } catch (JsonProcessingException e) {
            throw new RuntimeException(e);
        }
        //通过buffer工厂将字节数组包装成一个数据报
        DataBuffer wrap = response.bufferFactory().wrap(bytes);
        return response.writeWith(Mono.just(wrap));

    }

    @Override
    public int getOrder() {
        return 0;
    }
}
login-service服务
pom.xml文件
在pom文件中新增redis的依赖
		<dependency>
			<groupId>org.springframework.bootgroupId>
			<artifactId>spring-boot-starter-data-redisartifactId>
		dependency>
注意博主是在本机安装的redis所以不需要在服务中添加对应的redis配置。
LoginController类
在LoginController类中新增doLogin方法
@Autowired
    public StringRedisTemplate redisTemplate;

    @PostMapping("doLogin")
    public String doLogin(@RequestBody User user){
        //token
        String token= UUID.randomUUID().toString();
        //存起来
        redisTemplate.opsForValue().set(token,user.toString(), Duration.ofSeconds(7200));
        return token;
    }
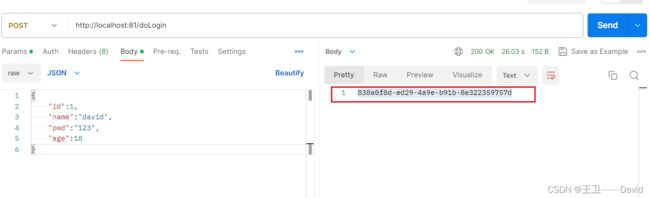
访问测试
http://localhost:81/doLogin
由于在gateway将该/doLogin放入了白名单,所以该请求不会进行token校验,发送请求成功之后会返回token
访问http://localhost:81/teach,并在请求头中添加token,最后可以看到请求访问成功。

如果我们不在请求头中添加对应的token或者token为错误token,那么gateway会将请求进行拦截。

总结
- gateway在微服务中起到了很重要的作用,作为项目请求的统一入口。
- gateway也体现了我们软件设计的复用思想,可以统一进行跨域处理,进行token校验。
- gateway比较重要的一块是关于他的过滤器,通过实现过滤器的接口,可以自定义过滤器,提供了很强大的可扩展支持
升华
通过学习gateway不光是学习gateway更重要的是学习软件设计思想。