SpringBoot + Vue 微人事项目(第一天)
登录页面前端
1.创建vue项目、
注意:项目名称要避开特殊名字如echarts、vue等
vue create login_security //创建名字为login_security项目
2、项目配置
等待后弹出选项窗口,询问用户以什么模板方式进行安装
Default ([Vue 3] babel, eslint):默认预设配置,会快速创建一个Vue3.0项目,提供了babel和eslint支持**

**Default ([Vue 2] babel, eslint):默认预设配置,会快速创建一个Vue2.0项目,提供了babel和eslint支持**

**Manually select features:手动配置项目,可根据项目的需要选择合适的选项,具备更多的选择性**
通过上下箭头选中手动方式创建项目,Enter键确定显示如下图片
Babel:使用Babel将源码进行转码(把ES6=>ES5)
TypeScript:使用TypeScript进行源码编写。使用TypeScript可以编写强类型JavaScript
Progressive Web App (PWA) Support:使用渐进式Web应用程序
Router:使用Vue路由
Vuex:使用Vuex状态管理器
CSS Pre-processors:CSS 预处理器(如:less、sass)
Linter / Formatter:使用代码风格检查和格式化(如:ESlint)
Unit Testing:使用单元测试(unit tests)
E2E Testing:使用E2E(end to end)黑盒测试
使用空格进项按需选择,Enter进行下一步,选择项目版本
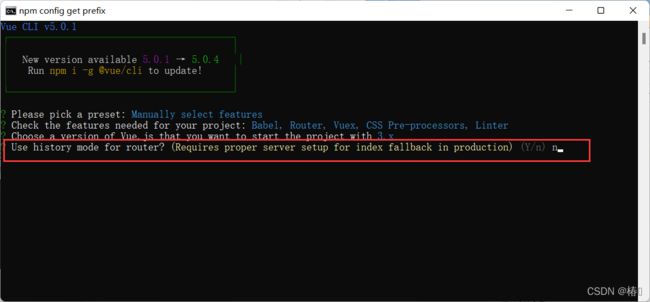
Enter下一步,如图,询问是否使用history路由模式
Enter选择文件存放方式
Enter下一步设置是否保存当前配置,以后生成新项目时方便快速构建
Y:保存,后续创建新项目可直接使用改配置
N:不保存,需要重新配置
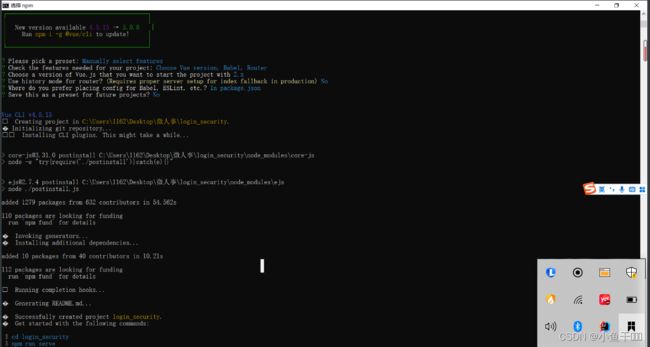
3.输入提示命令运行项目
cd login_security
npm run serve
4.创建登录页面Login
router/index.js
import Vue from 'vue'
//导入router组件
import VueRouter from 'vue-router'
import Login from '../views/Login.vue'

//全局注册router组件,在任何地方都能使用
Vue.use(VueRouter)

const routes = [
  {
    path: '/', //访问 /  路径,就会跳转到component: Login 组件
    name: 'Login',
    component: Login
  },
]

//创建router对象
const router = new VueRouter({
  routes
})

//导出router
export default router
安装elmentui
npm i element-ui -S
在main.js引入element ui
import Vue from 'vue';
import ElementUI from 'element-ui';
import 'element-ui/lib/theme-chalk/index.css';
import App from './App.vue';

Vue.use(ElementUI);
Login.vue
<template>
<div>
    <el-form :model="ruleForm" :rules="rules" ref="ruleForm" class="demo-ruleForm">
        <h1>Login</h1>
        <el-form-item  label="账号" prop="username">
            <el-input type="text" v-model="ruleForm.username"  placeholder="请输入用户名"></el-input>
        </el-form-item>
        <el-form-item label="密码" prop="password">
            <el-input type="password" v-model="ruleForm.password" placeholder="请输入密码"></el-input>
        </el-form-item>
        <el-checkbox v-model="checked" class="checked">记住密码</el-checkbox>
        <el-button type="primary" style="width: 100%"  @click="submit">登录</el-button>
    </el-form>
</div>
</template>

<script>
    export default {
        name: "Login",
        data(){
            return{
                ruleForm:{
                    username:"admin",
                    password:"123"
                },
                checked:true,

                rules:{//rules定义表单的输入规则
                    username:[{required:true,message:"请输入用户名",trigger:'blur'}],
                    password:[{ required: true, message: '请输入密码', trigger: 'blur' },//trigger触发的方式是blur
                       // { min: 6, max: 16, message: '长度在 6 到 16 个字符', trigger: 'blur' },
                    ],
                }

            }
        },
        methods:{
            submit(){
                this.$refs.loginForm.validate((valid) => {
                    if (valid) {
                        alert('submit!');
                    } else {
                        this.$message.error('请输入所有的字段');
                        return false;
                    }
                });
            }
        }
    }
</script>

<style >

    .demo-ruleForm{
        box-sizing: border-box;
        width: 380px;
        height:380px;
        margin: 150px auto;
        background: white;
        border-radius: 15px;
        padding: 15px 30px;
        box-shadow: 0 15px 30px #333;
    }

    .checked{
        margin-bottom: 10px;
    }
    .demo-ruleForm h1{
        text-align: center;
        font-size: 1.8rem;
    }

</style>
登录后端
创建SpringBoot项目
使用的是SpringBoot 2.4.4 版本,JDK 8
pom.xml 依赖
<project xmlns="http://maven.apache.org/POM/4.0.0" xmlns:xsi="http://www.w3.org/2001/XMLSchema-instance"
         xsi:schemaLocation="http://maven.apache.org/POM/4.0.0 https://maven.apache.org/xsd/maven-4.0.0.xsd">
    <modelVersion>4.0.0modelVersion>
    <parent>
        <groupId>org.springframework.bootgroupId>
        <artifactId>spring-boot-starter-parentartifactId>
        <version>2.4.5version>
        <relativePath/>
    parent>
    <groupId>com.xyggroupId>
    <artifactId>vhr_logartifactId>
    <version>0.0.1-SNAPSHOTversion>
    <name>vhr_logname>
    <description>vhr_logdescription>
    <properties>
        <java.version>8java.version>
    properties>
    <dependencies>
        <dependency>
            <groupId>org.springframework.bootgroupId>
            <artifactId>spring-boot-starter-securityartifactId>
        dependency>
        <dependency>
            <groupId>org.springframework.securitygroupId>
            <artifactId>spring-security-testartifactId>
            <scope>testscope>
        dependency>
        <dependency>
            <groupId>org.springframework.bootgroupId>
            <artifactId>spring-boot-starter-webartifactId>
        dependency>
        <dependency>
            <groupId>org.mybatis.spring.bootgroupId>
            <artifactId>mybatis-spring-boot-starterartifactId>
            <version>2.2.0version>
        dependency>

        <dependency>
            <groupId>mysqlgroupId>
            <artifactId>mysql-connector-javaartifactId>
            <scope>runtimescope>
            <version>5.1.27version>
        dependency>
        <dependency>
            <groupId>com.alibabagroupId>
            <artifactId>druidartifactId>
            <version>1.2.1version>
        dependency>
        <dependency>
            <groupId>org.springframework.bootgroupId>
            <artifactId>spring-boot-starter-testartifactId>
            <scope>testscope>
        dependency>


        <dependency>
            <groupId>org.springframework.bootgroupId>
            <artifactId>spring-boot-starter-testartifactId>
            <scope>testscope>
            <exclusions>
                <exclusion>
                    <groupId>org.junit.vintagegroupId>
                    <artifactId>junit-vintage-engineartifactId>
                exclusion>
            exclusions>
        dependency>
        <dependency>
            <groupId>org.projectlombokgroupId>
            <artifactId>lombokartifactId>
            <version>1.18.24version>
        dependency>
        <dependency>
            <groupId>junitgroupId>
            <artifactId>junitartifactId>
            <scope>testscope>
        dependency>
    dependencies>

    <build>

        <resources>
            <resource>
                <directory>src/main/javadirectory>
                <includes>
                    <include>**/*.propertiesinclude>
                    <include>**/*.xmlinclude>
                includes>
                <filtering>falsefiltering>
            resource>
            <resource>
                <directory>src/main/resourcesdirectory>
                <includes>
                    <include>**/*.propertiesinclude>
                    <include>**/*.xmlinclude>
                includes>
                <filtering>falsefiltering>
            resource>
        resources>
        <plugins>
            <plugin>
                <groupId>org.springframework.bootgroupId>
                <artifactId>spring-boot-maven-pluginartifactId>
                <configuration>
                    <excludes>
                        <exclude>
                            <groupId>org.projectlombokgroupId>
                            <artifactId>lombokartifactId>
                        exclude>
                    excludes>
                configuration>
            plugin>
        plugins>
    build>

project>
application.properties 配置
server.port=8888
spring.datasource.driver-class-name=com.mysql.jdbc.Driver
spring.datasource.url=jdbc:mysql://localhost:3306/vhr01?useUnicode=true&characterEncoding=UTF-8
spring.datasource.username=root
spring.datasource.password=123456
spring.datasource.type=com.alibaba.druid.pool.DruidDataSource
Hr实体类实现UserDetails

实现UserDetails接口的7个方法
方法名             解释
gctAuthorities(): 获取当前用户对象所具有的角色信息
getPassword();    获取当前用户对象的密码
getUsename():     获取当前用户对象的用户名
isAccountNonExpired(); 当前账户是否未过期
isAccountNonLocked(); 当前账户是否未锁定
isOredentialsNonExpired(); 当前账户密码是否未过期
isEnabled();      当前账户是否可用
service/HrService.java

实现UserDetailsService重写方法
@Service
public class HrService implements UserDetailsService {

    @Autowired
    HrMapper hrMapper;
    @Override
    public UserDetails loadUserByUsername(String username) throws UsernameNotFoundException {
        Hr hr =hrMapper.loginByName(username);//根据名字查询用户
        if(hr==null){//判断查到的用户是否为空
            throw new UsernameNotFoundException("用户不存在!");
        }
        return hr;
    }
}
 <select id="loginByName" resultMap="BaseResultMap">
    select * from hr where username =#{username}
  select>
SecurityConfig 配置类
package com.xyg.config;

import com.fasterxml.jackson.databind.ObjectMapper;
import com.xyg.RespBean.RespBean;
import com.xyg.pojo.Hr;
import com.xyg.service.HrService;
import org.springframework.beans.factory.annotation.Autowired;
import org.springframework.context.annotation.Bean;
import org.springframework.context.annotation.Configuration;
import org.springframework.security.authentication.*;
import org.springframework.security.config.annotation.authentication.builders.AuthenticationManagerBuilder;
import org.springframework.security.config.annotation.web.builders.HttpSecurity;
import org.springframework.security.config.annotation.web.configuration.WebSecurityConfigurerAdapter;
import org.springframework.security.core.Authentication;
import org.springframework.security.core.AuthenticationException;
import org.springframework.security.crypto.bcrypt.BCryptPasswordEncoder;
import org.springframework.security.crypto.password.PasswordEncoder;
import org.springframework.security.web.authentication.AuthenticationFailureHandler;
import org.springframework.security.web.authentication.AuthenticationSuccessHandler;
import org.springframework.security.web.authentication.logout.LogoutSuccessHandler;

import javax.servlet.ServletException;
import javax.servlet.http.HttpServletRequest;
import javax.servlet.http.HttpServletResponse;
import java.io.IOException;
import java.io.PrintWriter;

@Configuration
public class SecurityConfig extends WebSecurityConfigurerAdapter {
    @Autowired
    HrService userService;

    @Override
    protected void configure(AuthenticationManagerBuilder auth) throws Exception {
        auth.userDetailsService(userService);//从数据库中获取用户
    }

    @Bean
    PasswordEncoder passwordEncoder() {
        return new BCryptPasswordEncoder();
    }
    @Override
    protected void configure(HttpSecurity http) throws Exception {
        http.authorizeRequests()
                .anyRequest().authenticated()
                .and()
                .formLogin()//配置登录请求相关内容
                .usernameParameter("username")//设置请求参数中,用户名参数名称。 默认useranme
                .passwordParameter("password")//设置请求参数中,密码参数名称。默认 password
                .loginProcessingUrl("/doLogin")//用户登录逻辑请求地址是什么。默认是 /login
                .loginPage("/login")//配置登录页面
                //登录成功的回调方法返回json数据
                .successHandler(new AuthenticationSuccessHandler(){
                    @Override
                    public void onAuthenticationSuccess(HttpServletRequest request, HttpServletResponse response, Authentication authentication) throws IOException, ServletException, IOException {
                        response.setContentType("application/json;charset=utf-8");//设置发送的数据属于什么文件类型
                        PrintWriter out = response.getWriter();//拿到属于response的流
                        Hr hr = (Hr) authentication.getPrincipal();// 可以获取到代表当前用户的信息
                        hr.setPassword(null);
                        RespBean ok =RespBean.ok("登录成功!",hr);
                        String s = new ObjectMapper().writeValueAsString(ok);//将数据序列化为json格式
                        out.write(s);
                        out.flush();
                        out.close();
                    }
                })
                .failureHandler(new AuthenticationFailureHandler() {
                    @Override
                    public void onAuthenticationFailure(HttpServletRequest request, HttpServletResponse response, AuthenticationException exception) throws IOException, ServletException {
                        response.setContentType("application/json;charset=utf-8");
                        PrintWriter out = response.getWriter();
                        RespBean respBean =RespBean.err("登录失败!");
                        if (exception instanceof LockedException) {
                            respBean.setMsg("账户被锁定,请联系管理员!");
                        } else if (exception instanceof CredentialsExpiredException) {
                            respBean.setMsg("密码过期,请联系管理员!");
                        } else if (exception instanceof AccountExpiredException) {
                            respBean.setMsg("账户过期,请联系管理员!");
                        } else if (exception instanceof DisabledException) {
                            respBean.setMsg("账户被禁用,请联系管理员!");
                        } else if (exception instanceof BadCredentialsException) {
                            respBean.setMsg("用户名或者密码输入错误,请重新输入!");
                        }
                        out.write(new ObjectMapper().writeValueAsString(respBean));
                        out.flush();
                        out.close();
                    }
                })
                .permitAll()//登录请求接口可以随便访问。
                .and()
                .logout()
                .logoutSuccessHandler(new LogoutSuccessHandler() {
                    @Override
                    public void onLogoutSuccess(HttpServletRequest request, HttpServletResponse response, Authentication authentication) throws IOException, ServletException {
                        response.setContentType("application/json;charset=utf-8");
                        PrintWriter out = response.getWriter();
                        out.write(new ObjectMapper().writeValueAsString(RespBean.ok("注销成功!")));
                        out.flush();
                        out.close();
                    }
                })
                .permitAll()
                .and()
                //关闭CSRF安全协议。
                //关闭是为了保证完整流程的可用。
                .csrf().disable();
    }
}
测试
@RestController
public class HelloController {

    @GetMapping("/hello")

    public String hello(){

        return "hello";
    }
}
PostMan
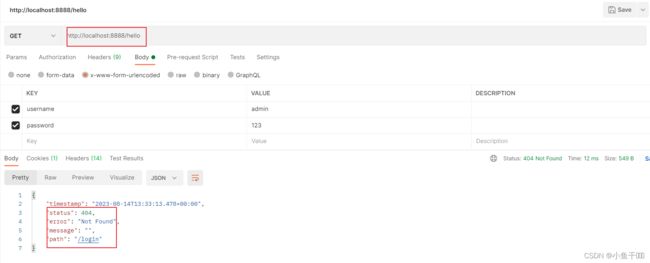
没登录前访问/hello报404,没有/login

没有登录进行hello访问报404,给用户展示不太好

我没有login页面给跳转,直接返回一个JSON给浏览器,
没有登录访问其他的路径,就会跳转/login,返回一个JSON数据
@RestController
public class LoginController {

    @GetMapping("/login")
    public RespBean Login(){

        return RespBean.err("尚未登录,请先登录",null);
    }
}
前后端接口对接
前后端接口的对接就需要用到axios来发送我们的网络请求
npm install axios
utils/api.js
import axios from 'axios'
import {Message} from 'element-ui';//element-ui中单独引入Message组件

//处理响应信息的响应拦截器

axios.interceptors.response.use(success => {
    //success.status:http的响应码    success.status ==200   success.data.status == 500:返回json的status
    if (success.status && success.status ==200 && success.data.status == 500){
        //把后台的出错消息写出来
        Message.error({message:success.data.msg})
        return;
    }
    return success.data
},error => {
    if (error.response.status==504 || error.response.status==404){
        Message.error({message:'服务器被吃了'})
    }else if (error.response.status==403){
        Message.error({message:'权限不足,清联系管理员'})
    }else if(error.response.status==401){
        Message.error({message:'尚未登录'})
    }else{
        //服务端返回的错误信息
        if (error.response.data.msg){
            Message.error({message:error.response.data.msg})
        }else {
            Message.error({message:'未知错误'})
        }
    }
    return;
})

// `transformRequest` 允许在向服务器发送前,修改请求数据
            // 只能用在 'PUT', 'POST' 和 'PATCH' 这几个请求方法

let base = '';//防止有一天要给所有请求路径前缀要一个一个去改,太麻烦
// url:请求的地址   请求的参数:param
/**
 * SpringSecurity 需要接受一个key:value形式的值,前端传的Json值需要转为key:value   也就是username='admin'& password='123'*/
export const postKeyValueRequest = (url, params) => {
    return axios({
        method: 'post',
        url: `${base}${url}`,
        data: params,//直接这样会以json的形式传给服务器,这是不支持的
        //
        transformRequest: [function (data) {   //transformRequest 表示允许在向服务器发送前,修改请求数据
            console.log(data)
            let ret = '';
            for (let i in data) {
                //把JSON参数对象修改成key:value形式   username=admin& password=123
                ret += encodeURIComponent(i) + '=' + encodeURIComponent(data[i]) + '&'
            }
            console.log(ret)
            return ret;
        }],
        headers: {
            'Content-Type': 'application/x-www-form-urlencoded'
        }
    });
}
在Login.vue文件里面的script标签里面通过 import {postKeyValueRequest} from "…/utils/api"进行导入;
Login.vue
     Login_submit(){
                this.$refs.refLoginFrom.validate(valid=>{
                    if (valid) {
                        postKeyValueRequest('/doLogin',this.LoginFrom).then(resp=>{
                            //resp:从服务端拿到的数据  用户的数据要保存到哪里? 保存在sessionSto  打开就没了
                            if(resp){
                                alert(JSON.stringify(resp))
                            } //then里面的参数就是服务端返回过来的参数
                        },(err)=>{
                            console.log(err)
                        })
                    } else {
                        console.log('error submit!!');
                        return false;
                    }
                })
            }
配置请求转发的代理对象对接后端
在vuehr项目的根目录下再新建一个vue.config.js文件
//配置请求转发的代理
//定义代理的对象
let proxyObj={};

proxyObj['/']={  //拦截http请求
    ws:false,    //关掉websocket
    target:'http://localhost:8888',   //目标转发地址
    changeOrigin: true,   //
    pathRewrite:{         //请求地址重写
        '^/':''   //拦截到的地址不去修改它
    }
}
//把这个导出来
module.exports={
    devServer:{  //配置开发环境
        host:'localhost', //端口号
        port:8080,
        proxy:proxyObj  //代理对象
    }
}
然后再到浏览器登录,输入用户名和密码登录的详情页如下:

弹出了从服务端返回的信息。
在api.js文件里面把其他登录的请求方法封装一下,想要引入这些封装好的登录方法直接在methods方法里面使用this.方法就行
export const postRequest=(url,params)=>{
    return axios({
        method: 'post',
        url:`${base}${url}`,
        data: params
    })
}

export const putRequest=(url,params)=>{
    return axios({
        method:'put',
        url:`${base}${url}`,
        data:params
    })
}
export const getRequest=(url,params)=>{
    return axios({
        method:'get',
        url:`${base}${url}`,
        data:params
    })
}
登录页面的跳转
     Login_submit(){
                this.$refs.refLoginFrom.validate(valid=>{
                    if (valid) {
                        postKeyValueRequest('/doLogin',this.LoginFrom).then(resp=>{
                            //resp:从服务端拿到的数据  用户的数据要保存到哪里? 保存在sessionSto  打开就没了
                            if(resp){
                                window.sessionStorage.setItem("user",JSON.stringify(resp.obj))  //不能直接写resp.obj,这是一个js对象,我们要把它转成字符串
                                //页面跳转  replace:替换  用push的话,可以使用后退按钮回到登录页,用replace不可以回到登录页
                                this.$router.replace("/home")
                            } //then里面的参数就是服务端返回过来的参数
                        },(err)=>{
                            console.log(err)
                        })
                    } else {
                        console.log('error submit!!');
                        return false;
                    }
                })
            }
把登录的用户名和密码保存到sessionStorage里面去,然后进行跳转,使用this.$router.replace(‘/home’)进行页面跳转到home页,我们并没有home页,所以要写一个home页
在views文件夹里面新建一个Home.vue页面

Home.vue
<template>
    <div>
        Home....
    </div>
</template>

<script>
    export default {
        name: "Home"
    }
</script>

<style scoped>

</style>
只是新建了Home.vue页面还不够,还要在router文件夹下的index.js文件里面加上

这两个才能实现真正的跳转
在浏览器的登录页输入正确的用户名和密码之后,点击登录,就直接跳到了home页

在main.js 进行全局注册属性这个样就可直接 this.postKeyValueRequest 进行使用这个api 的属性
import {postKeyValueRequest} from './utils/api'
Vue.prototype.postKeyValueRequest=postKeyValueRequest;
注册全局属性后就可以直接this.postKeyValueRequest调用![]()
就不用之前这种了方式了,使用上面的全局属性的方式比较方便

![]()
总结
- 前端
前端创建了Login.vue 登录界
- 后端
1.后端数据库的表进行逆向工程生成实体类和mapper
2.对Hr实体类实现了UserDetails接口并重写接口7个方法
3.创建了HrService实现UserDetailsService重写方法编写方法逻辑,进行数据库根据用户名查询用户对象。
4.创建SpringSecurity配置类继承WebSecurityConfigurerAdapter 重写方法
configure(AuthenticationManagerBuilder auth) 方法 HrSevice的bean交给SpringSecurity让 SpringSecurity数据库获取用户
passwordEncoder方法 进行密码加密
configure(HttpSecurity http)方法 配置登录请求相关内容
- 前后端接口对接
安装axios与后端交互,响应请求拦截器进行拦截判断状态码,,进行登录交互SpringSecurity接收的是key:value形式的username=admin 形式参数,需要进行修改。
使用代理进行转发连接后端


