手写模拟SpringBoot核心流程(一):实现极简一个SpringBoot——模拟SpringBoot启动过程
前言
Spring Boot 是一个开源的框架,用于简化 Spring 应用程序的开发和部署。它建立在 Spring Framework 的基础上,内置了web服务器——tomcat和jetty,使得 Spring 应用的构建变得更加快速、简单和可维护。
本文通过实现一个SpringBoot,学习SpringBoot是如何进行工作的。
创建两个模块
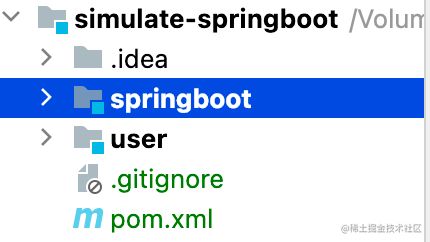
- springboot:模拟实现springboot框架
- user:测试调用实现的springboot架构的用户业务系统
引入依赖包
- SpringBoot基于Spring架构,需要在springboot模块中依赖Spring
- SpringBoot也支持Spring MVC功能,依赖Spring MVC和Tomcat等
在SpringBoot模块中要添加以下依赖。
<project xmlns="http://maven.apache.org/POM/4.0.0"
         xmlns:xsi="http://www.w3.org/2001/XMLSchema-instance"
         xsi:schemaLocation="http://maven.apache.org/POM/4.0.0 http://maven.apache.org/xsd/maven-4.0.0.xsd">
    <parent>
        <artifactId>simulate-springbootartifactId>
        <groupId>org.examplegroupId>
        <version>1.0-SNAPSHOTversion>
    parent>
    <modelVersion>4.0.0modelVersion>

    <artifactId>springbootartifactId>

    <properties>
        <maven.compiler.source>8maven.compiler.source>
        <maven.compiler.target>8maven.compiler.target>
    properties>

    <dependencies>
        <dependency>
            <groupId>org.springframeworkgroupId>
            <artifactId>spring-contextartifactId>
            <version>5.3.18version>
        dependency>
        <dependency>
            <groupId>org.springframeworkgroupId>
            <artifactId>spring-webartifactId>
            <version>5.3.18version>
        dependency>
        <dependency>
            <groupId>org.springframeworkgroupId>
            <artifactId>spring-webmvcartifactId>
            <version>5.3.18version>
        dependency>
        <dependency>
            <groupId>javax.servletgroupId>
            <artifactId>javax.servlet-apiartifactId>
            <version>4.0.1version>
        dependency>
        <dependency>
            <groupId>org.apache.tomcat.embedgroupId>
            <artifactId>tomcat-embed-coreartifactId>
            <version>9.0.60version>
        dependency>
    dependencies>

project>
对于user模块,添加springboot模块即可
<project xmlns="http://maven.apache.org/POM/4.0.0"
         xmlns:xsi="http://www.w3.org/2001/XMLSchema-instance"
         xsi:schemaLocation="http://maven.apache.org/POM/4.0.0 http://maven.apache.org/xsd/maven-4.0.0.xsd">
    <parent>
        <artifactId>simulate-springbootartifactId>
        <groupId>org.examplegroupId>
        <version>1.0-SNAPSHOTversion>
    parent>
    <modelVersion>4.0.0modelVersion>

    <artifactId>userartifactId>

    <properties>
        <maven.compiler.source>8maven.compiler.source>
        <maven.compiler.target>8maven.compiler.target>
    properties>

    <dependencies>
        <dependency>
            <groupId>org.examplegroupId>
            <artifactId>springbootartifactId>
            <version>1.0-SNAPSHOTversion>
        dependency>
    dependencies>

project>
实现SpringBoot简单功能
以下代码若无特别说明则均在springboot模块中,具体位置请查看项目文件结构。
@BerSpringBootApplication注解
package com.ber.springboot;

import org.springframework.context.annotation.ComponentScan;
import org.springframework.context.annotation.Configuration;

import java.lang.annotation.ElementType;
import java.lang.annotation.Retention;
import java.lang.annotation.RetentionPolicy;
import java.lang.annotation.Target;

/**
 * @Author 鳄鱼儿
 * @Description TODO
 * @date 2023/8/19 14:05
 * @Version 1.0
 */
@Target(ElementType.TYPE)
@Retention(RetentionPolicy.RUNTIME)
@Configuration
@ComponentScan
public @interface BerSpringBootApplication {
}
BerSpringApplication启动类
package com.ber.springboot;

import org.apache.catalina.*;
import org.apache.catalina.connector.Connector;
import org.apache.catalina.core.StandardContext;
import org.apache.catalina.core.StandardEngine;
import org.apache.catalina.core.StandardHost;
import org.apache.catalina.startup.Tomcat;
import org.springframework.web.context.WebApplicationContext;
import org.springframework.web.context.support.AnnotationConfigWebApplicationContext;
import org.springframework.web.servlet.DispatcherServlet;

/**
 * @Author 鳄鱼儿
 * @Description TODO
 * @date 2023/8/19 14:08
 * @Version 1.0
 */
public class BerSpringApplication {
    public static void run(Class clazz) {
        // 1. 创建Spring 容器
        AnnotationConfigWebApplicationContext applicationContext = new AnnotationConfigWebApplicationContext();
        applicationContext.register(clazz);
        applicationContext.refresh();

        // 2. 创建并启动Tomcat
        startTomcat(applicationContext);
    }

    private static void startTomcat(WebApplicationContext applicationContext) {
        // 2.1 创建tomcat对象
        Tomcat tomcat = new Tomcat();

        Server server = tomcat.getServer();
        Service service = server.findService("Tomcat");

        Connector connector = new Connector();
        // 设置默认tomcat启动端口
        connector.setPort(8023);

        Engine engine = new StandardEngine();
        engine.setDefaultHost("localhost");

        Host host = new StandardHost();
        host.setName("localhost");

        String contextPath = "";
        Context context = new StandardContext();
        context.setPath(contextPath);
        context.addLifecycleListener(new Tomcat.FixContextListener());

        host.addChild(context);
        engine.addChild(host);

        service.setContainer(engine);
        service.addConnector(connector);

        // 2.2 创建DispatcherServlet对象,并与Spring容器绑定,并将DispatcherServlet对象添加至Tomcat中
        tomcat.addServlet(contextPath, "dispatcher", new DispatcherServlet(applicationContext));
        context.addServletMappingDecoded("/*", "dispatcher");

        // 2.3 启动tomcat
        try {
            tomcat.start();
        } catch (LifecycleException e) {
            e.printStackTrace();
        }
    }
}
run方法实现
user模块中Controller方法被浏览器请求时,就需要run方法去启动一个tomcat,并需要通过一个Servlet接收所有的请求,并将请求分发给相应的Controller进行处理。
在Spring MVC中,DispatcherServlet就起到这个前端控制器的作用。DispatcherServlet需要绑定一个Spring容器,当DispatcherServlet接收到请求后,就可以从绑定的Spring容器中找到所匹配的Controller,并执行对应的方法。
因此,在run方法中实现了:
- 创建一个Spring容器
- 创建并启动Tomcat
- 创建tomcat对象
- 创建DispatcherServlet对象,并与Spring容器绑定,并将DispatcherServlet对象添加至Tomcat中
- 启动Tomcat
创建spring容器
创建了一个AnnotationConfigApplicationContext容器,并通过传入的clazz作为容器的配置类。
那么,是如何将clazz作为配置类的呢?
在user模块中,UserApplication启动类是这样的。
package com.ber.user;

import com.ber.springboot.BerSpringApplication;
import com.ber.springboot.BerSpringBootApplication;

/**
 * @Author 鳄鱼儿
 * @Description TODO
 * @date 2023/8/19 14:10
 * @Version 1.0
 */
@BerSpringBootApplication
public class UserApplication {

    public static void main(String[] args) {
        BerSpringApplication.run(UserApplication.class);
    }
}
将UserApplication.class传入run方法,UserApplication类就是AnnotationConfigWebApplicationContext容器的配置类。
配置过程为:
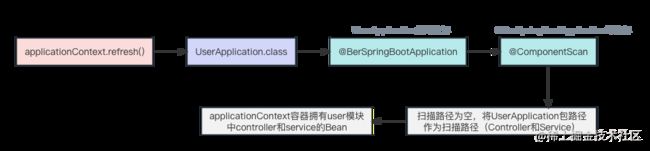
在Spring容器AnnotationConfigWebApplicationContext创建好后,该容器内部就拥有了user模块下启动类所在包路径下的Bean。
创建并启动Tomcat
在startTomcat()方法中,创建了tomcat对象,并对tomcat进行配置,如默认端口8023,创建和配置 Tomcat 引擎和主机等。然后再创建DispatcherServlet对象,并与Spring容器绑定,并将DispatcherServlet对象添加至Tomcat中。
当运行user模块的UserApplication启动类时,调用BerSpringApplication类中的run方法,所以在run方法中调用startTomcat()方法。
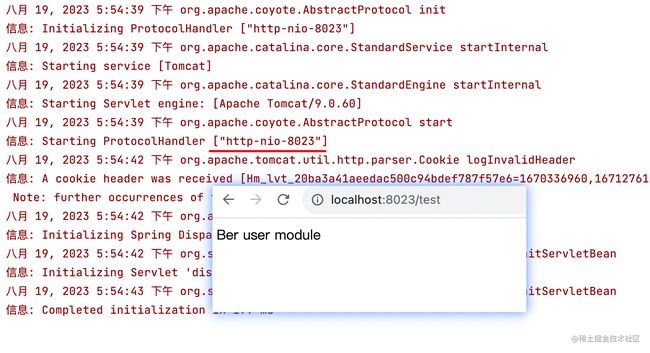
到此,就可以试着运行BerSpringBoot了,可以看到已经成功启动tomcat,并成功访问到了
http://localhost:8023/test