Hdfs 客户端写过程 源码解析
承接上文Hdfs客户端读过程;接着来分析一下hdfs客户端写入文件的过程;说道到写文件过程,都会知道写入文件的过程如下示意图:
客户端写过程示意图:
总体来说,最简单的HDFS写文件大体流程如下:
- 客户端获取文件系统实例FileSyStem,并通过其create()方法获取文件系统输出流outputStream。
- 首先会联系名字节点NameNode,通过ClientProtocol.create()进行rpc调用,在名字节点上创建文件元数据,并获取文件状态FileStatus;
- 通过文件状态FileStatus构造文件系统输出流outputStream;
- 通过文件系统输出流outputStream写入数据。
- 首次写入会首先向名字节点申请数据块,名字节点能够掌握集群DataNode整体状况,分配数据块后,连同DataNode列表信息返回给客户端;
- 客户端采用流式管道的方式写入数据节点列表中的第一个DataNode,并由列表中的前一个DataNode将数据转发给后面一个DataNode;
- 确认数据包由DataNode经过管道依次返回给上游DataNode和客户端;
- 写满一个数据块后,向名字节点提交一个数据块;
- 再次重复1-4的过程;
- 向名字节点提交文件(complete file),即告知名字节点文件已写完,然后关闭文件系统输出流outputStream等释放资源。
接下来从源码的角度一步步解析,看hdfs client是如何与NameNode,DataNode进行写文件交互的。
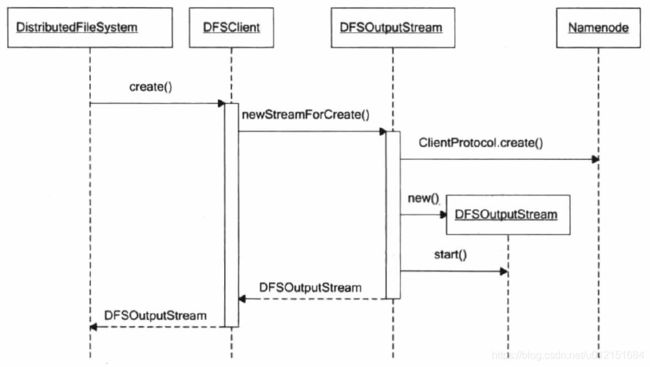
1、首先客户端调用FSDataOutputStream outputStream = DistributedFileSystem.create()方法,创建一个空的hdfs文件,并获取这个文件的输出流FSDataOutputStream;可以看到FSDataOutputStream其内部真正用于输出流的对象是DFSOutputStream,其用来将数据写入该hdfs文件。其构造流程及源码如下:
  public DFSOutputStream create(String src,
                             FsPermission permission,
                             EnumSet flag,
                             boolean createParent,
                             short replication,
                             long blockSize,
                             Progressable progress,
                             int buffersize,
                             ChecksumOpt checksumOpt,
                             InetSocketAddress[] favoredNodes) throws IOException {
    // 检查客户端是否已经打开
	checkOpen();
    // 权限设置等
	// ......
	// 调用DFSOutputStream.newStreamForCreate()创建DFSOutputStream对象
    final DFSOutputStream result = DFSOutputStream.newStreamForCreate(this,
        src, masked, flag, createParent, replication, blockSize, progress,
        buffersize, dfsClientConf.createChecksum(checksumOpt),
        favoredNodeStrs);
    beginFileLease(result.getFileId(), result);
    return result;
  }

  static DFSOutputStream newStreamForCreate(DFSClient dfsClient, String src,
      FsPermission masked, EnumSet flag, boolean createParent,
      short replication, long blockSize, Progressable progress, int buffersize,
      DataChecksum checksum, String[] favoredNodes) throws IOException {
    HdfsFileStatus stat = null;
    // ......
    while (shouldRetry) {
      shouldRetry = false;
      try {
	    // 通过RPC调用ClientProtocol.create()方法,在命名空间中创建hdfs文件
        stat = dfsClient.namenode.create(src, masked, dfsClient.clientName,
            new EnumSetWritable(flag), createParent, replication,
            blockSize, SUPPORTED_CRYPTO_VERSIONS);
        break;
      } catch (RemoteException re) {
        // ......
      }
    }
    Preconditions.checkNotNull(stat, "HdfsFileStatus should not be null!");
	// 构造DFSOutputStream对象 并启动该线程DataStreamer
    final DFSOutputStream out = new DFSOutputStream(dfsClient, src, stat,
        flag, progress, checksum, favoredNodes);
    out.start();
    return out;
  }
在构造DFSOutputStream对象中,其会初始化属性,并且调用computePacketChunkSize()方法确定数据包packet大小,同时确定一个数据包当中包含多少个校验块Chunk。接着会创建DataStreamer线程,其就是客户端写文件的输出流主体:后续就依靠这个数据流对象来通过管道发送流式数据;其主要负责建立数据流管道pipeline,并将数据包发送到数据流管道中的第一个DataNode。
  /** Construct a new output stream for creating a file. */
  private DFSOutputStream(DFSClient dfsClient, String src, HdfsFileStatus stat,
      EnumSet flag, Progressable progress,
      DataChecksum checksum, String[] favoredNodes) throws IOException {
    // 基本属性初始化
    this(dfsClient, src, progress, stat, checksum);
    this.shouldSyncBlock = flag.contains(CreateFlag.SYNC_BLOCK);
    // 计算数据包packet大小,以及校验块chunk
    computePacketChunkSize(dfsClient.getConf().writePacketSize, bytesPerChecksum);

    Span traceSpan = null;
    if (Trace.isTracing()) {
      traceSpan = Trace.startSpan(this.getClass().getSimpleName()).detach();
    }
    // 构造stream线程
    streamer = new DataStreamer(stat, traceSpan);
    if (favoredNodes != null && favoredNodes.length != 0) {
      streamer.setFavoredNodes(favoredNodes);
    }
} 2、在构造好了基本的文件输出流DFSOutputStream之后;便可以调用DFSOutputStream.write()方法进行数据的写入,在DFSOutputStream的写入过程中,其使用packet类来封装一个数据包。每个数据包中都包含多个校验块和校验和,其基本的数据包结构如下:
- 数据包头PacketHeader(PacketLength、HeaderLength、Header)
- CheckSums(checksum:1-n)
- Data(Chunk:1-n)
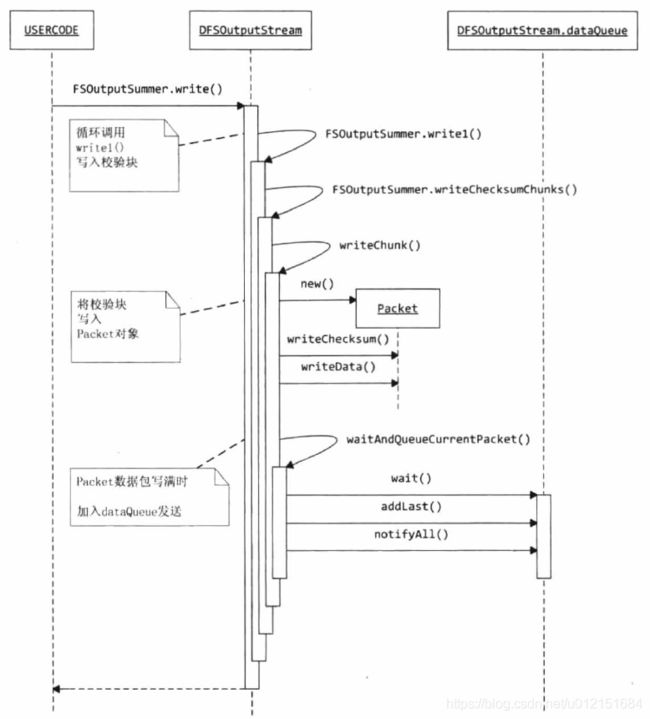
在write()写入方法中,其基本的写入流程如下:
可以看到其调用write()写入方法会继续循环调用write1()方法将数据写入到buffer缓冲区中,当buffer缓冲区已满时,会调用flushBuffer()将buffer中的多个校验块数据封装成一个packet包,并在该packet包中数据写满时,将其放入dataQueu队列中,等待写出到输出的IO流中;其基本的write1()和writeChunk()【writeChunk由子类DFSOutputStream实现】方法如下:
  private int write1(byte b[], int off, int len) throws IOException {
    if(count==0 && len>=buf.length) {
      // buf初始化的大小是chunk的大小,默认是512,这里的代码会在写入的数据的剩余内容大于或等于一个chunk的大小时调用
      // 这里避免多余一次复制
      final int length = buf.length;
      sum.update(b, off, length);//length是一个完整chunk的大小,默认是512,这里根据一个chunk内容计算校验和
      writeChecksumChunk(b, off, length, false);
      return length;
    }

    // buf初始化的大小是chunk的大小,默认是512,这里的代码会在写入的数据的剩余内容小于一个chunk的大小时调用
    // 规避了数组越界问题
    int bytesToCopy = buf.length-count;
    bytesToCopy = (len
protected synchronized void writeChunk(byte[] b, int offset, int len, byte[] checksum)throws IOException {
//创建一个package,并写入数据
currentPacket = new Packet(packetSize, chunksPerPacket,bytesCurBlock);
currentPacket.writeChecksum(checksum, 0, cklen);
currentPacket.writeData(b, offset, len);
currentPacket.numChunks++;
bytesCurBlock += len;
//如果此package已满,则放入队列中准备发送
if (currentPacket.numChunks == currentPacket.maxChunks ||bytesCurBlock == blockSize) {
......
dataQueue.addLast(currentPacket);
//唤醒等待dataqueue的传输线程,也即DataStreamer
dataQueue.notifyAll();
currentPacket = null;
......
}
}在packet包中数据写满时,会将其放入dataQueue队列中,并通知发送线程;之后的具体发送过程便是DataStreamer线程的工作了;接下来分析DataStreamer线程的工作原理:
3、DataStreamer线程:DataStreamer线程是DFSOutputStream的一个内部线程类;其基本工作流程为:1、先向NameNode申请一个新的数据块,然后建立与这个数据块之间的数据流管道pipeline,最后从待发送队列dataQueue中取出需要发送的packet数据包并通过数据流管道pipeline发送给对应的DataNode。每个数据包packet都会有要求有ack确认信息;当一个数据块中的所有数据包都发送完毕并接收到对应的ack响应后,DataStreamer线程就会关闭与当前数据块的数据流管道pipeline。如果DFSOutputStream中还有数据需要发送,则DataStreamer线程会再次向NameNode申请一个新的数据块,获取到新分配的数据块后,DataStreamer会再次建立到这个新数据块的数据流管道,然后进行数据的发送;
在DataStreamer线程类中,其定义了相应的字段用来记录保存数据流管道中的DataNode信息与对应数据流管道的状态信息如下:
class DataStreamer extends Daemon {
// 当前数据块对应的数据流管道中的DN信息
private volatile DatanodeInfo[] nodes = null; // list of targets for current block
// 在DN上保存这个数据块存储的存储类型
private volatile StorageType[] storageTypes = null;
// 在DN上保存这个数据块的存储storage
private volatile String[] storageIDs = null;
// 数据流管道的状态(PIPELINE_SETUP_CREATE、DATA_STREAMING、PIPELINE_CLOSE)
private BlockConstructionStage stage; // block construction stage
}
接着来看一下DataStreamer线程类的主体运行方法run():
  public void run() {
    while (!closed && clientRunning) {
      Packet one = null;
      synchronized (dataQueue) {
       boolean doSleep = processDatanodeError(hasError, false);//如果ack出错,则处理IO错误
        //如果队列中没有package,则等待
        while ((!closed && !hasError && clientRunning && dataQueue.size() == 0) || doSleep) {
          try {
            dataQueue.wait(1000);
          } catch (InterruptedException  e) {
          }
          doSleep = false;
         }
	     // get packet to be sent.
	     // 得到队列中的第一个packet or 创建心跳数据包(防止数据流管道超时关闭)
         if (dataQueue.isEmpty()) {
		    one = createHeartbeatPacket();
	      } else {
		    one = dataQueue.getFirst(); // regular data packet
	     }
	    }

	  // get new block from namenode.
	  // 从namenode处申请获得新的数据块
	  if (stage == BlockConstructionStage.PIPELINE_SETUP_CREATE) { // create新建文件写入模式
		setPipeline(nextBlockOutputStream());
		initDataStreaming();
	  } else if (stage == BlockConstructionStage.PIPELINE_SETUP_APPEND) { // append追加写模式
		setupPipelineForAppendOrRecovery();
		initDataStreaming();
	  }

	  // send the packet
	  // 将packet从dataQueue移至ackQueue,等待确认;数据包发送前准备
	  synchronized (dataQueue) {
		// move packet from dataQueue to ackQueue
		if (!one.isHeartbeatPacket()) {
		  dataQueue.removeFirst();
		  ackQueue.addLast(one);
		  dataQueue.notifyAll();
		}
	  }
	  // write out data to remote datanode
	  try {
		// 利用生成的写入流将数据写入DataNode中的block
		one.writeTo(blockStream);
		blockStream.flush();
	  } catch (IOException e) {
	  }

	  if (one.lastPacketInBlock) {
	    // wait for the close packet has been acked
		synchronized (dataQueue) {
		   while (!streamerClosed && !hasError &&
				  ackQueue.size() != 0 && dfsClient.clientRunning) {
			 dataQueue.wait(1000);// wait for acks to arrive from datanodes
			 }
		   }
		   if (streamerClosed || hasError || !dfsClient.clientRunning) {
			 continue;
		   }
		endBlock();
	  }
    }
    // ......
    // 循环体之外, 关闭清理工作
	closeInternal();
  }
对于写入文件的写操作,DataStreamer线程会调用nextBlockOutputStream()方法向NameNode申请新的数据块,并调用setPipeline()建立数据流管道,在成功建立数据流管道之后便会调用initDataStreaming()方法将数据流管道的状态进行更改为:DATA_STREAMING,之后便可以通过数据流管道进行相应数据包的发送了;当最后一个数据包发完完毕后,并且DataStreamer接收到这个数据包的响应信息后,也就是标识数据流管道中的所有DataNode都成功的写入了当前的数据块中的所有数据;便可调用endBlock()来关闭该数据流管道;之后DataStreamer会再次申请新的数据块,并建立数据流管道写入数据,直到DataStreamer线程最终关闭;
数据流管道的建立方法如下,接下来一步步分析数据流管道的建立过程;其流程及设计的源码部分如下:
setPipeline(nextBlockOutputStream());
initDataStreaming();
1、首先来看nextBlockOutputStream()方法:其用于向NameNode申请一个新的数据块(locateFollowingBlock中通过RPC调用namenode.addBlock(src, clientName)函数),并返回对应存储新数据块的DataNode节点信息;并且建立从客户端client到数据流管道中第一个DataNode的数据流:
    private LocatedBlock nextBlockOutputStream() throws IOException {
      LocatedBlock lb = null;
      DatanodeInfo[] nodes = null;
      StorageType[] storageTypes = null;
      int count = dfsClient.getConf().nBlockWriteRetry;
      boolean success = false;
      ExtendedBlock oldBlock = block;
      do {
	    // ......
        // 由NameNode为文件分配DataNode和block
        // locateFollowingBlock中通过RPC调用namenode.addBlock(src, clientName)函数
        block = oldBlock;
        lb = locateFollowingBlock(startTime,
            excluded.length > 0 ? excluded : null);
        block = lb.getBlock();
        nodes = lb.getLocations();
        storageTypes = lb.getStorageTypes();

        //
        // Connect to first DataNode in the list.
        //
		// 创建向DataNode的写入流
        success = createBlockOutputStream(nodes, storageTypes, 0L, false);

        // ......
      } while (!success && --count >= 0);
      return lb;
    }
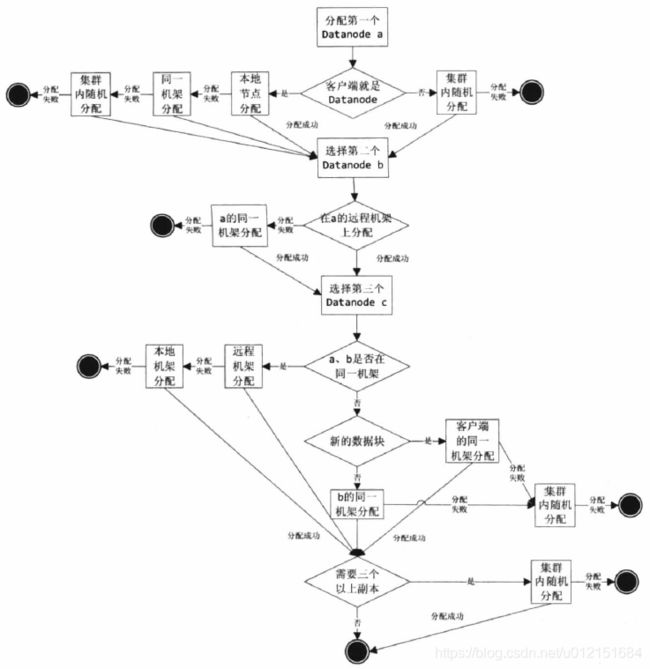
在nextBlockOutputStream中有一个向NameNode申请添加新block的过程;其调用locateFollowingBlock()函数通过RPC调用namenode.addBlock(src, clientName)函数;向NameNode申请新的block;其在NameNode处的block申请调用栈为:
- blockManager.chooseTarget4NewBlock()申请分配新的block
- BlockPlacementPolicyDefault.chooseTarget()
- 其最终会根据存放的副本数量以及客户端所在的节点位置分别调用:chooseLocalStorage()、chooseRemoteRack()、chooseLocalRack()、chooseRandom()等方法进行确定
- BlockPlacementPolicyDefault.chooseTarget()
其基本的申请策略如下:
在获取到分配的数据块的DataNode地址后,其会调用createBlockOutputStream()建立到数据流管道中第一个DataNode的输出流;s = createSocketForPipeline(nodes[0], nodes.length, dfsClient);之后便向对应的DataNode发送数据块写入的操作指令:new Sender(out).writeBlock();
2、之后便会调用setPipeline(),initDataStreaming()的方法进行分配数据节点的保存,以及启动对应的ResponseProcessor响应线程。在数据流管道建立好后,便可以进行写入数据的传输了。
在数据流管道建立好后,DataStreamer会循环的从dataQueue中取出对应的packet数据包,并将其加入ackQueue队列等待响应,之后便通过底层的socket io将数据包packet发送至远端的DataNode上。其对应的源码部分在DataStreamer.run()主体方法中,其涉及发送数据包部分如下:
// send the packet
synchronized (dataQueue) {
  // move packet from dataQueue to ackQueue
  // 将packet从dataQueue移至ackQueue,等待确认;数据包发送前准备
  if (!one.isHeartbeatPacket()) {
    dataQueue.removeFirst();
    ackQueue.addLast(one);
    dataQueue.notifyAll();
  }
}

// write out data to remote datanode
// 利用生成的写入流将数据写入DataNode中的block
try {
  one.writeTo(blockStream);
  blockStream.flush();
} catch (IOException e) {
}
4、ResponseProcessor响应线程:其负责接收来自datanode的ack,当接收到所有datanode对一个packet确认成功的ack,ResponseProcessor从ackQueue中删除相应的packet。在出错时,从ackQueue中移除packet到dataQueue,移除失败的datanode,恢复数据块,建立新的pipeline。实现如下:
public void run() {
  ...
  PipelineAck ack = new PipelineAck();
  while (!closed && clientRunning && !lastPacketInBlock) {
    try {
      // read an ack from the pipeline
      ack.readFields(blockReplyStream);
      ...
      // 处理所有DataNode响应的状态
      for (int i = ack.getNumOfReplies()-1; i >=0 && clientRunning; i--) {
          short reply = ack.getReply(i);
        // ack验证,如果DataNode写入packet失败,则出错
        if (reply != DataTransferProtocol.OP_STATUS_SUCCESS) {
          // 记录损坏的DataNode,会在processDatanodeError方法移除该失败的DataNode
          errorIndex = i;
          throw new IOException("Bad response " + reply + " for block " + block +  " from datanode " + targets[i].getName());
        }
      }

      long seqno = ack.getSeqno();
      // 心跳ack,忽略
      if (seqno == Packet.HEART_BEAT_SEQNO) {
        continue;
      }
      Packet one = null;
      synchronized (ackQueue) {
        one = ackQueue.getFirst();
      }
      ...
      synchronized (ackQueue) {
        // 验证ack
        assert ack.getSeqno() == lastAckedSeqno + 1;
        lastAckedSeqno = ack.getSeqno();
        // 移除确认写入成功的packet
        ackQueue.removeFirst();
        ackQueue.notifyAll();
      }
    } catch (Exception e) {
    }
  }
}
至此,已经详细分析完客户端写入数据的整体客户端流程,再回顾下其基本流程为:
- 客户端端构造实际用于数据写入的DFSOutputStream,其会初始化并开启DataStreamer线程;
- 当客户端client写入的字节流数据到达一个数据包packet的长度时,其会构造封装成packet对象,并将其放入到待发送队列dataQueue中,等待DataStreamer线程处理;
- DataStreamer线程会循环从dataQueue中取出packet对象,若pipeline未建立,则会先向NameNode申请数据块block,并与对应的DataNode建立相应的数据流管道;然后通过底层IO流将packet发送到数据流管道中的第一个DataNode上。发送完毕后,会将该packet从dataQueue中移除,并将其添加到ackQueue中等待下游节点的确认消息。
- ResponseProcessor线程等待下游节点的响应ack,判断ack状态,并将其从ackQueue队列中移除,该数据包的发送过程就完成了。
其整体的数据包发送流程如下:


