Debian10(xfce4)Linux换源中文输入法sudo等常用软件安装配置
文章目录
- 1,debian系统安装选英文还是中文
- 2,安装设置sudo(debian默认是没有的):
- 3,debian10换国内源https
-
- 测试版testing源
- 稳定版stable源
- 3,安装网络管理插件与代理
-
- pptp插V件PN
- 虚拟机linux端安装代理
- 4,设置中文及安装中文输入法
-
- 设置中文
-
- 添加中文包
- 设置为中文桌面环境(英文好就默认en_US.UTF-8)
- 安装中文字体包,防止乱码(前两个简体,后一个繁体)
- 安装中文输入法fcitx
- 5,常用软件安装设置
-
- 设置Alt+Ctrl+T快捷终端:
- dpkg安装、卸载deb包:
- 安装vim
- 安装pip:
-
- pip修改国内源
- pip查看软件包可用版本
- pip安装报错CryptographyDeprecationWarning: int_from_bytes is deprecated, use int.from_bytes instead from cryptography.utils import int_from_bytes, int_to_bytes
- 安装git
- 安装wget
- 安装密码密钥管理seahorse
- 安装邮箱软件Thunderbird
- 安装linux护眼神器 Redshift
- linux下最好用的PDF阅读软件:Zathura
-
- 键盘操作
- 命令行模式(按:进入命令行模式)
- 安装Wine
-
- **安装依赖:**
- **WineHQ 提供的安装包只能用于 x86 架构;它们不能被安装于 ARM 架构系统。**
- **然后安装 以下其中一个安装包:**
-
- **手动安装wine-mono和wine-gecko组件**
- 6,linux环境变量、shell脚本路径配置
-
- 6.1查看变量PATH值
- 6.2清除环境变量
- 6.3常见的环境变量
- 6.4修改环境变量PATH的方法
-
- 6.4.1临时添加PATH环境变量(在当前终端窗口shell内有效)
- 6.4.2永久修改
-
- 修改配置文件~/.profile(当前用户有效)
- 修改~/.bashrc文件(当前用户有效)
- 修改/etc/profile(所有用户有效)
- 修改/etc/environment(所有用户有效)
- 6.5 可执行文件软链接设置
- 6.6添加shell(*.sh)脚本路径(PATH)
-
- 无依赖脚本路径设置
- 有依赖的脚本路径设置
- 7,错误BUG解决
-
- debian开机出现[Failed]failed to start raise network interfaces. see 'systemctl status networking.service' for details.
1,debian系统安装选英文还是中文
debian等linux发行版系统安装时一定要选英文,安装好之后再改中文,否则容易出现乱码。
2,安装设置sudo(debian默认是没有的):
在root用户下
#安装sudo
apt-get install sudo
#编辑控制文件
vi  /etc/sudoers
在sudoers里添加一行 username ALL=(ALL) ALL 其中username用你自己的用户名替换,然后保存推出 :wq!
更改sudoers文件权限 chmod 0440 /etc/sudoers 退出root
3,debian10换国内源https
对于https源,需要安装apt-transport-https
sudo apt-get install apt-transport-https ca-certificates
修改/etc/apt/sources.list文件,注释官方源,添加国内源
sudo vi /etc/apt/sources.list
测试版testing源
# 清华源
deb https://mirrors.tuna.tsinghua.edu.cn/debian/ testing main contrib non-free
deb-src https://mirrors.tuna.tsinghua.edu.cn/debian/ testing main contrib non-free
deb https://mirrors.tuna.tsinghua.edu.cn/debian/ testing-updates main contrib non-free
deb-src https://mirrors.tuna.tsinghua.edu.cn/debian/ testing-updates main contrib non-free

deb https://mirrors.tuna.tsinghua.edu.cn/debian/ testing-backports main contrib non-free
deb-src https://mirrors.tuna.tsinghua.edu.cn/debian/ testing-backports main contrib non-free

deb https://mirrors.tuna.tsinghua.edu.cn/debian-security testing-security main contrib non-free
deb-src https://mirrors.tuna.tsinghua.edu.cn/debian-security testing-security main contrib non-free
稳定版stable源
#网易163镜像站

deb http://mirrors.163.com/debian/ buster main non-free contrib
deb http://mirrors.163.com/debian/ buster-updates main non-free contrib
deb http://mirrors.163.com/debian/ buster-backports main non-free contrib
deb http://mirrors.163.com/debian-security/ buster/updates main non-free contrib

deb-src http://mirrors.163.com/debian/ buster main non-free contrib
deb-src http://mirrors.163.com/debian/ buster-updates main non-free contrib
deb-src http://mirrors.163.com/debian/ buster-backports main non-free contrib
deb-src http://mirrors.163.com/debian-security/ buster/updates main non-free contrib

#华为云镜像站

deb https://mirrors.huaweicloud.com/debian/ buster main contrib non-free
deb https://mirrors.huaweicloud.com/debian/ buster-updates main contrib non-free
deb https://mirrors.huaweicloud.com/debian/ buster-backports main contrib non-free
deb https://mirrors.huaweicloud.com/debian-security/ buster/updates main contrib non-free

deb-src https://mirrors.huaweicloud.com/debian/ buster main contrib non-free
deb-src https://mirrors.huaweicloud.com/debian/ buster-updates main contrib non-free
deb-src https://mirrors.huaweicloud.com/debian/ buster-backports main contrib non-free

#腾讯云镜像站

deb http://mirrors.cloud.tencent.com/debian/ buster main non-free contrib
deb http://mirrors.cloud.tencent.com/debian-security buster/updates main
deb http://mirrors.cloud.tencent.com/debian/ buster-updates main non-free contrib
deb http://mirrors.cloud.tencent.com/debian/ buster-backports main non-free contrib

deb-src http://mirrors.cloud.tencent.com/debian-security buster/updates main
deb-src http://mirrors.cloud.tencent.com/debian/ buster main non-free contrib
deb-src http://mirrors.cloud.tencent.com/debian/ buster-updates main non-free contrib
deb-src http://mirrors.cloud.tencent.com/debian/ buster-backports main non-free contrib

#中科大镜像站

deb https://mirrors.ustc.edu.cn/debian/ buster main contrib non-free
deb https://mirrors.ustc.edu.cn/debian/ buster-updates main contrib non-free
deb https://mirrors.ustc.edu.cn/debian/ buster-backports main contrib non-free
deb https://mirrors.ustc.edu.cn/debian-security/ buster/updates main contrib non-free

deb-src https://mirrors.ustc.edu.cn/debian/ buster main contrib non-free
deb-src https://mirrors.ustc.edu.cn/debian/ buster-updates main contrib non-free
deb-src https://mirrors.ustc.edu.cn/debian/ buster-backports main contrib non-free
deb-src https://mirrors.ustc.edu.cn/debian-security/ buster/updates main contrib non-free

#阿里云镜像站

deb http://mirrors.aliyun.com/debian/ buster main non-free contrib
deb http://mirrors.aliyun.com/debian-security buster/updates main
deb http://mirrors.aliyun.com/debian/ buster-updates main non-free contrib
deb http://mirrors.aliyun.com/debian/ buster-backports main non-free contrib

deb-src http://mirrors.aliyun.com/debian-security buster/updates main
deb-src http://mirrors.aliyun.com/debian/ buster main non-free contrib
deb-src http://mirrors.aliyun.com/debian/ buster-updates main non-free contrib
deb-src http://mirrors.aliyun.com/debian/ buster-backports main non-free contrib

#清华大学镜像站

deb https://mirrors.tuna.tsinghua.edu.cn/debian/ buster main contrib non-free
deb https://mirrors.tuna.tsinghua.edu.cn/debian/ buster-updates main contrib non-free
deb https://mirrors.tuna.tsinghua.edu.cn/debian/ buster-backports main contrib non-free
deb https://mirrors.tuna.tsinghua.edu.cn/debian-security/ buster/updates main contrib non-free

deb-src https://mirrors.tuna.tsinghua.edu.cn/debian/ buster main contrib non-free
deb-src https://mirrors.tuna.tsinghua.edu.cn/debian/ buster-updates main contrib non-free
deb-src https://mirrors.tuna.tsinghua.edu.cn/debian/ buster-backports main contrib non-free
deb-src https://mirrors.tuna.tsinghua.edu.cn/debian-security/ buster/updates main contrib non-free
3,安装网络管理插件与代理
pptp插V件PN
sudo apt install network-manager-pptp-gnome
虚拟机linux端安装代理
ubuntu终端默认不支持socks协议,如果想让终端命令也走代理(加快git clone速度,进行rosdep init等),我们需要使用到proxychains工具。
首先安装proxychains工具,
sudo apt-get install proxychains
然后我们需要对/etc/proxychains.conf进行修改,将自己的代理ip地址和端口添加到ProxyList下。例如socks5 192.xxx.xxx.xxx 10808。
sudo vim /etc/proxychains.conf
最后需要使用find /usr/lib/ -name libproxychains.so.3 -print命令输出路径,
sudo find /usr/lib/ -name libproxychains.so.3 -print
再将/usr/bin/proxychains下的export LD_PRELOAD=libproxychains.so.3改为export LD_PRELOAD=刚刚获得的路径我们就可以使用proxychains工具了。
sudo vim /usr/bin/proxychains
想要走代理时只需要在命令前加上proxychains即可。
4,设置中文及安装中文输入法
设置中文
添加中文包
sudo dpkg-reconfigure locales
操作:space(空格)键选中,Tab切换到ok键,回车键Enter确认
增加几个zh_CN选项,zh_CN.UTF-8必选,下一步确定界面语言环境。

设置为中文桌面环境(英文好就默认en_US.UTF-8)

安装中文字体包,防止乱码(前两个简体,后一个繁体)
sudo apt-get install fonts-arphic-bsmi00lp fonts-arphic-gbsn00lp fonts-arphic-gkai00mp
安装中文输入法fcitx
安装fctix
sudo apt-get install fcitx
安装输入法码表套件:
sudo apt-get install fcitx-table*
安装应用程序支持:
sudo apt-get install fcitx-frontend-gtk2 fcitx-frontend-gtk3 fcitx-frontend-qt*
sudo apt install fcitx-table-wbpy
安装拼音输入法:
可以全装也可以装一部分。
sudo apt-get install fcitx-sunpinyin fcitx-googlepinyin fcitx-pinyin
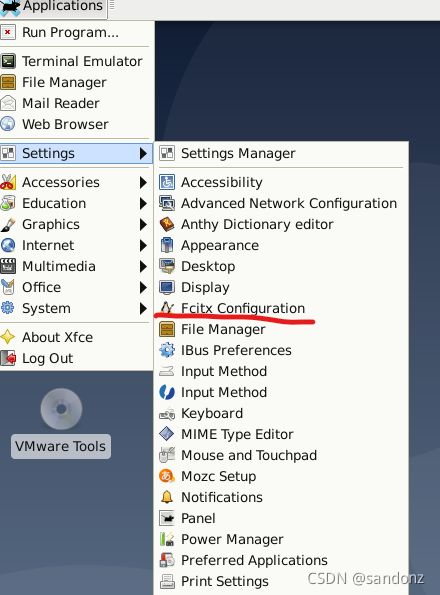
设置fcitx为首选,重启debian
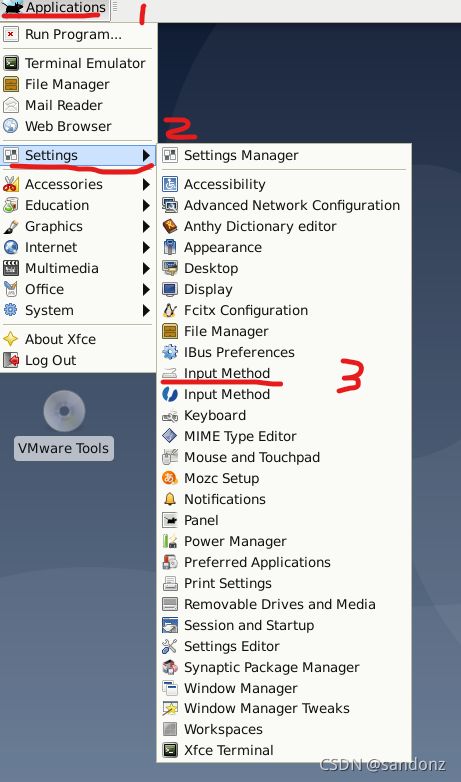


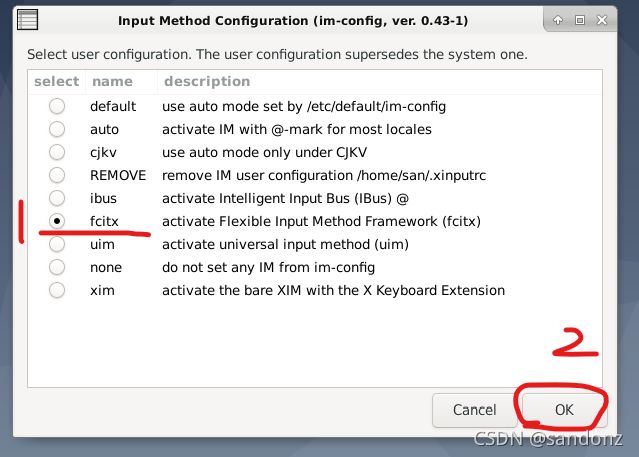
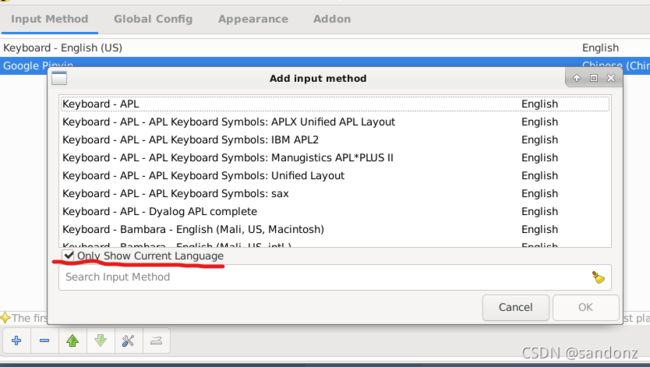
添加中文输入法

如果列表没有找到,去掉红色标记位置勾选,再找
5,常用软件安装设置
设置Alt+Ctrl+T快捷终端:
Alt+F3打开"Application Finder",搜索Keyboard并打开,选择"Application Shortcuts"点开+Add 在Command里输入 “xfce4-terminal.wrapper”->点击ok(确定),按下组键"Alt+Ctrl+T",点ok(确定)(组合键可按自己的习惯设置)
dpkg安装、卸载deb包:
sudo dpkg -i packagename.deb
#有依赖关系时输入下面命令(后面不加内容)
sudo apt-get -f -y install
#卸载deb包
sudo dpkg -r packagename
安装vim
sudo apt-get install vim
安装pip:
sudo apt install python3-pip
pip修改国内源
临时使用:
可以在使用pip的时候加参数-i https://pypi.tuna.tsinghua.edu.cn/simple
例如:pip install -i https://pypi.tuna.tsinghua.edu.cn/simple pyspider,这样就会从清华这边的镜像去安装pyspider库。
永久修改:
Linux下,修改 ~/.pip/pip.conf (没有就创建一个文件夹及文件。文件夹要加“.”,表示是隐藏文件夹)
内容如下:
[global]
index-url = https://pypi.tuna.tsinghua.edu.cn/simple
[install]
trusted-host=mirrors.aliyun.com
windows下,直接在user目录中创建一个pip目录,如:C:\Users\xx\pip,新建文件pip.ini。内容同上。
pip查看软件包可用版本
pip install 包名==
如:pip install scrapy==
pip安装报错CryptographyDeprecationWarning: int_from_bytes is deprecated, use int.from_bytes instead from cryptography.utils import int_from_bytes, int_to_bytes
解决方案是将 cryptography 的版本降至 3.4 以下便不会抛警告。
pip uninstall cryptography
pip install cryptography==3.3.2
安装git
sudo apt-get install git-all
安装wget
sudo apt -y install wget
安装密码密钥管理seahorse
sudo apt-get install seahorse
安装邮箱软件Thunderbird
sudo apt-get install thunderbird
安装linux护眼神器 Redshift
sudo apt-get install redshift

sudo apt install redshift-gtk

sudo gedit ~/.config/redshift.conf
[redshift] ;
白天屏幕温度 temp-day=6500 ;
夜晚屏幕温度 temp-night=3500 ;
昼夜是否平滑过度(1/0) transition=1;
位置提供方式(redshift -l list) location-provider=manual ;
夜晚 gamma 值 gamma-night=0.8 ;
手动设置位置 location-provider=manual ;
新校准方法API adjustment-method=randr[manual] ;
纬度 lat=30 ; 经度 lon=120
[randr] screen=0
linux下最好用的PDF阅读软件:Zathura
优点:轻量,依赖少,支持所有linux发行版,可以用命令行模式操作(模仿vim)
安装命令:
sudo apt-get install zathura
键盘操作
普通浏览模式
J: 下翻一页
K: 上翻一页
h,k,j,l
Ctrl+t,Ctrl+y: 左右滚动半页
Ctrl+d, Ctrl+u: 上下滚动半页
t,y: 左右滚动一页
Ctrl+f, Ctrl+b: 上下滚动一页
space:下滚动一页
gg, G, nG: 第一页,最后一页,跳转到第n页
H,L: 跳转到当前页面的top,bottom
Ctrl+o,Ctrl+i: 移动到之前的跳转的页面,移动到之后跳转的页面
Ctrl+j, Ctrl+k: 在两个跳转之间切换
Ctrl+c, Escape: 终止
a, s: 以高度或者宽度适应窗口
/, ?: 搜索,向前和向后,参考vim
o, O: 打开文件
f: 链接
<:> : 输入命令
r: 旋转90度
Ctrl+r: 换色
R: 重新加载文件
Tab: 打开/关闭目录
d: 打开/关闭 双页面显示
F5: 切换显示模式
F11: 切换到全屏模式
Ctrl+m: 打开/关闭 输入栏
Ctrl+n: 打开/关闭 状态栏
+, -, =: 放大,缩小,恢复原始大小
n=: 放大到大小为n
mX: 快速标记
‘X: 跳转到标记处
目录模式
k,j: 移动
l,h: 展开,折叠
L,H: 全部展开,全部折叠
space, Return: 选中并打开
命令行模式(按:进入命令行模式)
bmark: 保存书签
bdelete: 删除书签
blist: 列出书签
close: 关闭文档
exec: 执行外部命令
ifno: 显示文档信息
open: 打开一个文档
offset: 设置页面偏移
print: 打印文档
write(!): 保存文档(强制覆盖)
export: 导出附件
安装Wine
安装依赖:
错误Wine cannot find the ncurses library (libncurses.so.5)所需依赖
sudo apt-get install libncurses5:i386
安装软件包 Libsdl2-2.0-0
wget http://ftp.us.debian.org/debian/pool/main/libs/libsdl2/libsdl2-2.0-0_2.0.9+dfsg1-1_adm64.deb

sudo dpkg -i libsdl2-2.0-0_2.0.9+dfsg1-1_amd64.deb
安装依赖项 libstb0
sudo apt-get install libstb0
安装依赖包 libfaudio0
wget https://download.opensuse.org/repositories/Emulators:/Wine:/Debian/Debian_10/amd64/libfaudio0_20.01-0~buster_amd64.deb

sudo dpkg -i libfaudio0_20.01-0~buster_amd64.deb
WineHQ 提供的安装包只能用于 x86 架构;它们不能被安装于 ARM 架构系统。
首先,开启 32 位支持:
sudo dpkg --add-architecture i386
安装被用于签发安装包的密钥:
wget -nc https://dl.winehq.org/wine-builds/Release.key

sudo apt-key add Release.key
安装wine密钥:
wget -nc https://dl.winehq.org/wine-builds/winehq.key

sudo apt-key winehq.key
然后添加软件源到 /etc/apt/sources.list 或创建一个 *.list 文件于 /etc/apt/sources.list.d/,并包含以下内容:
Debian 版本 向 /etc/apt/sources.list 填入:
| Debian 9 (Stretch) | deb https://dl.winehq.org/wine-builds/debian/ stretch main |
|---|---|
| Debian 10 (Buster) | deb https://dl.winehq.org/wine-builds/debian/ buster main |
| Debian Testing (目前为 Bullseye) | deb https://dl.winehq.org/wine-builds/debian/ bullseye main |
更新软件仓库:
sudo apt update
然后安装 以下其中一个安装包:
稳定分支
sudo apt install --install-recommends winehq-stable
开发分支
sudo apt install --install-recommends winehq-devel
Staging 分支
sudo apt install --install-recommends winehq-staging
如果 apt 提示缺少依赖,请先安装缺少的依赖,然后重复以上两步(update 和 install)。
配置命令:
winecfg
首次运行winecfg会自动下载安装wine-mono和wine-gecko组件,但是很慢!!!需要手动装
手动安装wine-mono和wine-gecko组件
中国科技大学镜像源可以下载
安装wine-mono
输入网址:http://mirrors.ustc.edu.cn/wine/wine/wine-mono/
点击wine-mono-5.0.0-x86.msi并下载
安装:wine start /i wine-mono-5.0.0-x86.msi
安装winetricks验证mono是否安装成功
sudo apt install winetricks
终端打开winetricks:依次选择:Select the default wineprefix(默认的wine容器)→OK→Yes→Yes→Run uninstaller(运行卸载程序),在弹出的界面中,如果发现了wine-mono的相关软件,则说明wine-mono安装成功了,点击Cancel(取消)。
安装wine-gecko
输入网址:http://mirrors.ustc.edu.cn/wine/wine/wine-gecko/2.47.1/
下载wine-gecko-2.47.1-x86_64.msi 和wine-gecko-2.47.1-x86.msi
依次安装:wine start /i wine-gecko-2.47.1-x86.msi
wine start /i wine-gecko-2.47.1-x86_64.msi
用winetricks以同样的方式验证gecko是否安装成功
6,linux环境变量、shell脚本路径配置
6.1查看变量PATH值
export
或
env
单独查看PATH环境变量
echo $PATH
查看所有本地定义的shell变量
set
6.2清除环境变量
unset ×××
如
$ export TEST=“test”       # 增加一个环境变量 TEST

$ env | grep TEST      # 此命令有输出,证明环境变量 TEST 已经存在了

  TEST=test

unset TEST                   #删除环境变量TEST

$ env | grep TEST    # 此命令无输出,证明环境变量 TEST 已经不存在了
6.3常见的环境变量
$PATH:决定了shell将到哪些目录中寻找命令或程序
$HOME:当前用户主目录
$MAIL:是指当前用户的邮件存放目录。
$SHELL:是指当前用户用的是哪种Shell。
$HISTSIZE:是指保存历史命令记录的条数
$LOGNAME:是指当前用户的登录名。
$HOSTNAME:是指主机的名称,许多应用程序如果要用到主机名的话,通常是从这个环境变量中来取得的。
$LANG/LANGUGE:是和语言相关的环境变量,使用多种语言的用户可以修改此环境变量。
PS1:是基本提示符,对于root用户是#,对于普通用户是,也可以使用一些更复杂的值。
$PS2:是附属提示符,默认是“>”。可以通过修改此环境变量来修改当前的命令符,比如下列命令会将提示符修改成字符串“Hello,My NewPrompt : ) ”。
# PS1=" Hello,My NewPrompt : ) "
$IFS:输入域分隔符。当shell读取输入时,用来分隔单词的一组字符,它们通常是空格、制表符和换行符。
$0:shell脚本的名字。
例如,在我的Linux系统中:
echo0
/bin/bash
$#:传递给脚本的参数个数。
:shell脚本的进程号,脚本程序通常会用它生成一个唯一的临时文件,如/tmp/tmfile_
例如,在我的Linux系统中:
echo$
31038 #表示当前shell进程号为31038
6.4修改环境变量PATH的方法
6.4.1临时添加PATH环境变量(在当前终端窗口shell内有效)
换个shell设置就无效了
export PATH=绝对路径:$PATH
#例如
export PATH=/opt/STM/STLinux-2.3/devkit/sh4/bin:$PATH
6.4.2永久修改
修改配置文件~/.profile(当前用户有效)
sudo vim ~/.profile
添加下面的代码到末尾。
export PATH =” $PATH:/usr/local/chromedriver"
更新使修改生效
source ~/.profile
修改~/.bashrc文件(当前用户有效)
sudo vim ~/.bashrc
在最后一行添上路径:
比如:export PATH=/usr/local/mongodb/bin:$PATH
生效方法:(有以下两种)
1、关闭当前终端窗口,重新打开一个新终端窗口就能生效
2、输入source ~/.bashrc命令,立即生效
修改/etc/profile(所有用户有效)
sudo vim /etc/profile
在vim界面输入查找命令:
/export PATH
//找到设置PATH的行,添加代码,
例如:export PATH=/usr/local/mongodb/bin:$PATH
修改/etc/environment(所有用户有效)
sudo vim /etc/environment
在PATH="/usr/local/sbin:/usr/local/bin:/usr/sbin:/usr/bin:/sbin:/bin:/usr/games:/usr/local/games"中加入路径:
比如,:/usr/local/mongodb/bin
6.5 可执行文件软链接设置
如:
sudo ln -sf /usr/local/share/phantomjs211/bin/phantomjs /usr/local/bin/
就可以直接在命令行输入文件名启动
6.6添加shell(*.sh)脚本路径(PATH)
无依赖脚本路径设置
用户目录下创建一个bin文件夹
cd ~
sudo mkdir bin
将.sh脚本传过去
sudo mv .../*.sh ~/bin
修改执行权限
cd ~/bin
chmod +x ./*sh
打开主目录下.bashrc文件
sudo vim ~/.bashrc
添加下面代码到最后一行:
export PATH=$PATH:~/bin
有依赖的脚本路径设置
打开主目录下.bashrc文件
sudo vim ~/.bashrc
添加有依赖脚本的绝对路径,
export PATH=$PATH:绝对路径
例如:export PATH=$PATH:~/.android-studio/bin
7,错误BUG解决
debian开机出现[Failed]failed to start raise network interfaces. see ‘systemctl status networking.service’ for details.
解决办法:
删除 /etc/network/interfaces.d/setup
sudo rm /etc/network/interfaces.d/setup
然后在 /etc/network/interfaces 中添加如下代码(如果已经存在就不要重复添加):
auto lo
iface lo inet loopback
把下面这行代码用#号注释掉:
source /etc/network/interfaces.d/*
#source /etc/network/interfaces.d/*
解决完毕,重启。