[References]Deploying .NET Compact Framework 2.0 Applications with .cab and .msi Files
.NET Compact Framework
Christopher Tacke
OpenNETCF Consulting
December 2005
Applies to:
Microsoft .NET Compact Framework version 2.0
Windows Mobile version 5.0
Microsoft Windows CE
Microsoft ActiveSync
Microsoft Visual Studio 2005
Summary: Learn how to deploy your application to Windows Mobile–based devices by using Visual Studio 2005 to create device .cab files and by creating a desktop computer Microsoft Installer Package. (19 printed pages)
Download Deploy_CF2_Apps_Cab_Msi.msi from the Microsoft Download Center.
Contents
Introduction
Device Deployment Overview
Creating Device .cab Files with Visual Studio
Creating a Desktop Computer Microsoft Installer Package
Conclusion
Introduction
So you've written the next best-selling embedded application. The next step is to get it into the hands of users and onto their devices. With a desktop computer application, it's pretty simple—you create a deployment package project that generates a Microsoft Installer (MSI) package, and distribute the .msi package. Unfortunately, it's not quite as simple for a device. In this article, you will find out what a Windows Mobile–based device needs to install an application, how to use Microsoft ActiveSync to make distributing easier, and how to use Microsoft Visual Studio 2005 to make the entire process seamless.
Deploying an application to a device has a lot more variables than deploying a simple desktop computer application, yet the process needs to be just as simple for the user. To make a device deployment as simple as desktop computer deployment, it's important to understand the overall process and then all of the variables that come into play. After you understand the process and the variables, you can put together any deployment—no matter how complex the underlying system gets.
There are essentially three major systems involved with a device deployment. The first is the desktop computer; the second is Microsoft ActiveSync; and the third is the device .cab file extractor application called wceload.exe. Add to these systems the potential mix of different processors in addition to a mix of managed and unmanaged code, and you've got the deployment landscape. This article will guide you through this landscape, starting with the device.
Device Deployment Overview
To the user, a device deployment is no different than a desktop computer application deployment. The user downloads or receives an .msi file and runs it on his or her desktop computer. The Microsoft Installer walks the user through a few wizard screens and then the application is installed.
From a developer's point of view, however, the .msi file is only the final step of many in creating the deployment package. A Windows Mobile–based device cannot use an .msi file directly, but it instead requires a .cab file to perform a program installation. For the .msi file to be useful to the user, the developer must programmatically instruct the ActiveSync Application Manager to copy the .cab file to the device with the option of allowing the user to deploy to more than one device or remove the file later.
To achieve a friendly, user-expected installation experience, you will have to complete the following steps:
- Create .cab files for the target device.
- Add your application files and registry entries to the .cab files.
- Register the .cab file with ActiveSync, so it can deploy from the desktop computer.
- Provide the code for any custom actions that the installer file must make during installation or uninstallation.
- Pack all of this information—and anything else the application needs—into a single distributable .msi file.
This article takes you through each of these steps using a real-world example of deploying the OpenNETCF WiFiDiscovery application.
Creating Device .cab Files with Visual Studio
When you create the deployment package, you need to generate the .cab files that actually get installed on the targeted device. If you have experience with device development—or even installed many third-party applications on your device—you're probably familiar with .cab files. Essentially a .cab file is a compressed file that contains the application's file, any necessary registry entries, and some string resources for the on-device installer. The .cab file itself is uncompressed and interpreted by wceload.exe, which exists on all Pocket PC and Windows Mobile–based Smartphone devices—in addition to many generic Windows CE devices.
Because Windows CE–based devices can differ in their operating system versions in addition to their processor architectures, some application install packages contain several .cab files—one for each permutation of processor and operating system version that the device supports. For example, the Microsoft .NET Compact Framework version 2.0 itself has seven .cab files.
At this point, you may be tempted to ask, "But managed applications use Microsoft Intermediate Language (MSIL), which is processor independent. Why can't there just be one .cab file?" This is a good and very valid question. Microsoft Visual Studio .NET 2003 would always create several .cab files when you chose to have it generate them. The reason is that an installer .cab file may contain a file called setup.dll that contains special instructions for the installer to run when the application is installed or uninstalled. This .dll file must be written in unmanaged code, and because of that fact, there must be different installs for the processor types and operating system versions.
Fortunately, if your application has no special needs, you don't need the setup.dll file—a single .cab file will work. The examples in this article work with a single .cab file.
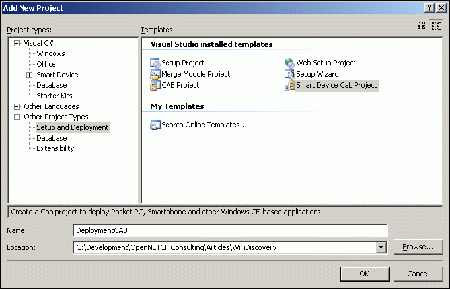
You need to add a Smart Device Cab Project to your application's solution. For this example, the project is named DeploymentCAB, as shown in Figure 1.
Figure 1. Adding a new Smart Device Cab Project to your application's solution
Next, you need to add files to the cab project. You can add files in a couple of ways: you can select an individual file you want to deploy, or you can select another project in the solution and have its output added to the .cab file. Explicit selection of each file to deploy would work for every file, but being able to add a project output is useful because it makes it easier to keep the cab project contents current with project changes, and it automatically adds all detected references. Solution Explorer, right-click the DeploymentCAB project, select Add, and then click Project Output. The dialog box in Figure 2 appears.
![[References]Deploying .NET Compact Framework 2.0 Applications with .cab and .msi Files](http://img.e-com-net.com/image/product/f66133edf2d548a5bdb9606166a34234.png)
Figure 2. Add the output of your application project to the cab project
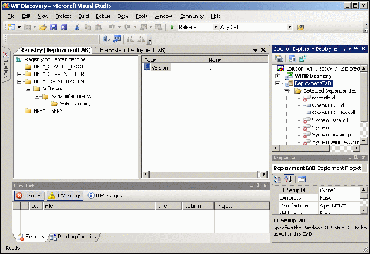
In this example, the application project is referencing the OpenNETCF Smart Device Framework libraries, which are automatically pulled in, as shown in Figure 3.
![[References]Deploying .NET Compact Framework 2.0 Applications with .cab and .msi Files](http://img.e-com-net.com/image/product/7fdb5d576a1f4cd3b08b74cdf0886e6e.png)
Figure 3. Project output and dependencies shown in Solution Explorer
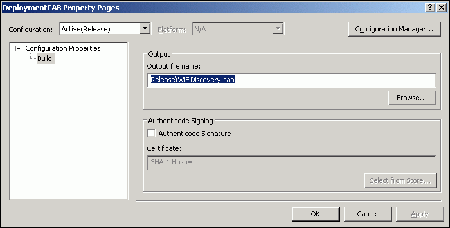
This project was named DeploymentCAB because when looking at the solution, it's self-descriptive. However, Visual Studio 2005 uses the project name as the default name for the generated .cab file. Deploying a .cab file called DeploymentCAB.cab isn't terribly friendly, so you can alter the project properties to alter the actual output file name, as shown in Figure 4.
Figure 4. Change the name of the generated .cab file
Keep in mind that this change only affects the output file name, and you must change it by selecting the project in Solution Explorer, and then, on the Project menu, click Properties. It's a bit counterintuitive that you cannot change the output file name in the Visual Studio Properties pane. The settings in the Properties pane affect how the ActiveSync installer user interface (UI) will present information, like Product Name and Company.
A .cab file is actually generated by an application called cabwiz.exe on the desktop computer, even in the Smart Device Cab Project. Visual Studio simply calls to cabwiz.exe to generate the actual files. The information about the files and registry changes that go into the .cab file—along with text to display—is contained in an .inf file, which Visual Studio generates based on your cab project's settings.
There is plenty of documentation online about the exact format of the .inf file, so this article will not go into detail about it, but it's important to know that changes to the Properties pane (which is shown in Figure 5) are reflected in the .inf file. For example, modifying the Product Name entry in the Properties pane generates a line in the output .inf file. This article will explain where that information gets generated a little later.
![[References]Deploying .NET Compact Framework 2.0 Applications with .cab and .msi Files](http://img.e-com-net.com/image/product/9400a96c18154bd98e05a9c6b49b3f8e.png)
Figure 5. Modify Properties for setting install text
As mentioned previously in this article, you can add registry entries into the .cab file as well. In the Solution Explorer, simply click the Registry Editor icon to open the editor UI, and then make the modifications. Figure 6 shows an example of adding a version number to the registry for the WiFiDiscovery application. Remember that entries you put into the Smart Device Cab Project get applied to the targeted device—not the installing desktop computer. If you need registry entries on the desktop computer, those entries are done in one of the other projects.
Figure 6. Add the install's device registry entries
After you've added all of the files and registry entries to your project and you've adjusted the Properties pane to reflect the information you want displayed by ActiveSync and the device .cab file installer, you can build the project. It generates outputs that are similar to those in Figure 7: a .cab file, a .log file (which is useful if the build fails), and the .inf file.
Figure 7. Output files from the cab project
If you find that during your tests the device-side installation process doesn't go quite as expected, such as incorrect dialog captions, missing files, or incorrect or missing device registry settings, the .inf file is the place to begin debugging the behavior. Visual Studio 2005 provides a friendly UI for generating the .cab files, but it's the actual .inf file that cabwiz.exe uses to actually generate the .cab files, and all .cab file behavior will be reflected in the .inf file.
After you've verified that the .cab file was generated, you're done with this part of the deployment package. Next, this article describes the pieces for the desktop computer.
Creating a Desktop Computer Microsoft Installer Package
Providing a .cab file for download is one way to distribute your application, but most users won't know what to do with it, leading to support calls (the best scenario) or lost customers (the worst scenario). The desktop computer installer package is where the "magic" that makes the installation friendly and professional looking to the user happens.
For device applications, there are two things that the installer needs to do: it must present the user with the usual wizard screens for the installation, and it also must deploy the application to a connected device without requiring the user to take additional steps. In this section, you'll look at both of these things.
Registering with ActiveSync
ActiveSync handles installing applications to a connected Windows Mobile–based device by using an application called CeAppMgr.exe, which is installed onto the desktop computer as part of the ActiveSync application. CeAppMgr.exe requires an .ini file for an application to be registered with it for deployment, and unfortunately, this .ini file must be generated manually. Fortunately, it's not a complex file format.
Note When you're generating and testing your .ini files, it can be extremely helpful to turn on debug output from CeAppMgr.exe, which provides simple MessageBox outputs that report how it is parsing the .ini file.
To turn on debugging, set the following registry key on your desktop computer.
[HKLM\Software\Microsoft\Windows CE Services\AppMgr]

"ReportErrors"=dword:1
The following code example is the .ini file that is used for registering WiFiDiscovery. Note that line numbers were added for reference only—your .ini file should not have them.
01  [CEAppManager]

02  Version = 1.0

03  Component = OpenNETCF WiFiDiscovery

04

05  [OpenNETCF WiFiDiscovery]

06  Description = Sample WiFi Network Discovery Application using the


SDF

07  CabFiles = WiFiDiscovery.cab
Line 01 denotes that this is an .ini file for CeAppMgr.exe. This line is required.
Line 02 denotes the version of CeAppMgr.exe that this file supports. It is not the version of your application.
Line 03 denotes the component name. The name used in this line of code must appear in square brackets later in the file (in this case, this location is on line 05).
Line 05 starts the component description section.
Line 06 provides the text that will be displayed as the program description in the ActiveSync installer UI on the screen (you'll see this later in Figure 17 when you test the deployment package).
Line 7 enumerates all of the .cab files that are used for this installation in a comma-separated list. This line must not have any spaces in it.
As you learned earlier, .cab files internally hold the processor and operating system version they support, so you simply need to list all of the .cab files. ActiveSync will know which cab file to use. These files can also be in subdirectories; if you choose to use subdirectories, the .cab file names use a relative path from the ActiveSync install folder (this topic will be discussed more later).
Custom Actions During Installation
Again, because you're trying to make your installation friendly and professional, you want to follow some basic guidelines and standards. Applications registered with CeAppMgr.exe for installation usually are in a subfolder of the ActiveSync installation folder (in fact, Designed for Windows Mobile logo certification requires that you put your application in this location).
Because a user could have installed ActiveSync in a different location and because you don't want the user to have an option to install your application files in a location that ActiveSync can't find, you need your installation to determine where this path is and automatically put the necessary files where they should be. To achieve this, you'll use a feature of the Microsoft Installer that allows you to provide a class library that exports some custom actions that get automatically run at certain points during the installation process. In fact, you'll use this mechanism to launch CEAppMgr.exe with your .ini file as well.
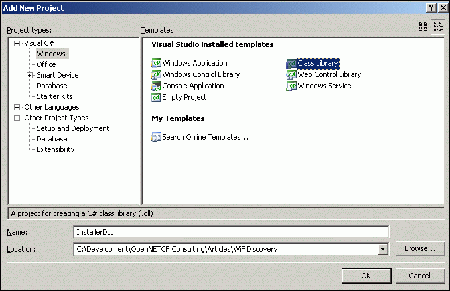
You need to simply add a new Windows Class Library project to the application solution, as shown in Figure 8; for this example, it is named InstallerDLL.
Figure 8. Add a new Windows Class Library project
You won't be using the default wizard generated Class1, so delete it. Instead, you'll be using a custom installer class, which is a special type. Of course, if you need a complex installation process, you can add the generic classes for use—you just won't be doing anything that complex in this sample.
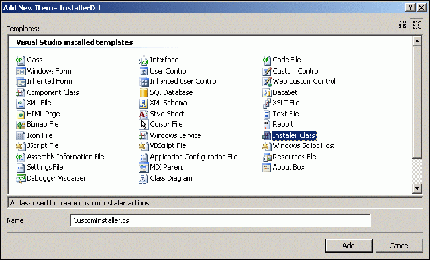
To add the new custom installer class to the InstallerDLL project (in Solution Explorer, right-click the InstallerDll project, point to Add, and then click New Item), as shown in Figure 9.
Figure 9. Add an installer class to the project
The installer class supports several events that are related to installation and uninstallation. For this example, you'll use BeforeInstall to copy your files to the ActiveSync folder and register with CEAppMgr.exe, AfterInstall to clean up the files from the install path (you don't need to keep needless duplicate files), and BeforeUninstall to remove the files from the ActiveSync folder because the automatic uninstaller doesn't know about files that you've copied elsewhere.
Register each of the events you're interested in handling in the class constructor, as shown in the following code example.
public CustomInstaller()

{

InitializeComponent();

this.BeforeInstall +=

new InstallEventHandler(CustomInstaller_BeforeInstall);

this.AfterInstall +=

new InstallEventHandler(CustomInstaller_AfterInstall);

this.BeforeUninstall +=

new InstallEventHandler(CustomInstaller_BeforeUninstall);

}
You need to define some constants for use throughout the code, as shown in the following code example.
private const string CEAPPMGR_PATH =

@"SOFTWARE\Microsoft\Windows\CurrentVersion\App Paths\CEAPPMGR.EXE";

private const string ACTIVESYNC_INSTALL_PATH =

@"SOFTWARE\Microsoft\Windows CE Services";

private const string INSTALLED_DIR = "InstalledDir";

private const string CEAPPMGR_EXE_FILE = @"CEAPPMGR.EXE";

private const string CEAPPMGR_INI_FILE = @"WiFiDiscovery.ini";

private const string APP_SUBDIR = @"\OpenNETCF WiFiDiscovery";

private string TEMP_PATH =

Environment.SystemDirectory + @"\TEMP\WiFiDiscovery";
Because you will need to know where ActiveSync is installed so that you can install and uninstall your application, you need a helper method to extract this information from the registry, as shown in the following code example.
private string GetAppInstallDirectory()

{

// Get the ActiveSync install directory

RegistryKey keyActiveSync =

Registry.LocalMachine.OpenSubKey(ACTIVESYNC_INSTALL_PATH);

if (keyActiveSync == null)

{

throw new Exception("ActiveSync is not installed.");

}

// Build the target directory path under the ActiveSync folder

string activeSyncPath =

(string)keyActiveSync.GetValue(INSTALLED_DIR);

string installPath = activeSyncPath + APP_SUBDIR;

keyActiveSync.Close();

return installPath;

}
Next, look at the event handlers. Before you install the application, you need to determine the path so your installation folder will be under the ActiveSync folder. You can determine this path by calling the GetAppInstallDirectory method as shown in the previous code example, and then you can copy all of your application files to that directory.
After you've copied the application files, you have to determine where CeAppMgr.exe is installed—again, you can retrieve this information from the registry. You will call CeAppMgr.exe with the fully qualified path of your .ini file as a parameter, and this step will register your application and start the ActiveSync installation wizard, as shown in the following code example.
void CustomInstaller_BeforeInstall(object sender, InstallEventArgs e)

{

// Find the location where the application will be installed

string installPath = GetAppInstallDirectory();

// Create the target directory

Directory.CreateDirectory(installPath);

// Copy your application files to the directory

foreach (string installFile in Directory.GetFiles(TEMP_PATH))

{

File.Copy(installFile, Path.Combine(installPath,

Path.GetFileName(installFile)), true);

}

// Get the path to ceappmgr.exe

RegistryKey keyAppMgr =

Registry.LocalMachine.OpenSubKey(CEAPPMGR_PATH);

string appMgrPath = (string)keyAppMgr.GetValue(null);

keyAppMgr.Close();

// Run CeAppMgr.exe to install the files to the device

System.Diagnostics.Process.Start(appMgrPath,

"\"" + Path.Combine(installPath, CEAPPMGR_INI_FILE) + "\"");

}
After you've installed your application in the ActiveSync folder, you want to remove the files from the temporary folder you initially installed them in, as shown in the following code example.
void CustomInstaller_AfterInstall(object sender, InstallEventArgs e)

{

// Delete the temp files

foreach (string tempFile in Directory.GetFiles(TEMP_PATH))

{

File.Delete(tempFile);

}

}
That completes the custom installation procedure, but because you've moved files during the installation process, the Microsoft Installer has no idea they exist, so you must manually remove them. This requires a custom action for the uninstallation as well. Again, you determine the directory where the files were copied, and then you iterate through the code and delete each of the files, as shown in the following code example.
void CustomInstaller_BeforeUninstall(object sender, InstallEventArgs e)

{

// Find where the application is installed

string installPath = GetAppInstallDirectory();

// Delete the files

foreach (string appFile in Directory.GetFiles(installPath))

{

File.Delete(appFile);

}

// Delete the folder

Directory.Delete(installPath);

}
After you have all of your event handlers written, all you need to do is compile the InstallerDLL project to generate a class library that you'll use in the final step.
Creating the MSI
Now for the final step: creating the actual .msi file. This section focuses on the device-specific information and leaves topics like wizard UI modifications and the like as exercises for the reader.
Note For detailed information about creating Microsoft Installer Packages with Visual Studio, see the Visual Studio Installer Reference.
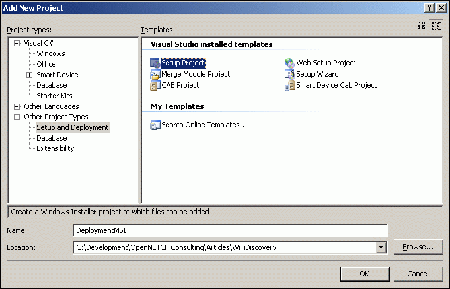
First, add a new setup project to the existing solution as shown in Figure 10. For this example, the setup project is named DeploymentMSI.
Figure 10. Add a setup project to the solution
Again, it's a good practice to update the Properties pane for the Application Name, Company, SupportUrl and the like. These items get displayed on the desktop computer during the Install Wizard progression.
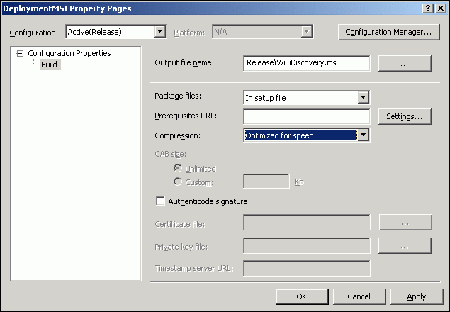
Again Visual Studio sets the default output file name to the project name, which is often not very user friendly, so you should click the Project menu, and then select the Properties command to open the dialog box that is shown in Figure 11. On this dialog box, set the output file name.
Figure 11. Set the property for the output file name
Next, you need to choose the location on the desktop computer for the installation files. As you may recall, you have to eventually put the files in a subfolder of ActiveSync, and you won't know that location until the installer is run (and then, you will only know that location through a custom action), so you'll simply place the files in a temporary folder you will create in the Windows System folder called WiFiDiscovery. Use the File System Explorer in the Installer Project to generate the new folder, as shown in Figure 12.
Figure 12. Add the System folder to your project
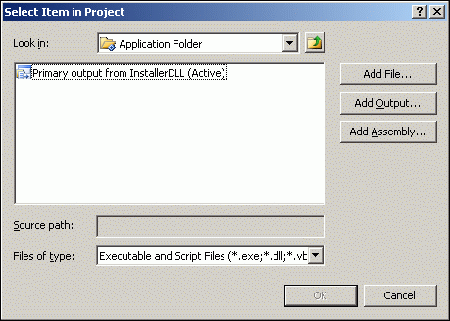
After you have the folder, you can add any file content to it. Again, to make things simple, you can add the output of another project in your solution instead of an explicit file. Figure 13 shows the dialog box for adding the InstallerCAB project output.
![[References]Deploying .NET Compact Framework 2.0 Applications with .cab and .msi Files](http://img.e-com-net.com/image/product/f566dc7060b84e5fa7dfaa13ba1838ab.png)
Figure 13. Add the cab project output to the installer
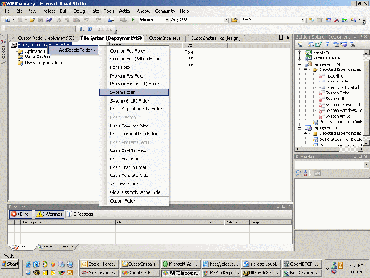
Next, you need to set up the .msi file to use the custom actions that you created in the InstallerDLL project. Open the Custom Actions Editor by using the shortcut menu (right-click the DeploymentMSI project, and then click Custom Action) or by clicking the Custom Actions Editor icon at the top of the Solution Explorer, and then select Add Custom Action.
Select your newly created temporary folder, and then use the Add Project Output Group dialog box that is shown in Figure 14 to add the output of the InstallerDLL project.
![[References]Deploying .NET Compact Framework 2.0 Applications with .cab and .msi Files](http://img.e-com-net.com/image/product/703b7250439040109d23c5f9dae5d024.png)
Figure 14. Add the custom installer DLL to the installer
By adding a custom action DLL, you're tying your custom code to the desktop computer .msi file extractor, which will call into your custom DLL when it is run by the user and perform any actions you tell it to. This addition provides you almost limitless flexibility to make an installation perform operations that are necessary for your application to install perfectly.
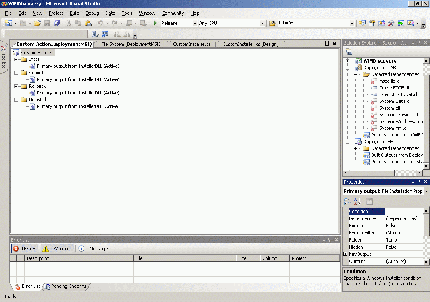
After you've added the output, verify that the custom installer has been added to the project by ensuring it appears in the dialog box that is shown in Figure 15.
Figure 15. Verify that the custom installer has been added
The Custom Action Explorer should show the output of InstallerDLL being used for all actions, as shown in Figure 16.
Figure 16. Custom Actions applied to installer
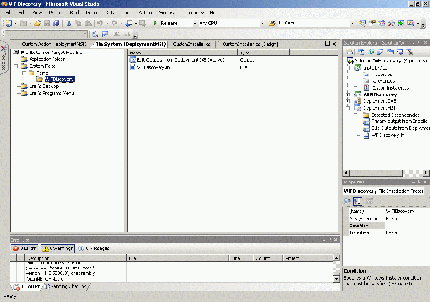
Finally, you need to add the .ini file that CeAppMgr.exe uses as an explicit file, and then your project is complete and ready to be used to create your program's Microsoft Installer Package, as shown in Figure 17.
Figure 17. All Files added to the installer
Make sure you've built all of the other projects in the solution, and then build the DeploymentMSI project to create the output .msi file.
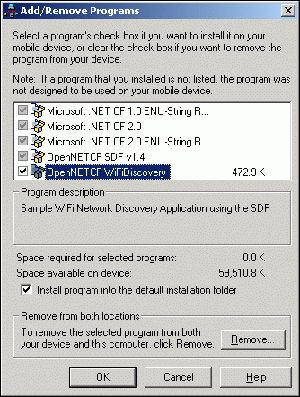
Finally, you can test the installer from end to end. Make sure you either have your Windows Mobile–based device connected by means of ActiveSync or you have one of Visual Studio 2005's device emulator's selected as cradled. In the Solution Explorer, right-click the DeploymentMSI project, and then select Install from the shortcut menu (you'll also see Uninstall as an option, which is useful for testing the package's uninstall processes). If all goes well, the Installer Wizard opens, and after you follow the instructions in the wizard, CeAppMgr.exe opens the installation dialog box, as shown in Figure 18.
Figure 18. ActiveSync's Application Manager
If you follow the instructions on the dialog boxes that open on the device, the WiFiDiscovery application will be installed on your mobile device.
Conclusion
Deploying a mobile device application is still not a simple point-and-click process—especially if you want to get logo certification for your application and make installing your application easy for your users. In this article, you learned the basic steps that are necessary for a typical installation. By no means does this article cover every possibility or contingency, but, depending on the complexity of your application's deployment needs, the topics in this article should either be everything you need for your installation, or they should provide a solid foundation that you can modify. When you need to work on the deployment package for your next application, you'll at least know the path to follow for a successful rollout.
