SpringCloud Gateway服务网关的介绍与使用
目录
- 1、网关介绍
- 2、SpringCloudGateway工作原理
- 3、三大组件
-
- 3.1 、Route(路由)
- 3.2、断言 Predicate
- 3.3、过滤器 filter
- 4、Gateway整合nacos的使用
-
- 4.1 、引入依赖
- 4.2、 编写基础类和启动类
- 4.3、 编写基础配置和路由规则
- 4.4 、测试结果
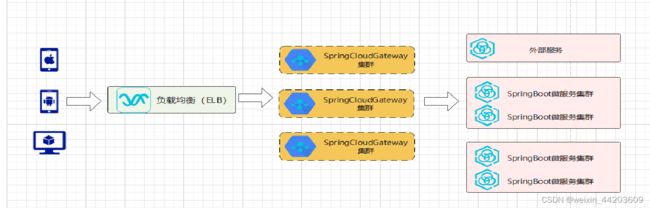
1、网关介绍
客户机和服务器不断的高并发请求,微服务架构就急需一个API网关通统一入口。网关可以负责保护和路由消息、隐藏服务、负载均衡以及许多其他有用的功能。Spring Cloud Gateway为您提供了对API层的精确控制,它集成了Spring Cloud服务发现和客户端负载平衡解决方案,以简化配置和维护。
2、SpringCloudGateway工作原理

3、三大组件
**Route(路由):**路由是网关的基本单元,由ID、URI、一组Predicate、一组Filter组成,根据Predicate进行匹配转发。
Predicate(谓语、断言): 路由转发的判断条件,目前SpringCloud Gateway支持多种方式,常见如:Path、Query、Method、Header等,写法必须遵循 key=vlue的形式
Filter(过滤器): 过滤器是路由转发请求时所经过的过滤逻辑,可用于修改请求、响应内容
3.1 、Route(路由)
Route 主要由 路由id、目标uri、断言集合和过滤器集合组成,那我们简单看看这些属性到底有什么作用。
(1)id:路由标识,要求唯一,名称任意(默认值 uuid,一般不用,需要自定义)
(2)uri:请求最终被转发到的目标地址
(3)order: 路由优先级,数字越小,优先级越高
(4)predicates:断言数组,即判断条件,如果返回值是boolean,则转发请求到 uri 属性指定的服务中
(5)filters:过滤器数组,在请求传递过程中,对请求做一些修改
3.2、断言 Predicate
Predicate 来自于 Java8 的接口。Gateway的断言就是从Request中获取请求数据进行判断,返回true或者false
RoutePredicateHandlerMapping负载寻找路由规则,把所有的route遍历一遍,获取和当前请求匹配的路由规则
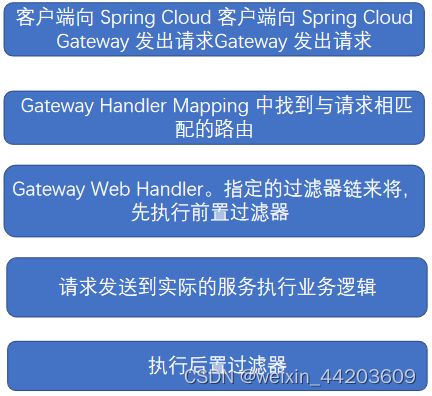
3.3、过滤器 filter
客户端向Spring Cloud Gateway发出请求。如果网关处理程序映射确定请求与路由匹配,则将其发送到网关Web处理程序。此处理程序通过特定于请求的筛选器链运行请求。过滤器用虚线分隔的原因是过滤器可以在发送代理请求之前和之后运行逻辑。执行所有“预”过滤器逻辑。然后发出代理请求。发出代理请求后,将运行“post”过滤器逻辑。
Gateway 过滤器从作用范围可分为两种:
GatewayFilter:应用到单个路由或者一个分组的路由上(需要在配置文件中配置).路由过滤器允许以某种方式修改传入的HTTP请求或传出的HTTP响应。路由过滤器的作用域是特定的路由。
GlobalFilter:应用到所有的路由上(无需配置,全局生效),拥有路由过滤器的功能。
4、Gateway整合nacos的使用
模块文件

4.1 、引入依赖
gateway模块依赖
      org.springframework.cloud
      spring-cloud-starter-gateway


      com.alibaba.cloud
      spring-cloud-starter-alibaba-nacos-discovery


      org.springframework.cloud
      spring-cloud-starter-openfeign
      2.2.3.RELEASE
provider模块依赖
      org.springframework.boot
      spring-boot-starter-web


      com.alibaba.cloud
      spring-cloud-starter-alibaba-nacos-discovery
4.2、 编写基础类和启动类
gateway启动类
import org.springframework.boot.SpringApplication;
import org.springframework.boot.autoconfigure.SpringBootApplication;
import org.springframework.cloud.client.discovery.EnableDiscoveryClient;

@SpringBootApplication
@EnableDiscoveryClient
public class GateWayApplication {
    public static void main(String[] args) {
        SpringApplication.run(GateWayApplication.class, args);
    }
}
provider启动类
import org.springframework.boot.SpringApplication;
import org.springframework.boot.autoconfigure.SpringBootApplication;
import org.springframework.cloud.client.discovery.EnableDiscoveryClient;

@SpringBootApplication
@EnableDiscoveryClient
public class ProviderApplication {
    public static void main(String[] args) {
        SpringApplication.run(ProviderApplication.class, args);
    }
}
providerController类
import org.springframework.web.bind.annotation.GetMapping;
import org.springframework.web.bind.annotation.RestController;

@RestController
public class ProviderController {
    private String name;
    @GetMapping("send")
    public String send(){
        name="通过网关调用provider";
        return name;
    }
}
4.3、 编写基础配置和路由规则
gateway配置文件
server:
  port: 5000

spring:
  application:
    name: gateway
  cloud:
    nacos:
      discovery:
        server-addr: 10.32.93.135:8848
    gateway:
      discovery:
        locator:
          enabled: false
          lowerCaseServiceId: true
      routes:
        - id: provider
          uri: lb://provider
          predicates:
            - Path=/provider/**
          filters:
            - StripPrefix=1
provider配置模块
spring.application.name=provider
spring.cloud.nacos.config.serveraddr=localhost:8848
server.port= 8000
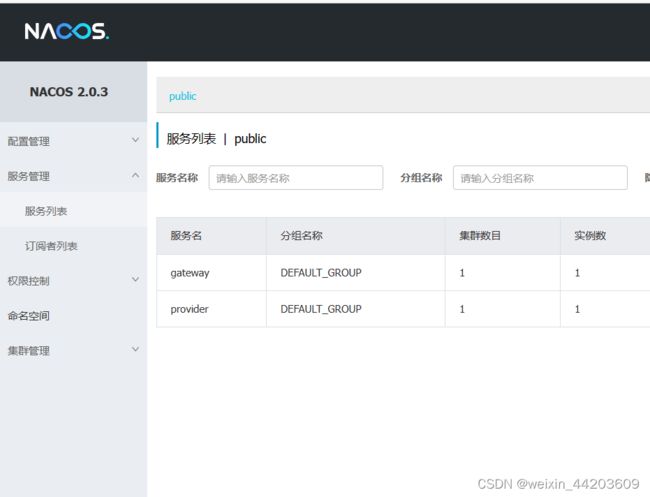
4.4 、测试结果
启动以后,可以看到gateway,provider模块已经注册到nacos上了
在浏览器上输入地址:http://localhost:5000/provider/send/
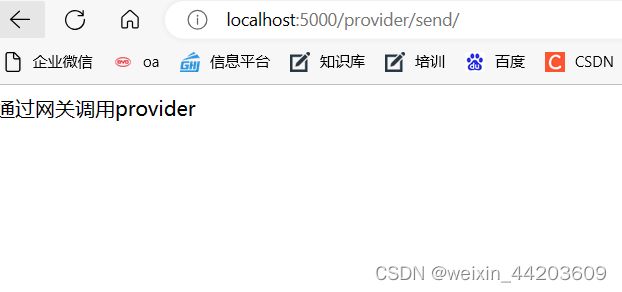
可以看到测试成功