如何创建具有多个收件人的联系表单(4种方法)
Do you want your contact form to send notifications to different people in your company?
您是否希望联系表格将通知发送给公司中的其他人?
Perhaps you want all messages to get copied to your assistant, or you want specific messages to be sent to different departments, or maybe you simply want to send users a copy of the information they submitted.
也许您希望将所有消息都复制到您的助手中,或者希望将特定消息发送到不同部门,或者您只是想向用户发送他们提交的信息的副本。
In this article, we’ll share four different ways to create a contact form with multiple recipients, so you can choose the option that best fits your need.
在本文中,我们将分享四种不同的方法来与多个收件人创建联系表单,因此您可以选择最适合您的选项。
为什么可能要从联系表中发送多个收件人 (Why You Might Want to Send Multiple Recipients From Your Contact Form)
By default, contact forms only send notifications to one email address.
默认情况下,联系表单仅将通知发送到一个电子邮件地址。
You might want to change this for a number of reasons. Here are some situations that you might face:
您可能出于多种原因想要更改此设置。 您可能会遇到以下几种情况:
- You run your site with a friend, and both of you want an identical copy of all messages that come in through your contact form. 您与一个朋友一起经营您的网站,并且双方都希望通过联系表收到的所有邮件都具有相同的副本。
- You want your users to receive a confirmation email whenever they send you a message. You want this confirmation email to be slightly different from the one you receive yourself. 您希望用户在每次给您发送消息时都收到一封确认电子邮件。 您希望此确认电子邮件与您自己收到的确认电子邮件有所不同。
- You want your contact form messages to go to different people depending on the purposes of the message. For instance, you want sales inquiries to go straight to your sales team vs billing inquiries going to your billing team. 您希望您的联系表单消息根据消息的目的发送给不同的人。 例如,您希望销售查询直接向您的销售团队而不是帐单查询直接向您的计费团队。
- You want to copy your blogging partner, and your assistant in on your contact form emails, so you can easily “reply all” to keep everyone in the loop. 您想复制您的博客合作伙伴和您的助理在您的联系表单电子邮件中,这样您就可以轻松地“全部答复”以使所有人保持联系。
In this article, we’ll be showing you several different ways to get your contact form plugin to send multiple emails to different people. This lets you deal with all the above scenarios and anything else you might face.
在本文中,我们将向您展示几种不同的方式来获取联系表单插件,以向不同的人发送多封电子邮件。 这样,您就可以应对以上所有情况以及可能遇到的任何其他情况。
Note: Our tutorial is meant for self-hosted WordPress sites only. If you want to learn more about WordPress, see our article on how to start a WordPress blog or how to make a WordPress site.
注意:我们的教程仅适用于自托管的WordPress网站。 如果您想了解有关WordPress的更多信息,请参阅有关如何启动WordPress博客或如何创建WordPress网站的文章 。
选择正确的WordPress表单生成器 (Choosing The Right WordPress Form Builder)
There are a ton of WordPress form plugins on the market. Some of them support multiple email notifications, but not many of them allow you to customize notifications.
市场上有大量的WordPress表单插件。 它们中的一些支持多个电子邮件通知,但其中很少有一些允许您自定义通知。
We’ll be using the WPForms plugin for this tutorial. It is a popular WordPress form builder used by over 3 million websites.
在本教程中,我们将使用WPForms插件。 这是一个流行的WordPress表单生成器,已有超过300万个网站使用。
There is also a free version called WPForms Lite which you can use if you only want to send the contents of your contact form to multiple recipients.
还有一个名为WPForms Lite的免费版本,如果您只想将联系表单的内容发送给多个收件人,则可以使用该版本。
However, if you want to send custom notifications to multiple recipients, then you’ll need the paid version of the plugin. To demonstrate all four methods, we’ll be using the pro version in this tutorial.
但是,如果您要将自定义通知发送给多个收件人,则需要插件的付费版本。 为了演示所有四种方法,我们将在本教程中使用专业版。
发送联系表的多个通知 (Sending Multiple Notifications for Contact Form)
There are multiple scenarios for sending contact form email notifications. In this article, we will be tackling each one of them.
发送联系人表单电子邮件通知有多种方案。 在本文中,我们将解决每个问题。
First, you need to install and activate the WPForms plugin. For more details, see our step by step guide on how to install a WordPress plugin.
首先,您需要安装并激活WPForms插件。 有关更多详细信息,请参阅有关如何安装WordPress插件的分步指南。
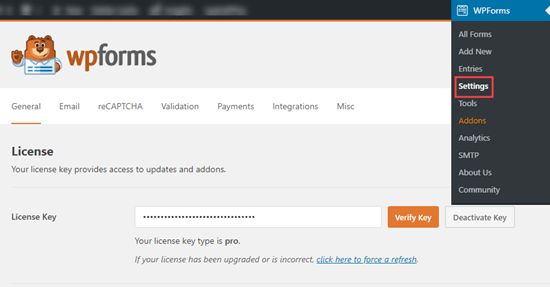
Next, you’ll need to head over to WPForms » Settings page to enter your license key. You can find this information under your account on the WPForms website.
接下来,您需要转到WPForms»设置页面以输入您的许可证密钥。 您可以在WPForms网站上的帐户下找到此信息。
After that, you need to visit WPForms » Add New page to create your first contact form. For instructions, see our step by step tutorial on how to create a contact form in WordPress.
之后,您需要访问WPForms»添加新页面以创建您的第一个联系表。 有关说明,请参阅有关如何在WordPress中创建联系表单的分步教程。
Now that you’ve created your form, you can use any of the methods below to add multiple recipients and even create custom notifications for your forms.
创建表单后,您可以使用下面的任何方法添加多个收件人,甚至为表单创建自定义通知。
1.向多个收件人发送相同的通知 (1. Send Same Notification to Multiple Recipients)
The simplest way to set up multiple recipients is to send the same notification to each person.
设置多个收件人的最简单方法是将相同的通知发送给每个人。
Simply go to WPForms » All Forms and edit the form that you want to setup notifications for.
只需转到WPForms»所有表单,然后编辑要为其设置通知的表单。
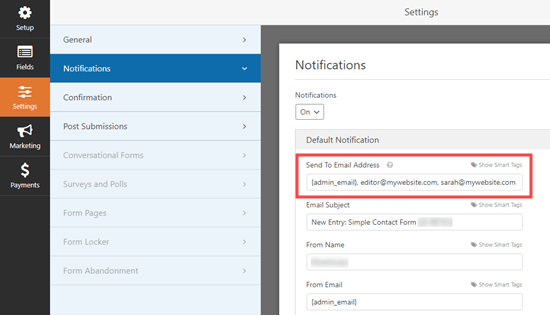
Next, you need to go to the Settings » Notifications tab in the form builder and enter the recipients email in the ‘Send To Email Address’ box.
接下来,您需要转到表单构建器中的“设置”»“通知”选项卡,然后在“发送至电子邮件地址”框中输入收件人的电子邮件。
You can enter as many emails as you like, but remember to separate the email addresses with a comma.
您可以输入任意数量的电子邮件,但请记住用逗号分隔电子邮件地址。
In the example, notifications will be sent to:
在示例中,通知将发送到:
- The default admin email address 默认的管理员电子邮件地址
- [email protected] [email protected]
- [email protected] [email protected]
Tip: The {admin_email} is the email address for your WordPress administrator. This might be you if you’re the site owner. It could also be whoever set up the website. You can check what it is under Settings » General menu in your WordPress dashboard.
提示: {admin_email}是WordPress管理员的电子邮件地址。 如果您是网站所有者,则可能是您。 建立网站的人也可以。 您可以在WordPress信息中心的“设置”»“常规”菜单下检查其内容。
2.向多个收件人发送不同的联系表单通知 (2. Send Different Contact Form Notifications to Multiple Recipients)
In some situations, you might want to send a different notification to each recipient.
在某些情况下,您可能希望向每个收件人发送不同的通知。
For instance, you might send users a confirmation email that’s different from the admin email notification you get.
例如,您可能会向用户发送一封确认电子邮件,该电子邮件不同于您收到的管理员电子邮件通知。
You can easily do this with WPForms. Simply open the form builder, go to Settings » Notifications, and then click the ‘Add New Notification’ button.
您可以使用WPForms轻松地做到这一点。 只需打开表单构建器,转到“设置”»“通知” ,然后单击“添加新通知”按钮。
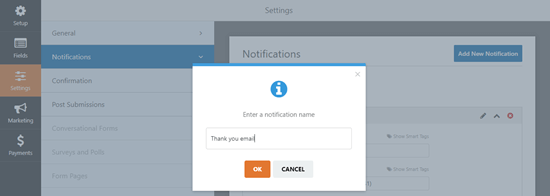
You’ll see a popup that asks you to name the notification. This name is just for your reference, so you can put in whatever makes the most sense to you. We’re going to use “Thank you email” for the sake of this tutorial.
您会看到一个弹出窗口,要求您命名通知。 此名称仅供参考,因此您可以输入最合适的名称。 在本教程中,我们将使用“谢谢电子邮件”。
Next, click the ‘OK’ button and your new notification will appear at the top of the Notifications list. You can scroll down to find your original ‘Default Notification’ below this.
接下来,单击“确定”按钮,您的新通知将显示在“通知”列表的顶部。 您可以向下滚动以找到原始的“默认通知”。
Delete the {admin_email} tag from the ‘Send to Email Address’ box.
从“发送到电子邮件地址”框中删除{admin_email}标签。
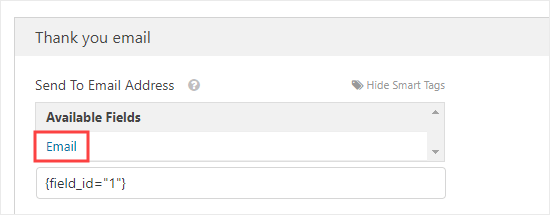
After that, you need to click on the ‘Show Smart Tags’ link just above the ‘Send To Email Address’ box. This will expand to show available fields. Simply, click the ‘Email’ field.
之后,您需要点击“发送至电子邮件地址”框上方的“显示智能标签”链接。 这将展开以显示可用字段。 只需单击“电子邮件”字段。
This will then be added into the box as {field_id=”1″} if you’re using the Simple Contact Form template. If you’ve customized your form, then the field ID will be different.
如果您使用的是简单联系表单模板,那么它将作为{field_id =“ 1”}添加到框中。 如果您已自定义表单,则字段ID将不同。
All what this means is that WPForms will send this notification to the user’s email address, which they entered into the contact form.
这意味着WPForms会将此通知发送到用户的电子邮件地址,该电子邮件地址已在联系表中输入。
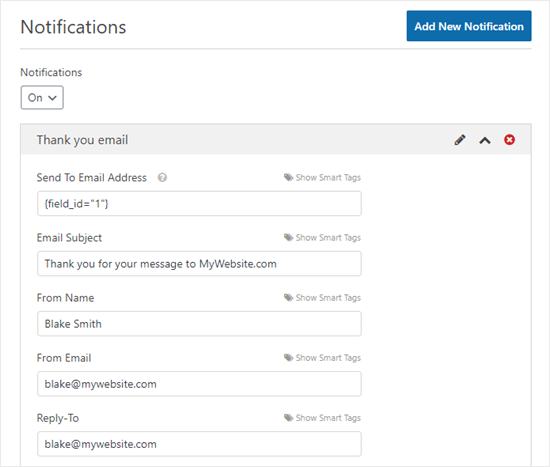
Next, you’ll need to fill in the Email Subject, From Name, From Email, and Reply-To. Here’s an example of how that could look:
接下来,您需要填写电子邮件主题,发件人姓名,发件人电子邮件和回复对象。 这是一个看起来如何的示例:
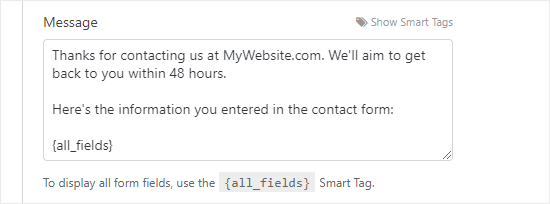
You’ll also want to add a thank you message. By default, the ‘Message’ section contains the tag {all_fields}. This will show all the data that the user entered.
您还需要添加一个感谢信息。 默认情况下,“消息”部分包含标签{all_fields}。 这将显示用户输入的所有数据。
Here’s our thank you message:
这是我们的感谢信息:
Now, your user will get the thank you message after submitting the form, and you’ll get the standard default notification without the thank you message.
现在,您的用户在提交表单后将收到“谢谢”消息,并且您将获得标准的默认通知,而没有“谢谢”消息。
You can set up as many custom notifications as you like. You don’t have to include all the form data in each message, either.
您可以根据需要设置任意数量的自定义通知。 您也不必在每封邮件中都包含所有表单数据。
For instance, if you’re a coach taking bookings, then you could choose to have all the form data sent to you and the client. Your assistant might only receive the client’s name, email address, and the time(s) for which they’ve booked. That way, any private information stays confidential.
例如,如果您是一位接受预订的教练,那么您可以选择将所有表格数据发送给您和客户。 您的助手可能只会收到客户的姓名,电子邮件地址以及他们预定的时间。 这样,任何私人信息都将保持机密。
3.为不同的表单选项添加不同的收件人 (3. Add Different Recipients for Different Form Options)
Sometimes, you might have a single form that you want to send to different people depending on what option the user picks.
有时,您可能希望将单个表单发送给不同的人,具体取决于用户选择的选项。
For instance, you may want to use a single contact form that allows users to submit questions, ask to buy ads on your site, and suggest guest post ideas.
例如,您可能希望使用一个联系表,该表单允许用户提交问题,要求购买您网站上的广告以及建议来宾帖子想法。
You might want to:
你可能想要:
- Send the questions to your assistant. 将问题发送给您的助手。
- Receive the advertising requests yourself. 自己接收广告请求。
- Send the guest post ideas to your editor. 将来宾帖子想法发送给您的编辑。
With WPForms, it’s easy to do this.
使用WPForms,很容易做到这一点。
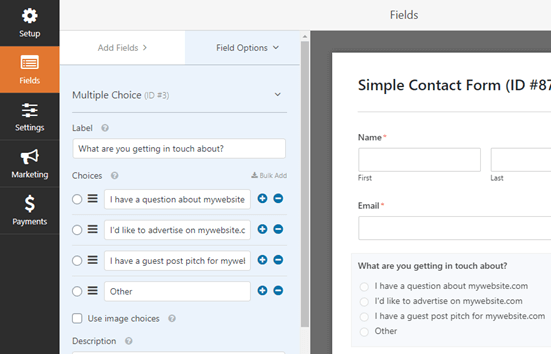
First, go to the ‘Fields’ view of your form. You’ll need to add a field that lets users choose between two or more alternatives. You could pick either the Dropdown or the Multiple Choice field for this.
首先,转到表单的“字段”视图。 您需要添加一个字段,以便用户在两个或多个备选方案之间进行选择。 您可以为此选择“下拉列表”或“多项选择”字段。
For our example, we’re going to use the Multiple Choice (radio button) field. Drag and drop the field onto your form. Next, click on it to edit the different choices.
对于我们的示例,我们将使用“多项选择”(单选按钮)字段。 将字段拖放到表单上。 接下来,单击它以编辑不同的选择。
Once you’ve set up the field with various choices, go to Settings » Notifications.
设置好各种选项的字段后,转到设置»通知 。
Next, click the ‘Add New Notification’ button to create additional notifications that you need. You will need to fill in the details as appropriate for each notification.
接下来,单击“添加新通知”按钮以创建所需的其他通知。 您将需要为每个通知填写适当的详细信息。
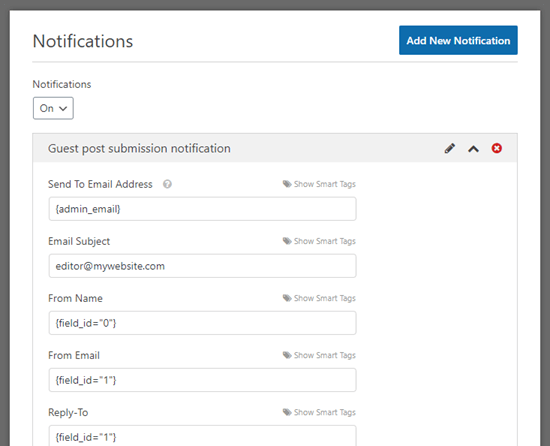
Here’s a notification that’s being sent when a guest post is submitted:
这是提交来宾帖子时发送的通知:
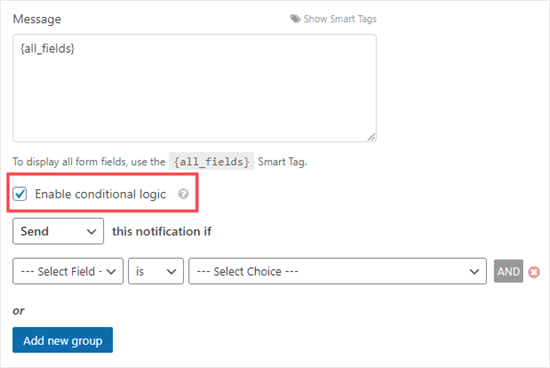
As you scroll down, you need to click the checkbox next to ‘Enable conditional logic’. This will show you few additional settings.
向下滚动时,需要单击“启用条件逻辑”旁边的复选框。 这将显示一些其他设置。
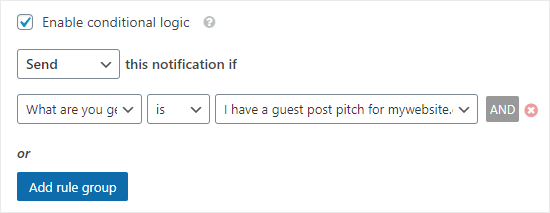
You need to select your multiple-choice field from the dropdown. After that click on the appropriate choice for this notification.
您需要从下拉列表中选择多项选择字段。 之后,单击此通知的适当选择。
You can then continue to set up new notifications for each of your options.
然后,您可以继续为每个选项设置新的通知。
Tip: You can use this method along with the methods we’ve already looked at.
提示:您可以将这种方法与我们已经讨论过的方法一起使用。
For instance, you could enter two or more email addresses in the ‘Send To Email Address’ box. That would send copies of the same notification to those people.
例如,您可以在“发送到电子邮件地址”框中输入两个或多个电子邮件地址。 这样会将相同通知的副本发送给那些人。
You could also set up an email confirmation message to go to the user. If you want to use different confirmations for the different options, you’ll need to enable conditional logic for these too.
您还可以设置一封电子邮件确认消息以发送给用户。 如果要对不同的选项使用不同的确认,则也需要为这些选项启用条件逻辑。
4.在通知电子邮件上抄送其他人 (4. CCing Others on a Notification Email)
Sometimes, you might want to copy people in on your contact form notifications. For instance, you might want to copy in your site’s editor and lead writer when you get a notification about a new guest post submission.
有时,您可能希望复制联系人表单通知中的人员。 例如,当您收到有关新来宾帖子提交的通知时,您可能想复制您网站的编辑和首席作者。
The advantage of using this method is that you can easily ‘Reply All’ to the notification email. Instead of everyone receiving a separate email, as with the first method, there’s one email with multiple recipients copied in.
使用此方法的优点是您可以轻松地“全部答复”到通知电子邮件。 与第一种方法一样,不是每个人都收到单独的电子邮件,而是有一封电子邮件中复制了多个收件人。
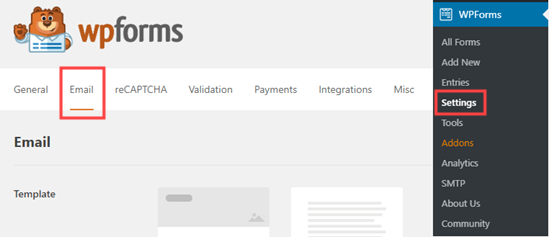
To add a CC field to your form notification settings, go to WPForms » Settings page and then click on the Email tab.
要将抄送字段添加到表单通知设置中,请转至WPForms»设置页面,然后单击电子邮件选项卡。
Scroll down to the bottom of the page and then check the box next to ‘Carbon Copy’ option. Don’t forget to save your settings.
向下滚动到页面底部,然后选中“ Carbon Copy”选项旁边的框。 不要忘记保存您的设置。
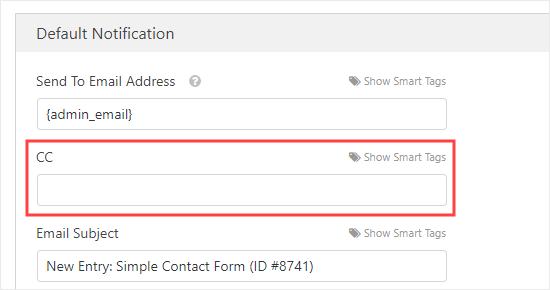
Now, when you’re editing any of your form’s notifications, you’ll see a CC box. This lets you enter any addresses you want that notification sent to.
现在,当您编辑任何表单的通知时,您将看到一个抄送框。 这使您可以输入要将通知发送到的任何地址。
Tip: Don’t enter more than one email address in the ‘Send To Email Address’ box if you’re using this method. Otherwise, the people being CC’d will receive multiple emails.
提示:如果您使用的是此方法,请不要在“发送至电子邮件地址”框中输入多个电子邮件地址。 否则,被抄送的人将收到多封电子邮件。
解决表单的电子邮件传递问题 (Troubleshooting Email Delivery Issues for Your Forms)
If you are having trouble sending email notifications from your WordPress contact form, then this section is for you.
如果您在通过WordPress联系人表格发送电子邮件通知时遇到问题,那么本节适合您。
By default WordPress uses PHP to send emails. This method can be easily misused by spammers and is limited or blocked by many WordPress hosting companies.
默认情况下,WordPress使用PHP发送电子邮件。 此方法很容易被垃圾邮件发送者滥用,并被许多WordPress托管公司限制或阻止。
Since it is not a secure method, it is also blocked by popular email providers like Gmail and Outlook. This means your emails never reach the users inbox.
由于这不是一种安全的方法,因此它也被受欢迎的电子邮件提供商(如Gmail和Outlook)阻止。 这意味着您的电子邮件永远不会到达用户收件箱。
Luckily, there is an easy solution to fix that. You can either use a professional SMTP service provider or use your hosting company’s free business email address feature to securely send your emails.
幸运的是,有一个简单的解决方案可以解决此问题。 您可以使用专业的SMTP服务提供商,也可以使用托管公司的免费公司电子邮件地址功能来安全地发送电子邮件。
For step by step instructions, see our guide on how to fix WordPress not sending email issue.
有关逐步说明,请参阅有关如何修复WordPress不发送电子邮件问题的指南 。
We hope this article has helped you learn how to create a contact form with multiple recipients in WordPress. You might also like our guide on the best WordPress plugins and best email marketing services for small business.
我们希望本文能帮助您学习如何在WordPress中与多个收件人创建联系表单。 您可能还会喜欢我们的有关最佳WordPress插件和最佳小型企业电子邮件营销服务的指南。
If you liked this article, then please subscribe to our YouTube Channel for WordPress video tutorials. You can also find us on Twitter and Facebook.
如果您喜欢这篇文章,请订阅我们的YouTube频道 WordPress视频教程。 您也可以在Twitter和Facebook上找到我们。
翻译自: https://www.wpbeginner.com/plugins/how-to-create-a-contact-form-with-multiple-recipients/
