Android复习总结
这里写目录标题
- 一、安卓历史及配置环境
-
- 1、发展历程
- 2、andorid调试方法
-
- 2.1.模拟器(绿色三角启动)
- 2.2.真机调试
- 3、工程目录结构
-
- 3.1.app目录结构
- 3.2.res文件夹
- 4、开发语言
- 5、代码模块
-
- 5.1.清单文件
- 5.2.界面显示和逻辑
- 二、简单控件
-
- 1、TextView
-
- 1.1.设置文本颜色的几种方式
- 1.2.设置宽高
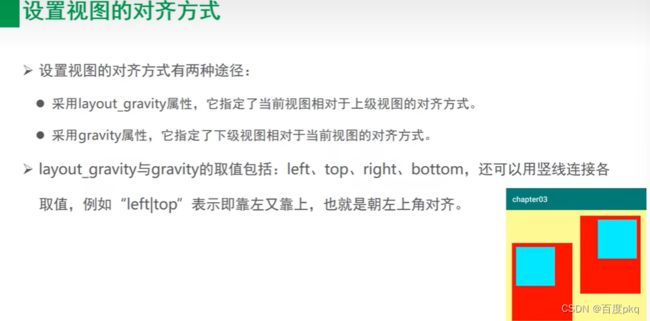
- 1.3.设置间距和对齐方式
- 2、常用布局
-
- 2.1.线性布局
- 2.2.帧布局
- 2.3.相对布局
- 2.4.网格布局
- 2.5.滚动视图
- 2.6.布局总结
- 3、按钮监听
-
- 按钮禁用和恢复
- NoActionBar
- 4、ImageView
-
- 实现按钮控制切换海绵宝宝和派大星图片:
- ImageButton
- 同时展示文本和图片
- svg图标下载导入
- 三、Activity
-
- 1、Activity规则
-
- 1.1 Activtiy启动和结束
- 1.2 Activtiy生命周期
- 1.3 Activtiy启动模式
-
- 1.3.1启动模式分类
- 2、Activity之间传递消息
-
- 2.1 显式和隐式Intent
- 2.2向下一个Activity发送数据
- 2.3向上一个Activity返回数据
一、安卓历史及配置环境
1、发展历程
安卓(Android)是基于Linux内核的自由及开放源代码的操作系统,主要用于移动设备(手机,平板),游戏机,智能手表,车载大屏,智能家居等。
Android Studio和Pycharm一样都是基于IntelliJ IDEA演变而来。
2、andorid调试方法
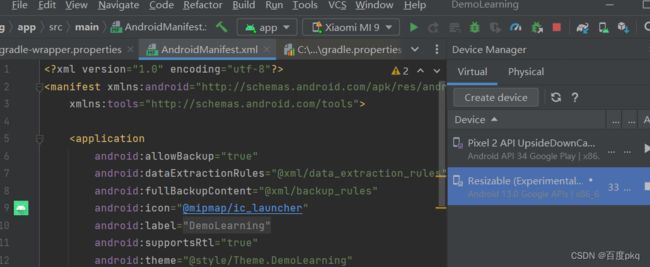
2.1.模拟器(绿色三角启动)
2.2.真机调试
(好处,发布更快,使用拍照之类的功能)
各种机型真机调试出现bug的话可以百度解决。

3、工程目录结构
1、.gradle和.idea
这两个目录下放置的都是Android Studio自动生成的一些文件,我们无须关心,也不要去手动编辑。
2、app
项目中的代码、资源等内容几乎都是放置在这个目录下的,我们后面的开发工作也基本都是在这个目录下进行的,待会儿还会对这个目录单独展开进行讲解。
3、build
这个目录你也不需要过多关心,它主要包含了一些在编译时自动生成的文件。
4、gradle
这个目录下包含了gradle wrapper的配置文件,使用gradle wrapper的方式不需要提前将gradle下载好,而是会自动根据本地的缓存情况决定是否需要联网下载gradle。Android Studio默认没有启动gradle wrapper的方式,如果需要打开,可以点击Android Studio导航栏 --> File --> Settings --> Build,Execution,Deployment --> Gradle,进行配置更改。
5、.gitignore
这个文件是用来将指定的目录或文件排除在版本控制之外的。
6、build.gradle
这是项目全局的gradle构建脚本,通常这个文件中的内容是不需要修改的。
7、gradle.properties
这个文件是全局的gradle配置文件,在这里配置的属性将会影响到项目中所有的gradle编译脚本。
8、gradlew和gradlew.bat
这两个文件是用来在命令行界面中执行gradle命令的,其中gradlew是在Linux或Mac系统中使用的,gradlew.bat是在Windows系统中使用的。
9、HelloWorld.iml
iml文件是所有IntelliJ IDEA项目都会自动生成的一个文件(Android Studio是基于IntelliJ IDEA开发的),用于标识这是一个IntelliJ IDEA项目,我们不需要修改这个文件中的任何内容。
10、local.properties
这个文件用于指定本机中的Android SDK路径,通常内容都是自动生成的,我们并不需要修改。除非你本机中的Android SDK位置发生了变化,那么就将这个文件中的路径改成新的位置即可。
11、settings.gradle
这个文件用于指定项目中所有引入的模块。由于HelloWorld项目中就只有一个app模块,因此该文件中也就只引入了app这一个模块。通常情况下模块的引入都是自动完成的,需要我们手动去修改这个文件的场景可能比较少。
3.1.app目录结构
现在整个项目的外层目录结构已经介绍完了。你会发现,除了app目录之外,大多数的文件和目录都是自动生成的,我们并不需要进行修改。想必你已经猜到了,app目录下的内容才是我们以后的工作重点,展开之后结构如下:

1、build
这个目录和外层的build目录类似,主要也是包含了一些在编译时自动生成的文件,不过它里面的内容会更多更杂,我们不需要过多关系。
2、libs
如果你的项目中使用到了第三方jar包,就需要把这些jar包都放在libs目录下,放在这个目录下的jar包都会被自动添加到构建路径里去。
3、AndroidTest
此处是用来编写Android Test测试用例的,可以对项目进行一些自动化测试。
4、java
毫无疑问,java目录是放置我们所有java代码的地方,展开该目录,你将看到我们刚才创建的HelloWorldActivity文件就在里面。
5、res
这个目录下的内容就有点多了。简单点说,就是你在项目中使用到的所有图片,布局,字符串等资源都要存放在这个目录下。当然这个目录下还有很多子目录,图片放在drawable目录下,布局放在layout目录下,字符串放在values目录下,所以你不用担心会把整个res目录弄得乱糟糟的。
6、AndroidManifest.xml
这是你整个Android项目的配置文件,你在程序中定义的所以四大组件都需要在这个文件里注册,另外还可以在这个文件中给应用程序添加权限声明。
7、test
此处是用来编写Unit Test测试用例的,是对项目进行自动化测试的另一种方式。
8、.gitignore
这个文件用于将app模块内的指定的目录或文件排除在版本控制之外,作用和外层的.gitignore文件类似。
10、build.gradle
这是app模块的gradle构建脚本,这个文件中会指定很多项目构建相关的配置。
11、proguard-rules.pro
这个文件用于指定项目代码的混淆规则,当代码开发完成后打成安装包文件,如果不希望代码被别人破解,通常会将代码混淆,从而让破解者难以阅读。
3.2.res文件夹
如果你展开res目录看一下,其实里面的东西还是挺多的,很容易让人看得眼花缭乱,如下图:

所有以drawable开头的文件夹都是用来放图片的,
所有以mipmap开头的文件夹都是用来放应用图标的,
所有以values开头的文件夹都是用来放字符串、样式、颜色等配置的,
layout文件夹是用来放布局文件的。
4、开发语言
分为两大技术路线:原生开发(渲染效果更好)和混合开发(更快,可以跨平台)
使用语言:Java和Kotlin
扩展语言和工具:
- C/C++(用于计算图像,音视频处理等复杂运算场合,配合NDK使用,高级开发中常用)
- XML(常用的布局开发,但是在逐渐被compose取代,compose使用kotlin开发)
- SQLite (Android开发自带的数据库,使用SQL语法)
- Gradle 是一个项目自动化构建工具,做依赖、打包、部署、发布、各种渠道差异化管理等工作。
5、代码模块
5.1.清单文件
<manifest xmlns:android="http://schemas.android.com/apk/res/android"
    xmlns:tools="http://schemas.android.com/tools">

    <application
        android:allowBackup="true"
        android:dataExtractionRules="@xml/data_extraction_rules"
        android:fullBackupContent="@xml/backup_rules"
        指定App的图标
        android:icon="@mipmap/ic_launcher"
        指定App的名字
        android:label="@string/app_name"
        是否支持阿拉伯语,波斯语(从右往左排序)
        android:supportsRtl="true"
        指定App主体风格
        android:theme="@style/Theme.DemoLearning"
        tools:targetApi="31">
        活动的注册和显示顺序
        <activity
            android:name=".MainActivity"
            android:exported="true"
            android:label="@string/app_name"
            android:theme="@style/Theme.DemoLearning.NoActionBar">
            <intent-filter>
                <action android:name="android.intent.action.MAIN" />

                <category android:name="android.intent.category.LAUNCHER" />
            intent-filter>
        activity>
    application>

manifest>
5.2.界面显示和逻辑
使用XML标记来写布局,Java写功能逻辑,APP由二者组合而成。
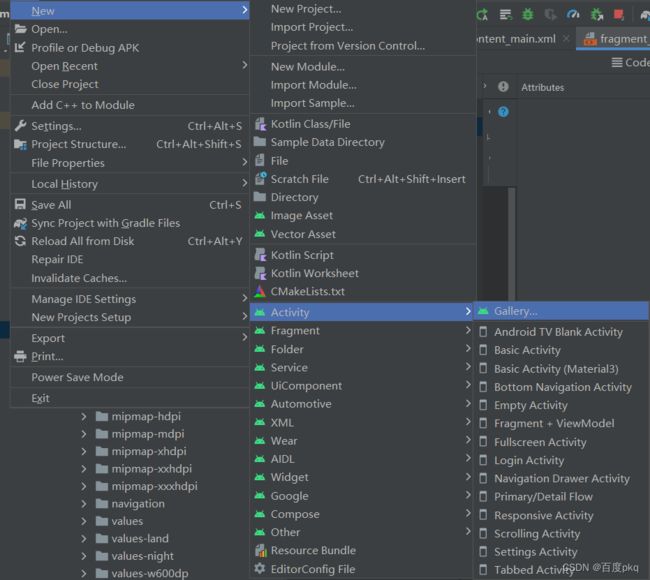
Activity创建(配套创建XML)

二、简单控件
1、TextView
字体大小的单位关系

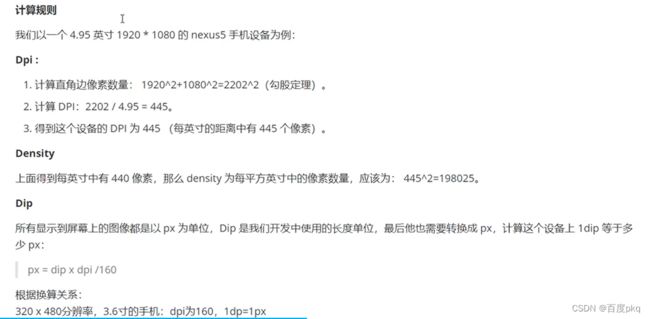
对于相同分辨率的手机,屏幕越大,同DP的组件占用屏幕比例越小

1.1.设置文本颜色的几种方式
可以分别在Xml和Java中设置,设置方式RGB和**ARGB(前面带有两位十六进制表示透明度)**方式基本相同。
- 使用RGB,xml中#00ff00,java中0x00ff00红色
- 使用ARGB,xml中#ff00ff00,java中0xff00ff00非透明红色
- 在values文件夹下的colors.xml中预先设置再调用

1.2.设置宽高
package com.example.demo1;


import androidx.appcompat.app.AppCompatActivity;

import android.os.Bundle;
import android.util.Log;
import android.view.ViewGroup;
import android.widget.TextView;

public class TextVActivity extends AppCompatActivity {

    @Override
    protected void onCreate(Bundle savedInstanceState) {
        super.onCreate(savedInstanceState);
        setContentView(R.layout.activity_text_view);
        TextView tv= findViewById(R.id.tv2);
        tv.setText("你好,世界");
//        tv.setTextColor(Color.GREEN);
        //前两位是透明度,不透明
        tv.setTextColor(0xff00ff00);
        //获取tv的布局参数
        ViewGroup.LayoutParams layoutParams = tv.getLayoutParams();
        //默认返回px,要转化为dp
        layoutParams.width=Utils.dip2px(this,350);
        tv.setLayoutParams(layoutParams);
    }
}
工具类
package com.example.demo1;

import android.content.Context;

public class Utils {
    public static int dip2px(Context context,float val){
        //获取当前手机像素密度(1dp对应的px数量)
        float density = context.getResources().getDisplayMetrics().density;
        return (int)(density * val+0.5f);
    }
}
1.3.设置间距和对齐方式
<LinearLayout xmlns:android="http://schemas.android.com/apk/res/android"
    xmlns:app="http://schemas.android.com/apk/res-auto"
    xmlns:tools="http://schemas.android.com/tools"
    android:layout_width="match_parent"
    android:layout_height="600dp"
    android:background="#43ff99ff"
    android:gravity="right|bottom"
    android:orientation="vertical"
    tools:context=".MarginActivity">

    <LinearLayout
        android:layout_width="200dp"
        android:layout_height="200dp"
        android:layout_gravity="left">

        <LinearLayout
            android:layout_width="match_parent"
            android:layout_height="match_parent"
            android:layout_margin="20dp"
            android:background="#ff0000"
            android:orientation="vertical">

            <View
                android:layout_width="100dp"

                android:layout_height="100dp"
                android:layout_gravity="right|bottom"
                android:background="#0000ff" />
        LinearLayout>
    LinearLayout>

    <LinearLayout
        android:layout_width="200dp"
        android:layout_height="200dp">

        <LinearLayout
            android:layout_width="match_parent"
            android:layout_height="match_parent"
            android:layout_margin="20dp"
            android:background="#ff0000"
            android:gravity="left|bottom"
            android:orientation="vertical">

            <View
                android:layout_width="100dp"
                android:layout_height="100dp"
                android:background="#0000ff" />
        LinearLayout>
    LinearLayout>

LinearLayout>
2、常用布局
2.1.线性布局
2.2.帧布局
默认一层一层叠在一起,可根据距离,尺寸来进行位移。
FrameLayout 以前很喜欢和线性搭配使用,但是为了提高渲染效率尽量使用相对布局,减少深度。
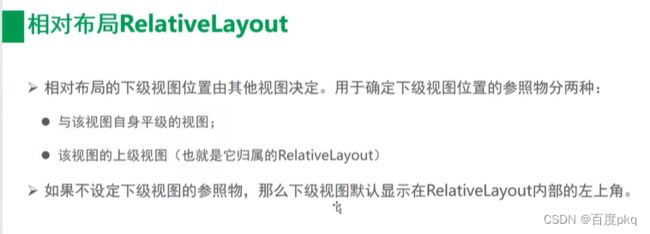
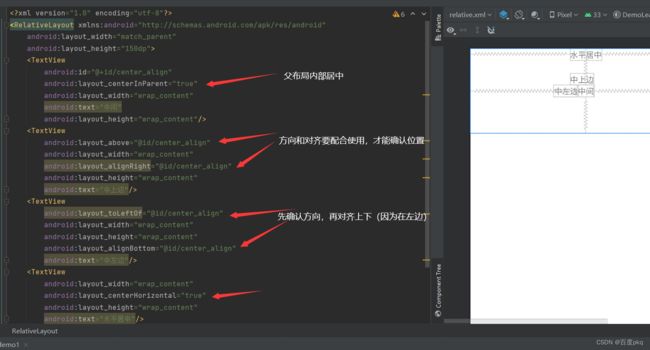
2.3.相对布局
2.4.网格布局
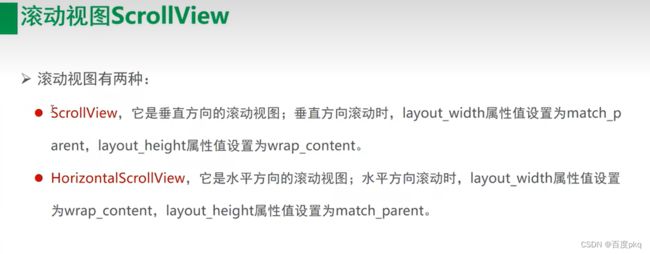
2.5.滚动视图
2.6.布局总结
布局简单,优先使用 LinearLayout,其次考虑 RelativeLayout 和 ConstraintLayout 。
原因:简单布局下,LinearLayout 确实简单,且耗时不多,代码量也相对少一些。
布局复杂,优先使用 RelativeLayout 和 ConstraintLayout
原因:布局过多层次的嵌套,会增加绘制时间。
3、按钮监听
Button 是TextView的派生类
内部默认居中对齐,有默认背景,会默认将英文转换成大写。

logcat TAG确切值筛选日志

Ctrl+Alt+F 将局部变量变成全局私有变量
activity_main.xml
<RelativeLayout xmlns:android="http://schemas.android.com/apk/res/android"
    xmlns:app="http://schemas.android.com/apk/res-auto"
    xmlns:tools="http://schemas.android.com/tools"
    android:layout_width="match_parent"
    android:layout_height="match_parent"
    tools:context=".MainActivity">

    <LinearLayout
        android:layout_width="wrap_content"
        android:layout_height="wrap_content"
        android:layout_centerInParent="true"
        android:orientation="horizontal">

        <Button
            android:id="@+id/short_press"
            android:layout_width="wrap_content"
            android:layout_height="wrap_content"
            android:layout_marginEnd="10dp"
            android:background="@drawable/bt_background_orginal"
            android:text="@string/bt_short"
            android:textAllCaps="false" />

        <Button
            android:id="@+id/long_press"
            android:layout_width="wrap_content"
            android:layout_height="wrap_content"

            android:background="@drawable/bt_background_orginal"
            android:text="@string/bt_long"
            android:textAllCaps="false" />
    LinearLayout>

RelativeLayout>
drawable/bt_background_orginal
<shape xmlns:android="http://schemas.android.com/apk/res/android">
    <solid android:color="@color/purple_500"/>

    <corners android:radius="5dp"/>
shape>
java
package com.example.buttonlistener;

import androidx.appcompat.app.AppCompatActivity;

import android.content.Context;
import android.graphics.Color;
import android.os.Bundle;
import android.view.View;
import android.widget.Button;
import android.widget.Toast;

public class MainActivity extends AppCompatActivity implements View.OnLongClickListener {
    public Button bt_short;
    public Button bt_long;

    @Override
    protected void onCreate(Bundle savedInstanceState) {
        super.onCreate(savedInstanceState);
        setContentView(R.layout.activity_main);
        bt_short = findViewById(R.id.short_press);
        bt_long = findViewById(R.id.long_press);
        bt_short.setOnClickListener(new MyOnClickListener(bt_short, this));//有很好的健壮性,也可以直接new View.OnClickListener
        bt_long.setOnLongClickListener(this);

    }

    @Override
    public boolean onLongClick(View view) {
        if (view.getId() == R.id.long_press) {
            Toast.makeText((Context) this, "你长按了按钮", Toast.LENGTH_LONG).show();
        }
        return true;//如果返回值为true的话这个点击事件会被长点击独占,否则相反。
    }
}

class MyOnClickListener implements View.OnClickListener {

    private final Button bt_short;
    private boolean flag = true;
    private final Context context;

    public MyOnClickListener(Button bt_short, Context context) {
        this.bt_short = bt_short;
        this.context = context;
    }

    @Override
    public void onClick(View view) {
    //定义一个标记变量来修改点击按钮的背景
        if (flag) {
            bt_short.setText("已点击");
            bt_short.setBackgroundColor(0x888888);//int
            bt_short.setTextColor(Color.BLACK);
            Toast.makeText(context, "你点击了按钮", Toast.LENGTH_SHORT).show();
            flag = false;
        } else {
            bt_short.setText("短按");
            bt_short.setBackgroundResource(R.drawable.bt_background_orginal);//int setBackground方法为Drawable类型
            bt_short.setTextColor(Color.WHITE);
            flag = true;

        }
    }
}
按钮禁用和恢复
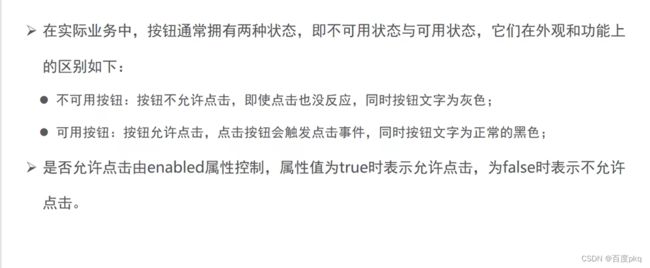
常用于发送验证码,或者等待监听事件中,使点击后处理过程中无法重复点击。
package com.example.buttonlistener;

import android.annotation.SuppressLint;
import android.graphics.Color;
import android.os.Bundle;

import com.google.android.material.snackbar.Snackbar;

import androidx.appcompat.app.AppCompatActivity;

import android.text.format.DateUtils;
import android.view.View;
import android.widget.Button;
import android.widget.TextView;
import android.widget.Toast;

import androidx.navigation.NavController;
import androidx.navigation.Navigation;
import androidx.navigation.ui.AppBarConfiguration;
import androidx.navigation.ui.NavigationUI;

import com.example.buttonlistener.databinding.ActivityButtonEnableBinding;

import java.util.Date;

public class ButtonEnableActivity extends AppCompatActivity implements View.OnClickListener {
    public Button test_code;
    public TextView show;

    @Override
    protected void onCreate(Bundle savedInstanceState) {
        super.onCreate(savedInstanceState);
        setContentView(R.layout.activity_button_enable);
        Button open = findViewById(R.id.open);
        Button close = findViewById(R.id.close);
        test_code = findViewById(R.id.test_code);
        show = findViewById(R.id.show);
        open.setOnClickListener(this);
        close.setOnClickListener(this);
        test_code.setOnClickListener(this);
    }

    @SuppressLint("ResourceAsColor")
    @Override
    public void onClick(View view) {
        switch (view.getId()) {
            case R.id.open:
                test_code.setEnabled(true);
                test_code.setTextColor(Color.WHITE);
                Toast.makeText(this, "启用", Toast.LENGTH_SHORT).show();
                break;
            case R.id.close:
                test_code.setEnabled(false);
                Toast.makeText(this, "禁用", Toast.LENGTH_SHORT).show();
                test_code.setTextColor(Color.GRAY);
                break;
            case R.id.test_code:
                String time = String.valueOf(System.currentTimeMillis());
                String describe = String.format("%s发送短信验证码为:%s", "test_code", time.substring(time.length()-5,time.length()-1));
                show.setText(describe);
                break;
        }
    }
}
NoActionBar
在注册清单中的目标Activity中写入可以去除标题android:theme=“@style/Theme.项目名.NoActionBar”
4、ImageView
实现按钮控制切换海绵宝宝和派大星图片:
package com.example.buttonlistener;

import androidx.appcompat.app.AppCompatActivity;

import android.os.Bundle;
import android.view.View;
import android.widget.Button;
import android.widget.ImageView;

public class ImageActivity extends AppCompatActivity {
    public boolean flag = true;

    @Override
    protected void onCreate(Bundle savedInstanceState) {
        super.onCreate(savedInstanceState);
        setContentView(R.layout.activity_image);
        ImageView im = findViewById(R.id.im);
        Button change = findViewById(R.id.change);
        change.setOnClickListener(new View.OnClickListener() {
            @Override
            public void onClick(View view) {
                if (flag) {
                    im.setImageResource(R.drawable.image2);
                    flag = false;
                } else {
                    im.setImageResource(R.drawable.image);
                    flag = true;
                }
            }
        });
    }
}
ImageButton
同时展示文本和图片
<LinearLayout xmlns:android="http://schemas.android.com/apk/res/android"
    xmlns:app="http://schemas.android.com/apk/res-auto"
    xmlns:tools="http://schemas.android.com/tools"
    android:layout_width="match_parent"
    android:layout_height="match_parent">
    <Button
        android:text="图标在左边"
        android:drawablePadding="10dp"
        android:background="#999999"
        android:drawableLeft="@drawable/icon_test"
        android:layout_width="wrap_content"
        android:layout_height="wrap_content" />
LinearLayout>
阿里巴巴矢量库:(加入购物车可批量下载)
https://www.iconfont.cn/collections/detail?spm=a313x.7781069.1998910419.de12df413&cid=16472
svg图标下载导入
在矢量库中选择想要的图片,可以直接下载png,但是大小颜色无法定制,下载svg可以在用Vector Asset导入成xml调节大小和颜色。


   <Button
            android:id="@+id/btn_del"
            android:layout_width="60dp"
            android:paddingStart="15dp"
            android:layout_height="50dp"
            android:layout_marginLeft="14dp"
            android:background="@drawable/selector"
            android:drawableStart="@drawable/tui"
            android:textSize="20sp" />
不点击的bt_background_unclick

<shape xmlns:android="http://schemas.android.com/apk/res/android" >
    <corners
        android:radius="10dp"/>
    <solid
        android:color="#fffefefe"/>
    <padding android:bottom="1dp"/>

shape>
按下的bt_background_click

<shape xmlns:android="http://schemas.android.com/apk/res/android" >
    <corners
        android:radius="10dp"/>
    <solid
        android:color="#fffcfcfc"/>
    <padding android:bottom="1dp"/>
shape>
等于按钮的背景

<shape xmlns:android="http://schemas.android.com/apk/res/android" >

    <solid android:color="#FF9400"/>
    <corners
        android:radius="8dp"/>
shape>
selector整合两个click

<selector xmlns:android="http://schemas.android.com/apk/res/android" >
    <item android:drawable="@drawable/bt_background_unclick"
        android:state_pressed="true"/>
    <item android:drawable="@drawable/bt_background_click"/>
selector>
<LinearLayout xmlns:android="http://schemas.android.com/apk/res/android"
    xmlns:tools="http://schemas.android.com/tools"
    android:layout_width="match_parent"
    android:layout_height="match_parent"
    android:background="@color/white"
    android:orientation="vertical"
    tools:context=".MainActivity">


    <LinearLayout
        android:layout_width="match_parent"
        android:layout_height="match_parent"
        android:layout_marginBottom="30dp"
        android:gravity="bottom"
        android:orientation="vertical">

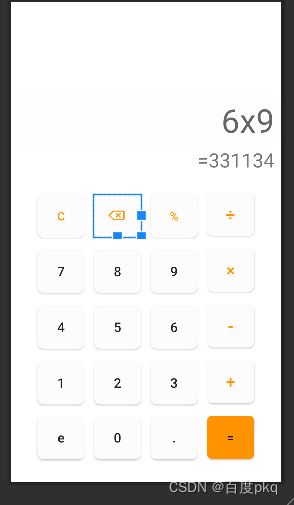
        <EditText
            android:id="@+id/et_input"
            android:layout_width="match_parent"
            android:layout_height="80dp"
            android:background="@drawable/bt_background_unclick"
            android:hint="6x9"
            android:paddingEnd="10dp"

            android:textAlignment="textEnd"
            android:textSize="50sp"
            tools:ignore="RtlSymmetry" />

        <TextView
            android:id="@+id/tv_res"
            android:layout_width="match_parent"
            android:layout_height="wrap_content"
            android:paddingEnd="10dp"
            android:text="=331134"
            android:textAlignment="textEnd"
            android:textSize="30sp"
            tools:ignore="RtlSymmetry" />

        <LinearLayout
            android:layout_width="fill_parent"
            android:layout_height="wrap_content"
            android:layout_marginTop="30dp"
            android:gravity="center_horizontal"
            android:orientation="horizontal">

            <Button
                android:id="@+id/btn_clr"
                android:layout_width="72dp"
                android:layout_height="66dp"
                android:layout_marginBottom="5dp"
                android:background="@drawable/selector"
                android:drawablePadding="20dp"
                android:text="C"
                android:textColor="#FF9400"
                android:textSize="18sp" />

            <Button
                android:id="@+id/btn_del"
                android:layout_width="72dp"
                android:layout_height="66dp"
                android:layout_marginLeft="14dp"
                android:background="@drawable/selector"
                android:drawableStart="@drawable/tui"
                android:paddingStart="20dp"
                android:textAlignment="center"
                android:textSize="20sp" />

            <Button
                android:id="@+id/btn_percent"
                android:layout_width="72dp"
                android:layout_height="66dp"
                android:layout_marginLeft="14dp"
                android:background="@drawable/selector"
                android:text="%"
                android:textColor="#FF9400"

                android:textSize="18sp" />

            <Button
                android:id="@+id/btn_div"
                android:layout_width="72dp"
                android:layout_height="66dp"
                android:layout_marginLeft="14dp"
                android:background="@drawable/selector"
                android:text="÷"
                android:textColor="#FF9400"

                android:textSize="25sp" />


        LinearLayout>

        <LinearLayout
            android:layout_width="fill_parent"
            android:layout_height="wrap_content"
            android:layout_marginTop="14dp"
            android:gravity="center_horizontal"
            android:orientation="horizontal">

            <Button
                android:id="@+id/btn_7"
                android:layout_width="72dp"
                android:layout_height="66dp"
                android:layout_marginBottom="5dp"
                android:background="@drawable/selector"
                android:text="7"

                android:textSize="20sp" />

            <Button
                android:id="@+id/btn_8"
                android:layout_width="72dp"
                android:layout_height="66dp"
                android:layout_marginLeft="14dp"
                android:background="@drawable/selector"
                android:text="8"

                android:textSize="20sp" />

            <Button
                android:id="@+id/btn_9"
                android:layout_width="72dp"
                android:layout_height="66dp"
                android:layout_marginLeft="14dp"
                android:background="@drawable/selector"
                android:text="9"

                android:textSize="20sp" />

            <Button
                android:id="@+id/btn_mul"
                android:layout_width="72dp"
                android:layout_height="66dp"
                android:layout_marginLeft="14dp"
                android:background="@drawable/selector"

                android:text="×"
                android:textColor="#FF9400"

                android:textSize="25sp" />

        LinearLayout>

        <LinearLayout
            android:layout_width="fill_parent"
            android:layout_height="wrap_content"
            android:layout_marginTop="14dp"
            android:gravity="center_horizontal"
            android:orientation="horizontal">

            <Button
                android:id="@+id/btn_4"
                android:layout_width="72dp"
                android:layout_height="66dp"
                android:background="@drawable/selector"
                android:text="4"
                android:layout_marginBottom="5dp"
                android:textSize="20sp" />

            <Button
                android:id="@+id/btn_5"
                android:layout_width="72dp"
                android:layout_height="66dp"
                android:layout_marginLeft="14dp"
                android:background="@drawable/selector"
                android:text="5"

                android:textSize="20sp" />

            <Button
                android:id="@+id/btn_6"
                android:layout_width="72dp"
                android:layout_height="66dp"
                android:layout_marginLeft="14dp"
                android:background="@drawable/selector"
                android:text="6"

                android:textSize="20sp" />

            <Button
                android:id="@+id/btn_sub"
                android:layout_width="72dp"
                android:layout_height="66dp"
                android:layout_marginLeft="14dp"
                android:background="@drawable/selector"

                android:text="-"
                android:textColor="#FF9400"

                android:textSize="25sp" />
        LinearLayout>


        <LinearLayout
            android:layout_width="fill_parent"
            android:layout_height="wrap_content"
            android:layout_marginTop="14dp"
            android:gravity="center_horizontal"
            android:orientation="horizontal">

            <Button
                android:id="@+id/btn_1"
                android:layout_width="72dp"
                android:layout_height="66dp"
                android:layout_marginBottom="5dp"
                android:background="@drawable/selector"
                android:text="1"

                android:textSize="20sp" />

            <Button
                android:id="@+id/btn_2"
                android:layout_width="72dp"
                android:layout_height="66dp"
                android:layout_marginLeft="14dp"
                android:background="@drawable/selector"
                android:text="2"
                android:textSize="20sp" />

            <Button
                android:id="@+id/btn_3"
                android:layout_width="72dp"
                android:layout_height="66dp"
                android:layout_marginLeft="14dp"
                android:background="@drawable/selector"
                android:text="3"
                android:textSize="20sp" />

            <Button
                android:id="@+id/btn_add"
                android:layout_width="72dp"
                android:layout_height="66dp"
                android:layout_marginLeft="14dp"
                android:background="@drawable/selector"
                android:text="+"
                android:textColor="#FF9400"

                android:textSize="25sp" />
        LinearLayout>

        <LinearLayout
            android:layout_width="fill_parent"
            android:layout_height="wrap_content"
            android:layout_marginTop="14dp"
            android:gravity="center_horizontal"
            android:orientation="horizontal">

            <Button
                android:id="@+id/btn_e"
                android:layout_width="72dp"
                android:layout_height="66dp"
                android:layout_marginBottom="5dp"
                android:background="@drawable/selector"
                android:text="e"

                android:textAllCaps="false"
                android:textSize="20sp" />

            <Button
                android:id="@+id/btn_0"
                android:layout_width="72dp"
                android:layout_height="66dp"
                android:layout_marginLeft="14dp"
                android:background="@drawable/selector"
                android:text="0"
                android:textSize="20sp" />


            <Button
                android:id="@+id/btn_pt"
                android:layout_width="72dp"
                android:layout_height="66dp"
                android:layout_marginLeft="14dp"
                android:background="@drawable/selector"
                android:text="."
                android:textSize="20sp" />

            <Button
                android:id="@+id/btn_eq"
                android:layout_width="72dp"
                android:layout_height="66dp"
                android:layout_marginLeft="14dp"
                android:background="@drawable/bt_bg"
                android:text="="

                android:textSize="20sp" />
        LinearLayout>

    LinearLayout>
LinearLayout>
三、Activity
android四大组件分别为activity、service、content provider、broadcast receiver。
- 一个Activity通常就是一个单独的屏幕(窗口)。
- Activity之间通过Intent进行通信。
- 每一个Activity都必须要在Android Manifest.xml配置文件中声明,否则系统将不识别也不执行该Activity,new出来的活动会自动在清单文件中配置。
1、Activity规则
1.1 Activtiy启动和结束
// 跳转到新页面方法:
startActivity(new intent(当前class名.this,目标.class);
// 结束当前Activity页面;
finish();
1.2 Activtiy生命周期
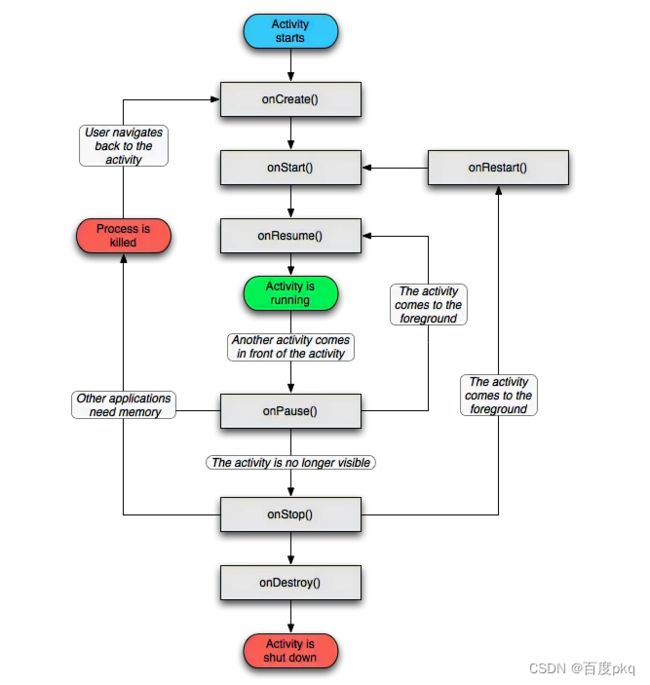
什么是 Activtiy生命周期?
Activtiy生命周期是从创建到销毁过程中调用的方法。
onCreate->onStart->onResume
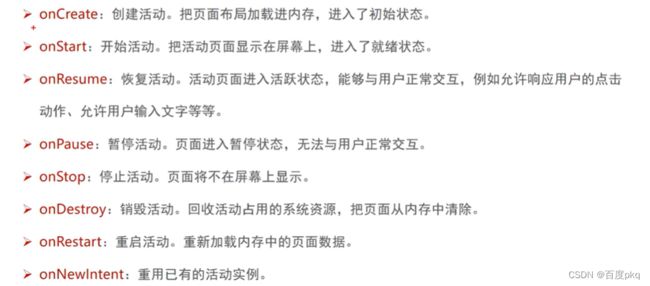
直到显示界面,创建,开始,显示这一条路,当跳转Activity时,到onPause如果在当前界面未消失时返回回来,就会回到onResume,如果不挂在后台就会执行onStop,在onStop时,点击返回就会重新回到onRestart(为啥不回到onResume,因为是Stop和Start一对的,Resume和Pause等),反之如果不挂在后台就会选择到onDestroy销毁,挂在后台就会出现其他应用要使用内存,这边会杀死进程(系统会自行判定),重新进来的时候就回到创建状态。
1.3 Activtiy启动模式
启动Activity的方式。
设置启动模式两种方法
- 在清单文件中
- 在Java代码中动态设置
/**
 *  FLAG_ACTIVITY_SINGLE_TOP:指定启动模式为栈顶复用模式(SingleTop)
 *  FLAG_ACTIVITY_NEW_TASK:指定启动模式为栈内复用模式(SingleTask)
 *  FLAG_ACTIVITY_CLEAR_TOP:所有位于其上层的Activity都要移除,SingleTask模式默认具有此标记效果;
 *  FLAG_ACTIVITY_EXCLUDE_FROM_RECENTS:具有该标记的Activity不会出现在历史Activity的列表中,即无法通过历史列表回到该Activity上;
 */
Intent inten = new Intent (ActivityA.this,ActivityB.class);
intent.addFlags(Intent,FLAG_ACTIVITY_NEW_TASK);
startActivity(intent);
1.3.1启动模式分类
-
standard 默认启动模式,在不进行显式指定的情况下,所有活动都会自动使用这种启动模式。每当启动一个新的活动,它就会在返回栈中入栈,并处于栈顶的位置。对于使用 standard 模式的活动,系统不会在乎这个活动是否已经在返回栈中存在,每次启动都会创建该活动的一个新的实例,就是说每次都会增加内存使用。
-
singleTop在启动活动时如果发现返回栈的栈顶已经是该活动,则认为可以直接使用它,不会再创建新的活动实例,使用场景(适合开启方式多、多应用开启调用的Activity,通过这种设置可以避免已经创建过的Activity被重复创建,多数通过动态设置使用,例如微信支付,QQ支付等支付界面)。
-
singleTask每次启动该活动时系统首先会在返回栈中检查是否存在该活动的实例,如果发现已经存在则直接使用该实例,并把在这个活动之上的所有活动统统出栈,如果没有发现就会创建一个新的活动实例,使用场景(程序主界面及耗费系统资源的Activity,因为回到主界面不应该被多次创建其他的Activity实例,返回主界面时应该清空上面所有实例)。
-
singleInstance 模式的活动会启用一个新的返回栈来管理这个活动。程序中有一个活动是允许其他程序调用的,实现其他程序和我们的程序可以共享这个活动的实例。


