【SpringSecurity】二、密码处理与获取当前登录用户
文章目录
- 一、密码处理
-
- 1、加密方案
- 2、BCryptPasswordEncoder类初体验
- 3、使用加密码加密
- 二、获取当前登录用户
-
- 1、方式一:通过安全上下文的静态调用
- 2、方式二:做为Controller中方法的参数
- 3、方式三:从HTTPServletRequest中获取
- 4、方式四:使用@AuthenticationPrincipal
- 5、方法五:通过自定义接口获取用户信息
- 6、在JSP中获取用户信息
- 7、结果分析
一、密码处理
1、加密方案
密码加密一般使用散列函数,又称散列算法,哈希函数,这些函数都是单向函数(
从明文到密文,反之不行),此时哪怕被拖库,拿到密文也无法解析。校验登录时,拿用户的输入进行加密后和库中密文对比即可。
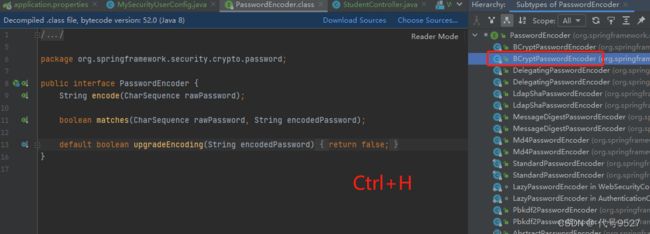
常用的散列算法有MD5和SHA。Spring Security提供多种密码加密方案,基本上都实现了PasswordEncoder接口,官方推荐使用BCryptPasswordEncoder
接口中,encode方法用来加密,match则用来判断密码的密文是否匹配。
2、BCryptPasswordEncoder类初体验
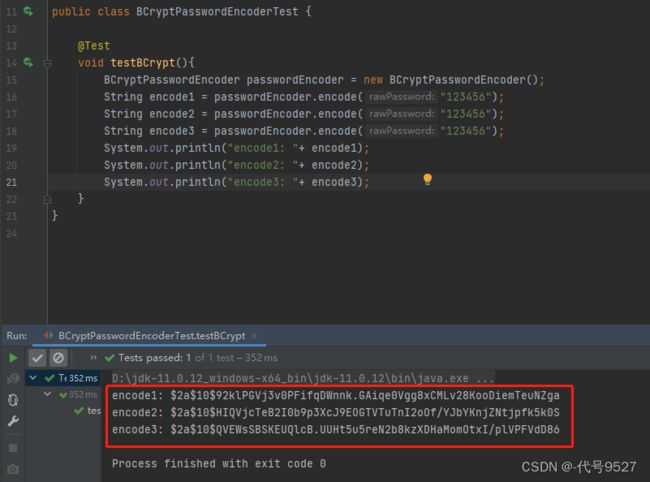
可以看到,同样的String密码,三次编码的结果并不相同,如果不添加噪音(加盐),一个字符串被编码后的结果始终相同,则即使它不能反编译,也可以被破解。(反复正向编译不同密码,直到匹配这个密文 ⇒ RainbowCrack彩虹表攻击)
@Slf4j
public class PasswordEncoderTest {
    @Test
    @DisplayName("测试加密类BCryptPasswordEncoder")  //DisplayName :为测试类或者测试方法设置展示名称
    void testPassword(){
        BCryptPasswordEncoder bCryptPasswordEncoder = new BCryptPasswordEncoder();
        //加密(明文到密文)
        String encode1 = bCryptPasswordEncoder.encode("123456");
        log.info("encode1:"+encode1);
        String encode2 = bCryptPasswordEncoder.encode("123456");
        log.info("encode2:"+encode2);
        String encode3 = bCryptPasswordEncoder.encode("123456");
        log.info("encode3:"+encode3);
        //匹配方法,判断明文经过加密后是否和密文一样
        boolean result1 = bCryptPasswordEncoder.matches("123456", encode1);
        boolean result2 = bCryptPasswordEncoder.matches("123456", encode1);
        boolean result3 = bCryptPasswordEncoder.matches("123456", encode1);
        log.info(result1+":"+result2+":"+result3);
        assertTrue(result1);
        assertTrue(result2);
        assertTrue(result3);
    }
}
查看控制台发现特点是:
相同的字符串加密之后的结果都不一样,但是比较的时候是一样的,因为加了盐(salt)了。
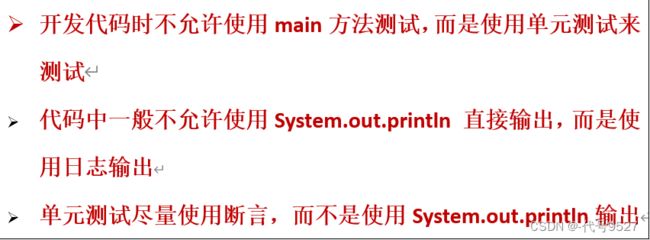
小Tip:
3、使用加密码加密
接下来,修改编码器为BCryptPasswordEncoder:
@Bean
public PasswordEncoder passwordEncoder(){
    //使用加密算法对密码进行加密
    return new BCryptPasswordEncoder();
}
重启服务,发现登录失败,这是因为前端传了密码为123,然后转为密文后,和存于内存中的明文密码123做对比,密文肯定不等于明文,校验失败。因此,系统中定义的用户密码也需要加密,使用密文存储:
* 使用PasswordEncoder接口中的encode方法

UserDetails user1 = User.builder()
                .username("liu")
                .password(passwordEncoder().encode("123"))
                .roles("student")
                .build();
UserDetails user2 = User.builder()
		        .username("Mr.liu")
		        .password(passwordEncoder().encode("123"))
		        .roles("teacher")
		        .build();
二、获取当前登录用户
根据SpringSecuriuty框架校验用户的流程,可以分析出,想拿当前登录用户的信息,有以下几种方式:
1、方式一:通过安全上下文的静态调用
Authentication authentication = SecurityContextHolder.getContext().getAuthentication();
String currentPrincipalName = authentication.getName();
做个改进,在获取前,首先检查是否存在经过身份验证的用户。
Authentication authentication = SecurityContextHolder.getContext().getAuthentication();
if (!(authentication instanceof AnonymousAuthenticationToken)) {
    String currentUserName = authentication.getName();
    return currentUserName;
}
2、方式二:做为Controller中方法的参数
可以直接将principal对象定义为方法参数,框架会正确解析并赋值:
@RestController
public class SecurityTestController {

    @GetMapping(value = "/username")
    public String yourMethodName(Principal principal) {
    	//...
        String userName =  principal.getName();
        //...
    }
}
也可直接将Authentication对象定义为Controller中方法的参数:(Authentication接口继承自Principal)
@RestController
public class SecurityTestController {

    @GetMapping(value = "/username")
    public String yourMethodName(Authentication authentication) {
    	//...
        String userName =  authentication.getName();
        //...
    }
}
框架为了尽可能的灵活,Authentication 类的API很方便使用。因此,通过转换可以返回principal对象。
UserDetails userDetails = (UserDetails) authentication.getPrincipal();
System.out.println("User has authorities: " + userDetails.getAuthorities());
3、方式三:从HTTPServletRequest中获取
@RestController
public class GetUserWithHTTPServletRequestController {

    @GetMapping(value = "/username")
    public String currentUserNameSimple(HttpServletRequest request) {
        Principal principal = request.getUserPrincipal();
        String username =  principal.getName();
        //...
    }
}
4、方式四:使用@AuthenticationPrincipal
@RestController
public class SecurityController {

    @GetMapping("/user")
    public String getUser(@AuthenticationPrincipal UserDetails userDetails) {
        return "User Name: " + userDetails.getUsername();
    }
}
@AuthenticationPrincipal注解将会自动提供当前经过身份验证的用户的主体注入到方法中
5、方法五:通过自定义接口获取用户信息
public interface IAuthenticationFacade {
    Authentication getAuthentication();
}
实现这个自定义接口:
@Component
public class AuthenticationFacade implements IAuthenticationFacade {

    @Override
    public Authentication getAuthentication() {
        return SecurityContextHolder.getContext().getAuthentication();
    }
}
在需要用户信息的地方:
@Controller
public class GetUserWithCustomInterfaceController {
    @Autowired
    private IAuthenticationFacade authenticationFacade;

    @RequestMapping(value = "/username", method = RequestMethod.GET)
    @ResponseBody
    public String currentUserNameSimple() {
        Authentication authentication = authenticationFacade.getAuthentication();
        return authentication.getName();
    }
}
以上暴露了Authentication认证对象,且隐藏静态访问代码,让业务解耦并方便测试
6、在JSP中获取用户信息
当前认证用户也可以在jsp页面中获取到。利用spring security标签支持。首先我们需要在页面中定义标签:
<%@ taglib prefix="security" uri="http://www.springframework.org/security/tags" %>
然后,我们可以引用principal:
<security:authorize access="isAuthenticated()">
    authenticated as <security:authentication property="principal.username" />
</security:authorize>
官方文档:https://www.baeldung.com/get-user-in-spring-security
7、结果分析
{
	"authorities": [{
		"authority": "ROLE_teacher"
	}],
	"details": {
		"remoteAddress": "0:0:0:0:0:0:0:1",
		"sessionId": "34E452050095348E6306CF95B2025CD9"
	},
	"authenticated": true,
	"principal": {
		"password": null,
		"username": "thomas",
		"authorities": [{
			"authority": "ROLE_teacher"
		}],
		"accountNonExpired": true,
		"accountNonLocked": true,
		"credentialsNonExpired": true,
		"enabled": true
	},
	"credentials": null,
	"name": "liu"
}
- Principal:定义认证的用户,如果用户使用用户名密码登录,principal通常就是一个UserDetails
- Credentials:登录凭证,一般就是指密码。当用户登录成功之后,登录凭证会被自动擦除,以防止泄露
- authorities:用户被授予的权限信息,为ROLE_ + “角色”


