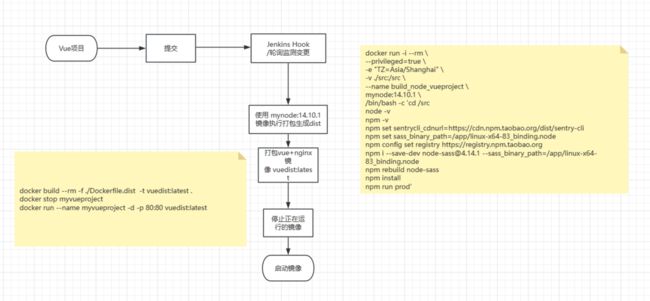
文章源于 Jenkins 构建 Vue 项目失败,然后就把 node_modules 删了重新构建发现 node-sass 安装不上了,折腾一天终于可以稳定构建了。
犹记得从学 node 的第一天,就被 node-sass 折磨了一整天,后面本地没问题了然后服务器开始折磨了,这次又遇到,尝试了一次又一次,还是用本地包构建最稳,觉得还算有用,故记录一二。
构建环境 docker+jenkins
之前已经记录过就不在多说了,可参考之前的文章,此为打包构建的流程
本篇文章的目录结构
- Dockerfile 构建node打包镜像
- sources.list 阿里云软件源 debian 9
- linux-x64-83_binding.node  node-sass包 v4.14.1
- Dockerfile.dist 构建vue运行的nginx镜像
- nginx.conf nginx镜像的配置
- src  源码
  - dist 由node打包镜像运行的容器生成的构建产物
  - package.json npm包配置
  - ...
为 vue 项目制制作 node 打包镜像
linxu 下 node 打包遇到解决的问题
笔者环境:docker:18.06,node:14.10.1,vue:2.6.11 ,webpack-cli:3.3.12
image-webpack-loader 在 linux 环境需要安装依赖包
apt-get clean && apt-get update && apt-get install -y --no-install-recommends apt-utils autoconf automake file g++ libtool make nasm libpng-dev
sentry 下载慢可以设置下镜像
npm set sentrycli_cdnurl=https://npmmirror.com/mirrors/sentry-cli/
node-sass
- 从 GitHub 下载下半天,尝试设置淘宝镜像也没有用
npm set sass_binary_site=https://npmmirror.com/mirrors/node-sass/- 最后各种尝试设置源都无效,于是采用指定本地的方式,
-
- 下载 node 所对应的 node-sass 版本
-
- 指定文件路径:
npm set sass_binary_path=/app/linux-x64-83_binding.node
- 指定文件路径:
-
- 安装到依赖:
npm i --save-dev [email protected] --sass_binary_path=/app/linux-x64-83_binding.node
- 安装到依赖:
-
- 重新构建包生成相关文件 :
npm rebuild node-sass(不执行会报错找不到 node_modules/node-sass/vendor)
- 重新构建包生成相关文件 :
以上,就是在 linux 中 node 打包 vue 项目的过程中所遇到的一些问题,接下来分享 docker 中如何将这些坑一一解决
Dockerfile
node14 的镜像基于 debian 9 ,默认源安装不了软件,故需要指定其他镜像软件源,笔者用的阿里云的
FROM node:14.10.1 AS base
COPY ./sources.list /etc/apt/
COPY ./linux-x64-83_binding.node /app/linux-x64-83_binding.node
RUN apt-get clean && apt-get update && apt-get install -y --no-install-recommends apt-utils autoconf automake file g++ libtool make nasm libpng-dev
Dockerfile 用到的 sources.list
阿里云的包源设置,用于软件安装,构建打包镜像会将其复制到 /etc/apt 目录
!官方文档更新没对,还是在阿里云包源文档的评论区的有用
deb http://mirrors.aliyun.com/debian-archive/debian stretch main contrib non-free
deb http://mirrors.aliyun.com/debian-archive/debian stretch-backports main
deb http://mirrors.aliyun.com/debian-archive/debian-security stretch/updates main
deb-src http://mirrors.aliyun.com/debian-archive/debian stretch main
deb-src http://mirrors.aliyun.com/debian-archive/debian stretch-backports main
deb-src http://mirrors.aliyun.com/debian-archive/debian-security stretch/updates main
Dockerfile 用到的 linux-x64-83_binding.node
用于 vue 项目构建时指定本地路径,构建打包镜像复制到 /app 目录
- github 下载:https://github.com/sass/node-sass/releases/download/v4.14.1/linux-x64-83_binding.node
- cnpm 下载:https://registry.npmmirror.com/-/binary/node-sass/v4.14.0/lin...
构建 node 打包镜像
将上面的 Dockerfile,sources.list,linux-x64-83_binding.node 放到 linux 同一目录中,执行 docker build 命令 打包自定义镜像即可
docker build --rm -t mynode:14.10.1 .打包镜像完成,接下来将使用此镜像进行 vue 项目的打包生成 dist 部署文件
使用 docker 构建的自定义 node 镜像打包 vue 项目
将项目顶级目录 src 映射到容器中的 /src ,运行刚刚构建的 mynode:14.10.1 镜像并传入打包 vue 相关命令,如果还有下载慢需要加镜像的包,再添加即可。
docker run -i --rm \
--privileged=true \
-e "TZ=Asia/Shanghai" \
-v ./src:/src \
--name build_node_vueproject \
mynode:14.10.1 \
/bin/bash -c 'cd /src
node -v
npm -v
npm set sentrycli_cdnurl=https://cdn.npm.taobao.org/dist/sentry-cli
npm set sass_binary_path=/app/linux-x64-83_binding.node
npm config set registry https://registry.npm.taobao.org
npm i --save-dev [email protected] --sass_binary_path=/app/linux-x64-83_binding.node
npm rebuild node-sass
npm install
npm run prod'
构建生成的容器运行完毕,就可以将 dist 下的构建产物进行发布了
制作 vue 项目发布镜像
Dockerfile.dist,nginx.conf 与上面 Dockerfile 等同级目录,故映射前一步的构建产物 ./src/dist 到镜像中
- Dockerfile 文件: Dockerfile.dist
FROM nginx:latest
EXPOSE 80
COPY ./src/dist /usr/share/nginx/html
COPY ./nginx.conf /etc/nginx- history 模式的 nginx.conf(根据项目调整)
worker_processes auto;

events {
    worker_connections 1024;
}
http {
    server {
        listen       80;
        location / {
            root /usr/share/nginx/html/;
            index index.html;
            try_files $uri $uri/ /index.html;
        }
    }
}
- 执行构建
docker build --rm -f ./Dockerfile.dist -t vuedist:latest .
运行构建的 vue 镜像
docker run --name myvueproject -d -p 80:80 vuedist:latest
至此,记录结束,踩坑不易,文章更不易,如有错误,也欢迎指教
转载请注明出处:By 易墨