SpringBoot整合RabbitMQ
SpringBoot整合RabbitMQ
1、RabbitMQ核心概念
Broker:接收和分发消息的应用,RabbitMQ Server就是Message Broker。可以看做RabbitMQ的服务节
点,一般请下一个Broker可以看做一个RabbitMQ服务器,简单来说就是消息队列服务器实体。
Virtual host:出于多租户和安全因素设计的,把AMQP的基本组件划分到一个虚拟的分组中,类似于网络中
的namespace概念。当多个不同的用户使用同一个RabbitMQ server提供的服务时,可以划分出多个vhost,
每个用户在自己的vhost创建exchange/queue等。vhost可以作为不同权限隔离的手段(一个典型的例子就是
不同的应用可以跑在不同的vhost中)。
Connection:publisher/consumer和broker之间的TCP连接。
Channel:如果每一次访问RabbitMQ都建立一个Connection,在消息量大的时候建立TCP Connection的开
销将是巨大的,效率也较低。Channel是在connection内部建立的逻辑连接,如果应用程序支持多线程,通
常每个thread创建单独的channel进行通讯,AMQP method包含了channel id帮助客户端和message
broker识别channel,所以channel之间是完全隔离的。Channel作为轻量级的Connection极大减少了操作系
统建立TCP connection的开销。channel消息通道,在客户端的每个连接里,可建立多个channel,每个
channel代表一个会话任务由Exchange、Queue、RoutingKey三个才能决定一个从Exchange到Queue的唯
一的线路。
Exchange:message到达broker的第一站,根据分发规则,匹配查询表中的routing key,分发消息到
queue中去。常用的类型有:headers、direct (point-to-point),topic (publish-subscribe) and fanout
(multicast)。Exchange生产者将消息发送到交换器,由交换器将消息路由到一个或者多个队列中。当路由不
到时,或返回给生产者或直接丢弃。简言之消息交换机,它指定消息按什么规则,路由到哪个队列。用来接
收生产者发送的消息并将这些消息路由给服务器中的队列。
Queue:消息队列,用来保存消息直到发送给消费者。它是消息的容器,也是消息的终点。一个消息可投入
一个或多个队列。消息一直在队列里面,等待消费者连接到这个队列将其取走。消息最终被送到这里等待
consumer取走。
Binding:exchange和queue之间的虚拟连接,binding中可以包含routing key。Binding信息被保存到
exchange中的查询表中,用于message的分发依据。简言之Binding它的作用就是把exchange和queue按照
路由规则绑定起来。
Routing Key:生产者将消息发送给交换器的时候,会指定一个RoutingKey,用来指定这个消息的路由规
则,这个RoutingKey需要与交换器类型和绑定键(BindingKey)联合使用才能最终生效。路由关键字,
exchange根据这个关键字进行消息投递。
Publisher:消息的生产者,也是一个向交换器发布消息的客户端应用程序。
Consumer:消息的消费者,表示一个从消息队列中取得消息的客户端应用程序。
Message:消息,消息是不具名的,它由消息头和消息体组成。消息体是不透明的,而消息头则由一系列的
可选属性组成,这些属性包括 routing-key(路由键)、priority(相对于其他消息的优先权)、delivery-mode(指
出该消息可能需要持久性存储)等。
2、整合
RabbitMQ版本 3.8.16,SpringBoot版本 2.5.4。
pom文件
<project xmlns="http://maven.apache.org/POM/4.0.0" xmlns:xsi="http://www.w3.org/2001/XMLSchema-instance"
         xsi:schemaLocation="http://maven.apache.org/POM/4.0.0 https://maven.apache.org/xsd/maven-4.0.0.xsd">
    <modelVersion>4.0.0modelVersion>
    <parent>
        <groupId>org.springframework.bootgroupId>
        <artifactId>spring-boot-starter-parentartifactId>
        <version>2.5.4version>
        <relativePath/>
    parent>
    <groupId>com.examplegroupId>
    <artifactId>rabbitmq-demoartifactId>
    <version>0.0.1-SNAPSHOTversion>
    <name>rabbitmq-demoname>
    <description>rabbitmq-demodescription>
    <properties>
        <java.version>1.8java.version>
    properties>
    <dependencies>

        <dependency>
            <groupId>org.springframework.bootgroupId>
            <artifactId>spring-boot-starterartifactId>
        dependency>

        <dependency>
            <groupId>org.springframework.bootgroupId>
            <artifactId>spring-boot-starter-webartifactId>
        dependency>

        <dependency>
            <groupId>org.springframework.bootgroupId>
            <artifactId>spring-boot-starter-testartifactId>
            <scope>testscope>
        dependency>

        <dependency>
            <groupId>org.springframework.bootgroupId>
            <artifactId>spring-boot-starter-amqpartifactId>
        dependency>

        <dependency>
            <groupId>com.alibabagroupId>
            <artifactId>fastjsonartifactId>
            <version>1.2.7version>
        dependency>

        <dependency>
            <groupId>junitgroupId>
            <artifactId>junitartifactId>
            <scope>testscope>
        dependency>

    dependencies>

    <build>
        <plugins>
            <plugin>
                <groupId>org.springframework.bootgroupId>
                <artifactId>spring-boot-maven-pluginartifactId>
            plugin>
        plugins>
    build>

project>
注:这里可以不指定AMQP版本,SpringBoot会自动导入与该SpringBoot版本相搭配的AMQP的版本。
配置文件
# RabbitMQ基本配置
# RabbitMQ的主机地址(默认为:localhost)
spring.rabbitmq.host=localhost
# 指定该用户要连接到的虚拟host端(注:如果不指定,那么默认虚拟host为"/")
spring.rabbitmq.virtual-host = /
# amqp协议端口号:5672; 集群端口号:25672;http端口号:15672;
spring.rabbitmq.port=5672
# 登录到RabbitMQ的用户名、密码
spring.rabbitmq.username=zsx242030
spring.rabbitmq.password=zsx242030
# RabbitMQ可选配置(注:这里只用到了特别少的几个)
# broker端没有收到消费者的ACK(即:消费者异常时)时,是否再次向消费者投递消息(默认为false)
# 为false时,如果没有收到消费者的ACK,那么会无限投递;设置为true时,默认投递时次数为3此
spring.rabbitmq.listener.simple.retry.enabled=true
# 设置向消费者投递消息的最大次数
spring.rabbitmq.listener.simple.retry.max-attempts=2
# 投递消息的间隔(单位ms)
spring.rabbitmq.listener.simple.retry.initial-interval=2000ms
用户实体类
package com.example.model;

/**
 * 用户实体类模型
 */
public class User {

	/** 姓名 */
	private String name;

	/** 年龄 */
	private Integer age;

	/** 性别 */
	private String gender;

	/** 座右铭 */
	private String motto;

	public String getName() {
		return name;
	}

	public void setName(String name) {
		this.name = name;
	}

	public Integer getAge() {
		return age;
	}

	public void setAge(Integer age) {
		this.age = age;
	}

	public String getGender() {
		return gender;
	}

	public void setGender(String gender) {
		this.gender = gender;
	}

	public String getMotto() {
		return motto;
	}

	public void setMotto(String motto) {
		this.motto = motto;
	}

	@Override
	public String toString() {

		return age + "岁" + gender + "人[" + name + "]的座右铭居然是: " + motto + "!!!";
	}

}
Consumer -> QueueConfiguration配置类 -> 定义队列
这个是公共的队列,每个类型的交换机都会用到这些队列。
package com.example.config;

import org.springframework.amqp.core.Queue;
import org.springframework.context.annotation.Bean;
import org.springframework.context.annotation.Configuration;

/**
 * Queue队列注入
 */
@Configuration
public class QueueConfiguration {

	/**
	 * 注入第一个Queue队列 实例
	 */
	@Bean(name = "myFirstQueue")
	public Queue getFirstQueue() {
		// 设置队列名为My-First-Queue
		return new Queue("My-First-Queue");
	}

	/**
	 * 注入第二个Queue队列 实例
	 */
	@Bean(name = "myTwoQueue")
	public Queue getTwoQueue() {
		// 设置队列名为My-Two-Queue
		return new Queue("My-Two-Queue");
	}

	/**
	 * 注入第三个Queue队列 实例
	 */
	@Bean(name = "myThreeQueue")
	public Queue getThreeQueue() {
		// 设置队列名为My-Three-Queue
		return new Queue("My-Three-Queue");
	}

	/**
	 * 关于MQ传递消息时,实际上用的HttpClient的什么请求方式的测试
	 */
	@Bean(name = "myRequestTestQueue")
	public Queue getRequestTestQueue() {
		// 设置队列名为My-Request-Test-Queue
		return new Queue("My-Request-Test-Queue");
	}
}
Consumer -> DemoMessageListener监听类
这个是公共的监听器,每个类型的交换机都会用到这些监听器。
package com.example.listen;

import com.example.model.User;
import org.springframework.amqp.rabbit.annotation.RabbitListener;
import org.springframework.stereotype.Component;

import com.alibaba.fastjson.JSON;

/**
 * 注入消息监听器
 */
@Component
public class DemoMessageListener {

	@RabbitListener(queues = "My-First-Queue") // 指定Queue队列
	public void firstConsumer(String string) {

		System.out.println("我是:My-First-Queue" + "\tString:" + string);
	}

	@RabbitListener(queues = "My-Two-Queue") // 指定Queue队列
	public void twoConsumer(Integer num) {

		System.out.println("我是:My-Two-Queue" + "\tInteger:" + num);
	}

	@RabbitListener(queues = "My-Three-Queue") // 指定Queue队列
	public void threeConsumer() {
		System.out.println("我是:My-Three-Queue");

	}

	@RabbitListener(queues = "My-Request-Test-Queue") // 指定Queue队列
	public void requestTestConsumer(String userJsonString) {
		System.out.println("我是:My-Request-Test-Queue队列");
		System.out.println("json字符串为:" + userJsonString);
        // 将json字符串 转换为 User对象
		User user=JSON.parseObject(userJsonString, User.class);
		System.out.println(user.toString());
	}
}
启动类
package com.example;

import org.springframework.boot.SpringApplication;
import org.springframework.boot.autoconfigure.SpringBootApplication;

@SpringBootApplication
public class RabbitmqDemoApplication {

	public static void main(String[] args) {
		SpringApplication.run(RabbitmqDemoApplication.class, args);
	}

}
3、Fanout策略
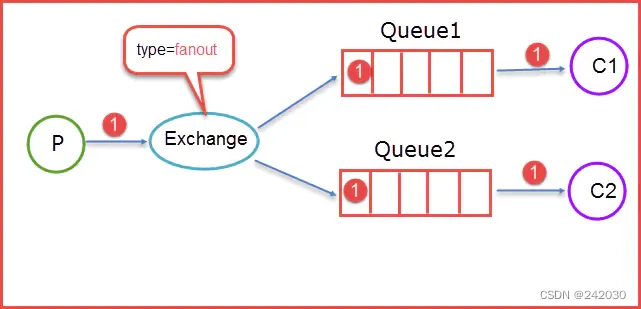
Fanout:路由规则是把所有发送到该Exchange的消息路由到所有与她绑定的Queue中。
备注:生产者P生产消息1推送到Exchange,由于Exchange Type=fanout这时候会遵循fanout的规则将消息推送
到所有与他绑定的Queue。
Consumer -> FanoutExchangeAndBindingConfiguration配置类 -> 定义交换机,绑定队列与交换机
package com.example.config;

import org.springframework.amqp.core.Binding;
import org.springframework.amqp.core.BindingBuilder;
import org.springframework.amqp.core.FanoutExchange;
import org.springframework.amqp.core.Queue;
import org.springframework.beans.factory.annotation.Qualifier;
import org.springframework.context.annotation.Bean;
import org.springframework.context.annotation.Configuration;

/**
 * fanout路由策略(广播机制)的交换机注入、Queue与Exchange的绑定注入
 */
@Configuration
public class FanoutExchangeAndBindingConfiguration {

	/**
	 * 注入Fanout路由策略的Exchange交换机实例
	 */
	@Bean(name = "myFanoutExchange")
	FanoutExchange getFanoutExchange() {
		// 创建并返回名为My-Fanout-Exchange的交换机
		return new FanoutExchange("My-Fanout-Exchange");
	}

	/**
	 * 将myFirstQueue对应的队列,绑定到myFanoutExchange对应的交换机
	 */
	@Bean
	Binding bindingQueueOneToFanoutExchange(@Qualifier("myFirstQueue") Queue myFirstQueue,
			@Qualifier("myFanoutExchange") FanoutExchange myFanoutExchange) {
		return BindingBuilder.bind(myFirstQueue).to(myFanoutExchange);
	}

	/**
	 * 将myTwoQueue对应的队列,绑定到myFanoutExchange对应的交换机
	 */
	@Bean
	Binding bindingQueueTwoToFanoutExchange(@Qualifier("myTwoQueue") Queue myTwoQueue,
			@Qualifier("myFanoutExchange") FanoutExchange myFanoutExchange) {
		return BindingBuilder.bind(myTwoQueue).to(myFanoutExchange);
	}

	/**
	 * 将myThreeQueue对应的队列,绑定到myFanoutExchange对应的交换机
	 */
	@Bean
	Binding bindingQueueThreeToFanoutExchange(@Qualifier("myThreeQueue") Queue myThreeQueue,
			@Qualifier("myFanoutExchange") FanoutExchange myFanoutExchange) {
		return BindingBuilder.bind(myThreeQueue).to(myFanoutExchange);
	}
}
Producer -> 单元测试SimulationMessageProducerTest
package com.example;

import java.util.HashMap;
import java.util.Map;

import com.example.model.User;
import org.junit.Test;
import org.junit.runner.RunWith;
import org.springframework.amqp.core.AmqpTemplate;
import org.springframework.amqp.rabbit.core.RabbitMessagingTemplate;
import org.springframework.beans.factory.annotation.Autowired;
import org.springframework.boot.test.context.SpringBootTest;
import org.springframework.test.context.junit4.SpringRunner;

import com.alibaba.fastjson.JSON;

/**
 * 模拟消息生产者 向Exchange发送消息 注:在正常使用时,消息生产者 一般都和 消息消费者 不处在同一个项目或服务下;
 * 这里只是测试,所以本人在同一个项目下,使用单元测试,模拟的消息生产者(用法是一样的)
 */

@SpringBootTest(classes = RabbitmqDemoApplication.class)
@RunWith(SpringRunner.class)
public class MessageProducerTest {

	/** 装配AMQP模板 */
	@Autowired
	private AmqpTemplate amqpTemplate;

	/** 装配RabbitMessaging模板 */
	@Autowired
	private RabbitMessagingTemplate rabbitMessagingTemplate;

	/**
	 * fanout路由策略(即:广播模式) 测试
	 */
	@Test
	public void fanoutExchangeTest() {

		amqpTemplate.convertAndSend("My-Fanout-Exchange", "", "123");
	}
}
我是:My-Three-Queue
我是:My-First-Queue	String:123
我是:My-Two-Queue	Integer:123
convertAndSend(String exchangeName,String routingKey,Object obj)
提示:当不采用direct或topic策略时,没有路由键,那么对应路由键参数位置使用双引号即可。
4、Direct策略
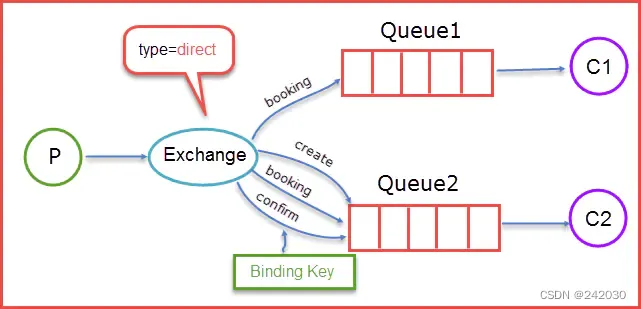
direct:把消息路由到那些 binding key 与 routing key 完全匹配的Queue中。
备注:生产者P发送消息时Routing key = booking时,这时候将消息传送到Exchange,Exchange获取到生产者发
送过来的消息后,会根据自身的规则进行与匹配响应的Queue,这时候发现Queue1和Queue2都符合,就会将消
息传送给这两个队列,如果我们以Routing key = create和routing key = confirm发送消息时,这时候消息只会被
推送到Queue2队列中,其他的Routing key 的消息会被丢弃。
Consumer -> DirectExchangeAndBindingConfiguration配置类 -> 定义交换机,绑定队列与交换机
package com.example.config;

import org.springframework.amqp.core.Binding;
import org.springframework.amqp.core.BindingBuilder;
import org.springframework.amqp.core.DirectExchange;
import org.springframework.amqp.core.Queue;
import org.springframework.beans.factory.annotation.Qualifier;
import org.springframework.context.annotation.Bean;
import org.springframework.context.annotation.Configuration;

/**
 * direct路由策略(路由键routingKey)的交换机注入、Queue与Exchange的绑定注入
 */
@Configuration
public class DirectExchangeAndBindingConfiguration {

	/**
	 * 注入Direct路由策略的Exchange交换机实例
	 */
	@Bean(name = "myDirectExchange")
	DirectExchange getDirectExchange() {
		// 创建并返回名为My-Direct-Exchange的交换机
		return new DirectExchange("My-Direct-Exchange");
	}

	/**
	 * 将Queue绑定到此directExchange,并指定路由键为"routingKey.First"
	 *
	 * @date 2018年7月19日 上午12:20:09
	 */
	@Bean
	Binding bindingQueueOneToDirectExchange(@Qualifier("myFirstQueue") Queue myFirstQueue,
			@Qualifier("myDirectExchange") DirectExchange myDirectExchange) {
		return BindingBuilder.bind(myFirstQueue).to(myDirectExchange).with("routingKey.First");
	}

	/**
	 * 将Queue绑定到此directExchange,并指定路由键为"requestTest"
	 *
	 * @date 2018年7月19日 上午12:20:09
	 */
	@Bean
	Binding bindingQueueRequestTestToDirectExchange(@Qualifier("myRequestTestQueue") Queue myRequestTestQueue,
			@Qualifier("myDirectExchange") DirectExchange myDirectExchange) {
		return BindingBuilder.bind(myRequestTestQueue).to(myDirectExchange).with("requestTest.aa");
	}
}
Producer -> 单元测试SimulationMessageProducerTest
package com.example;

import java.util.HashMap;
import java.util.Map;

import com.example.model.User;
import org.junit.Test;
import org.junit.runner.RunWith;
import org.springframework.amqp.core.AmqpTemplate;
import org.springframework.amqp.rabbit.core.RabbitMessagingTemplate;
import org.springframework.beans.factory.annotation.Autowired;
import org.springframework.boot.test.context.SpringBootTest;
import org.springframework.test.context.junit4.SpringRunner;

import com.alibaba.fastjson.JSON;

/**
 * 模拟消息生产者 向Exchange发送消息 注:在正常使用时,消息生产者 一般都和 消息消费者 不处在同一个项目或服务下;
 * 这里只是测试,所以本人在同一个项目下,使用单元测试,模拟的消息生产者(用法是一样的)
 */

@SpringBootTest(classes = RabbitmqDemoApplication.class)
@RunWith(SpringRunner.class)
public class MessageProducerTest {

	/** 装配AMQP模板 */
	@Autowired
	private AmqpTemplate amqpTemplate;

	/** 装配RabbitMessaging模板 */
	@Autowired
	private RabbitMessagingTemplate rabbitMessagingTemplate;

	/**
	 * direct路由策略---测试HttpClient的请求方法
	 */
	@Test
	public void directExchangeRequestTest() {
		User user = new User();
		user.setAge(18);
		user.setGender("女");
		user.setMotto("不感兴趣!");
		user.setName("喵喵");
		String jsonString = JSON.toJSONString(user);
		amqpTemplate.convertAndSend("My-Direct-Exchange", "requestTest.aa",jsonString);
	}

	/**
	 * direct路由策略(具体的路由键)测试
	 */
	@Test
	public void directExchangeTest() {
		amqpTemplate.convertAndSend("My-Direct-Exchange", "routingKey.First", "1234578");
	}
}
单元测试directExchangeRequestTest()的运行结果为:
我是:My-Request-Test-Queue队列
json字符串为:{"age":18,"gender":"女","motto":"不感兴趣!","name":"喵喵"}
18岁女人[喵喵]的座右铭居然是: 不感兴趣!!!!
单元测试directExchangeTest()的运行结果为:
我是:My-First-Queue String:1234578
5、Topic策略
topic:模糊匹配,通过通配符满足一部分规则就可以传送,其中注意的是有两个字符 * 和#号,其中*用于匹
配一个单词,#号用于匹配多个单词(可以是0个)。
备注:当生产者发送消息Routing Key=F.C.E的时候,这时候只满足Queue1,所以会被路由到Queue中,如果
Routing Key=A.C.E这时候会被同是路由到Queue1和Queue2中,如果Routing Key=A.F.B时,这里只会发送一条
消息到Queue2中。
Consumer -> TopicExchangeAndBindingConfiguration配置类 -> 定义交换机,绑定队列与交换机
package com.example.config;

import org.springframework.amqp.core.Binding;
import org.springframework.amqp.core.BindingBuilder;
import org.springframework.amqp.core.Queue;
import org.springframework.amqp.core.TopicExchange;
import org.springframework.beans.factory.annotation.Qualifier;
import org.springframework.context.annotation.Bean;
import org.springframework.context.annotation.Configuration;

/**
 * topic路由策略(路由键routingKey,且支持模糊匹配)的交换机注入、Queue与Exchange的绑定注入
 */
@Configuration
public class TopicExchangeAndBindingConfiguration {

	/**
	 * 注入Topic路由策略的Exchange交换机实例
	 */
	@Bean(name = "myTopicExchange")
	TopicExchange getTopicExchange() {
		// 创建并返回名为My-Topic-Exchange的交换机
		return new TopicExchange("My-Topic-Exchange");
	}


	/**
	 * 将myFirstQueue对应的Queue绑定到此topicExchange,并指定路由键为"routingKey.#"
	 * 即:此Exchange中,路由键以"routingKey."开头的Queue将被匹配到
	 */
	@Bean
	Binding bindingQueueOneToTopicExchange(@Qualifier("myFirstQueue") Queue myFirstQueue,
			@Qualifier("myTopicExchange") TopicExchange myTopicExchange) {
		return BindingBuilder.bind(myFirstQueue).to(myTopicExchange).with("routingKey.#");
	}

	/**
	 * 将myTwoQueue对应的Queue绑定到此topicExchange,并指定路由键为"#.topic"
	 * 即:此Exchange中,路由键以".topic"结尾的Queue将被匹配到
	 */
	@Bean
	Binding bindingQueueTwoToTopicExchange(@Qualifier("myTwoQueue") Queue myTwoQueue,
			@Qualifier("myTopicExchange") TopicExchange myTopicExchange) {
		return BindingBuilder.bind(myTwoQueue).to(myTopicExchange).with("#.topic");
	}

	/**
	 * 将myThreeQueue对应的Queue绑定到此topicExchange,并指定路由键为"#"
	 * 即:此topicExchange中,任何Queue都将被匹配到
	 */
	@Bean
	Binding bindingQueueThreeToTopicExchange(@Qualifier("myThreeQueue") Queue myThreeQueue,
			@Qualifier("myTopicExchange") TopicExchange myTopicExchange) {
		return BindingBuilder.bind(myThreeQueue).to(myTopicExchange).with("#");
	}
}
Producer -> 单元测试SimulationMessageProducerTest
package com.example;

import java.util.HashMap;
import java.util.Map;

import com.example.model.User;
import org.junit.Test;
import org.junit.runner.RunWith;
import org.springframework.amqp.core.AmqpTemplate;
import org.springframework.amqp.rabbit.core.RabbitMessagingTemplate;
import org.springframework.beans.factory.annotation.Autowired;
import org.springframework.boot.test.context.SpringBootTest;
import org.springframework.test.context.junit4.SpringRunner;

import com.alibaba.fastjson.JSON;

/**
 * 模拟消息生产者 向Exchange发送消息 注:在正常使用时,消息生产者 一般都和 消息消费者 不处在同一个项目或服务下;
 * 这里只是测试,所以本人在同一个项目下,使用单元测试,模拟的消息生产者(用法是一样的)
 */

@SpringBootTest(classes = RabbitmqDemoApplication.class)
@RunWith(SpringRunner.class)
public class MessageProducerTest {

	/** 装配AMQP模板 */
	@Autowired
	private AmqpTemplate amqpTemplate;

	/** 装配RabbitMessaging模板 */
	@Autowired
	private RabbitMessagingTemplate rabbitMessagingTemplate;

	/**
	 * topic路由策略(可以通配的路由键)测试
	 */
	@Test
	public void topicExchangeTest1() {
		// 此消息能匹配上 路由键为“routingKey.#”和“#”的队列
		amqpTemplate.convertAndSend("My-Topic-Exchange", "routingKey.myTest", "1");
	}

	@Test
	public void topicExchangeTest2() {
		// 此消息能匹配上 路由键为“#.topic”和“#”的队列
		amqpTemplate.convertAndSend("My-Topic-Exchange", "myTest.topic", "2");
	}

	@Test
	public void topicExchangeTest3() {
		// 此消息能匹配上 路由键为“#”的队列
		amqpTemplate.convertAndSend("My-Topic-Exchange", "myTest", "3");
	}

}
单元测试topicExchangeTest1()的运行结果为:
我是:My-Three-Queue
我是:My-First-Queue	String:1
单元测试topicExchangeTest2()的运行结果为:
我是:My-Three-Queue
我是:My-Two-Queue	Integer:2
单元测试topicExchangeTest3()的运行结果为:
我是:My-Three-Queue
提示:如果输出结果与理想结果不一样;那么最好去MQ里,把原来与Queue绑定的Exchange删除,重新绑定Queue
队列到TopicExchange交换机并放入vhost里(原因分析:该交换机原来绑定的可能是没有通配路由键的Queue,改
成了路由键通配后,需要先删除vhost中原来的该交换机,再重新把绑定了通配路由键队列后的交换机放入vhost
里面)。
即:一旦将绑定了Queue的Exchange放入vhost后,那么该交换机对于其绑定了的Queue的“认知”就固定了;如果
想改变该交换机的认知,那么必须先删除该交换机,然后在放入有新“认知”的交换机。
追注:其他几种策略也一样,修改Queue与Exchange的绑定信息后,也最好去vhost中删除该交换机,再重新放
入新的交换机。
6、Headers策略
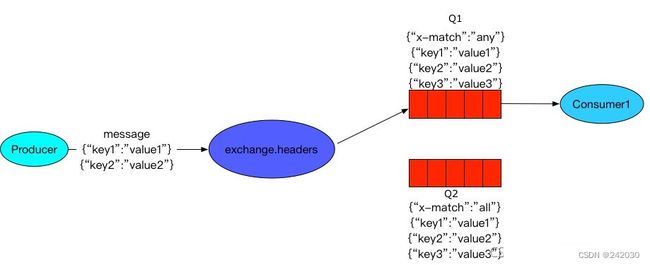
headers:单薄模式,1对1。
headers 匹配规则:any、all。
any: 只要在发布消息时携带的有一对键值对headers满足队列定义的多个参数的其中一个就能匹配上,注意这
里是键值对的完全匹配,只匹配到键了,值却不一样是不行的;
all:在发布消息时携带的所有Entry必须和绑定在队列上的所有Entry完全匹配。
缺点:Headers类型的交换器性能会很差。
Consumer -> HeadersExchangeAndBindingConfiguration配置类 -> 定义交换机,绑定队列与交换机
package com.example.config;

import java.util.HashMap;
import java.util.Map;

import org.springframework.amqp.core.Binding;
import org.springframework.amqp.core.BindingBuilder;
import org.springframework.amqp.core.HeadersExchange;
import org.springframework.amqp.core.Queue;
import org.springframework.beans.factory.annotation.Qualifier;
import org.springframework.context.annotation.Bean;
import org.springframework.context.annotation.Configuration;

/**
 * headers路由策略的交换机注入、Queue与Exchange的绑定注入
 */
@Configuration
public class HeadersExchangeAndBindingConfiguration {

	/**
	 * 注入Headers路由策略的Exchange交换机实例
	 */
	@Bean(name = "myHeadersExchange")
	HeadersExchange getDirectExchange() {
		// 创建并返回名为My-Headers-Exchange的交换机
		return new HeadersExchange("My-Headers-Exchange");
	}

	/**
	 * 将Queue绑定到此headersExchange(并指定:当headers中所有的“map”被此Queue匹配时,才可使用此队列)
	 * 注:此示例是匹配的.whereAll(Map map);
	 *    也可以只匹配.whereAll(String... headersKeys);
	 */
	@Bean
	Binding bindingQueueOneToHeadersAllExchange(@Qualifier("myFirstQueue") Queue myFirstQueue,
			@Qualifier("myHeadersExchange") HeadersExchange myHeadersExchange) {
		Map<String, Object> headers = new HashMap<>();
		headers.put("name", "邓沙利文");
		headers.put("motto", "justry");
		return BindingBuilder.bind(myFirstQueue).to(myHeadersExchange).whereAll(headers).match();
	}

	/**
	 * 将Queue绑定到此headersExchange(并指定:当headers中任意一个map被此Queue匹配时,就会使用此队列)
	 * 注:此示例是匹配的.whereAny(Map map);
	 *    也可以只匹配.whereAny(String... headersKeys);
	 */
	@Bean
	Binding bindingQueueOneToHeadersAnyExchange(@Qualifier("myThreeQueue") Queue myThreeQueue,
			@Qualifier("myHeadersExchange") HeadersExchange myHeadersExchange) {
		Map<String, Object> headers = new HashMap<>();
		headers.put("name", "邓沙利文");
		headers.put("motto", "justry");
		return BindingBuilder.bind(myThreeQueue).to(myHeadersExchange).whereAny(headers).match();
	}

}
注:headers中,可以存放很多用来验证身份的键值对,我们可以用All来指定:当消息生产者传到Exchange中的
headers中的键值对所有都符合(所有Map或所有Key)要求时,才启用该队列;或使用Any来指定:只要消息生产者
传到Exchange中的headers中的键值对有至少一个(至少一个Map或至少一个Key)符合要求时,就启用该队列。
Producer -> 单元测试SimulationMessageProducerTest
package com.example;

import java.util.HashMap;
import java.util.Map;

import com.example.model.User;
import org.junit.Test;
import org.junit.runner.RunWith;
import org.springframework.amqp.core.AmqpTemplate;
import org.springframework.amqp.rabbit.core.RabbitMessagingTemplate;
import org.springframework.beans.factory.annotation.Autowired;
import org.springframework.boot.test.context.SpringBootTest;
import org.springframework.test.context.junit4.SpringRunner;

import com.alibaba.fastjson.JSON;

/**
 * 模拟消息生产者 向Exchange发送消息 注:在正常使用时,消息生产者 一般都和 消息消费者 不处在同一个项目或服务下;
 * 这里只是测试,所以本人在同一个项目下,使用单元测试,模拟的消息生产者(用法是一样的)
 */

@SpringBootTest(classes = RabbitmqDemoApplication.class)
@RunWith(SpringRunner.class)
public class MessageProducerTest {

	/** 装配AMQP模板 */
	@Autowired
	private AmqpTemplate amqpTemplate;

	/** 装配RabbitMessaging模板 */
	@Autowired
	private RabbitMessagingTemplate rabbitMessagingTemplate;

	/**
	 * headers路由策略---WhereAllMap匹配测试
	 */
	@Test
	public void headersExchangeWhereAllMapTest() {
		Map<String, Object> headers = new HashMap<String, Object>();
		headers.put("name", "邓沙利文");
		headers.put("motto", "justry");
		rabbitMessagingTemplate.convertAndSend("My-Headers-Exchange", "", "通过[头交换机]传递数据咯", headers);
	}

	/**
	 * headers路由策略测试WhereAnyMap匹配测试
	 */
	@Test
	public void headersExchangeWhereAnyMapTest() {
		Map<String, Object> headers = new HashMap<String, Object>();
		headers.put("name", "邓沙利文");
		headers.put("motto", "justry123");
		rabbitMessagingTemplate.convertAndSend("My-Headers-Exchange", "", "", headers);
	}

}
单元测试headersExchangeWhereAllMapTest()的运行结果为:
我是:My-Three-Queue
我是:My-First-Queue	String:通过[头交换机]传递数据咯
单元测试headersExchangeWhereAnyMapTest()的运行结果为:
2021-11-07 18:44:32.556  INFO 13428 --- [           main] com.example.MessageProducerTest          : Started MessageProducerTest in 2.422 seconds (JVM running for 3.182)
我是:My-Three-Queue
提示:本文只是对SpringBoot使用MQ的一个示例介绍;在实际运用时,方式方法注意事项等较多。
如果想传递对象,那么可以:消息生产者将对象转换为json字符串放入MQ,然后消息消费者接受json字符串后,
转换为Java对象即可。


