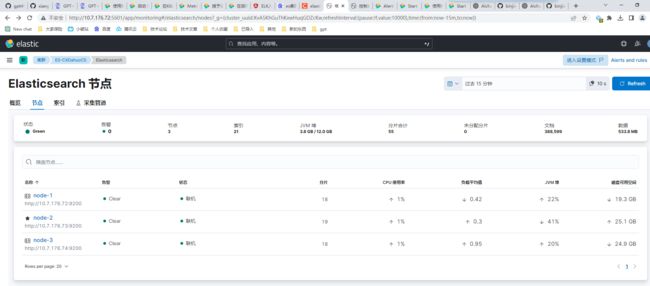
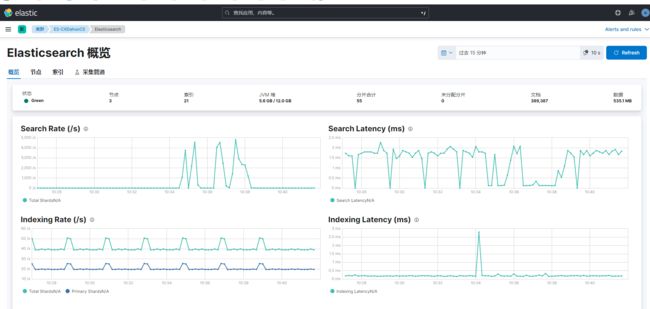
ELK进阶 -- 优化部分
断路器
作用
Elasticsearch 使用断路器来防止节点耗尽 JVM 堆内存。如果 Elasticsearch 估计某个操作将超出断路器,它会停止该操作并返回错误。
来自官网的一句话,就是说相当于限流的作用
集群各节点的相关配置
在es.yml中添加如下配置(三节点)
cd ~/es-8.7.0/config/
vim elasticsearch.yml
# 断路器
# 总熔断器(相当于似乎总闸) true:堆大小超过 95% 就报错触发熔断,false:75%
indices.breaker.total.use_real_memory: false
# 避免发生OOM,发生OOM对集群影响很大的,揉合 request 和 fielddata 断路器保证两者组合起来不会使用超过堆内存的 70%。
indices.breaker.total.limit: 80%
# 有了这个设置,最久未使用(LRU)的 fielddata 会被回收为新数据腾出空间
indices.fielddata.cache.size: 10%
# 字段数据断路器的限制(默认40%):fielddata 断路器默认设置堆的  作为 fielddata 大小的上限。
indices.breaker.fielddata.limit: 60%
# request 断路器估算需要完成其他请求部分的结构大小,例如创建一个聚合桶,默认限制是堆内存的 40%。
indices.breaker.request.limit: 40%
复制代码:
indices.breaker.total.use_real_memory: false
indices.breaker.total.limit: 80%
indices.fielddata.cache.size: 10%
indices.breaker.fielddata.limit: 60%
indices.breaker.request.limit: 40%
重启es(参考之前的文章)
ps -ef | grep elastic
kill 13874
回到bin目录
cd ~/es-8.7.0/bin/
nohup ./elasticsearch &
tail -f nohup.out
查询代码
# 获取每个节点的断路器统计信息
GET /_nodes/stats/breaker

# 获取整个集群的断路器统计信息
GET /_cluster/stats/breaker
完成!
如果内存持续过高,请参阅:https://www.elastic.co/guide/en/elasticsearch/reference/8.9/high-jvm-memory-pressure.html
参考文档
官网
logstash
如何修改logstash创建索引的分片数和副本数?
方法一(待测试)
全量修改,通过修改Elasticsearch的配置文件elasticsearch.yml来实现,添加或修改:
index.number_of_shards: 5
重启es
方法二
新增 关于索引 的模板,在kibana中操作
# 查询所有模板信息
GET /_template/
PUT /_index_template/dragon_template
{
  "index_patterns": ["t_settle_order_info"],
  "template": {
    "settings": {
      "number_of_shards": 5
    }
  }
}

# 查询设置信息
GET /_index_template/dragon_template

# 删除模板(非必要不执行)
# delete /_index_template/dragon_template
测试执行
cd ~elas/logstash-8.7.0
./bin/logstash -f extend/job/logstash-t_settle_order_info.conf
会出现字段类型转换的问题(待研究)
logstash同步mysql的千万条大数据到es
这里主要讲一下sql的写法
方式一
LIMIT和OFFSET的用法
offset :跳过多少行
limit:查询多少条
select * from table limit 5000 offset 0 :跳过0行,查询5000条
select * from table limit 5000 offset 5000 : 跳过5000行,从5001开始,查询5000条
不合适:
对于从MySQL同步大量数据到Elasticsearch的情况,使用LIMIT和OFFSET方式是不太适合的。这是因为使用LIMIT和OFFSET方式,每次查询只返回指定的行数,然后通过调整OFFSET来获取下一页数据,这样会涉及到大量的数据库查询操作,效率较低,并且可能会对MySQL和Elasticsearch产生较大的负载。
方式二
where id >= ‘b7341b13f1c61f68e050040a96005350’ and id < ‘b7341b13f2c61f68e050040a96005350’
推荐:方式更适合同步大量数据到Elasticsearch。这种方式通过指定一个范围条件,可以一次性获取到指定范围内的所有数据,然后进行批量插入或更新到Elasticsearch中。这样可以减少数据库查询的次数,提高同步效率,并且减少对数据库和Elasticsearch的负载。
执行命令
cd ~elas/logstash-8.7.0
./bin/logstash -f extend/job/logstash-t_settle_order_info.conf
nohup ./bin/logstash -f extend/job/logstash-t_settle_order_info.conf &   (后台)

vim ~/logstash-8.7.0/extend/job/logstash-t_settle_order_info.conf
问题
explain select id from t_settle_order_info limit 1

explain select * from t_settle_order_info limit 1
这两行sql返回的id不同
很神奇,不一定是按主键排序,先加上 order by id 吧!
结论:从 explain可以看出,是根据key len 长度进行选择的。不同索引排序不同,查询的id自然也不同。
select * 默认走主键索引,select id 走的是自建索引
以下是测试内容
input {
  jdbc {
    type => "jdbc"
    jdbc_connection_string => "jdbc:mysql://10.221.50.106:3306/dh_order?autoReconnect=true&useUnicode=true&characterEncoding=UTF-8&serverTimezone=Asia/Shanghai&useSSL=false"
		jdbc_user => "dh_test"
		jdbc_password => "Y2017dh123"
		jdbc_driver_library => "/home/elas/logstash-8.7.0/extend/plugin/mysql-connector-java-5.1.49.jar"
    jdbc_driver_class => "com.mysql.jdbc.Driver"
		connection_retry_attempts => "3"
		jdbc_validate_connection => "true"
		jdbc_validation_timeout => "3600"
    jdbc_paging_enabled => true
    # statement => "SELECT * FROM t_car_order where id = 578"
    # Value can be any of: fatal,error,warn,info,debug,默认info;
		sql_log_level => debug
  }
}
output {
  stdout { codec =>  rubydebug}
  elasticsearch {
		hosts => ["10.7.176.73:9200"]
  	user => "elastic"
    password => "Mvwm@n12nal"
		index => "t_car_order-test"
		document_id => "%{id}"
	}
}


input {
  jdbc {
    type => "jdbc"
    jdbc_connection_string => "jdbc:mysql://10.221.50.106:3306/dh_order?autoReconnect=true&useUnicode=true&characterEncoding=UTF-8&serverTimezone=Asia/Shanghai&useSSL=false"
    jdbc_user => "dh_test"
    jdbc_password => "Y2017dh123"
    jdbc_driver_library => "/home/elas/logstash-8.7.0/extend/plugin/mysql-connector-java-5.1.49.jar"
    jdbc_driver_class => "com.mysql.jdbc.Driver"
    connection_retry_attempts => "3"
    jdbc_validate_connection => "true"
    jdbc_validation_timeout => "3600"
    jdbc_paging_enabled => true
    statement => "SELECT * FROM t_car_order where id = 578"
    # Value can be any of: fatal,error,warn,info,debug,默认info;
    sql_log_level => debug
  }
}
output {
  stdout { codec =>  rubydebug}
  elasticsearch {
      hosts => ["10.7.176.72:9200","10.7.176.73:9200","10.7.176.74:9200"]
      user => "elastic"
      password => "Mvwm@n12nal"
      index => "t_car_order-test"
      document_id => "%{id}"
  }
}
cd ~elas/logstash-8.7.0
./bin/logstash -f extend/job/dragon_order.conf
es快照备份(本地windows测试)
配置路径
注意:这一步的坑,需要所有节点都进行操作,包括重启
首先对 elasticsearch.yml 添加 快照库位置
# 仓库 由于只有一台机制,所以快照存储库放在一起,后面kibana才好设置
path.repo: ["E:/es/node/es_snapshot"]
注册快照存储库
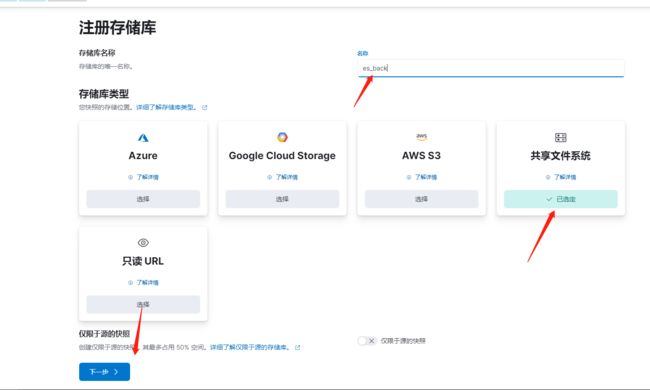
快照可以存储在本地或远程存储库中。这里我们选择本地
方式一:kibana界面操作
方式二:命令(本地就不测试了)
[外链图片转存失败,源站可能有防盗链机制,建议将图片保存下来直接上传(img-WpRD7Mbm-1692867140663)(https://cdn.nlark.com/yuque/0/2023/png/25461556/1691388423311-8874af22-dad7-4129-9b7f-c409cd208793.png#averageHue=%2382bdcf&clientId=uf24512ce-1f86-4&from=paste&height=395&id=u0ea25914&originHeight=395&originWidth=855&originalType=binary&ratio=1&rotation=0&showTitle=false&size=39465&status=done&style=none&taskId=uddaa7b53-655d-4525-a831-8ac0aa23f54&title=&width=855)]
相关命令
# 注册快照
PUT _snapshot/es_snapshot
    {
      "type": "fs",
      "settings": {
      "location": "/home/elas/es-8.7.0/data/es_snapshot",
      "compress": true
      }
    }

# 查看快照
GET _snapshot
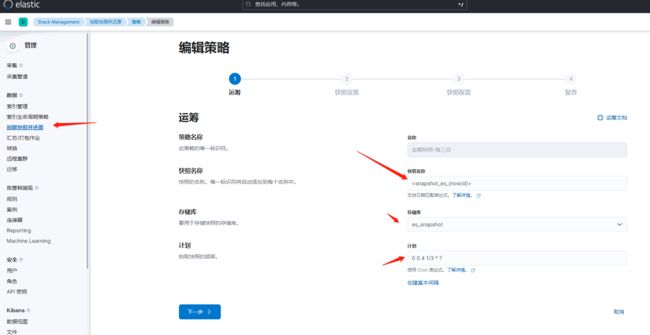
创建快照备份策略
这里选择用kibana界面操作
0 0 4 1/3 * ?
选择对应名称和cron
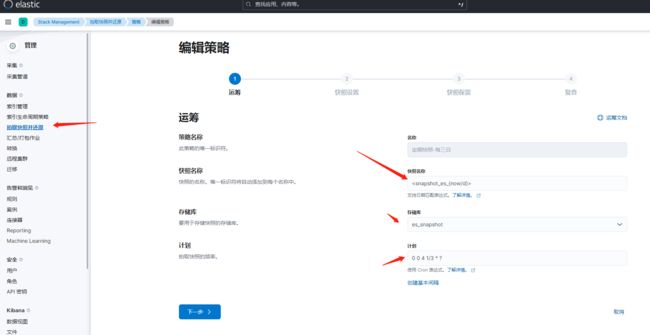
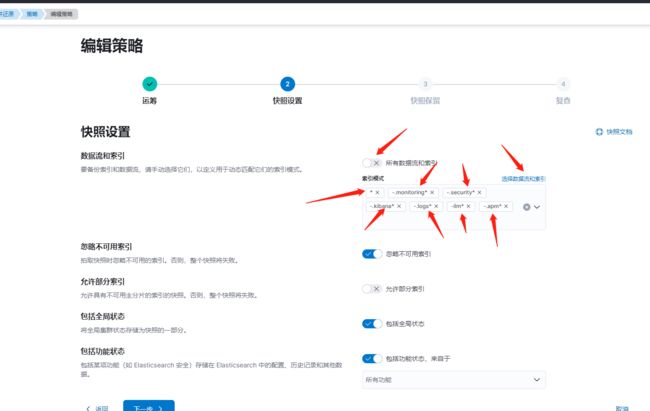
这里需要排除系统索引(优化前)
按照创建快照的命令可以推敲出如下写法
*
-.monitoring*
-.security*
-.kibana*
-.logs*
-ilm*
-.apm*
*
-ilm*
-.*
恢复快照
[外链图片转存失败,源站可能有防盗链机制,建议将图片保存下来直接上传(img-3D4mwdFB-1692867140665)(https://cdn.nlark.com/yuque/0/2023/png/25461556/1691462326866-cc803a83-fdd2-4567-8505-ba374ec3c28f.png#averageHue=%23d7c374&clientId=u24cc4201-ea5d-4&from=paste&height=750&id=u996f8dca&originHeight=750&originWidth=1858&originalType=binary&ratio=1&rotation=0&showTitle=false&size=156775&status=done&style=none&taskId=u8fddd8f8-957b-4ab0-92b4-670ee26e10b&title=&width=1858)]
es快照备份(linux)
配置路径
注意:这一步的坑,需要所有节点都进行操作,包括重启
首先对 elasticsearch.yml 添加 快照库位置
#仓库
path.repo: ["/home/elas/es-8.7.0/data/es_snapshot"]
注意:考虑到要和es本身区分开,故此仓库地址改成:
/home/elas/es_snapshot
然后创建仓库
[email protected]:~/es-8.7.0/data mkdir es_snapshot
给备份目录权限(这一步似乎不需要)
[email protected]:~/es-8.7.0/data chown -R elas:elas es_snapshot
重启es
ps -ef | grep elastic
kill 13874
回到bin目录
cd ~/es-8.7.0/bin/
nohup ./elasticsearch &
tail -f nohup.out
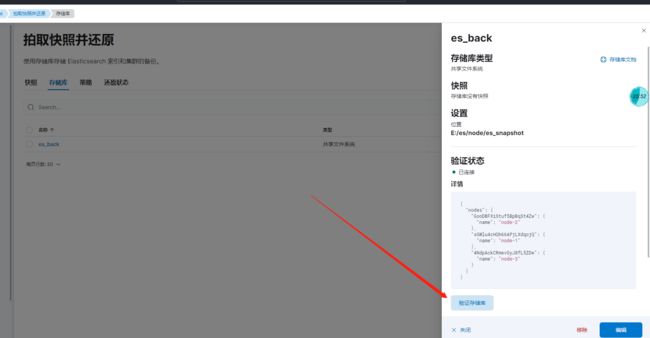
注册快照存储库
挂载nfs
umount -l 10.7.176.74:/data/nfs/data/es_snapshot
mount -t nfs -o nolock,vers=3 10.7.176.74:/data/nfs/data/es_snapshot /home/elas/es_snapshot
参考下方问题的链接
如果存储库的用户组变了,切换到tomcat用户下执行命令
su tomcat
sudo chown -R elas:elas es_snapshot
注意这里要用sudo命令获取更高的权限,不然会无权限修改
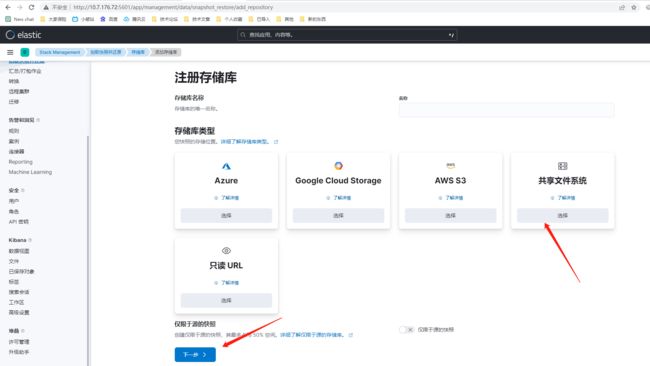
创建存储库
快照可以存储在本地或远程存储库中。这里我们选择本地
方式一:kibana界面操作
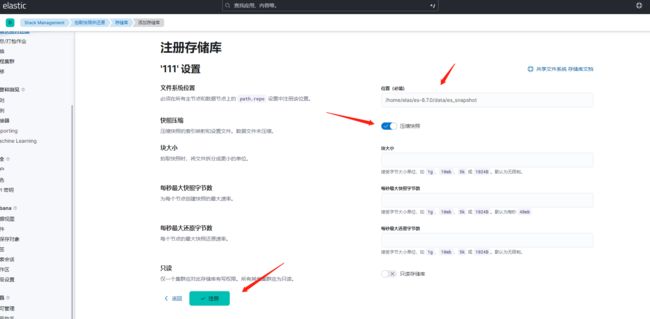
方式二:命令
[外链图片转存失败,源站可能有防盗链机制,建议将图片保存下来直接上传(img-1d8Ej1qv-1692867140666)(https://cdn.nlark.com/yuque/0/2023/png/25461556/1691388423311-8874af22-dad7-4129-9b7f-c409cd208793.png#averageHue=%2382bdcf&clientId=uf24512ce-1f86-4&from=paste&height=395&id=IuWai&originHeight=395&originWidth=855&originalType=binary&ratio=1&rotation=0&showTitle=false&size=39465&status=done&style=none&taskId=uddaa7b53-655d-4525-a831-8ac0aa23f54&title=&width=855)]
相关命令
# 注册快照
PUT _snapshot/es_snapshot
    {
      "type": "fs",
      "settings": {
      "location": "/home/elas/es-8.7.0/data/es_snapshot",
      "compress": true
      }
    }

# 查看快照
GET _snapshot
创建快照备份策略
这里选择用kibana界面操作
0 0 4 1/3 * ?
这里需要排除系统索引(优化前)
按照创建快照的命令可以推敲出如下写法
*
-.monitoring*
-.security*
-.kibana*
-.logs*
-ilm*
-.apm*
*,-ilm*,-.*
恢复快照

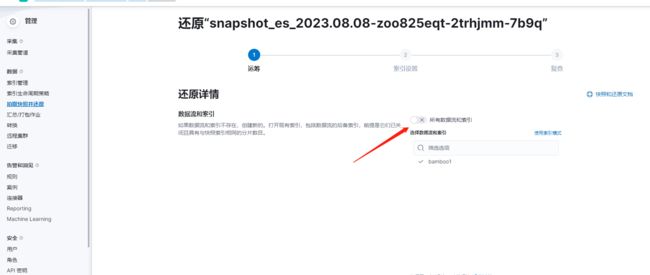
恢复部分索引:需要去掉这里的勾勾,然后选择对应索引,否则会出现问题(暂未解决)快照已经排除系统索引,可放心食用
问题
运行状况red分析
# 查看集群健康状态
GET /_cluster/health?pretty
# 查看集群状态信息
GET /_cluster/stats?pretty

# 查看集群健康状态及索引健康状态概览
GET /_cat/indices?v&h=health,status,index
# 查看分片信息
GET /_cat/shards
# 查看分片未分配的具体原因
GET /_cluster/allocation/explain
存储库检验失败,提示无权限什么的
需要搭建nfs服务器
参考:ES集群7.3.0设置快照,存储库进行索引备份和恢复等
elasticsearch8集群——搭建nfs实现快照和还原
相关命令参考
创建快照
# 为全部索引创建快照
PUT _snapshot/es_snapshot/snapshot_1
PUT _snapshot/es_snapshot/snapshot_1?wait_for_completion=true
# 为指定索引创建快照
PUT _snapshot/my_backup/snapshot_2
{
    "indices": "index_1,index_2"
}
查看备份完成的列表
查看所有快照信息
GET _snapshot/my_backup/_all

根据快照名查看指定快照的信息
GET _snapshot/my_backup/snapshot_3

使用_status API查看指定快照的信息
GET _snapshot/my_backup/snapshot_3/_status
删除快照
DELETE _snapshot/my_backup/snapshot_3
从快照恢复
# 恢复指定索引
POST /_snapshot/my_backup/snapshot_1/_restore
{
 "indices": "index_1",
 "rename_pattern": "index_(.+)",
 "rename_replacement": "restored_index_$1"
}

# 恢复所有索引(除.开头的系统索引)
POST _snapshot/my_backup/snapshot_1/_restore
{"indices":"*,-.monitoring*,-.security*,-.kibana*","ignore_unavailable":"true"}

# 恢复所有索引(包含.开头的系统索引)
POST _snapshot/my_backup/snapshot_1/_restore
POST _snapshot/my_backup/snapshot_1/_restore?wait_for_completion=true

# 将快照恢复到Indexing Service实例中。
例如将my_backup仓库中,snapshot_1快照中的index_1索引数据恢复到Indexing Service实例中(不是很理解)
# ** 说明** 实际使用时,您需要将对应信息替换为您实际的信息。
POST /_snapshot/my_backup/snapshot_1/_restore
{
  "indices": "index_1",
  "ignore_index_settings": [
    "index.apack.cube.following_index"
  ]
}
查看快照恢复信息
# 查看快照中指定索引的恢复状态
GET restored_index_3/_recovery

# 查看集群中的所有索引的恢复信息
GET /_recovery/
删除正在进行快照恢复的索引
通过DELETE命令删除正在恢复的索引,取消恢复操作。
DELETE /restored_index_3
自动备份脚本
mkdir shell
vim es_backup.sh
下面是脚本内容
#!/bin/bash

#日志级别 debug-1, info-2, warn-3, error-4, always-5
LOG_LEVEL=3
user=$(whoami)
#日志文件
LOG_FILE=./Elasticsearch.log

#调试日志
function log_debug() {
  content="[DEBUG] $(date '+%Y-%m-%d %H:%M:%S') $0  $user msg : $@"
  [ $LOG_LEVEL -le 1 ] && echo $content >>$LOG_FILE
}
#信息日志
function log_info() {
  content="[INFO] $(date '+%Y-%m-%d %H:%M:%S') $0  $user msg : $@"
  [ $LOG_LEVEL -le 2 ] && echo $content >>$LOG_FILE
}
#警告日志
function log_warn() {
  content="[WARN] $(date '+%Y-%m-%d %H:%M:%S') $0  $user msg : $@"
  [ $LOG_LEVEL -le 3 ] && echo $content >>$LOG_FILE
}
#错误日志
function log_err() {
  content="[ERROR] $(date '+%Y-%m-%d %H:%M:%S') $0  $user msg : $@"
  [ $LOG_LEVEL -le 4 ] && echo $content >>$LOG_FILE
}
#一直都会打印的日志
function log_always() {
  content="[ALWAYS] $(date '+%Y-%m-%d %H:%M:%S') $0  $user msg : $@"
  [ $LOG_LEVEL -le 5 ] && echo $content >>$LOG_FILE
}

# 执行快照备份
time=$(date +"%Y.%m.%d_%H:%M:%S")
IP=$(hostname -I|awk '{print $1}')
host='http://'$IP':9200'
username='elastic'
password='Mvwm@n12nal'

#仓库名称
STORE_NAME="es_snapshot"

code=$(curl  -o /dev/null  -s -w "%{http_code}" -u ${username}:${password} -sXPUT "$host"/_snapshot/${STORE_NAME}/snapshot_es_"${time}"?wait_for_completion=true)

if [[ $code -eq 200 ]]; then
  log_always " 全局es快照已经备份成功"
else
        log_err "全局es快照备份失败,请查看"
        #告警信息 -- 邮件发送
        report_url="http://intradhtest.djbx.com:9093/api/v1/alerts"
        alerts_info='[
                {
                  "labels": {
                     "alertname": "es快照备份告警",
                     "instance": "'$IP'"
                   },
                   "annotations": {
                      "info": "es快照备份失败,请检查",
                      "summary": "请检查日志,对应路径:/home/elas/es-8.7.0/shell/es_backup.log"
                    }
                }
              ]'
        curl -XPOST -o /dev/null -s -w "%{http_code}\n" -d"${alerts_info}" $report_url
fi
执行命令
/bin/bash -x /home/elas/es-8.7.0/shell/es_backup.sh > /home/elas/es-8.7.0/shell/es_backup.log
参考文档
官网:https://www.elastic.co/guide/en/elasticsearch/reference/8.7/snapshot-restore.html
Elasticsearch快照备份
ES集群red状态排查与恢复
kibana监控
采取方式
Elastic Agent :更完善的功能
Metricbeat:轻量级指标收集(采用)
传统收集方法:使用内部导出器收集指标,已不建议
安装 metricbeat
https://www.elastic.co/cn/downloads/beats/metricbeat
解压
tar xzvf metricbeat-8.7.0-linux-x86_64.tar.gz
监控es
详细步骤
启动 elasticsearch-xpack
cd metricbeat-8.7.0-linux-x86_64/
./metricbeat modules enable elasticsearch-xpack
cd modules.d
vim elasticsearch-xpack.yml
改为如下内容:
module: elasticsearch
  xpack.enabled: true
  period: 10s
  hosts: ["http://10.7.176.72:9200","http://10.7.176.73:9200","http://10.7.176.74:9200"]
  username: "elastic"
  password: "Mvwm@n12nal"
配置 metricbeat.yml (重点)
cd ..
vim metricbeat.yml
output.elasticsearch:
  hosts: ["http://10.7.176.72:9200","http://10.7.176.73:9200","http://10.7.176.74:9200"]
  username: "elastic"
  password: "Mvwm@n12nal"
启动 metricbeat
# 前台启动
./metricbeat -e
# 后台启动
nohup ./metricbeat -e -c metricbeat.yml -d "publish" & > nohup.out
关闭跨集群监控(重要)
# 关闭跨集群监控,否则堆栈监控页面打不开(因为角色中不包含某个跨集群的角色,可能需要自己新建)
monitoring.ui.ccs.enabled: false
遇到的坑
如果部署的是集群,但是只在主节点部署 Metricbeat 测试,必须要在es的host那里写入所有节点,写单节点就怎么也打不开
参考文档
官网
使用Elasticsearch + Kibana快速搭建监控看板
windows下kibana使用metricbeat教程
ELK下kibana安装Metricbeat工具
监控 logstash
详细步骤
启动 Logstash
创建 Created Logstash keystore
cd ~/logstash-8.7.0
./bin/logstash-keystore create
创建一些 key: ES_HOST 及 ES_PWD
./bin/logstash-keystore add ES_HOST
输入:"http://10.7.176.72:9200","http://10.7.176.73:9200","http://10.7.176.74:9200"
./bin/logstash-keystore add ES_PWD
输入:Mvwm@n12nal
cd ~/logstash-8.7.0/config/
vim logstash.yml
xpack.monitoring.enabled: true
xpack.monitoring.elasticsearch.username: logstash_system
xpack.monitoring.elasticsearch.password: "${ES_PWD}"
xpack.monitoring.elasticsearch.hosts: ["${ES_HOST}"]
修改 logstash_system 的密码 为 Mvwm@n12nal

启动 logstash-xpack 模块
 cd ~/metricbeat-8.7.0-linux-x86_64/
./metricbeat modules enable logstash-xpack
./metricbeat modules list
# 关闭不要的模块
# ./metricbeat modules disable system
配置 modules.d/logstash.yml 文件(略)
cd modules.d/
重启 metricbeat (logstash的那台机器)
ps -ef | grep metricbeat
kill 13874
回到bin目录
cd ~/es-8.7.0/bin/
nohup ./elasticsearch &
tail -f nohup.out
# 前台启动
./metricbeat -e
# 后台启动
nohup ./metricbeat -e -c metricbeat.yml -d "publish" & > nohup.out
待定:启动失败,推测logstash没启动
参考文档
Logstash:使用 Metricbeat 监控 Logstash
Logstash: 启动监控及集中管理

