基于Jenkins构建生产CICD环境(第二篇)
基于Jenkins自动打包并部署Tomcat环境
传统网站部署的流程
在运维过程中,网站部署是运维的工作之一。传统的网站部署的流程大致分为:需求分 析-->原型设计-->开发代码-->提交代码-->内网部署-->内网测试-->确认上线-->备份数据-->外网更新-->外网测试-->发布完成。如果在内网测试时发现代码有异常,返回代码开发人员名字,调整代码;如果在外网测试时发现外网部署的代码有异常,可以及时进行网站回滚。

传统代码上线的过程
开发人员发起代码上线的需求(邮件中包含开发做好的WAR包)-->运维人员连接线上负载调度器(Nginx)--> 隔离一组服务器(Tomcat)--> 连接服务器(Tomcat)--> 备份旧代码(tar打包)--> 删除旧代码目录 --> 上传新的WAR包 --> 外网测试 --> 测试不通过则通过备份回滚代码 --> 测试通过则利用rsync的脚本推送代码到其他服务器--> 统一外网测试 -->连接调度器恢复隔离机制 --> 隔离另一组服务器实施上线步骤 --> 上线完成。
目前主流网站部署的流程
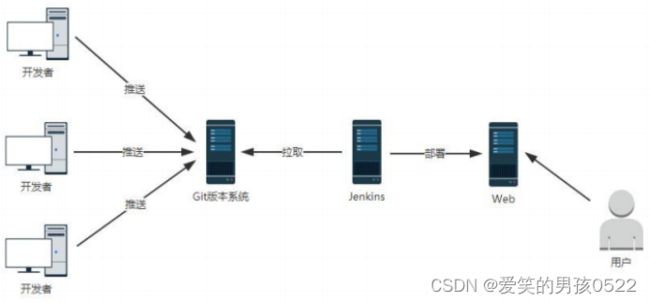
目前主流网站部署方法:通过 Hudson/Jenkins 工具平台实现全自动部署+测试,是一个可扩展的持续集成引擎,属于开源软件项目,旨在提供一个开放易用的软件平台,使软件的持续集成变成可能。Jenkins 非常易于安装和配置,简单易用。
- 开发人员:写好代码,不需要自己进行源码编译、打包等工作,直接将代码分支存放在 SVN、Git 仓库即可。
- 运维人员:减轻人工干预的错误率,同时解放运维人员繁杂的上传代码、手动备份、更新等操作。
- 测试人员:可以通过 Jenkins 进行简单的代码及网站测试。

Jenkins 的工作原理是先将源代码从 SVN/Git 版本控制系统中拷贝一份到本地,然后根据设置的脚本调用Maven进行 build(构建)。整个系统的关键就是 build 脚本,build 脚本告诉Jenkins 在一次集成中需要执行的任务。
所需工具提取链接:https://pan.baidu.com/s/1N_HvY1WExW6yycI3udbnFw?pwd=02yi
提取码:02yi
实验环境
| 操作系统 |
IP地址 |
主机名 |
角色 |
| CentOS7.5 |
192.168.2.121 |
git | git服务器 |
| CentOS7.5 |
192.168.2.122 |
Jenkins git客户端 | jenkins服务器 |
| CentOS7.5 |
192.168.2.123 |
tomcat |
web服务器 |
所有主机关闭防火墙和selinux
[root@localhost ~]# systemctl stop firewalld
[root@localhost ~]# iptables -F
[root@localhost ~]# setenforce 0
1、配置git主机
# rpm安装安装依赖关系:6和7都安
[root@localhost ~]# hostname gitclient
[root@localhost ~]# bash
[root@gitclient ~]#

[root@gitclient ~]# yum -y install curl-devel expat-devel gettext-devel  openssl-devel zlib-devel
# 编译安装—服务端和客户端,访问https://mirrors.edge.kernel.org/pub/software/scm/git/下载所需要的版本
[root@gitclient ~]# tar xf git-2.22.0.tar.gz -C /usr/src/

[root@gitclient ~]# cd /usr/src/git-2.22.0/

[root@gitclient git-2.22.0]#  make configure

[root@git git-2.22.0]# ./configure --prefix=/usr/local/git && make && make install

[root@gitclient git-2.22.0]# ln -sf /usr/local/git/bin/git /usr/bin/

[root@gitclient git-2.22.0]# git --version

git version 2.22.0

[root@gitclient git-2.22.0]# cd
[root@gitclient ~]# useradd git
[root@gitclient ~]#  echo "123456" | passwd --stdin git
更改用户 git 的密码 。
passwd:所有的身份验证令牌已经成功更新。
创建本地仓库probe
[root@git ~]# su - git

[git@gitclient ~]$ mkdir probe.git

[git@gitclient ~]$ cd probe.git/

[git@gitclient probe.git]$ git --bare init
已初始化空的 Git 仓库于 /home/git/probe.git/

[git@gitclient probe.git]$ exit
exit
克隆项目代码同步到自己创建的仓库中
[root@gitclient ~]# rz -E
rz waiting to receive.

[root@gitclient ~]# tar xf psi-probe.tar.gz

[root@gitclient ~]# git clone [email protected]:/home/git/probe.git
正克隆到 'probe'...
[email protected]'s password:             #密码为123456
warning: 您似乎克隆了一个空仓库。

[root@gitclient ~]# cp -rf psi-probe/* probe/

[root@gitclient ~]# cd probe/

[root@gitclient probe]# git add .

[root@gitclient probe]# git config --global user.email "[email protected]"

[root@gitclient probe]# git config --global user.name "zch"

[root@gitclient probe]# git commit -m "all probe"

[root@gitclient probe]# git push origin master
[email protected]'s password:              #密码为123456

枚举对象: 1168, 完成.
对象计数中: 100% (1168/1168), 完成.
使用 2 个线程进行压缩
压缩对象中: 100% (1121/1121), 完成.
写入对象中: 100% (1168/1168), 2.02 MiB | 6.79 MiB/s, 完成.
总共 1168 (差异 395),复用 0 (差异 0)
To 192.168.2.117:/home/git/probe.git
 * [new branch]      master -> master
2、配置jenkins主机
1)添加验证凭据 :凭证这里添不添加都可以,这个试验不牵扯到凭证


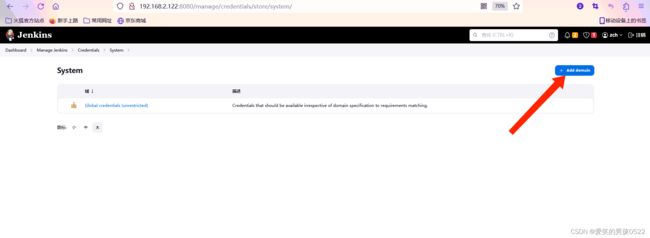

在凭据页面中,点击“system”跳转到“系统”页面。点击左侧导航栏中“添加域”,
跳转到“添加域”页面。在该页面创建域名为“crushlinux”并点击“ok”完成配置。
“添加凭据”。


填写以上数据后,点击“确定”就可以查看到新增的远程 web 主机账号。

2)添加 Publish Over SSH 远程主机
在 Jenkins 首页中点击“Manage Jenkins”->“Configure System”->“Publish over SSH”->“SSH Servers”->“增加”选项按钮,添加 SSH 远程主机。如图 3.13 所示,输入 Name、Hostname、Username 等必要信息后,点击“高级”选项按钮->勾选“Use Password authentication,or use a different key”选项->输入“远程主机登录密码”->“Test Configuration”测试远程主机配置。测试远程主机配置成功后点击“保存”按钮即可。


3)配置 Maven、JDK、Git 环境
在 Jenkins 首页中点击“Manage Jenkins”->“Global Tool Configuration”->“JDK” ->新增“JDK”,设置 JDK 别名为”JDK17”。去掉“Install automatically”选项,设置 “JAVA_HOME”为本案例中 JDK 实际安装路径。
/usr/local/java 

在Jenkins安装maven
[root@jenkins ~]# rz -E            #上传apache-maven-3.5.0-bin.tar.gz
rz waiting to receive.

[root@jenkins ~]# tar xf apache-maven-3.5.0-bin.tar.gz

[root@jenkins ~]# mv apache-maven-3.5.0 /usr/local/maven-3.5.0
为maven更换阿里云镜像站
[root@jenkins ~]# vim /usr/local/maven-3.5.0/conf/settings.xml
#删除两个中的所有东西,大概12行,把下面的阿里云镜像站添加到两个中

        nexus-aliyun
        central
        Nexus aliyun
        http://maven.aliyun.com/nexus/content/groups/public


最后达到的效果 
在“Global Tool Configuration”配置界面中找到 Maven 配置选项,然后点击“新增 Maven”并设置别名为“Maven3.5”。

Git 配置
[root@jenkins ~]# which git
/usr/bin/git

以上全局基本配置完毕后,点击保存即可完成。
3、配置web主机
[root@tomcat ~]# tar xf apache-tomcat-8.5.40.tar.gz
[root@tomcat ~]# tar xf jdk-8u191-linux-x64.tar.gz
[root@tomcat ~]# mv jdk1.8.0_191/ /usr/local/java
[root@tomcat ~]# mv apache-tomcat-8.5.40 /usr/local/tomcat
[root@tomcat ~]# vim /etc/profile

export JAVA_HOME=/usr/local/java/
export CLASSPATH=$JAVA_HOME/lib/tools.jar:$JAVA_HOME/lib/dt.jar
export PATH=$JAVA_HOME/bin:$PATH

[root@tomcat ~]# source /etc/profile

[root@tomcat ~]# java -version

java version "1.8.0_191"
Java(TM) SE Runtime Environment (build 1.8.0_191-b12)
Java HotSpot(TM) 64-Bit Server VM (build 25.191-b12, mixed mode)
发布公钥给jenkins主机
[root@tomcat ~]# ssh-keygen
Generating public/private rsa key pair.
Enter file in which to save the key (/root/.ssh/id_rsa):
Enter passphrase (empty for no passphrase):
Enter same passphrase again:
Your identification has been saved in /root/.ssh/id_rsa.
Your public key has been saved in /root/.ssh/id_rsa.pub.
The key fingerprint is:
SHA256:2oIK3dABtlQQWpoUbeRl/xGhb9BC+gVpxHy1ExGxkkw root@tomcat
The key's randomart image is:
+---[RSA 2048]----+
| o@=.o++.Eo*+    |
|.B.=o +=*.o +    |
|+ o....=.B +     |
|   . .. * o .    |
|  . .  .S+       |
| . o . o.        |
|. . o o .        |
| . .   .         |
|  .              |
+----[SHA256]-----+


[root@tomcat ~]# ssh-copy-id 192.168.2.122
/usr/bin/ssh-copy-id: INFO: Source of key(s) to be installed: "/root/.ssh/id_rsa.pub"
The authenticity of host '192.168.2.122 (192.168.2.122)' can't be established.
ECDSA key fingerprint is SHA256:RG6SwP4IEdCtwZTqmw5B3lW7k3e06TBVBtpIQQhXXU8.
ECDSA key fingerprint is MD5:30:ae:c1:97:d5:fd:9f:ca:6b:36:a1:6d:e3:b7:06:d2.
Are you sure you want to continue connecting (yes/no)? yes
/usr/bin/ssh-copy-id: INFO: attempting to log in with the new key(s), to filter out any that are already installed
/usr/bin/ssh-copy-id: INFO: 1 key(s) remain to be installed -- if you are prompted now it is to install the new keys
[email protected]'s password:

Number of key(s) added: 1

Now try logging into the machine, with:   "ssh '192.168.2.122'"
and check to make sure that only the key(s) you wanted were added.
主机Jenkins默认用jenkins用户去连接git,所以用jenkins用户生成密钥对,并发送给git。
[root@jenkins ~]# id jenkins

uid=997(jenkins) gid=995(jenkins) 组=995(jenkins)

[root@jenkins ~]# su -s /bin/bash jenkins

bash-4.2$ ssh-keygen                #生成密钥

Generating public/private rsa key pair.
Enter file in which to save the key (/var/lib/jenkins/.ssh/id_rsa):
Created directory '/var/lib/jenkins/.ssh'.
Enter passphrase (empty for no passphrase):
Enter same passphrase again:
Your identification has been saved in /var/lib/jenkins/.ssh/id_rsa.
Your public key has been saved in /var/lib/jenkins/.ssh/id_rsa.pub.
The key fingerprint is:
SHA256:TXyhCWBXN2DJk1/wZGz6ltw3XPqlshRVa7L6iLpt0ME jenkins@jenkins
The key's randomart image is:
+---[RSA 2048]----+
|      o.oo++=oo .|
|     . . +=+ *+..|
|        . =o.=oo |
|         E .o.+ .|
|        S o .+.+.|
|       . .  ..*o+|
|        .  ... o+|
|        ....+ . .|
|       o+o ..+   |
+----[SHA256]-----+

bash-4.2$ ssh-copy-id [email protected]            #发送密钥

/usr/bin/ssh-copy-id: INFO: Source of key(s) to be installed: "/var/lib/jenkins/.ssh/id_rsa.pub"
The authenticity of host '192.168.2.121 (192.168.2.121)' can't be established.
ECDSA key fingerprint is SHA256:a7IpGawJCffvD7q1hMT/WIP+ZT/Bm9Qhy8NxapJa1GA.
ECDSA key fingerprint is MD5:a6:56:1e:0c:59:62:fa:bf:f5:9b:77:d5:f0:0c:65:5d.
Are you sure you want to continue connecting (yes/no)? yes
/usr/bin/ssh-copy-id: INFO: attempting to log in with the new key(s), to filter out any that are already installed
/usr/bin/ssh-copy-id: INFO: 1 key(s) remain to be installed -- if you are prompted now it is to install the new keys
[email protected]'s password:

Number of key(s) added: 1

Now try logging into the machine, with:   "ssh '[email protected]'"
and check to make sure that only the key(s) you wanted were added.

bash-4.2$ ssh [email protected]                #登录测试

Last failed login: Tue Aug 22 15:06:36 CST 2023 on ssh:notty
There were 2 failed login attempts since the last successful login.
Last login: Tue Aug 22 14:58:26 2023

[git@gitclient ~]$ exit
登出
Connection to 192.168.2.121 closed.

bash-4.2$ exit
exit


[root@jenkins ~]# ssh-keygen             #生成密钥

Generating public/private rsa key pair.
Enter file in which to save the key (/root/.ssh/id_rsa):
Enter passphrase (empty for no passphrase):
Enter same passphrase again:
Your identification has been saved in /root/.ssh/id_rsa.
Your public key has been saved in /root/.ssh/id_rsa.pub.
The key fingerprint is:
SHA256:t92j/vRv35XZWWmEpkdGebNRy7oyFzWwz1oDnYT6rSA root@jenkins
The key's randomart image is:
+---[RSA 2048]----+
|             oo.o|
|            .oB+o|
|            .B.O+|
|           .= B.o|
|        S ...+.B.|
|         E +.o*.B|
|          ooo+=+o|
|            ++ o+|
|           .o...B|
+----[SHA256]-----+

[root@jenkins ~]# ssh-copy-id [email protected]        #发送密钥

/usr/bin/ssh-copy-id: INFO: Source of key(s) to be installed: "/root/.ssh/id_rsa.pub"
/usr/bin/ssh-copy-id: INFO: attempting to log in with the new key(s), to filter out any that are already installed
/usr/bin/ssh-copy-id: INFO: 1 key(s) remain to be installed -- if you are prompted now it is to install the new keys
[email protected]'s password:

Number of key(s) added: 1

Now try logging into the machine, with:   "ssh '[email protected]'"
and check to make sure that only the key(s) you wanted were added.

[root@jenkins ~]# ssh [email protected]                #登陆测试

Last login: Tue Aug 22 16:31:43 2023
[git@gitclient ~]$ exit
登出
Connection to 192.168.2.121 closed.
4、新建Maven项目
在以上配置完成后,回到 Jenkins 首页,选择“新建任务”,然后输入一个任务名称 “probe”,并选中“Maven project”点击当前页面下方的“确定”按钮。


在点击“确定”按钮后,选择“源码管理”选中“Git”,配置“RepositoriesURL”为
[email protected].2.121:/home/git/probe.git

选择“Build”
clean package -Dmaven.test.skip=true

选择“构建后操作“中的“send build artfacts over SSH” “Exec command”中执行命令的含义是:在自动部署前先杀掉 Tomcat 进程,然后删除 war 包,用 scp 远程拷贝命令将 Jenkins 自动打包好的项目 war 包拷贝到当前 Tomcat 应用目录。 然后重启 Tomcat 。
scp 192.168.2.122:/root/.jenkins/workspace/proble/psi-probe-web/target/probe.war /usr/local/tomcat/webapps/
/usr/local/tomcat/bin/startup.sh 

以上全部配置完成后,点击保存即可。然后点击刚才创建的“probe”->“Build Now” 直至项目构建完成。构建过程可以在“控制台输出”中查看到。
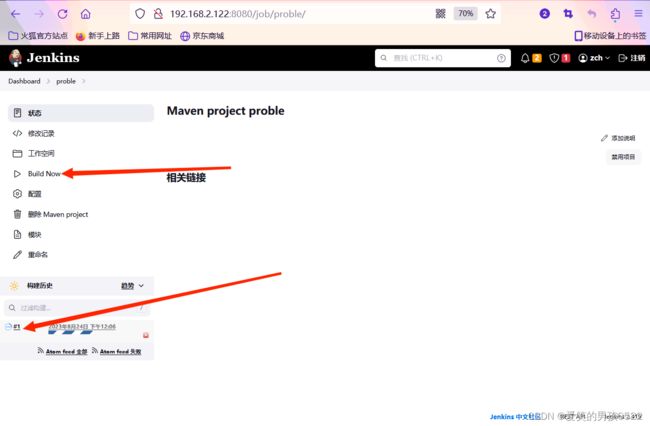


5、验证 Jenkins 自动打包部署结果
在web主机上查看 probe 目录是否被拷贝到/usr/local/tomcat/webapps 目录下
[root@tomcat ~]# ls /usr/local/tomcat/webapps/
docs  examples  host-manager  manager  probe  probe.war  ROOT
[root@tomcat ~]# ll /usr/local/tomcat/webapps/probe
总用量 20
drwxr-x---. 3 root root   66 8月  24 14:04 css
drwxr-x---. 2 root root 8192 8月  24 14:04 flags
-rw-r-----. 1 root root  536 8月  24 11:34 index.jsp
drwxr-x---. 3 root root  148 8月  24 14:04 js
drwxr-x---. 3 root root   76 8月  24 14:04 META-INF
drwxr-x---. 6 root root 4096 8月  24 14:04 WEB-INF


从以上结果来看,Jenkins 已把打好的 probe war 包拷贝过来了。
从构建后的执行命令可以看出,Tomcat 已经重新启动,通过浏览器访问测试 probe 监控系统。http://192.168.2.123:8080/probe。

[root@tomcat ~]# vim /usr/local/tomcat/conf/tomcat-users.xml

[root@tomcat ~]# vim /usr/local/tomcat/webapps/manager/META-INF/context.xml


[root@tomcat ~]# /usr/local/tomcat/bin/shutdown.sh
[root@tomcat ~]# /usr/local/tomcat/bin/startup.sh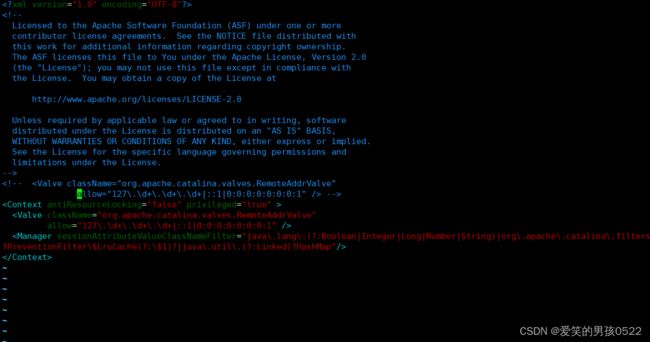

至此,Jenkins 自动打包部署完毕。