复习之web服务器--apache
PS:Vim复制小技巧
一、实验环境
- 两台虚拟机 (nodea,nodeb)
- 配置ip
- 搭建软件仓库
- 关闭selinux
[root@ftp Desktop]# hostnamectl set-hostname nodea.westos.org
[root@ftp Desktop]# hostname
nodea.westos.org
[root@ftp Desktop]# ifconfig
enp1s0: flags=4163  mtu 1500
        inet 172.25.254.100  netmask 255.255.255.0  broadcast 172.25.254.255
        inet6 fe80::5054:ff:fed0:fcf5  prefixlen 64  scopeid 0x20
        ether 52:54:00:d0:fc:f5  txqueuelen 1000  (Ethernet)
        RX packets 18  bytes 2225 (2.1 KiB)
        RX errors 0  dropped 0  overruns 0  frame 0
        TX packets 53  bytes 6507 (6.3 KiB)
        TX errors 0  dropped 0 overruns 0  carrier 0  collisions 0

lo: flags=73  mtu 65536
        inet 127.0.0.1  netmask 255.0.0.0
        inet6 ::1  prefixlen 128  scopeid 0x10
        loop  txqueuelen 1000  (Local Loopback)
        RX packets 168  bytes 13336 (13.0 KiB)
        RX errors 0  dropped 0  overruns 0  frame 0
        TX packets 168  bytes 13336 (13.0 KiB)
        TX errors 0  dropped 0 overruns 0  carrier 0  collisions 0

virbr0: flags=4099  mtu 1500
        inet 192.168.122.1  netmask 255.255.255.0  broadcast 192.168.122.255
        ether 52:54:00:f7:67:49  txqueuelen 1000  (Ethernet)
        RX packets 0  bytes 0 (0.0 B)
        RX errors 0  dropped 0  overruns 0  frame 0
        TX packets 0  bytes 0 (0.0 B)
        TX errors 0  dropped 0 overruns 0  carrier 0  collisions 0

[root@ftp Desktop]# cd /etc/yum.repos.d/
[root@ftp yum.repos.d]# ls
redhat.repo  westos.repo
[root@ftp yum.repos.d]# cat westos.repo
[AppStream]
name=AppStream
baseurl=http://172.25.254.73/westos/AppStream
gpgcheck=0
gpgkey=/etc/pki/rpm-gpg/RPM-GPG-KEY-redhat-release
enabled=1

[BaseOS]
name=BaseOS
baseurl=http://172.25.254.73/westos/BaseOS
gpgcheck=0
gpgkey=/etc/pki/rpm-gpg/RPM-GPG-KEY-redhat-release
enabled=1

[root@ftp yum.repos.d]# cd /etc/sysconfig/
[root@ftp sysconfig]# ls
anaconda  ebtables-config   kernel           qemu-ga     saslauthd
atd       firewalld         ksm              radvd       selinux
cbq       grub              libvirtd         raid-check  smartmontools
chronyd   htcacheclean      man-db           rhn         sshd
console   ip6tables-config  modules          rpcbind     virtlockd
cpupower  iptables-config   network          rsyslog     virtlogd
crond     irqbalance        network-scripts  run-parts   wpa_supplicant
dhcpd     kdump             nftables.conf    samba
[root@ftp sysconfig]# vim selinux
[root@ftp sysconfig]# reboot
二、Apache、http、httpd的关系
Apache(音译为阿帕奇)是世界使用排名第一的Web服务器软件。它可以运行在几乎所有广泛使用的计算机平台上,尤其对Linux的支持相当完美。在服务器上可以支持HTTP协议。
超文本传输协议(Hypertext Transfer Protocol,HTTP)是一个简单的请求-响应协议,它通常运行在TCP之上,主要是应用于WEB端内容获取。随着互联网的发展和WEB2.0的诞生,更多的内容开始被展示(更多的图片文件),排版变得更精美(更多的CSS),更复杂的交互也被引入(更多的JS)。用户打开一个网站首页所加载的数据总量和请求的个数也在不断增加。
httpd是Apache超文本传输协议(HTTP)服务器的主程序。被设计为一个独立运行的后台进程,它会建立一个处理请求的子进程或线程的池。
三、Apache的安装和启用
- dnf install httpd :安装apache,linux里面安装httpd即可!
- systemctl enable --now httpd : 设置apache当前及开机自启
- firewall-cmd --permanent --add-service=http :设定火墙策略
- firewall-cmd --permanent --add-service=https :设定火墙策略
- vim /var/www/html/index.html : 修改默认发布目录的内容
[root@nodea ~]# dnf install httpd
Updating Subscription Management repositories.
Unable to read consumer identity
This system is not registered to Red Hat Subscription Management. You can use subscription-manager to register.
Last metadata expiration check: 2:01:14 ago on Sun 06 Aug 2023 09:48:42 AM CST.
Package httpd-2.4.37-21.module+el8.2.0+5008+cca404a3.x86_64 is already installed.
Dependencies resolved.
Nothing to do.
Complete!
[root@nodea ~]# systemctl enable --now httpd
[root@nodea ~]# firewall-cmd --permanent --add-service=http
FirewallD is not running
[root@nodea ~]# systemctl start firewalld.service
[root@nodea ~]# firewall-cmd --permanent --add-service=http
success
[root@nodea ~]# firewall-cmd --permanent --add-service=https
success
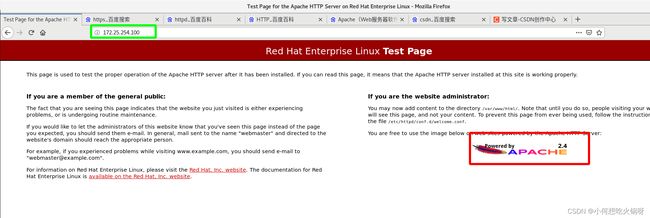
此时在浏览器输入: 172.25.254.100 可以看见apache的默认界面
修改默认发布文件的内容
[root@nodea html]# vim index.html
[root@nodea html]# cat index.html
hello apache
[root@nodea html]#
在浏览器查看默认发布界面,已经改变!
四、Apache的基本信息
- 服务名称: httpd
- 配置文件: /etc/httpd/conf/httpd.conf #主配置文件
/etc/httpd/conf.d/*.conf #子配置文件 - 默认发布目录: /var/www/html
- 默认发布文件: index.html
- 默认端口: 80
- 用户: apache
- 日志: /etc/httpd/logs
--------------------------------------------------------实验-----------------------------------------------------------
主配置文件和子配置文件的查看!
五、Apache的基本配置
1.默认端口号的修改
- listen 80 : 默认端口号
- 修改端口号设定火墙策略: firewall-cmd --permanent --add-port=8080/tcp
进入主配置文件修改httpd的默认端口
重启服务,设定火墙策略
[root@nodea ~]# vim /etc/httpd/conf/httpd.conf
[root@nodea ~]# systemctl restart httpd
[root@nodea ~]# firewall-cmd --permanent --add-service=8080/tcp
Error: INVALID_SERVICE: '8080/tcp' not among existing services
[root@nodea ~]# firewall-cmd --permanent --add-port=8080/tcp
success
[root@nodea ~]# firewall-cmd --reload
success
[root@nodea ~]# netstat -antlupe | grep httpd
tcp6       0      0 :::8080                 :::*                    LISTEN      0          69725      4115/httpd
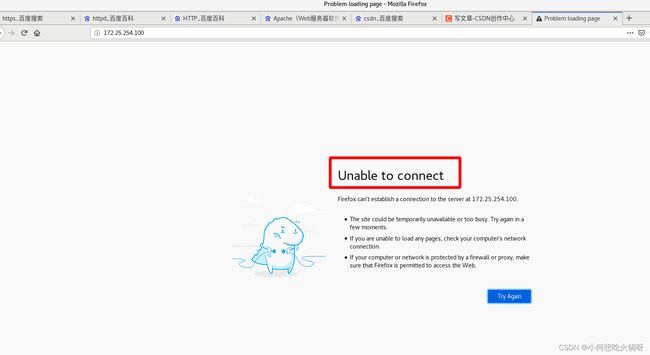
再次查看默认发布界面,已经无法连接!
在ip后加上端口号即可访问!http://172.25.254.100:8080/ ps:一定要用英文符号
最后在将端口号修改为默认端口号80,便恢复默认界面了!
[root@nodea ~]# vim /etc/httpd/conf/httpd.conf
[root@nodea ~]# systemctl restart httpd
[root@nodea ~]# netstat -antlupe | grep httpd
tcp6       0      0 :::80                   :::*                    LISTEN      0          71415      4458/httpd
2. 默认发布文件的修改
- index.html : 主配置文件直接修改
当然默认测试页也可以修改,默认测试页一般是index.html ,可以在主配置文件里面修改!
[root@nodea html]# touch westos.html
[root@nodea html]# vim westos.html
[root@nodea html]# cat westos.html
westos.html  page
[root@nodea html]# vim /etc/httpd/conf/httpd.conf
[root@nodea html]# systemctl restart httpd
此时测试页面变为:
3. 默认发布目录的修改
- 直接在主配置文件修改
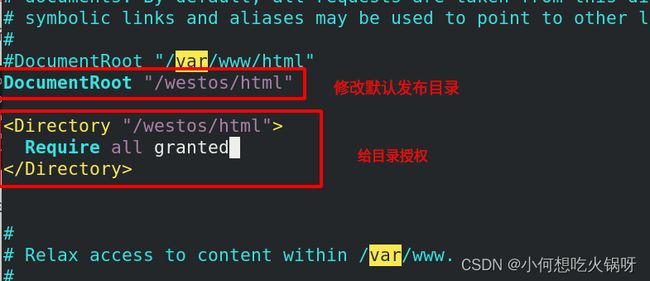
- 访问授权 :不授权无法访问!!
首先建立新的发布目录
[root@nodea ~]# mkdir /westos/html
[root@nodea ~]# touch /westos/html/index.html
[root@nodea ~]# vim /westos/html/index.html
[root@nodea ~]# cat /westos/html/index.html
/westos/html/index.html page
接着修改主配置文件,并重启服务!
查看默认发布界面!可知默认发布目录修改成功!
测试完成后恢复默认!!
六、Apache的访问控制
1. 实验素材的建立
在默认发布目录下建立新目录,并在该目录的发布界面写入文字!
[root@nodea ~]# mkdir /var/www/html/westos
[root@nodea ~]# echo "/var/www/html/westos's page" > /var/www/html/westos/index.html
[root@nodea ~]# cat /var/www/html/westos/index.html
/var/www/html/westos's page
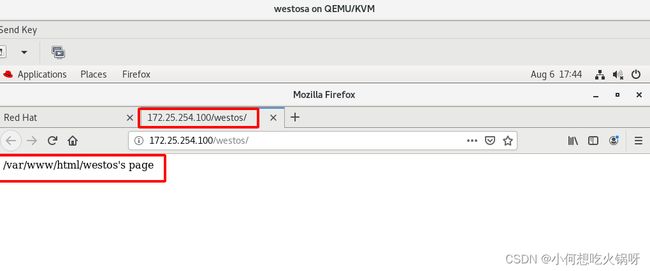
在浏览器查看该目录,显示正常!
2.基于客户端ip的访问控制
(1) ip白名单
如果想该目录只能让172.25.254.73看见,别的ip看不见,可以设置白名单!
在主配置文件添加ip白名单即可!
保存后,重启httpd服务,进行测试!
首先在172.25.254.73浏览器进行测试!可以访问该目录
在172.25.254.200浏览器访问,该目录无法访问!!
(2) ip黑名单
与上类似,如果不想让73访问,其他都可以访问,可以设置黑名单!
同样在主配置文件设定!
保存后重启服务,进行测试!
在172.25.254.73浏览器进行测试,发现无法访问!
在172.25.254.200浏览器进行访问,发现可以访问!
测试完成恢复默认值 !
3.基于用户认证的访问控制
- 建立认证文件--用户 : htpasswd -cm /etc/httpd/.htpasswdfile admin
- 在主配置文件认证:
- 指定认证文件
- 认证提示语
- 认证类型
- 允许认证通过的用户
首先建立两个认证用户,注意:第一建立用-cm 后来建立用-m ,否则会覆盖!
建立完成进入主配置文件认证!
ps:是 .htpasswdfile!!!!
保存后,重启服务!!进入浏览器进行测试!!会弹出需要认证的界面!
此时清理历史,再次访问,不清理不会弹出登陆框!
再次访问输入用户hgx及密码,发现无法访问!!因为设定只能admin用户访问!
修改主配置文件,设定所有认证用户均可访问!!
测试,hgx和admin用户都可以访问该目录!
七、Apache的虚拟主机
当我们想实现访问一个ip的不同域名可以展现不同页面,可以进行以下操作
- 编辑子配置文件
- 分别写入域名+页面
1. 建立实验素材
新建目录,建立不同的发布界面!
[root@nodea ~]# mkdir /var/www/virtual/westos.org/{news,bbs}/html -p
[root@nodea ~]# echo news.westos.org > /var/www/virtual/westos.org/news/html/index.html
[root@nodea ~]# echo bbs.westos.org > /var/www/virtual/westos.org/bbs/html/index.html
[root@nodea ~]# cat /var/www/virtual/westos.org/news/html/index.html
news.westos.org
[root@nodea ~]# cat /var/www/virtual/westos.org/bbs/html/index.html
bbs.westos.org
2.编辑子配置文件
设定不同域名对应的界面!
文件名字随意起,必须以conf结尾!
# vim /etc/httpd/conf.d/haha.conf编辑配置文件,设定访问不同域名显示不同的发布界面!
ps:设定完毕记得重启服务,重启成功说明设定没错!
3.添加本地解析
测试的浏览器在那儿就在那儿写本地解析!!
本次实验在真机写本地解析!
[root@node73 Desktop]# vim /etc/hosts
[root@node73 Desktop]# cat /etc/hosts
127.0.0.1   localhost localhost.localdomain localhost4 localhost4.localdomain4
::1         localhost localhost.localdomain localhost6 localhost6.localdomain6
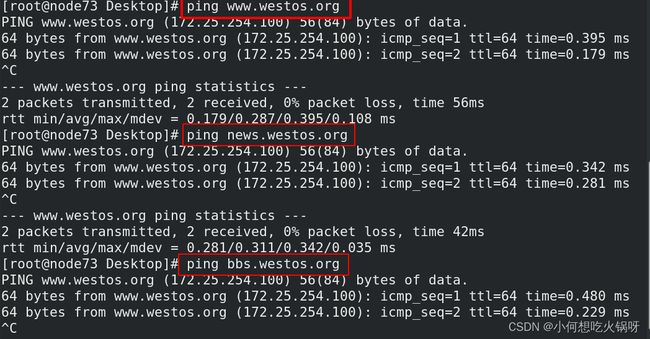
172.25.254.100 www.westos.org news.westos.org bbs.westos.org
4. 测试
在真机进行测试,分别访问3个域名,可以显示3个不同的发布界面!设定成功!
ping3个域名,ip都是172.25.254.100证明是同一个ip!
八、Apache的语言支持
1.超文本标记语言
默认发布界面写的就是超文本标记语言,默认支持!
测试界面正常显示!
2.php语言
PHP(PHP: Hypertext Preprocessor)即“超文本预处理器”,是在服务器端执行的脚本语言
- 安装插件即可支持
在默认目录下新建php目录,设定配置文件!
在发布界面写入:php语言
[root@nodea html]# mkdir php
[root@nodea html]# vim php/index.php
[root@nodea html]# cat php/index.php
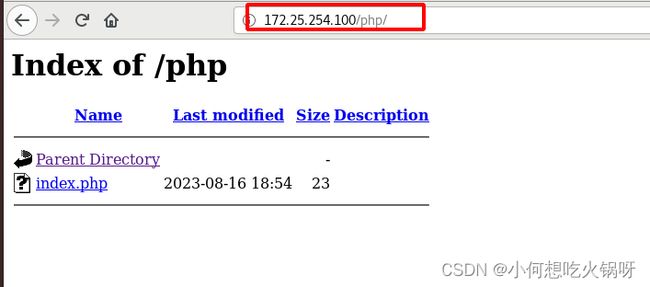
此时在浏览器测试,只是显示php目录,apache无法支持php语言!
因为需要安装php插件!
[root@nodea html]# dnf install php -y
[root@nodea html]# ll /etc/httpd/conf.d
total 24
-rw-r--r--. 1 root root 2926 Dec  2  2019 autoindex.conf
-rw-r--r--  1 root root  418 Aug 16 17:48 haha.conf
-rw-r--r--  1 root root 1618 Nov  8  2019 php.conf
-rw-r--r--. 1 root root  400 Dec  2  2019 README
-rw-r--r--. 1 root root 1252 Dec  2  2019 userdir.conf
-rw-r--r--. 1 root root  516 Dec  2  2019 welcome.conf
[root@nodea html]# systemctl restart httpd
安装成功后重启httpd服务,再次测试!支持php语言!
3.cgi语言
CGI(通用网关接口)是一种在Web服务器和应用程序之间通信的标准接口协议,它允许Web浏览器发送请求到Web服务器,并将用户输入与服务器端执行的程序进行交互。通过CGI技术,可以实现动态生成网页、处理表单数据、访问数据库等功能。
(1)使用cgi前
建立一个测试文件,写入“date",执行该程序,显示当前时间!
[root@nodea html]# ls
index.html  php  westos  westos.html
[root@nodea html]# vim test
[root@nodea html]# sh test
Wed Aug 16 19:46:19 CST 2023
[root@nodea html]# cat test
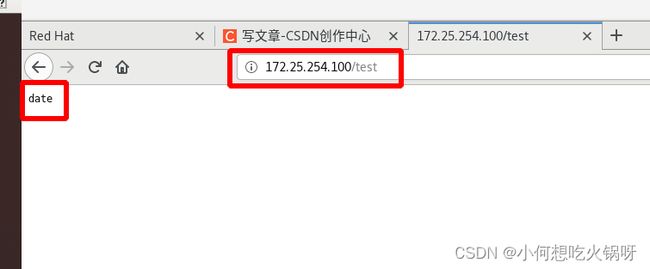
date
但是在网页测试浏览时,却无法执行该程序,只是显示date!
(2) apache的说明文档
那要怎么使用cgi呢?可以先查看apache的说明文档!
首先下载apache的说明文档!
[root@nodea html]# dnf install -y httpd-manual
[root@nodea html]# systemctl restart httpd
下载成功后,重启服务,就可以在网页查看apache的说明手册!
(3) 编辑cgi指令
进入apache手册------> cgi ----->Your first CGI program
![]()
复制该程序到新建的文件!
[root@nodea html]# mkdir /var/www/html/cgi
[root@nodea html]# vim /var/www/html/cgi/index.cgi
[root@nodea html]# cat /var/www/html/cgi/index.cgi
#!/usr/bin/perl
print "Content-type: text/html\n\n";
print `date`;
[root@nodea html]#
此时再次打开浏览器测试,该程序裸露在外,也并未执行,这是因为apache没有时别到cgi语言!
 (4) 识别cgi指令
查看cgi说明手册,将该指令写入子配置文件!
这是因为没有设定在直接访问!
(5) 直接访问指令
在配置文件中添加即可!!
浏览器再次测试,可以直接访问,但是还是无法执行!
这是因为cgi脚本需要执行权限!
(6) 添加可执行权限
[root@nodea conf.d]# ll /var/www/html/cgi/index.cgi
-rw-r--r-- 1 root root 67 Aug 16 20:53 /var/www/html/cgi/index.cgi
[root@nodea conf.d]# chmod +x /var/www/html/cgi/index.cgi
再次测试,执行成功!!
4. wsgi语言
Web服务器网关接口(Python Web Server Gateway Interface,缩写为WSGI)是为Python语言定义的Web服务器和Web应用程序或框架之间的一种简单而通用的接口。
(1) 编辑python脚本
注意!python对格式很严格,一定要仔细,否则不识别!!编辑完成重启httpd服务
[root@nodea conf.d]# cat /var/www/html/wsgi/index.wsgi
def application(env, westos):
    westos('200 ok',[('Content-Type', 'text/html')])
    return [b'hello westos linux hgx']
[root@nodea conf.d]# systemctl restart httpd
此时在浏览器测试,发现需要卸载文件!不能执行脚本
(2) 识别wsgi指令
进入配置文件!
(3) 安装wsgi插件
[root@nodea conf.d]# dnf search wsgi
Updating Subscription Management repositories.
Unable to read consumer identity
This system is not registered to Red Hat Subscription Management. You can use subscription-manager to register.
Last metadata expiration check: 1:11:44 ago on Thu 17 Aug 2023 03:18:59 PM CST.
========================= Name & Summary Matched: wsgi =========================
python3-mod_wsgi.x86_64 : A WSGI interface for Python web applications in Apache
python38-mod_wsgi.x86_64 : A WSGI interface for Python web applications in
                         : Apache
[root@nodea conf.d]# dnf install -y python3-mod_wsgi.x86_64
Updating Subscription Management repositories.
Unable to read consumer identity
This system is not registered to Red Hat Subscription Management. You can use subscription-manager to register.
Last metadata expiration check: 1:12:07 ago on Thu 17 Aug 2023 03:18:59 PM CST.
Package python3-mod_wsgi-4.6.4-4.el8.x86_64 is already installed.
Dependencies resolved.
Nothing to do.
Complete!
安装成功重启httpd服务
(4) 添加地址解析
在浏览器所在主机添加地址解析,保证可以直接访问虚拟机!
(5) 测试
在浏览器测试,直接访问wsgi.westos.org,成功!
九、Apache的加密访问
1.SSL证书
通常的互联网通信,是采用http的明文通信协议。在这种通信协议下,信息会以明文的方式进行传输。这样就会存在被第三方窃取、篡改的风险。因此,我们采用https协议进行加密通信。
https协议是采用加密的方式对数据进行传输,并且使用的是更适合互联网的公钥加密方式。网站只要在服务器上部署上ssl证书,即可使网站实现https协议通信。
SSL证书通过在客户端浏览器和Web服务器之间建立一条SSL安全通道(Secure socket layer (SSL) 安全套接字层)。由于SSL技术已建立到所有主要的浏览器和WEB服务器程序中,因此,仅需安装服务器证书就可以激活该功能了,安装SSL证书后,网站协议将从HTTP转换为安全HTTPS),即通过它可以激活SSL协议,实现数据信息在客户端和服务器之间的加密传输,可以防止数据信息的泄露,保证了双方传递信息的安全性,而且用户可以通过服务器证书验证他所访问的网站是否是真实可靠。
2.加密原理
- 对称加密:指加密和解密使用相同的密钥的加密算法。它的加密原理是将明文 (输入的机密信息) 通过密钥进行加密,然后再将加密后的密文发送出去。接收方收到密文后,使用相同的密钥进行解密,从而获得明文。对称加密的优点在于速度快,加密强度高,且密钥管理简单。但是,它也存在缺点,例如密钥管理不当会导致密钥泄露,攻击者可以轻松地破解加密信息。
-
非对称加密:是指加密和解密使用不同的密钥的加密算法。它的加密原理是将明文通过非对称密钥进行加密,然后再将加密后的密文发送出去。接收方收到密文后,使用对称密钥进行解密,从而获得明文。非对称加密的优点在于加密强度高,攻击者需要付出极大的代价才能破解加密信息,而且密钥管理简单。但是,它也存在缺点,例如由于非对称密钥较长,加密速度较慢,且密钥管理不当会导致密钥泄露。
3.https加密通信过程
https协议在通信时,首先会采用非对称加密的方式,把会话主密钥进行公钥加密,然后传输给服务器,服务器使用私钥解密后,客户端和服务器即可建立起安全的访问通道。在接下来的通信就会采用速度更快的对称加密方式进行数据传输。
这样https协议就既拥有非对称加密的安全性,同时也拥有了对称加密的速度快的两个优点。
- 首先,客户端(例如Web浏览器)向服务器发出HTTPS请求。
- 服务器将 SSL证书(包含服务器的公钥信息)和服务端随机数 发送给客户端。该公钥由数字证书颁发机构(CA)签名,以确保其真实性和可信度。
- 客户端对证书进行验证,验证成功后,利用 随机数 生成 主密钥 --->(非对称加密:安全传送主密钥)
- 客户端 使用 服务器公钥 加密 发送 会话主密钥
- 服务器 使用 服务器私钥 解密 获得会话主密钥
- 服务器 用会话主密钥加密传输会话内容-->(对称加密-->快速传输)
4. 实验验证
(1)安装SSL加密插件
# dnf install -y mod_ssl
# systemctl restart httpd
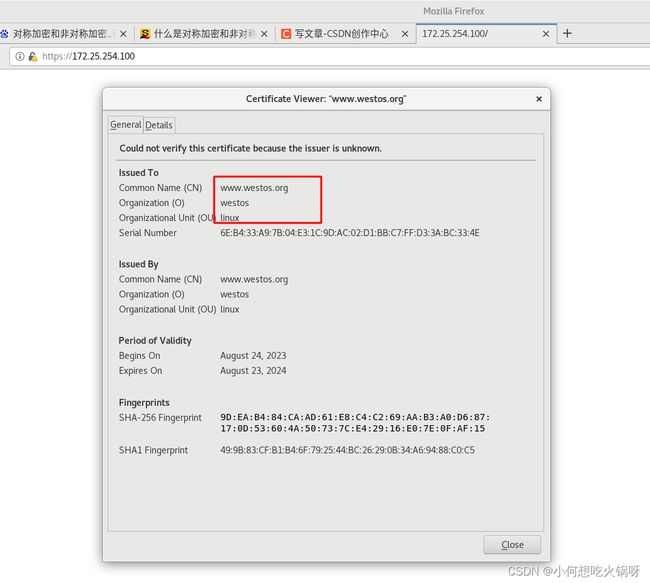
安装成功后重启服务httpd,即可在浏览器访问:https://172.25.254.100
这里会出现告警--因为我们没有CA机构的认证!
这里做实验,接受就可以!
查看证书信息,是系统默认的
因此,我们要部署SSL证书!
(2)生成SSL证书
建立新目录,在该目录下生成证书+会话密钥!
这里没有CA机构颁发的证书,因此只使用了对称加密!
[root@nodea ~]# mkdir /etc/httpd/certs
[root@nodea ~]# openssl req --newkey rsa:2048 -nodes -sha256 -keyout /etc/httpd/certs/westos.org.key -x509 -days 365 -out /etc/httpd/certs/westos.org.crt
Generating a RSA private key
..............................................................................................................................................................................................................................................................+++++
........................................+++++
writing new private key to '/etc/httpd/certs/westos.org.key'
-----
You are about to be asked to enter information that will be incorporated
into your certificate request.
What you are about to enter is what is called a Distinguished Name or a DN.
There are quite a few fields but you can leave some blank
For some fields there will be a default value,
If you enter '.', the field will be left blank.
-----
Country Name (2 letter code) [XX]:CN
State or Province Name (full name) []:Shannxi
Locality Name (eg, city) [Default City]:xi'an
Organization Name (eg, company) [Default Company Ltd]:westos
Organizational Unit Name (eg, section) []:linux
Common Name (eg, your name or your server's hostname) []:www.westos.org
Email Address []:[email protected]
[root@nodea ~]# ls /etc/httpd/certs/
westos.org.crt  westos.org.key
(3)编辑配置文件--系统识别证书
[root@nodea ~]# vim /etc/httpd/conf.d/ssl.conf
[root@nodea ~]# systemctl restart httpd
进入ssl主配置文件,修改证书+密钥路径
修改完成后,重启服务,在浏览器再次查看证书信息,已更改成功!
(4)http-->https
当访问ww.baidu.com时,会自动跳转到https://www.baidu.com,这是如何实现的 ?
首先新建一个新网址login.westos.org,当访问该网址自动转到加密。
[root@nodea ~]# mkdir /var/www/virtual/westos.org/login
[root@nodea ~]# echo login.westos.org > /var/www/virtual/westos.org/login/index.html
[root@nodea ~]# cat /var/www/virtual/westos.org/login/index.html
login.westos.org
编辑配置文件,添加两个语句块!
[root@nodea ~]# vim /etc/httpd/conf.d/haha.conf
[root@nodea ~]# systemctl restart httpd
在浏览器所在主机添加解析
以上设定完成,在浏览器输入login.westos.org测试,发现会自动跳转https://login.westos.org/
十、代理服务器
1.代理服务器的定义
代理服务器(Proxy Server)的功能是代理网络用户去取得网络信息。
代理服务器是网络信息的中转站。一般情况下,使用网络浏览器直接去链接其它Internet站点并取得网络信息时,须送出请求信号来得到应答,然后对方再把信息传送回来。代理服务器是介于浏览器和Web服务器之间的一台服务器,有了它之后,浏览器不是直接到Web服务器去取回网页而是向代理服务器发出请求,请求信号会先送到代理服务器,由代理服务器来取回浏览器所需要的信息并传送给你的浏览器。而且,大部分代理服务器都具有缓冲的功能,就好像一个大的Cache,它不断将新取得数据包存到它本机的存储器上,如果浏览器所请求的数据在它本机的存储器上已经存在而且是最新的,那么它就不重新从Web服务器取数据,而直接将存储器上的数据传送给用户的浏览器,这样就能显著提高浏览速度和效率。
2.实验
设定虚拟机nodeb为代理服务器,nodea为web服务器,真机为浏览器
ps:以下操作在nodeb上进行!
(1) 安装squid缓存服务器
Squid cache(简称为 Squid)是一个流行的自由软件(GNU 通用公共许可证)的代理服务器和 Web 缓存服务器。Squid 有广泛的用途,从作为网页服务器的前置 cache 服务器缓存相关请求来提高 Web 服务器的速度,到为一组人共享网络资源而缓存万维网,域名系统和其他网络搜索,到通过过滤流量帮助网络安全,到局域网通过代理上网。
dnf install -y squid(2)编辑主配置文件
[root@nodeb ~]# vim /etc/squid/squid.conf
[root@nodeb ~]# systemctl enable --now squid
注意:vhost指的是web服务器的虚拟主机,必须与配置文件一致!
配置完成,开启squid服务!
(3)添加火墙策略
[root@nodeb ~]# firewall-cmd --permanent --add-port=80/tcp
success
[root@nodeb ~]# firewall-cmd --reload
success
(4) 查询httpd服务
查询nodeb上是否有httpd,确保没有,才可以测试!
[root@nodeb ~]# rpm -qa | grep httpd
(5) 测试
在真机浏览器搜索172.25.254.200,显示
而node没有apache,显示的是nodea的默认发布界面!
[root@nodea ~]# cd /var/www/html/
[root@nodea html]# ls
cgi  index.html  php  test  westos  westos.html  wsgi
[root@nodea html]# cat index.html
hello apache
[root@nodea html]#
若修改nodea的默认发布界面为 172.25.254.100
[root@nodea html]# cat index.html
172.25.254.100
[root@nodea html]# systemctl restart httpd
再次搜索200,显示的仍是nodea的发布界面,这是因为nodeb为代理服务器,没有的请求会从nodea上获取!

