SpringBoot简单入门
![]()
星光下的赶路人star的个人主页
充满希望的旅途,胜过终点的到达
文章目录
- 1、Spring简介
-
- 2、SpringBoot简介
- 3、SpringBoot下的配置文件
- 4、HelloWorld
-
- 4.1 工程搭建
- 4.2 编写访问页面
- 4.3 编写后台程序处理请求
- 4.4 测试
- 5、Web基础常识
-
- 5.1 Web请求三要素
- 5.2 常见的html标签
- 5.3 请求方式
- 6 、接受参数
-
- 6.1 接受普通请求参数
- 6.2 接受Json格式的请求参数
- 6.3 接受路径参数
- 7、 返回数据
- 8 、限定请求方式
- 9、 常见错误状态码
- 10 、容器使用
-
- 10.1 在容器中初始化对象
- 10.2 从容器中获取指定类型的对象
- 10.3 读取配置注入属性
- 11 、定时调度
-
- 11.1 如何启用
- 11.2 如何配置
1、Spring简介
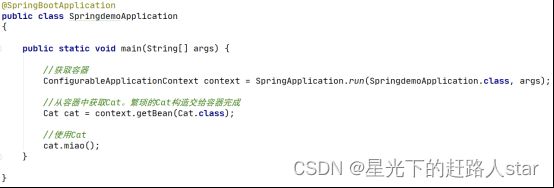
Spring是JavaEE开发中最常用的基础框架,它基于IOC(inverse of control)理念和容器思想,让javaEE开发更简洁。开发人员只需要专注于自己的业务逻辑,而其他的底层基础设施则由Spring进行管理,在程序需要的地方进行自动注入。
Spring让开发更加简洁,代码的可读性和可维护性更强,更加优雅。
不使用Spring开发:

使用Spring开发:
2、SpringBoot简介
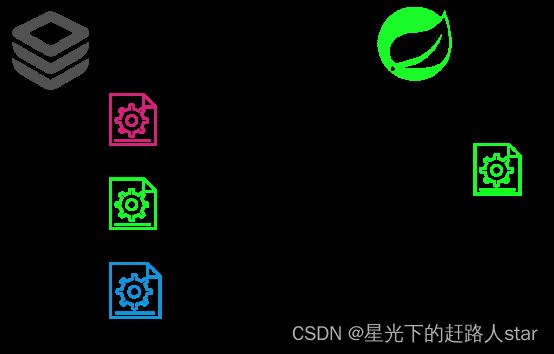
SpringBoot的作用是为了在使用Spring的应用进行开发的时候,简化配置。并且以最简单的方式来整合第三方应用,例如Redis,MyBatis,SpringBoot。
SpringBoot顺应了可插拔的插件式开发思想,需要集成什么框架,只需要引入此框架提供的SpringBoot-starter即可。
3、SpringBoot下的配置文件
SpringBoot环境下常用的配置文件有两种,一种是properties属性文件,一种是yml文件。二者仅仅是语法不通,但是最终效果一致。yml适合配置多嵌套层级关系的属性,而properties则更为直观。如果两个配置文件中有同名的属性,那么是以properties为准的。
4、HelloWorld
4.1 工程搭建
在project上选择new—>module
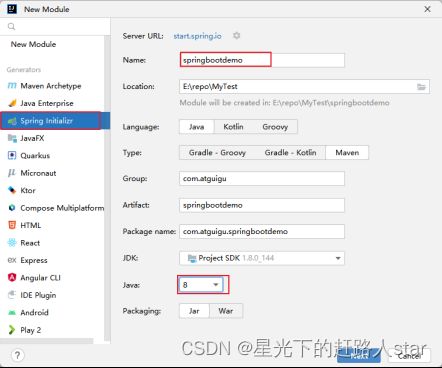
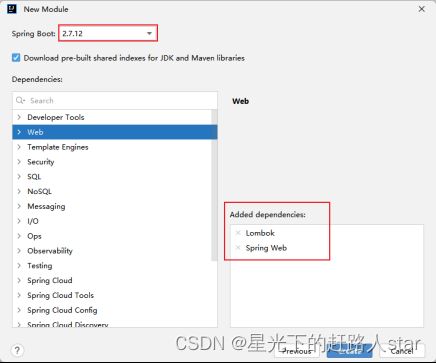
选择SpringBoot主版本和项目需要的组件,其中SpringWeb组件是开发一个web项目必须选择的模块。
由于SpringBoot3.x强制要求JDK17,因此如果你的jdk是8的话一定要选择2.x的系列
创建后的结构如下图:

注意:像.mvn、HELP.md、mvnw、mvnw,cmd这种用不着的可以直接删掉
4.2 编写访问页面
在static目录下创建index.html,向其中添加如下内容
DOCTYPE html>
<html lang="en">
<head>
    <meta charset="UTF-8">
    <title>首页title>
head>
<body>
        <a href="hello">发送hello请求a>
body>
html>
添加处理成功的页面success.html
DOCTYPE html>
<html lang="en">
<head>
    <meta charset="UTF-8">
    <title>欢迎title>
head>
<body>
    <h1>碰到好的欢喜的东西,总是要留得一份清淡余地,才会有中正的缘分h1>
body>
html>
4.3 编写后台程序处理请求
import org.springframework.stereotype.Controller;
import org.springframework.web.bind.annotation.RequestMapping;

@Controller
public class HelloController
{
    /*
        主机名和端口号是不写的!
     */
    @RequestMapping(value = "/hello")
    public String hello(){
        System.out.println("欢迎最帅||最美的你来看我的博客");
        return "/success.html";
    }
}
4.4 测试
启动程序后,打开浏览器访问localhost:8080,点击连接发送请求,效果如下:


5、Web基础常识
5.1 Web请求三要素
| 术语 | 解释 | 类比生活 |
|---|---|---|
| Request | 客户端发起的一个请求 | 想求人办事 |
| Request Url | 请求路径 | 找到求助目标 |
| Request Method | 请求方式 | 求人的方式 |
| Request Param | 请求参数 | 携带的东西 |
示例: http://localhost:8080/getRequest?name=jack&age=20
解释:
http:// 是使用的协议
localhost:8080:指的是当前的url要发送的主机名和端口,其中localhost会被域名解析为真实的ip地址。
getRequest:代表请求的路径名。
name=jack&age=20 :代表此次请求携带了两个参数。其中参数的格式为k=v格式,多个参数之间用&进行间隔。参数和url路径之间会使用?进行间隔。
5.2 常见的html标签
| 标签 | 属性 | 作用 |
|---|---|---|
| a | 超链接标签,点击后可以发送url请求 | |
| href | 发送请求的url路径 | |
| form | 表单标签,类似生活中填写的表格单据 | |
| action | 表单提交的url | |
| method | 请求方式 | |
| input | 嵌套在form中,代表一个输入框 | |
| name | 参数名 | |
| value | 参数值 | |
| type | 输入框类型,默认是text,即文本输入框。submit为提交按钮,radio为单选按钮 | |
| br | 换行 |
5.3 请求方式
在Http协议中,一共定义了9种请求方式,但是常用的GET和POST。
GET请求方式在发送请求时,会把参数附加在url后面。例如:
http://localhost:8080/hello?name=jack&age=20
POST请求方式在发送请求时,会把参数附加在请求体中,例如:
http://localhost:8080/hello
请求体:
name=jack
age=20
浏览器的地址栏和标签只能发送GET请求,POST请求的请求体可以在浏览器的F12选项中查看。
6 、接受参数
6.1 接受普通请求参数
方式一:前端发送的请求参数为name=value格式,在后端处理时,只需要在处理方法的参数列表中声明和请求参数名name一样的参数名,就可以收到。
方式二:如果前端发送的请求参数过多,也可以在处理方法的参数位置声明一个Bean来接受。其中和Bean的属性同名的参数会直接赋值给Bean的属性。
6.2 接受Json格式的请求参数
前端发送的请求参数如果为json格式,那么就可以在请求方法的参数位置声明Map或Bean类型接受,在Bean或Map前面标注#RequestBody注解,可以直接将json中的属性解析后赋值给Map或Bean。
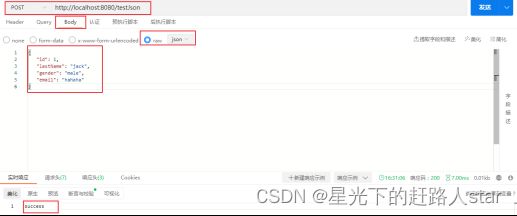
@PostMapping(value = "/testJson" )
 public Object handle5(@RequestBody Employee employee){

        System.out.println(employee);

        return "success";

 }
6.3 接受路径参数
如果希望接受某一层路径上的变量,可以在@RequestMapping中使用{xxx}进行占位,之后使用@PathVariable注解修饰方法的形参来接受路径参数
/*
        url格式:  /emp/1/a
*/
@ResponseBody
@RequestMapping(value = "/emp/{haha}/a")
public Object handle6(@PathVariable("haha") Integer id){
 //1
 System.out.println(id);
 return "ok";
}
7、 返回数据
在处理请求的方法上标注@RequestBody注解,可以把处理方法的返回值作为响应体返回给前端。
如果返回值是字面量,则直接返回。如果返回值是非字面量,则将返回值转换为json后再返回。
	@ResponseBody
    @RequestMapping(value = "/getData1")
    public Object handle2(){

        System.out.println("处理了getData1请求,即将返回字面量");

        return "success";

    }

    @ResponseBody
    @RequestMapping(value = "/getData2")
    public Object handle3(){

        System.out.println("处理了getData2请求,即将返回非字面量");

        Employee employee = new Employee(1, "Tom", "male", "abc");

        return employee;

    }
如果一个Controller中的方法都是返回数据的,而不是返回页面的,那么就可以直接在控制器类上使用@RestController注解,该注解已经具有@Controller注解的功能,还可以为当前控制器的所有方法都默认添加@ResponseBody注解
8 、限定请求方式
使用@PostMapping会限定只处理指定url发生的post方式的请求。
使用@GettingMapping会限定只处理指定url发送的get方式的请求。
如果请求的方式错误,此时客户端会报错405。
9、 常见错误状态码
| 状态码 | 含义 |
|---|---|
| 1xx | 请求正在进行 |
| 2xx | 响应成功 |
| 3xx | 请求重定向 |
| 4xx | 客户端错误。404:请求的资源不存在、405:请求方式错误、400:请求参数不符合要求、403:访问被禁止 |
| 5xx | 服务器端错误 |
| 6xx | 自定义状态码 |
10 、容器使用
10.1 在容器中初始化对象
如果希望容器在启动时,自动创建指定类型的对象,可以在当前类上标注@Component注解。此时容器启动后,会自动创建一个指定类型的单例对象。
@Data
@AllArgsConstructor
@Component
public class Dog
{
    private String name = "旺财";
    private Integer age = 5;

    public Dog(){
        System.err.println(name +"被创建了");
    }
}
如果没有要创建类对象的源码,可以在@Configuration标注的类中,使用@Bean标注的方法,将方法的返回值自动放入容器中。例如以下案例将在容器启动时,向容器中自动创建一个指定日期的LocalDate对象。
@Configuration
public class MyConfig
{
    @Bean
    public LocalDate getTs(){
        return LocalDate.parse("2023-05-10");
    }
}
10.2 从容器中获取指定类型的对象
方式一:使用自动注入的方式获取指定类型的对象
可以在指定类型的属性上标注注解@AutoWired,此时将从容器中获取指定类型的对象,复制给变量。
@SpringBootTest
class SpringbootdemoApplicationTests
{

    @Autowired
    Dog dog;
    @Autowired
    LocalDate date;
    @Test
    void contextLoads() {
        System.out.println(dog);
        System.out.println(date);
    }
}
如果容器中有两个同一类型的对象,例如:
@Data
@NoArgsConstructor
@AllArgsConstructor
@Component
public class TuDog extends Dog
{
    private String name = "TuDog";

}
@Component
@Data
@AllArgsConstructor
@NoArgsConstructor
public class YangDog extends Dog
{
    private String name = "YangDog";
}
此时再使用@AutoWired注入时候,容器中会检测到两个相同类型的Dog,产生歧义。

此时可以在@Component注解上,为每个Bean配置id。例如:
@Component("yangDog")
@Data
@AllArgsConstructor
@NoArgsConstructor
public class YangDog extends Dog
{
    private String name = "YangDog";
}
之后,可以使用@Qualifier注解指定要注入的指定id的Bean
@Autowired
@Qualifier("yangDog")
Dog dog;
方式二:获取容器对象手动获取
@SpringBootTest
class SpringbootdemoApplicationTests
{

    @Autowired
    ApplicationContext context;
    @Test
    void contextLoads() {

        LocalDate localDate = context.getBean(LocalDate.class);
        System.out.println(localDate);
        Dog dog = context.getBean("yangDog", Dog.class);
        System.out.println(dog);

    }

}
以上方式首先获取了容器对象,之后调用容器的getBean()主动获取容器中指定类型或指定类型和id的对象。
10.3 读取配置注入属性
在配置文件中定义的属性,可以通过@Value注解读取,它会在容器启动的时候,自动注入相关参数的值到指定的属性中,例如:
@Value("${hive.metastore.uris}")
public String metastoreUri;
metastoreUri属性将在容器启动时,自动读取配置文件中名为hive.metastore.uris的属性值。
11 、定时调度
springTask是SpringBoot框架中自带的时间调度程序。
优点:简单易用配置少
缺点:不能做分布式调度
11.1 如何启用
在SpringBoot启动程序上增加注解@EnableScheduling
@SpringBootApplication
@EnableScheduling
public class SpringbootdemoApplication
建立一个任务类,类上面增加@Component,在方法上增加表达式
import org.springframework.scheduling.annotation.Scheduled;
import org.springframework.stereotype.Component;

@Component
public class TestTask {

    @Scheduled(cron = "0/10 * * * * *")
    public void text1(){
        System.out.println("text1 测试"+System.currentTimeMillis());
    }
}
11.2 如何配置
@Scheduled可用的参数
- cron 表达式 表示" 秒 分 时 天 月 星期几"
- fixeDelay标识每次触发的固定间隔毫秒数,注意间隔为是前一次的结束时间到后一次的开始时间点的间隔。
- fixeRate标识每次触发的固定间隔毫秒数,注意间隔为是前一次的开始时间到后一次的开始时间点的间隔。如果后一次开始时前一次的任务还没做完,则后一次的处理会被阻塞,直到前一任务完成。
- initialDelay标识每次启动时初始的延迟,可以配合fixedDelay或者fixedRate使用
import org.apache.commons.lang3.time.DateFormatUtils;
import org.springframework.scheduling.annotation.Scheduled;
import org.springframework.stereotype.Component;

import java.util.Date;

@Component
public class DemoTask {

    @Scheduled(cron = "0/10 * * * * *")
    public void text1(){
        System.out.println("text1 测试"+DateFormatUtils.format(new Date(),"mm:ss"));
    }

    @Scheduled(fixedDelay = 5000)
    public void text2(){
        System.out.println("text2 测试"+ DateFormatUtils.format(new Date(),"mm:ss"));
    }
    @Scheduled(fixedRate = 5000)
    public void text3(){
        System.out.println("text3 测试"+DateFormatUtils.format(new Date(),"mm:ss"));
    }
    @Scheduled(initialDelay =3000,  fixedRate = 5000)
    public void text4(){
        System.out.println("text4 测试"+DateFormatUtils.format(new Date(),"mm:ss"));
    }
}
![]()
您的支持是我创作的无限动力
![]()
希望我能为您的未来尽绵薄之力
![]()
如有错误,谢谢指正;若有收获,谢谢赞美

