VISA编程实例(C实现)
今天写这个文章,是因为自己工作中用到了ROHDE&SCHWARZ(即罗德-施瓦茨公司)的仪表设备,需要通过编程的方式来读取仪表上功率测试结果,本来仪表上显示了测试结果,不知道硬件部门为什么需要通过程序来获取?需求我是不明白的。
既然要实现这个功能呢?自然就硬着头皮搞了,没想到,研究了几天,发现网上有这样的程序示例。
先来说说做这个工作的必要的工具:
1、电脑安装NIVISA1850这个工具。这个工具可以通过tcp的方式连接仪表,然后通过指令来获取相关的测试结果。其实这个工具在本文的例子中,它的作用是一个依赖,而不是用这个工具去查询功率结果,虽然通过这个工具可以查询到测量结果(measure result)。
2、仪表:罗德施瓦茨 CMW500,这个工具只有懂的人或者用过的人才知道。
3、本机安装vs2019。
4、芯片板子,既然是测试功率,就需要其他的设备了,这个设备是公司硬件部门捣鼓的东西,他们需要测试GPS功率,就是通过射频发射信号(GPRF),然后连接仪表来测试。
==========================================================================
开始试验:
a 、开启仪表,仪表是一个windows xp系统,启动之后,设置测试功率相关参数,然后等待测试:
b 、前面提到安装的第一个工具,nivisa,其实这个就是一个远程操作仪表的工具,安装之后,会有一个NI-MAX的工具,点击打开,选择左侧菜单,依次选择我的系统->设备和接口->网络设备->CMW "TCPIP0::192.168.253.13::inst0::INSTR":
c 、然后选择面板上的“打开VISA测试面板”,会打开如下所示的面板:
d 、切换到Input/Output:就可以通过命令来获取仪表信息了,如下所示:
以上说了这么多,其实在我们c++编程里面,nivisa是一个依赖,我们需要他安装之后的头文件visa.h,还需要依赖库visa64.lib
e 、在visual studio 2019中新建工程,编写如下代码:
#if defined(_MSC_VER) && !defined(_CRT_SECURE_NO_DEPRECATE)
#define _CRT_SECURE_NO_DEPRECATE
#endif

#include
#include
#include

#include "visa.h"

static ViSession defaultRM;
static ViSession instr;
static ViUInt32 retCount;
static ViUInt32 writeCount;
static ViStatus status;
static unsigned char buffer[100];
static char stringinput[512];


int main(void)
{

    status = viOpenDefaultRM(&defaultRM);
    if (status < VI_SUCCESS)
    {
        printf("Could not open a session to the VISA Resource Manager!\n");
        exit(EXIT_FAILURE);
    }

    //status = viOpen(defaultRM, "ASRL1::INSTR", VI_NULL, VI_NULL, &instr);
    status = viOpen(defaultRM, "TCPIP0::192.168.253.13::inst0::INSTR", VI_NULL, VI_NULL, &instr);
    if (status < VI_SUCCESS)
    {
        printf("Cannot open a session to the device.\n");
        goto Close;
    }

     /* Set the timeout to 5 seconds (5000 milliseconds). */
    status = viSetAttribute(instr, VI_ATTR_TMO_VALUE, 5000);

    /* Set the baud rate to 4800 (default is 9600). */
    status = viSetAttribute(instr, VI_ATTR_ASRL_BAUD, 4800);

    /* Set the number of data bits contained in each frame (from 5 to 8).
     * The data bits for  each frame are located in the low-order bits of
     * every byte stored in memory.
     */
    status = viSetAttribute(instr, VI_ATTR_ASRL_DATA_BITS, 8);

    status = viSetAttribute(instr, VI_ATTR_ASRL_PARITY, VI_ASRL_PAR_NONE);

    status = viSetAttribute(instr, VI_ATTR_ASRL_STOP_BITS, VI_ASRL_STOP_ONE);

    status = viSetAttribute(instr, VI_ATTR_TERMCHAR_EN, VI_TRUE);

    /* Set the termination character to 0xA
     */
    status = viSetAttribute(instr, VI_ATTR_TERMCHAR, 0xA);

    /* We will use the viWrite function to send the device the string "*IDN?\n",
     * asking for the device's identification.
    */
    //strcpy(stringinput, "*IDN?\n");
    strcpy(stringinput, "FETCh:GPRF:MEAS:POWer:PEAK:MAXimum?\n");
    status = viWrite(instr, (ViBuf)stringinput, (ViUInt32)strlen(stringinput), &writeCount);
    if (status < VI_SUCCESS){
        printf("Error writing to the device.\n");
        goto Close;
    }

    status = viRead(instr, buffer, 100, &retCount);
    if (status < VI_SUCCESS){
        printf("Error reading a response from the device.\n");
    }else{
        printf("\nData read: %*s\n", retCount, buffer);
    }

    /*
     * Now we will close the session to the instrument using
     * viClose. This operation frees all system resources.
     */
Close:
    status = viClose(instr);
    status = viClose(defaultRM);
    printf("Hit enter to continue.");
    fflush(stdin);
    getchar();

    return 0;
}
关于这个程序来源呢,网上有,另外nivisa安装之后,有个目录:C:\Users\Public\Documents\National Instruments\NI-VISA\Examples\C,这里面都是一些c的代码,通过usb,serial,tcpip方式连接并且操作的代码都有。
这个代码需要运行正确,需要对项目进行设置,主要是 VC++ Directories需要包含(Include Directories)visa.h所在的目录:
C:\Program Files\IVI Foundation\VISA\Win64\Include
库目录(Library Directories)要添加:
C:\Program Files\IVI Foundation\VISA\Win64\Lib_x64
还需要设置:链接(Link)->输入(Input),额外依赖(Additional Dependencies),添加:
C:\Program Files\IVI Foundation\VISA\Win64\Lib_x64\msc\nivisa64.lib
C:\Program Files\IVI Foundation\VISA\Win64\Lib_x64\msc\visa64.lib
全部设置好了,项目不报错,编译通过,运行:
f 、下面先给出仪表的显示结果:
功率最大值Power Maximum是:23.878 dBm
通过程序获取的结果:
打印的结果是一个接近的数值,跟仪表结果类似,应该是仪表做了取舍。
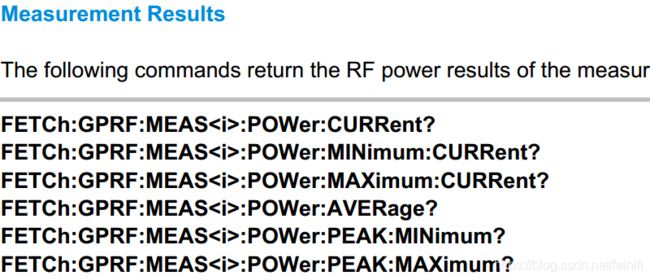
至此,通过visa编程,我们获取了仪表数据。这里我获取的是功率最大值,关于这个值,一般文档都是介绍的通过FETCh:GPRF:POWer:MAXimum:CURRent?获取,但是这个获取的是仪表上显示的Power Current Max的数值,我后来根据CMW_GPRF_UserManual文档找到了如下一些方法:
后来试着用了FETCh:GPRF:MEAS:POWer:PEAK:MAXimum?来获取最大功率,竟然成功了,很高兴。


