Git入门学习笔记(10分钟速通)
一、Git概述
官网翻译:
Git 是一个免费的开源 分布式版本控制系统,旨在快速高效地处理从小型项目到大型项目的所有内容。
Git易于学习, 体积小,性能快如闪电。它超越了 Subversion、CVS、Perforce 和 ClearCase 等 SCM 工具,具有廉价的本地分支、方便的临时区域和 多个工作流等特性。
二、Git安装
git官网:Git
基本一直下一步即可安装完成,具体安装过程网上有很多优秀教程,这里略了。。。
三、Git创建本地仓库
3.1、设置用户签名
- 设置用户名
git config --global user.name "xxx"- 设置邮箱
git config --global user.email "[email protected]"ps:设置用户名和邮箱只是区分不同开发者身份,与你要登录GitHub等平台账号没有关系。Git首次安转后必选设置用户签名。
3.2、初始化本地库
- init 命令
# git init 初始化仓库命令
zlp@zlpdeMacBook-Pro git_study % git init
hint: Using 'master' as the name for the initial branch. This default branch name
hint: is subject to change. To configure the initial branch name to use in all
hint: of your new repositories, which will suppress this warning, call:
hint:
hint:     git config --global init.defaultBranch
hint:
hint: Names commonly chosen instead of 'master' are 'main', 'trunk' and
hint: 'development'. The just-created branch can be renamed via this command:
hint:
hint:     git branch -m
Initialized empty Git repository in /Users/zlp/study/git_study/.git/
3.3、查看本地库状态
- status 命令
# git status
zlp@zlpdeMacBook-Pro git_study % git status
On branch master

No commits yet

nothing to commit (create/copy files and use "git add" to track)
在本地库新建一个文件,再次用命令查看状态:
zlp@zlpdeMacBook-Pro git_study % git status
On branch master

No commits yet

nothing to commit (create/copy files and use "git add" to track)
zlp@zlpdeMacBook-Pro git_study % vim demo
zlp@zlpdeMacBook-Pro git_study % cat demo
hello git
zlp@zlpdeMacBook-Pro git_study % git status
On branch master

No commits yet

Untracked files:
  (use "git add ..." to include in what will be committed)
    demo

nothing added to commit but untracked files present (use "git add" to track)
通过输出信息,可以看出git发现一个没有被追踪到的文件demo,可以使用git add命令进行追踪。
3.4、添加暂存区
- add 命令
zlp@zlpdeMacBook-Pro git_study % git add demo 再次查看本地库状态:
zlp@zlpdeMacBook-Pro git_study % git status
On branch master

No commits yet

Changes to be committed:
  (use "git rm --cached ..." to unstage)
    new file:   demo
到这里,文件已经添加到暂存区了,在暂存区里的文件是可以删除的。
文件ps:删除暂存区的文件并不是删除本地文件,只是在暂存区没有了,在本地还是存在的。
- rm 删除命令
zlp@zlpdeMacBook-Pro git_study % git rm -rf --cached demo 删除后再次查看状态:
zlp@zlpdeMacBook-Pro git_study % git status
On branch master

No commits yet

Untracked files:
  (use "git add ..." to include in what will be committed)
    demo

nothing added to commit but untracked files present (use "git add" to track)
但是文件在本地还是存在的:
zlp@zlpdeMacBook-Pro git_study % ls
demo
3.5、提交到本地仓库
- commit 命令
# version 1.0 是你提交时填写的日志
zlp@zlpdeMacBook-Pro git_study % git commit -m "version 1.0" demo
[master (root-commit) 6d0fab4] version 1.0
 1 file changed, 1 insertion(+)
 create mode 100644 demo
查看状态:
zlp@zlpdeMacBook-Pro git_study % git status
On branch master
nothing to commit, working tree clean
3.6、修改文件
修改文件后,查看状态:
zlp@zlpdeMacBook-Pro git_study % git status
On branch master
Changes not staged for commit:
  (use "git add ..." to update what will be committed)
  (use "git restore ..." to discard changes in working directory)
    modified:   demo

no changes added to commit (use "git add" and/or "git commit -a")
git add 命令提交到暂存区
git commit 命令提交到本地库
zlp@zlpdeMacBook-Pro git_study % git add demo
zlp@zlpdeMacBook-Pro git_study % git status
On branch master
Changes to be committed:
  (use "git restore --staged ..." to unstage)
    modified:   demo

zlp@zlpdeMacBook-Pro git_study % git commit -m "version 2.1" demo
[master 57437fb] version 2.1
 1 file changed, 1 insertion(+), 1 deletion(-)
zlp@zlpdeMacBook-Pro git_study % git status
On branch master
nothing to commit, working tree clean
在修改文件后查看状态有一段输出信息:
no changes added to commit (use "git add" and/or "git commit -a")
意思是需要我们添加到使用add命令暂存区,或者使用 git commit -a 命令直接提交到本地仓库,经过测试,修改完文件后,直接用 git commit -m "xxx" xxx 命令也可以提交成功。
3.7、查看版本信息
- reflog 命令
查看简洁版本信息:
# zlp@zlpdeMacBook-Pro git_study % git reflog
f4e981d (HEAD -> master) HEAD@{0}: commit: version 2.2
57437fb HEAD@{1}: commit: version 2.1
975154d HEAD@{2}: commit: version 2.0
6d0fab4 HEAD@{3}: commit (initial): version 1.0- log 命令
查看详细版本信息:
zlp@zlpdeMacBook-Pro git_study % git log
commit f4e981dbd5ade88ebdad78322ed00f7ff64f8fbb (HEAD -> master)
Author: zhaolaipeng
Date:   Fri Jan 6 11:17:13 2023 +0800

    version 2.2

commit 57437fb4cb09211146891e8876233efdaee44a23
Author: zhaolaipeng
Date:   Fri Jan 6 11:13:41 2023 +0800

    version 2.1

commit 975154dbd3cb1921628e035960872ab28ffb13bd
Author: zhaolaipeng
Date:   Fri Jan 6 11:11:16 2023 +0800

    version 2.0

commit 6d0fab4a77113ffc8b874124beb469c71f13f285
Author: zhaolaipeng
Date:   Fri Jan 6 10:58:51 2023 +0800

    version 1.0
: - 更改版本
57437fb4cb09211146891e8876233efdaee44a23就是你要更新的版本号
zlp@zlpdeMacBook-Pro git_study % git reset --hard 57437fb4cb09211146891e8876233efdaee44a23
HEAD is now at 57437fb version 2.1
四、GIt远程仓库
4.1、分支命令
- git branch -v 查看分支
zlp@zlpdeMacBook-Pro git_study % git branch -v
* master 57437fb version 2.1
- git branch xxx 新建分支
zlp@zlpdeMacBook-Pro git_study % git branch branch1
- git checkout xxx 切换分支
zlp@zlpdeMacBook-Pro git_study % git checkout branch1
Switched to branch 'branch1'
修改文件,提交缓存区,提交本地仓库。
此时切换到master分支,会发现文件并没有被修改。
- merge 合并分支
zlp@zlpdeMacBook-Pro git_study % git merge branch1
Updating 57437fb..3b8a50c
Fast-forward
 demo | 1 +
 1 file changed, 1 insertion(+)
branch1分支代码已经合并到master分支上了
4.2、创建并推送远程仓库
这里采用Gitee作为远程仓库测试。
开始之前先在gitee上面进行ssh免密认证,采用https也可以不过每次都要用户登录。
- 执行命令生成密钥
ssh-keygen -t rsa -C "邮箱"
一直按回车确认即可,根据保存的文件夹路径可以看到名为 .ssh 的文件夹,里面有id_rsa、id_rsa.pub ,即是私钥、公钥。
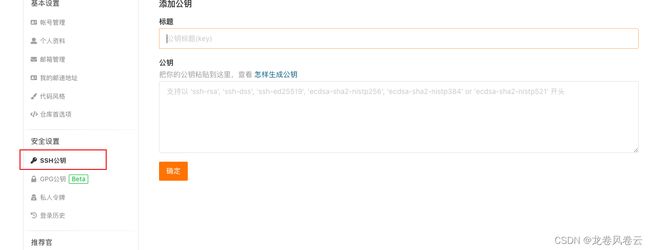
- 在Gitee设置里面添加公钥
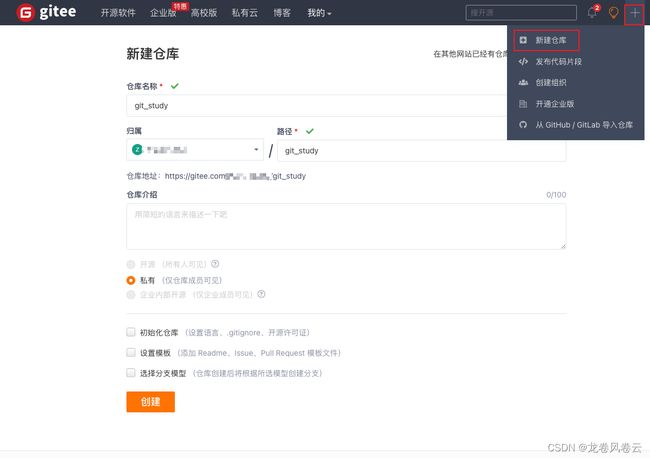
- 至此ssh认证完成,开始创建gitee仓库
- 创建仓库后我们可以看到有个https链接,还有个ssh链接。我们就可以直接用ssh链接,复制出来,如果每次都用链接操作,非常不方便,这是我们便可以给链接起个别名。
# "origin":就是你的别名名称
# "[email protected]:xxx/git_study.git":是你的ssh链接
git remote add origin [email protected]:xxx/git_study.git
# 查看别名
git remote -v
# 输出别名信息
origin    [email protected]:xxx/git_study.git (fetch)
origin [email protected]:xxx/git_study.git (push)- 本地库代码推送到远程库
 # git push 别名 分支
 # ps: 没有别名直接填链接也是可以的,提交时注意分支
 git push origin master
 # 输出:
 Enumerating objects: 12, done.
Counting objects: 100% (12/12), done.
Delta compression using up to 8 threads
Compressing objects: 100% (4/4), done.
Writing objects: 100% (12/12), 894 bytes | 894.00 KiB/s, done.
Total 12 (delta 0), reused 0 (delta 0), pack-reused 0
remote: Powered by GITEE.COM [GNK-6.4]
To gitee.com:xxx/git_study.git
 * [new branch]      master -> master
这时Gitee新建仓库里面有了我们本地库的代码。
- 拉取远程仓库代码
我们可以在远程仓库编辑信息,然后通过本地拉取代码进行测试。
执行命令:
# git pull 别名 分支
# ps:类似push 没有别名用链接也可以
git pull origin master
查看本地文件,会发现和远程仓库一样了。
- 克隆代码
首次从远程仓库获取代码是执行命令
git clone 链接五、IDEA集成GIt
5.1、环境配置
在实际开发中,每个人本地都有一些自己的配置文件,像idea、git等,而这些配置文件与工作代码没有关系,如果提交的时候带上这些文件,那其他人在拉取时就会出现代码冲突,为了避免这种情况,引入了 .gitignore 文件。
通常这个文件放在项目根目录即可,文件里面就配置了不需要上传的文件,这时在push的时候git就会自动过滤掉后缀名为.xxx 或某文件夹。例如:
*.log
*.temp
*.iml
/target
target/
*.csv
*.xls
*.xlsx
/\.idea
\.idea/
*.settings
*.classpath
*.project
/logs
*.idea
在IDEA中还需要设置你的Git安装位置,如下图通过测试显示出你的Git版本即可成功。
5.2、提交、拉取、推送
- commit
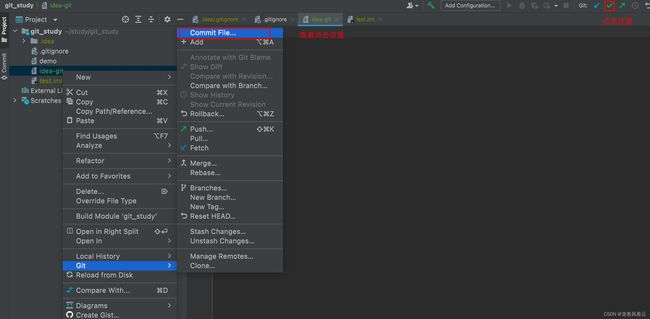
IDEA打开我们从远程仓库拉取的代码,新建一个文件,新建文件会提示我们是否添加到git,点add:
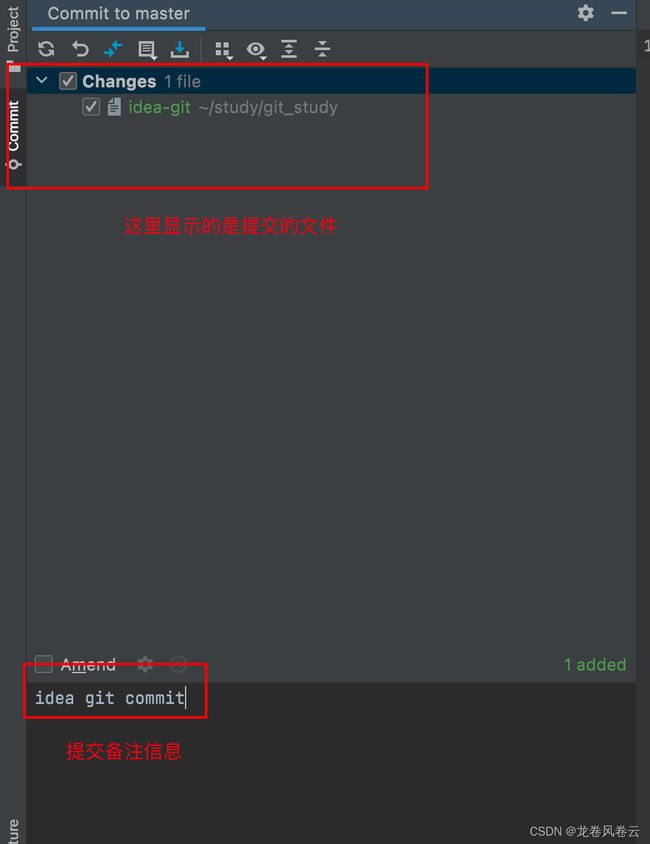
可以对文件单独提交,或者全部提交:
点击commit进行提交。
- push
这时gitee仓库就有了我们添加的文件:
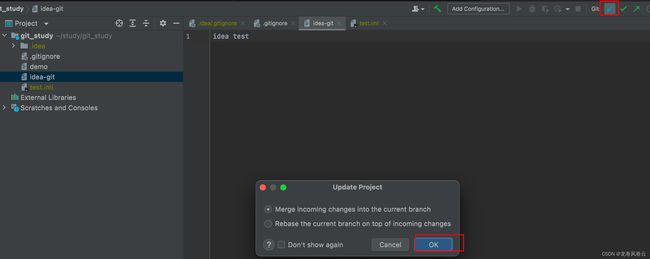
- pull
这个过程可能会出现的问题:
2:57 下午    Can't update
        master has no tracked branch
        Choose upstream branch (show balloon)
意思是:本地分支没有和远程分支关联
按过程操作即可:
5.3、版本管理
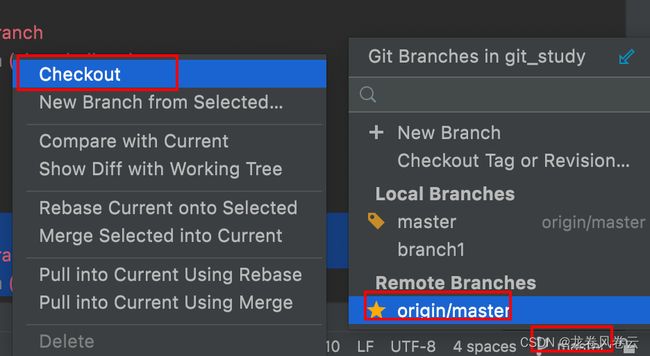
需要切换哪个版本选中点击checkout
5.4、分支
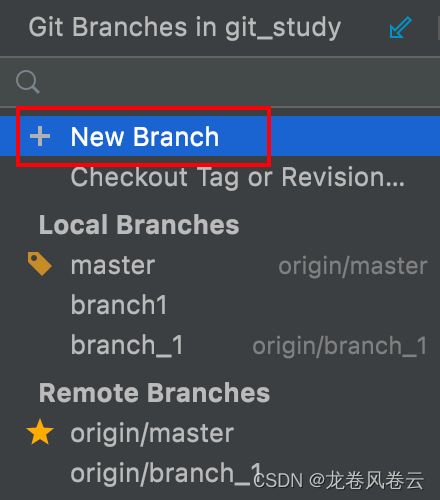
新建分支:
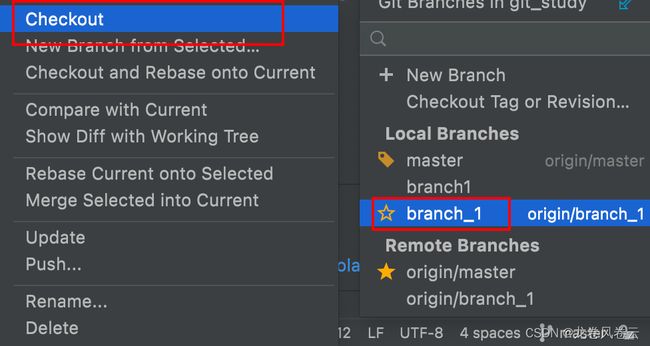
切换分支:
合并分支:
需要先切换要合并到的分支,比如master分支,选中被合并的分支也就是刚刚创建的分支。
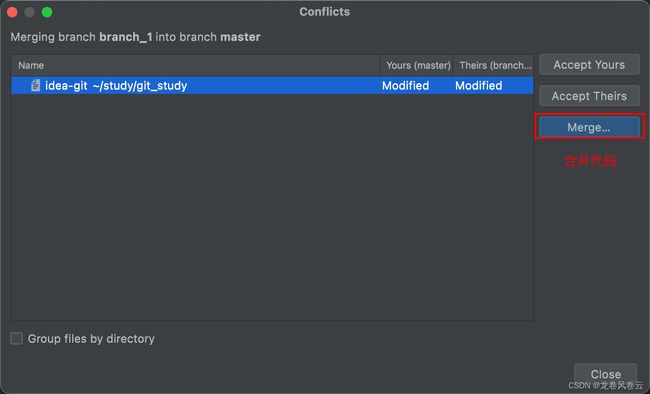
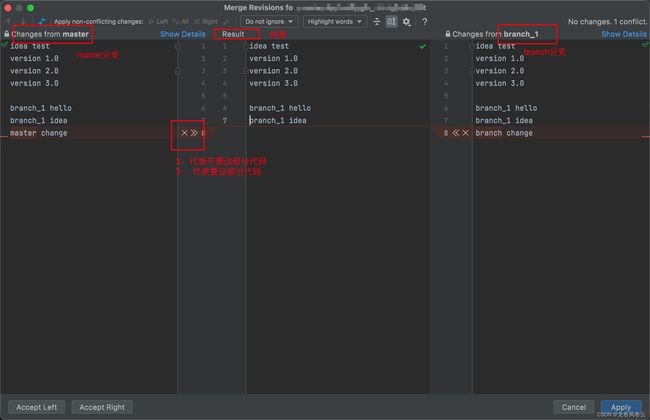
5.5、代码冲突
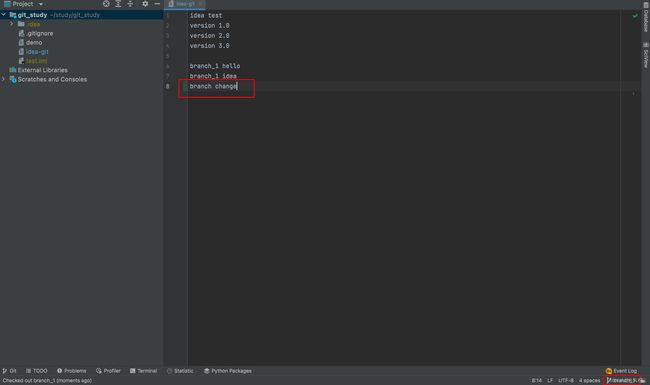
在分支代码添加信息并提交:
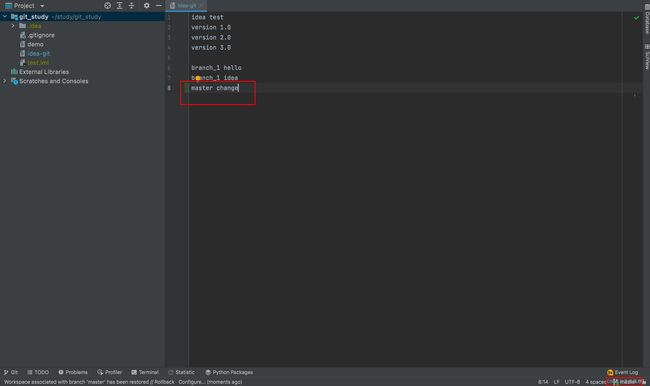
切换到master分支,在同一个文件夹添加信息并提交:
至此代码冲突解决。
