python-下载数据-制作全球地震散点图:JSON格式
查看JSON数据
import json

# 探索数据的结构
filename = 'eq_data_1_day_m1.geojson'
with open(filename) as f:
    all_eq_data = json.load(f)

readable_file = 'readable_eq_data.json'
with open(readable_file, 'w') as f:
    json.dump(all_eq_data, f, indent=4)
json.load() 将数据转换为Python能够处理的格式 - - 字典
json.dump() 接受一个JSON数据对象和一个文件对象,并将数据写入这个文件中
indent=4 让dump() 使用与数据结构匹配的缩进量来设置数据的格式
创建地震列表
创建一个列表,包含所有地震的各种信息
all_eq_dicts = all_eq_data['features']
len(all_eq_dicts)	# 160	# 160次地震
提取震级
magnitude震级
mags = []# 存储地震震级
for eq_dict in all_eq_dicts:
    mag = eq_dict['properties']['mag']
    mags.append(mag)

print(mags[:10])	# [1.6, 1.6, 2.2, 3.7, 2.92000008, 1.4, 4.6, 4.5, 1.9, 1.8]
提取位置数据
properties特征
geometry 存储位置数据
# longitude经度 latitude纬度 coordinates坐标
mags, titles, lons, lats = [], [], [], []
for eq_dict in all_eq_dicts:
    mag = eq_dict['properties']['mag']
    title = eq_dict['properties']['title']
    lon = eq_dict['geometry']['coordinates'][0]
    lat = eq_dict['geometry']['coordinates'][1]
    mags.append(mag)
    titles.append(title)
    lons.append(lon)
    lats.append(lat)

print(mags[:10])    # [1.6, 1.6, 2.2, 3.7, 2.92000008, 1.4, 4.6, 4.5, 1.9, 1.8]
print(titles[:2])   # ['M 1.6 - 27 km NNW of Susitna, Alaska', 'M 1.6 - 63 km SE of Pedro Bay, Alaska']
print(lons[:5])     # [-150.7585, -153.4716, -148.7531, -159.6267, -155.248336791992]
print(lats[:5])     # [61.7591, 59.3152, 63.1633, 54.5612, 18.7551670074463]
绘制震级散点图
import plotly.express as px

fig = px.scatter(	# 创建一个fig实例
    x=lons,
    y=lats,
    labels={"x": "经度", "y": "纬度"},
    range_x=[-200, 200],
    range_y=[-90, 90],
    width=800,
    height=800,
    title="全球地震散点图",
)
fig.write_html("global_earthquakes.html")	# 将可视化图保存为html文件
fig.show()
plotly.express别名px,是Plotly的高级接口,简单易用

另一种指定图表数据的方式
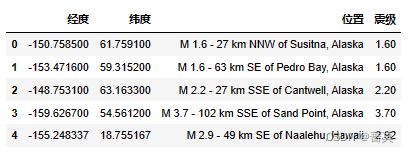
import pandas as pd
data = pd.DataFrame(	# 创建一个DataFrame ,将需要的数据封装起来
    data=zip(lons, lats, titles, mags), columns=["经度", "纬度", "位置", "震级"]
)
data.head()
pandas数据分析工具
将注释里的代码改为前面的代码
    data,        	# x=lons,
    x = "经度",     # y=lats,
    y = "纬度",     # labels={"x": "经度", "y": "纬度"},
定制标记的尺寸 和颜色
fig = px.scatter(
    data,
    x="经度",
    y="纬度",
    range_x=[-200, 200],
    range_y=[-90, 90],
    width=800,
    height=800,
    title="全球地震散点图",
    size="震级",
    size_max=10,	# 标记尺寸默认为20像素
    color="震级",
)
默认的视觉映射图例渐变色范围是从蓝到红再到黄,数值越小则标记越蓝,而数值越大则标记越黄

其他渐变
Plotly Express将渐变存储在模块colors 中。这些渐变是在列表px.colors.named_colorscales() 中定义的
px.colors.named_colorscales()
[‘aggrnyl’, ‘agsunset’, ‘blackbody’, ‘bluered’, ‘blues’, ‘blugrn’, ‘bluyl’, ‘brwnyl’, ‘bugn’, ‘bupu’, ‘burg’, ‘burgyl’, ‘cividis’, ‘darkmint’, ‘electric’, ‘emrld’, ‘gnbu’, ‘greens’, ‘greys’, ‘hot’, ‘inferno’, ‘jet’, ‘magenta’, ‘magma’, ‘mint’, ‘orrd’, ‘oranges’, ‘oryel’, ‘peach’, ‘pinkyl’, ‘plasma’, ‘plotly3’, ‘pubu’, ‘pubugn’, ‘purd’, ‘purp’, ‘purples’, ‘purpor’, ‘rainbow’, ‘rdbu’, ‘rdpu’, ‘redor’, ‘reds’, ‘sunset’, ‘sunsetdark’, ‘teal’, ‘tealgrn’, ‘turbo’, ‘viridis’, ‘ylgn’, ‘ylgnbu’, ‘ylorbr’, ‘ylorrd’, ‘algae’, ‘amp’, ‘deep’, ‘dense’, ‘gray’, ‘haline’, ‘ice’, ‘matter’, ‘solar’, ‘speed’, ‘tempo’, ‘thermal’, ‘turbid’, ‘armyrose’, ‘brbg’, ‘earth’, ‘fall’, ‘geyser’, ‘prgn’, ‘piyg’, ‘picnic’, ‘portland’, ‘puor’, ‘rdgy’, ‘rdylbu’, ‘rdylgn’, ‘spectral’, ‘tealrose’, ‘temps’, ‘tropic’, ‘balance’, ‘curl’, ‘delta’, ‘oxy’, ‘edge’, ‘hsv’, ‘icefire’, ‘phase’, ‘twilight’, ‘mrybm’, ‘mygbm’]
使用px.colors.diverging.RdYlGn[::-1] 可以将对应颜色的配色列表反转
注意 Plotly除了有px.colors.diverging 表示连续变量的配色方案,还有px.colors.sequential 和px.colors.qualitative 表示离散变量。随便挑一种配色,例如px.colors.qualitative.Alphabet ,你将看到渐变是如何定义的。每个渐变都有起始色和终止色,有些渐变还定义了一个或多个中间色。Plotly会在这些定义好的颜色之间插入颜色。
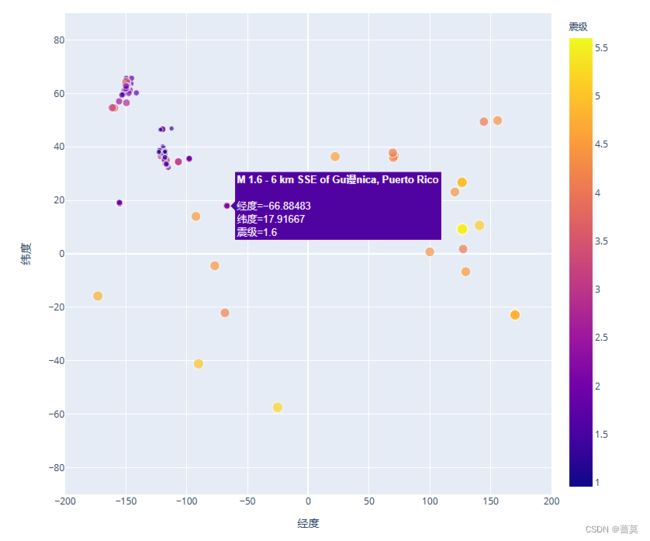
添加鼠标指向时显示的文本
hover_name
fig = px.scatter(
    color="震级",
    hover_name="位置",
)