Springboot2.0快速入门(第一章)
目录
- 一,SpringBoot简介
-
- 1.1,回顾什么是Spring
- 1.2,Spring是如何简化Java开发的
- 1.3,什么是SpringBoot
- 二,Hello,World
-
- 2.1,准备工作
- 2.2,创建基础项目说明
- 2.3,创建第一个Hello,SpringBoot程序
- 三,HTTP接口get请求
-
- 3.1,restful协议,从路径中获取参数 @PathVariable
- 3.2,参数默认设置 @RequestParam
- 3.3,bean对象传值(数据从body中获取) @RequestBody
- 3.4,获取http请求头信息,例如获取token @RequestHeader
- 四,常用json框架介绍和jackson返回结果处理
-
- 4.1,springboot统一返回封装
- 最后
一,SpringBoot简介
1.1,回顾什么是Spring
Spring是一个开源框架,2003 年兴起的一个轻量级的Java 开发框架,作者:Rod Johnson 。
Spring是为了解决企业级应用开发的复杂性而创建的,简化开发。
1.2,Spring是如何简化Java开发的
为了降低Java开发的复杂性,Spring采用了以下4种关键策略:
1、基于POJO的轻量级和最小侵入性编程,所有东西都是bean;
2、通过IOC,依赖注入(DI)和面向接口实现松耦合;
3、基于切面(AOP)和惯例进行声明式编程;
4、通过切面和模版减少样式代码,RedisTemplate,xxxTemplate;
1.3,什么是SpringBoot
Spring Boot是由Pivotal团队提供的基于Spring的框架,该框架使用了特定的方式来进行配置,从而使开发人员不再需要定义样板化的配置。Spring Boot集成了绝大部分目前流行的开发框架,就像Maven集成了所有的JAR包一样,Spring Boot集成了几乎所有的框架,使得开发者能快速搭建Spring项目。
Spring Boot的主要优点:
为所有Spring开发者更快的入门
开箱即用,提供各种默认配置来简化项目配置
内嵌式容器简化Web项目
没有冗余代码生成和XML配置的要求
二,Hello,World
2.1,准备工作
我们将学习如何快速的创建一个Spring Boot应用,并且实现一个简单的Http请求处理。通过这个例子对Spring Boot有一个初步的了解,并体验其结构简单、开发快速的特性。
我的环境准备:
依赖版本jdk1.8以上
Maven-3.2以上
SpringBoot 2.x
开发工具:
IDEA
2.2,创建基础项目说明
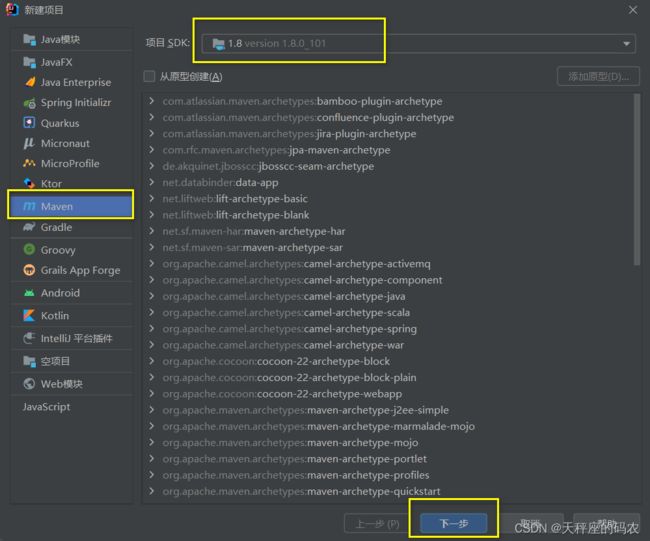
1.首先创建一个maven工程
2.在maven的pom文件中添加Springboot的父工程和对应的依赖
这样一个maven工程就创建好了!
然后在pom文件中添加Springboot的父工程和对应的依赖
    <parent>
        <groupId>org.springframework.bootgroupId>
        <artifactId>spring-boot-starter-parentartifactId>
        <version>2.0.1.RELEASEversion>
    parent>

    <dependencies>

        <dependency>
            <groupId>org.springframework.bootgroupId>
            <artifactId>spring-boot-starter-webartifactId>
        dependency>
    dependencies>
2.3,创建第一个Hello,SpringBoot程序
1.把启动类放到顶级目录
2.常用注解
启动类注解
@SpringBootApplication是一个复合型注解。@SpringBootApplication = @Configuration + @EnableAutoConfiguration + @ComponentScan
@Configuration:@Configuration标注在类上,相当于把该类作为spring的xml配置文件中 (beans ),作用为:配置spring容器(应用上下文)
@EnableAutoConfiguration:开启自动配置。MATA-INF下的spring.facotries的一些自动配置类
@ComponentScan:扫描注解。如果不配置basepackage,默认扫描@ComponentScan注解类的同级类和子目录下的所有类。所以要把启动类放到顶级目录。
控制层注解
@RestController and @RequestMapping是springMVC的注解,不是springboot特有的
@RestController = @Controller + @ResponseBody
package com.demo.controller;

import org.springframework.web.bind.annotation.RequestMapping;
import org.springframework.web.bind.annotation.RestController;

@RestController // 控制类
public class HelloController {

    @RequestMapping("/")
    public String sayHello(){
        return "hello,SpringBoot!!";
    }
}
在外面创建一个springboot的启动类

DemoApplication启动类
package com.demo;

import org.springframework.boot.SpringApplication;
import org.springframework.boot.autoconfigure.SpringBootApplication;

// @SpringBootApplication是一个复合型注解,通常情况下,我们会把启动类放到项目的顶级目录
// 注意:SpringBootApplication中的 @ComponentScan 会默认扫描本类所在包以下的子包
@SpringBootApplication
public class DemoApplication {

    public static void main(String[] args) {
        SpringApplication.run(DemoApplication.class,args);
    }
}
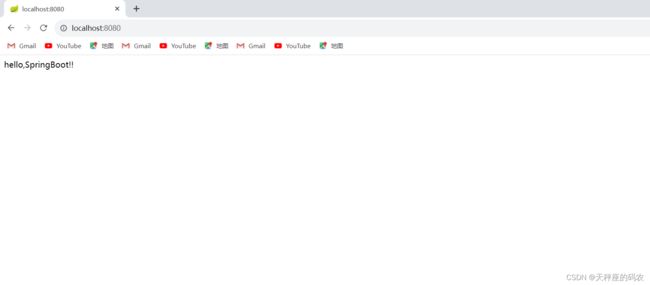
运行成功,如下:
三,HTTP接口get请求
3.1,restful协议,从路径中获取参数 @PathVariable
    /**
     * 功能描述: restful 协议。从路径中获取参数
     * 1.接口中的参数定义,建议使用下划线隔开,不再使用驼峰
     * 2.path="/{cityid}/{userid}" 标识路径中那些是参数
     * 3.method=RequestMethod.GET 只处理get请求
     * 4.@PathVariable("cityid") 从路径中取出参数值
     * @return
     * */

    @RequestMapping("/{cityid}/{userid}")
    public Object test1(
            @PathVariable("cityid") String cityId,
            @PathVariable("userid") String userId){
        return cityId + "--" + userId;
    }
3.2,参数默认设置 @RequestParam
    /**
     *
     * 参数的默认值设置
     * 添加@RequestParam 默认此参数是必填项
     * @return
     * **/
    @RequestMapping("/test2")
    public Object test2(@RequestParam(required = false,defaultValue = "1") Integer pageNo){
        return pageNo;
    }
上面显示的是默认值,如果你给他赋值,之后那个赋的值就会替代默认值,如下:
3.3,bean对象传值(数据从body中获取) @RequestBody
    /**
     *
     * 测试@RequestBody。要从请求体中获取数据
     * 有如下结果
     * 1.数据要在请求体中。
     * 2.数据的格式为JSON。content-type 的值是application/json
     * 3.只有post请求才允许在body中设置数据
     * **/
    @RequestMapping("/test3")
    public Object test3(@RequestBody Person person){
        return person.getUserId() + "-----" + person.getAge();
    }
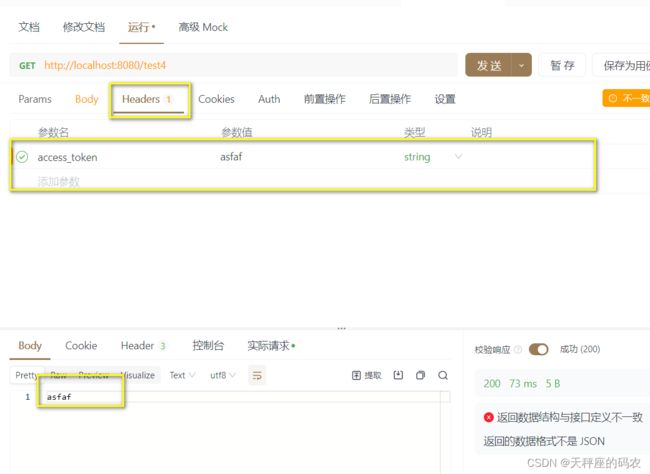
3.4,获取http请求头信息,例如获取token @RequestHeader
    /**
     * 从请求头获取数据
     * 一般请求头中获取一些认证信息,例如token
     * **/
    @RequestMapping("/test4")
    public Object test4(@RequestHeader String access_token){
        return access_token;
    }
四,常用json框架介绍和jackson返回结果处理
简介:介绍常用json框架和注解的使用,自定义返回json结构和格式
- 常用框架 阿里 fastjson 谷歌gosn等
javaBean序列化为json 性能:Jackson > FastJson > Gson > Json-lib 同个结构
Jackson,FastJson ,Gson 类库各有优点,各有各自的专长
空间换时间,时间换空间
2.Jackson处理相关自动
指定字段不返回:@JsonIgnore
指定日期格式: @JsonFormat(pattern=“yyyy-MM-dd hh:mm:ss”, locale=“zh”, timezone=“GMT+8”)
空字符串不返回:@JsonInclude(JsonInclude.Include.NON_NULL)
指定别名:@JsonProperty 注意:使用别名后,请求中的Key也要使用别名
4.1,springboot统一返回封装
创建一个util包
package com.demo.util;

import lombok.Data;

import java.io.Serializable;

@Data
public class ResultUtil<T> implements Serializable {

    public static final Integer SUCCESS_CODE = 2000;
    public static final Integer FAIL_CODE = 4000;
    public static final String SUCCESS_MESSAGE = "success";
    public static final String FAIL_MESSAGE = "fail";
    /**
     * 返回状态码
     */
    private Integer code;
    /**
     * 返回信息
     */
    private String message;

    /**
     * 返回数据
     */
    private T data;

    private ResultUtil() {
    }

    public static <T> ResultUtil<T> success() {
        ResultUtil<T> resultUtil = new ResultUtil<>();
        resultUtil.setCode(SUCCESS_CODE);
        resultUtil.setMessage(SUCCESS_MESSAGE);
        return resultUtil;
    }

    public static <T> ResultUtil<T> success(T data) {
        ResultUtil<T> resultUtil = success();
        resultUtil.setData(data);
        return resultUtil;
    }

    public static <T> ResultUtil<T> success(String message, T data) {
        ResultUtil<T> resultUtil = success();
        resultUtil.setMessage(message);
        resultUtil.setData(data);
        return resultUtil;
    }

    public static <T> ResultUtil<T> success(Integer code, String message, T data) {
        ResultUtil<T> resultUtil = new ResultUtil<>();
        resultUtil.setCode(code);
        resultUtil.setMessage(message);
        resultUtil.setData(data);
        return resultUtil;
    }

    public static <T> ResultUtil<T> fail() {
        ResultUtil<T> resultUtil = new ResultUtil<>();
        resultUtil.setCode(FAIL_CODE);
        resultUtil.setMessage(FAIL_MESSAGE);
        return resultUtil;
    }

    public static <T> ResultUtil<T> fail(T data) {
        ResultUtil<T> resultUtil = fail();
        resultUtil.setData(data);
        return resultUtil;
    }

    public static <T> ResultUtil<T> fail(String message, T data) {
        ResultUtil<T> resultUtil = fail();
        resultUtil.setMessage(message);
        resultUtil.setData(data);
        return resultUtil;
    }

    public static <T> ResultUtil<T> fail(Integer code, String message) {
        ResultUtil<T> resultUtil = fail();
        resultUtil.setCode(code);
        resultUtil.setMessage(message);
        return resultUtil;
    }

    public static <T> ResultUtil<T> fail(Integer code, String message, T data) {
        ResultUtil<T> resultUtil = new ResultUtil<>();
        resultUtil.setCode(code);
        resultUtil.setMessage(message);
        resultUtil.setData(data);
        return resultUtil;
    }

}
这种格式主要包含3部分:
1.code:状态码, 由后端统一定义各种返回结果的状态码 判断成功还是失败
2.message:描述信息 ,提示信息
3.data:返回的数据,例如列表数据
Person.java实体类修改一下不在需要get,set方法,但是得加上@Data
package com.demo.bean;

import com.fasterxml.jackson.annotation.*;
import lombok.Data;

import java.io.Serializable;
import java.util.regex.Pattern;

@Data
public class Person implements Serializable {


    private String userId;

    private int age;

}
    /**
     *
     * 测试@RequestBody。要从请求体中获取数据
     * 有如下结果
     * 1.数据要在请求体中。
     * 2.数据的格式为JSON。content-type 的值是application/json
     * 3.只有post请求才允许在body中设置数据
     * **/
    @RequestMapping("/test3")
    public Object test3(@RequestBody Person person){
        return ResultUtil.success(person);
    }
结果如下:
这样写的前提下还要在pom中在加一个依赖
最后
送大家一句话:你大好青春,怕什么,只管向前跑


